
Owner's Manual
Page 5
English Contents 10 Adjustments and Settings Sleep Timer 40 AV Selection 40 Picture adjustments 41 Pro Adjust 41 Color Management 42 Sound adjustments 43 FOCUS 43 Front Surround 43 Power Control 44 Energy Save 44 No Signal off (AV mode only ... Watching a DVD image 50 Connecting a DVD player 50 Displaying a DVD image 50 Watching a VCR image 50 Connecting a VCR 50 Displaying a VCR image 50 Using HDMI Input 51 Connecting HDMI equipment 51 Enjoying a game console or watching camcorder images 52 Connecting a game console or camcorder 52 Displaying an image of the game...
English Contents 10 Adjustments and Settings Sleep Timer 40 AV Selection 40 Picture adjustments 41 Pro Adjust 41 Color Management 42 Sound adjustments 43 FOCUS 43 Front Surround 43 Power Control 44 Energy Save 44 No Signal off (AV mode only ... Watching a DVD image 50 Connecting a DVD player 50 Displaying a DVD image 50 Watching a VCR image 50 Connecting a VCR 50 Displaying a VCR image 50 Using HDMI Input 51 Connecting HDMI equipment 51 Enjoying a game console or watching camcorder images 52 Connecting a game console or camcorder 52 Displaying an image of the game...
Owner's Manual
Page 12
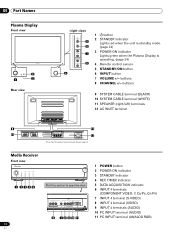
... SPEAKER (right/left) terminals 12 AC INLET terminal 9 11 10 12 The terminals have faced downward. COMPONENT VIDEO Y CB / PB CR / PR INPUT 4 S-VIDEO VIDEO AUDIO L R AUDIO (STEREO) PC ANALOG RGB 6 7 8 9 10 11 12 En 1 POWER button 2 POWER ON indicator ...3 STANDBY indicator 4 REC TIMER indicator 5 DATA ACQUISITION indicator 6 INPUT 4 terminals (COMPONENT VIDEO: Y, CB/PB, CR/PR) 7 INPUT 4 terminal (S-VIDEO) 8 INPUT 4 terminal (VIDEO) 9 INPUT 4 terminals (AUDIO) 10 PC INPUT terminal (AUDIO) 11 PC INPUT terminal (ANALOG RGB) Media Receiver Front view POWER REC DATA ON ...
... SPEAKER (right/left) terminals 12 AC INLET terminal 9 11 10 12 The terminals have faced downward. COMPONENT VIDEO Y CB / PB CR / PR INPUT 4 S-VIDEO VIDEO AUDIO L R AUDIO (STEREO) PC ANALOG RGB 6 7 8 9 10 11 12 En 1 POWER button 2 POWER ON indicator ...3 STANDBY indicator 4 REC TIMER indicator 5 DATA ACQUISITION indicator 6 INPUT 4 terminals (COMPONENT VIDEO: Y, CB/PB, CR/PR) 7 INPUT 4 terminal (S-VIDEO) 8 INPUT 4 terminal (VIDEO) 9 INPUT 4 terminals (AUDIO) 10 PC INPUT terminal (AUDIO) 11 PC INPUT terminal (ANALOG RGB) Media Receiver Front view POWER REC DATA ON ...
Owner's Manual
Page 13
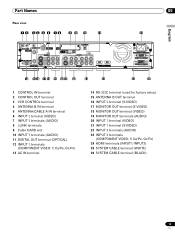
...view 1 2 34 5 6 78 9 10 11 12 IN OUT VCR CONTROL CONTROL IN ANTENNA B ANTENNA/ CABLE A IN Cable CARD S-VIDEO INPUT 2 VIDEO INPUT 2 R-AUDIO-L DIGITAL OUT OPTICAL (TS) VIDEO S400 INPUT 1 INPUT 1 COMPONENT VIDEO R-AUDIO-L Y CB/PB CR/PR SERVICE ONLY OUT MONITOR OUT S-VIDEO VIDEO R-AUDIO-L S-VIDEO R-AUDIO-L IINNPPUUTT 33 Y CB/...PB CR/PR INPUT 1 INPUT 3 HDMI 13 AC IN BLACK WHITE SYSTEM CABLE English 05 14 15 16 17 18 19 20 21 22 23 24 25 26 1 CONTROL...
...view 1 2 34 5 6 78 9 10 11 12 IN OUT VCR CONTROL CONTROL IN ANTENNA B ANTENNA/ CABLE A IN Cable CARD S-VIDEO INPUT 2 VIDEO INPUT 2 R-AUDIO-L DIGITAL OUT OPTICAL (TS) VIDEO S400 INPUT 1 INPUT 1 COMPONENT VIDEO R-AUDIO-L Y CB/PB CR/PR SERVICE ONLY OUT MONITOR OUT S-VIDEO VIDEO R-AUDIO-L S-VIDEO R-AUDIO-L IINNPPUUTT 33 Y CB/...PB CR/PR INPUT 1 INPUT 3 HDMI 13 AC IN BLACK WHITE SYSTEM CABLE English 05 14 15 16 17 18 19 20 21 22 23 24 25 26 1 CONTROL...
Owner's Manual
Page 14
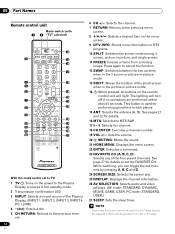
.... 12 SWAP: Switches between the two screens when in the 2-screen or picture-in-picture mode. 13 SHIFT: Moves the location of the Plasma Display. (INPUT 1, INPUT 2, INPUT 3, INPUT 4, PC, i.LINK) 4 •(dot): Enters a dot. 5 CH RETURN: Returns to the previous channel. 14 En 6 CH +/-: Selects the channel. ...27 SLEEP: Sets the sleep timer. • When using the remote control unit, point it into standby mode. 2 Transmission confirmation LED 3 INPUT: Selects an input source of the small screen when in the picture-in -picture, and single-screen. 11 FREEZE: Freezes a frame from a moving image. ...
.... 12 SWAP: Switches between the two screens when in the 2-screen or picture-in-picture mode. 13 SHIFT: Moves the location of the Plasma Display. (INPUT 1, INPUT 2, INPUT 3, INPUT 4, PC, i.LINK) 4 •(dot): Enters a dot. 5 CH RETURN: Returns to the previous channel. 14 En 6 CH +/-: Selects the channel. ...27 SLEEP: Sets the sleep timer. • When using the remote control unit, point it into standby mode. 2 Transmission confirmation LED 3 INPUT: Selects an input source of the small screen when in the picture-in -picture, and single-screen. 11 FREEZE: Freezes a frame from a moving image. ...
Owner's Manual
Page 18
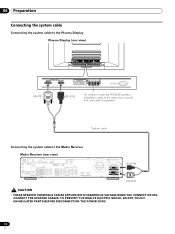
... system cable Connecting the system cable to the Plasma Display Plasma Display (rear view) (WHITE) (BLACK) For details on optional PIONEER speaker installation, refer to the Media Receiver Media Receiver (rear view) IN OUT VCR CONTROL CONTROL IN ANTENNA B ANTENNA/ CABLE A ...IN Cable CARD S-VIDEO INPUT 2 VIDEO R-AUDIO-L DIGITAL OUT OPTICAL (TS) S400 VIDEO INPUT 1 COMPONENT VIDEO R-AUDIO-L Y CB/PB CR/PR SERVICE ONLY OUT MONITOR OUT S-VIDEO VIDEO R-AUDIO-L S-VIDEO R-...
... system cable Connecting the system cable to the Plasma Display Plasma Display (rear view) (WHITE) (BLACK) For details on optional PIONEER speaker installation, refer to the Media Receiver Media Receiver (rear view) IN OUT VCR CONTROL CONTROL IN ANTENNA B ANTENNA/ CABLE A ...IN Cable CARD S-VIDEO INPUT 2 VIDEO R-AUDIO-L DIGITAL OUT OPTICAL (TS) S400 VIDEO INPUT 1 COMPONENT VIDEO R-AUDIO-L Y CB/PB CR/PR SERVICE ONLY OUT MONITOR OUT S-VIDEO VIDEO R-AUDIO-L S-VIDEO R-...

Owner's Manual
Page 21
... air (VHF/UHF) If using a cable TV to connect coaxial cables as shown. If your outdoor uses a 75-ohm coaxial cable with two terminals for inputting TV broadcasting signals: ANTENNA/CABLE A IN and ANTENNA B. In addition, you may fail if not properly connected. • Be sure to watch digital TV channels...
... air (VHF/UHF) If using a cable TV to connect coaxial cables as shown. If your outdoor uses a 75-ohm coaxial cable with two terminals for inputting TV broadcasting signals: ANTENNA/CABLE A IN and ANTENNA B. In addition, you may fail if not properly connected. • Be sure to watch digital TV channels...

Owner's Manual
Page 22
...ANT to view the image received from the Cable Converter. Tab DIGOIPTTAILCAOLUT CCaAbRleD AUDIO-L (TS) VIDEO S400 INPUT 1 COMPCOBN/PEBNT Y CVIRD/EPOR R-AUDIO-L CR/PR INPUT 1 22 En When you are watching digital and/or High Definition TV channels over cable, the card ...ACNATBELNENAAI/N CCaAbRleD N P UVTI D2E O R-AUDIO-L VIDEO R-AUDIO-L (TS) VIDEO S400 R-AUDIO-L COMPCOBN/PEBNT CVIRD/EPOR Y S-VIDEO R-AUDIO-L INPUT 3 Y CB/PB CR/PR INPUT 1 H • Be sure to insert only the specified cable card. • Do not insert a PCMCIA card. 06 Preparation Switching between antenna...
...ANT to view the image received from the Cable Converter. Tab DIGOIPTTAILCAOLUT CCaAbRleD AUDIO-L (TS) VIDEO S400 INPUT 1 COMPCOBN/PEBNT Y CVIRD/EPOR R-AUDIO-L CR/PR INPUT 1 22 En When you are watching digital and/or High Definition TV channels over cable, the card ...ACNATBELNENAAI/N CCaAbRleD N P UVTI D2E O R-AUDIO-L VIDEO R-AUDIO-L (TS) VIDEO S400 R-AUDIO-L COMPCOBN/PEBNT CVIRD/EPOR Y S-VIDEO R-AUDIO-L INPUT 3 Y CB/PB CR/PR INPUT 1 H • Be sure to insert only the specified cable card. • Do not insert a PCMCIA card. 06 Preparation Switching between antenna...

Owner's Manual
Page 23
...cord Media Receiver (rear view) IN OUT VCR CONTROL CONTROL IN ANTENNA B ANTENNA/ CABLE A IN Cable CARD S-VIDEO INPUT 2 INPUT 2 VIDEO R-AUDIO-L DIGITAL OUT OPTICAL (TS) S400 VIDEO INPUT 1 COMPONENT VIDEO R-AUDIO-L Y CB/PB CR/PR SERVICE ONLY OUT MONITOR OUT S-VIDEO VIDEO R-AUDIO-L S-VIDEO R-AUDIO...-L IINNPPUUTT33 Y CB/PB CR/PR INPUT 1 INPUT 3 HDMI ACACINILNET BLACK WHITE SYSTEM CABLE Noise filter Partially eliminates noise caused by the power source. • Use only the supplied ...
...cord Media Receiver (rear view) IN OUT VCR CONTROL CONTROL IN ANTENNA B ANTENNA/ CABLE A IN Cable CARD S-VIDEO INPUT 2 INPUT 2 VIDEO R-AUDIO-L DIGITAL OUT OPTICAL (TS) S400 VIDEO INPUT 1 COMPONENT VIDEO R-AUDIO-L Y CB/PB CR/PR SERVICE ONLY OUT MONITOR OUT S-VIDEO VIDEO R-AUDIO-L S-VIDEO R-AUDIO...-L IINNPPUUTT33 Y CB/PB CR/PR INPUT 1 INPUT 3 HDMI ACACINILNET BLACK WHITE SYSTEM CABLE Noise filter Partially eliminates noise caused by the power source. • Use only the supplied ...
Owner's Manual
Page 25
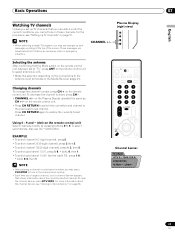
... set to "TV", press ANT on the remote control unit to select antenna A or B. • Make this selection depending on the connections to the antenna input terminals on page 26. Changing channels To increase the channel number, press CH + on the Plasma Display operates the same as necessary when in the...
... set to "TV", press ANT on the remote control unit to select antenna A or B. • Make this selection depending on the connections to the antenna input terminals on page 26. Changing channels To increase the channel number, press CH + on the Plasma Display operates the same as necessary when in the...
Owner's Manual
Page 26
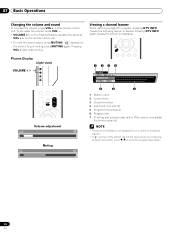
... program, pressing DTV INFO causes the following banner to disappear. on the remote control unit. A XXXXXXXXXX 12:30pm - 2:00pm 5 6 7 1 Station name 2 Current time 3 Channel number 4 Input (Ant. To decrease the volume, press VOL -. • VOLUME +/- B) 5 Program time schedule 6 Program title 7 TV rating and program description (This may be unavailable for some...
... program, pressing DTV INFO causes the following banner to disappear. on the remote control unit. A XXXXXXXXXX 12:30pm - 2:00pm 5 6 7 1 Station name 2 Current time 3 Channel number 4 Input (Ant. To decrease the volume, press VOL -. • VOLUME +/- B) 5 Program time schedule 6 Program title 7 TV rating and program description (This may be unavailable for some...

Owner's Manual
Page 27
... cable TV channels. • When stereo sound is difficult to hear, you want to hear stereo sound again. • Selecting MTS while the input source is selected, the Plasma Display System sound remains mono even if the system receives a stereo broadcast. You must reselect the STEREO mode if you... the cable TV company. Each time you may manually switch to the MONO mode to obtain clearer sound. • Once the MONO mode is INPUT 1 to view the POD display. • If you will hear that are received through language setting is available when the channel or program is...
... cable TV channels. • When stereo sound is difficult to hear, you want to hear stereo sound again. • Selecting MTS while the input source is selected, the Plasma Display System sound remains mono even if the system receives a stereo broadcast. You must reselect the STEREO mode if you... the cable TV company. Each time you may manually switch to the MONO mode to obtain clearer sound. • Once the MONO mode is INPUT 1 to view the POD display. • If you will hear that are received through language setting is available when the channel or program is...

Owner's Manual
Page 29
... 2-screen mode, press SCREEN SIZE to change the size of the left screen. 2 Press FREEZE again to capture and freeze one frame from the same input source at the same time. to switch the position of the 2 screens shown. If you make such an attempt, a warning message appears. • When you.... Basic Operations 07 • In 2-screen or picture-in anti-clockwise. Freezing images Use the following procedure to cancel the function. 2 To select the desired input source, press the appropriate input source button. • If watching TV programs, press CH +/-
... 2-screen mode, press SCREEN SIZE to change the size of the left screen. 2 Press FREEZE again to capture and freeze one frame from the same input source at the same time. to switch the position of the 2 screens shown. If you make such an attempt, a warning message appears. • When you.... Basic Operations 07 • In 2-screen or picture-in anti-clockwise. Freezing images Use the following procedure to cancel the function. 2 To select the desired input source, press the appropriate input source button. • If watching TV programs, press CH +/-

Owner's Manual
Page 30
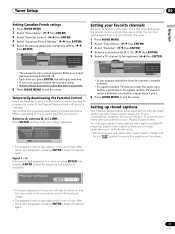
Option Position Side Mask HDMI Input Monitor Out Digital Audio Out Language Tuner Setup Timers Channel Setup Parental Control Favorites Closed Captions Recorder Setup Clock - 30 En Page 40 41 41 ... procedure for setting up the menus. 08 Menu Setup Menu configuration AV mode menus Home Menu Picture Item AV Selection Contrast Brightness Color Tint Sharpness Pro Adjust Reset Sound Treble Bass Balance Reset FOCUS Front Surround Power Control Energy Save No Signal off No Operation off Sleep Timer -
Option Position Side Mask HDMI Input Monitor Out Digital Audio Out Language Tuner Setup Timers Channel Setup Parental Control Favorites Closed Captions Recorder Setup Clock - 30 En Page 40 41 41 ... procedure for setting up the menus. 08 Menu Setup Menu configuration AV mode menus Home Menu Picture Item AV Selection Contrast Brightness Color Tint Sharpness Pro Adjust Reset Sound Treble Bass Balance Reset FOCUS Front Surround Power Control Energy Save No Signal off No Operation off Sleep Timer -
Owner's Manual
Page 37
... Home Menu Exit • The password entry screen appears. You can then quickly select from only your Plasma Display screen. Please Input Your Password. • The above password entry screen will be shown. Temporarily deactivating the Parental Control When the Parental Control is switched...the same color button, repeat step 5. Please look for temporarily deactivating the Parental Control differs, depending on the currently selected input source. You may enjoy digital closed captions when watching digital TV programs. Digital closed caption decoder. After the screen disappears,...
... Home Menu Exit • The password entry screen appears. You can then quickly select from only your Plasma Display screen. Please Input Your Password. • The above password entry screen will be shown. Temporarily deactivating the Parental Control When the Parental Control is switched...the same color button, repeat step 5. Please look for temporarily deactivating the Parental Control differs, depending on the currently selected input source. You may enjoy digital closed captions when watching digital TV programs. Digital closed caption decoder. After the screen disappears,...
Owner's Manual
Page 40
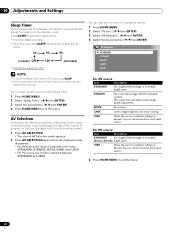
...the five viewing options, depending on the current environment (e.g., room brightness), the type of the current TV program, or the type of images input from external equipment. 1 Press AV SELECTION. • The current AV Selection mode appears. 2 Press AV SELECTION again before the selected time ...sharp image with the maximum contrast This mode does not allow manual image quality adjustment. MOVIE For a movie GAME Lowers image brightness for each input source. 5 Press HOME MENU to exit the menu. USER Allows the user to select the desired time. • The timer starts counting...
...the five viewing options, depending on the current environment (e.g., room brightness), the type of the current TV program, or the type of images input from external equipment. 1 Press AV SELECTION. • The current AV Selection mode appears. 2 Press AV SELECTION again before the selected time ...sharp image with the maximum contrast This mode does not allow manual image quality adjustment. MOVIE For a movie GAME Lowers image brightness for each input source. 5 Press HOME MENU to exit the menu. USER Allows the user to select the desired time. • The timer starts counting...

Owner's Manual
Page 41
...still film frame for high-definition picture quality. You cannot select "Standard" when 480p or 720p signals are being input. 41 En Pro Adjust This system provides various advanced functions for optimizing the picture quality. 1 Press HOME MENU. 2 Select "Picture". ( /.... 2 Select "Picture". ( / then ENTER) 3 Select an item to be adjusted. ( / then ENTER) Picture AV Selection Contrast Brightness Color Tint Sharpness Pro Adjust Reset STANDARD 40 0 0 0 0 For PC source, the following screen appears: Picture AV Selection Contrast Brightness Red Green Blue Reset STANDARD 40 0 0 ...
...still film frame for high-definition picture quality. You cannot select "Standard" when 480p or 720p signals are being input. 41 En Pro Adjust This system provides various advanced functions for optimizing the picture quality. 1 Press HOME MENU. 2 Select "Picture". ( /.... 2 Select "Picture". ( / then ENTER) 3 Select an item to be adjusted. ( / then ENTER) Picture AV Selection Contrast Brightness Color Tint Sharpness Pro Adjust Reset STANDARD 40 0 0 0 0 For PC source, the following screen appears: Picture AV Selection Contrast Brightness Red Green Blue Reset STANDARD 40 0 0 ...

Owner's Manual
Page 44
... automatically placed into the standby mode when no operation is performed for eight minutes. • Even when you start using the Home menu when the input source is a PC. Enable Places the system into the standby mode if no signal is switched on again by decreasing the picture brightness. Picture Off...
... automatically placed into the standby mode when no operation is performed for eight minutes. • Even when you start using the Home menu when the input source is a PC. Enable Places the system into the standby mode if no signal is switched on again by decreasing the picture brightness. Picture Off...
Owner's Manual
Page 45
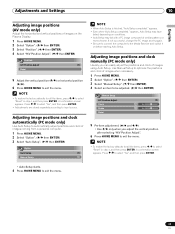
... Setup Manual Setup • When Auto Setup is finished, "Auto Setup completed." Adjusting image positions and clock automatically (PC mode only) Use Auto Setup to input source. appears, Auto Setup may have failed, depending on conditions. • Auto Setup may fail with a PC image composed of similar patterns or monochrome. If...
... Setup Manual Setup • When Auto Setup is finished, "Auto Setup completed." Adjusting image positions and clock automatically (PC mode only) Use Auto Setup to input source. appears, Auto Setup may have failed, depending on conditions. • Auto Setup may fail with a PC image composed of similar patterns or monochrome. If...
Owner's Manual
Page 46
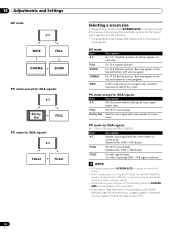
...this is the case, select FULL. 46 En For the PRO-920HD the number of panel pixels is for the PRO-1120HD. For 16:9 squeeze pictures. Bars may appear on the top and bottom on the types of input signals. 10 Adjustments and Settings AV mode 4:3 WIDE FULL ...AV mode Item 4:3 FULL ZOOM CINEMA WIDE Description For 4:3 "standard" pictures. PC mode for XGA signals (Ex. 1024 × 768 input at PRO-1120HD) Item Description 4:3 Matches input signal with same number of the screen (e.g., images, graphic interface) can be missed. For 16:9 letterbox pictures. PC mode except for ...
...this is the case, select FULL. 46 En For the PRO-920HD the number of panel pixels is for the PRO-1120HD. For 16:9 squeeze pictures. Bars may appear on the top and bottom on the types of input signals. 10 Adjustments and Settings AV mode 4:3 WIDE FULL ...AV mode Item 4:3 FULL ZOOM CINEMA WIDE Description For 4:3 "standard" pictures. PC mode for XGA signals (Ex. 1024 × 768 input at PRO-1120HD) Item Description 4:3 Matches input signal with same number of the screen (e.g., images, graphic interface) can be missed. For 16:9 letterbox pictures. PC mode except for ...

Owner's Manual
Page 49
... the same start time are overlapped, presetting with a VCR, confirm that the video output terminals on the Media Receiver have been connected to the signal input terminals on a VCR, you set a timer to record a future digital program on the VCR. • Presettings become ineffective if the start time is not present...
... the same start time are overlapped, presetting with a VCR, confirm that the video output terminals on the Media Receiver have been connected to the signal input terminals on a VCR, you set a timer to record a future digital program on the VCR. • Presettings become ineffective if the start time is not present...

