Owner's Manual
Page 2
.... When a cart is used, use this apparatus during lightning storms or when unused for long periods of the obsolete outlet. 10) Protect the power cord from being walked on or pinched particularly at plugs, convenience receptacles, and the point where they exit from tip-over. 13) Unplug this ...apparatus near any heat sources such as practical. Servicing is required when the apparatus has been damaged in any way, such as power-supply cord or plug is provided to call the CATV system installer's attention to Article 820-40 of the NEC that provides guidelines for proper grounding...
.... When a cart is used, use this apparatus during lightning storms or when unused for long periods of the obsolete outlet. 10) Protect the power cord from being walked on or pinched particularly at plugs, convenience receptacles, and the point where they exit from tip-over. 13) Unplug this ...apparatus near any heat sources such as practical. Servicing is required when the apparatus has been damaged in any way, such as power-supply cord or plug is provided to call the CATV system installer's attention to Article 820-40 of the NEC that provides guidelines for proper grounding...
Owner's Manual
Page 4
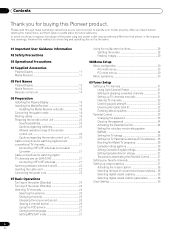
...method of connecting and operating the unit is the same. 01 Important User Guidance Information 02 Safety Precautions 03 Operational Precautions 04 Supplied Accessories Plasma Display 11 Media Receiver 11 05 Part Names Plasma Display 12 Media Receiver 12 Remote control unit 14 06 Preparation ...37 Setting up closed captions 37 Activating the closed caption 38 Selecting the type of the power plug and power outlet may sometimes differ from that shown in a safe place for buying this Pioneer product. After you for future reference. In some countries or regions, the shape of conventional...
...method of connecting and operating the unit is the same. 01 Important User Guidance Information 02 Safety Precautions 03 Operational Precautions 04 Supplied Accessories Plasma Display 11 Media Receiver 11 05 Part Names Plasma Display 12 Media Receiver 12 Remote control unit 14 06 Preparation ...37 Setting up closed captions 37 Activating the closed caption 38 Selecting the type of the power plug and power outlet may sometimes differ from that shown in a safe place for buying this Pioneer product. After you for future reference. In some countries or regions, the shape of conventional...
Owner's Manual
Page 8
...has small depth and is unstable, unpack, carry, and install the product with the product. To ensure your safety and prolong the service life of power supply used in an enclosed place such as the original parts. Use a damp cloth to perform servicing. 17. Stand-Do not place the product on ... or the manufacturer's instructions are followed. 11. Never expose the screen of time. The Plasma Display weighs about 32.8 kg (72.3 lbs.) for the PRO-505PU and about 26.8 kg (59.1 lbs.) for a long period of the Plasma Display to fall from stepping on them . The plasma Display used ...
...has small depth and is unstable, unpack, carry, and install the product with the product. To ensure your safety and prolong the service life of power supply used in an enclosed place such as the original parts. Use a damp cloth to perform servicing. 17. Stand-Do not place the product on ... or the manufacturer's instructions are followed. 11. Never expose the screen of time. The Plasma Display weighs about 32.8 kg (72.3 lbs.) for the PRO-505PU and about 26.8 kg (59.1 lbs.) for a long period of the Plasma Display to fall from stepping on them . The plasma Display used ...

Owner's Manual
Page 10
... cold place to the rear of the Plasma Display. the supplied cleaning cloth or other similar cloths (e.g., cotton and flannel). the supplied cleaning cloth or other similar cloths (e.g., cotton and flannel). ...wipe it with a wet cloth, water droplets on the product and wait until the power cord of the Media Receiver is in the discoloration or scratch of the Plasma Display automatically...to clean the cabinet. Do not move the Plasma Display by noise. 03 Operational Precautions PIONEER bears no responsibility for any damages arising from incorrect use of the product by you ...
... cold place to the rear of the Plasma Display. the supplied cleaning cloth or other similar cloths (e.g., cotton and flannel). the supplied cleaning cloth or other similar cloths (e.g., cotton and flannel). ...wipe it with a wet cloth, water droplets on the product and wait until the power cord of the Media Receiver is in the discoloration or scratch of the Plasma Display automatically...to clean the cabinet. Do not move the Plasma Display by noise. 03 Operational Precautions PIONEER bears no responsibility for any damages arising from incorrect use of the product by you ...
Owner's Manual
Page 11
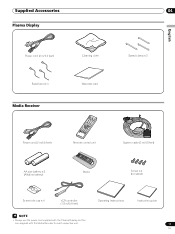
Supplied Accessories Plasma Display Power cord (2 m/6.6 feet) Bead band × 3 Media Receiver Cleaning cloth Warranty card 04 Speed clamp × 3 English Power cord (2 m/6.6 feet) Remote control unit System cable (3 m/9.8 feet) AA size battery × 2 (Alkaline battery) Stand Screw × 4 (for stand) Screw hole cap × 4 VCR controller (1.8 m/5.9 feet) Operating Instructions Instruction guide • Always use the power cord supplied with the Plasma Display and the one supplied with the Media Receiver for each respective unit. 11 En
Supplied Accessories Plasma Display Power cord (2 m/6.6 feet) Bead band × 3 Media Receiver Cleaning cloth Warranty card 04 Speed clamp × 3 English Power cord (2 m/6.6 feet) Remote control unit System cable (3 m/9.8 feet) AA size battery × 2 (Alkaline battery) Stand Screw × 4 (for stand) Screw hole cap × 4 VCR controller (1.8 m/5.9 feet) Operating Instructions Instruction guide • Always use the power cord supplied with the Plasma Display and the one supplied with the Media Receiver for each respective unit. 11 En
Owner's Manual
Page 16
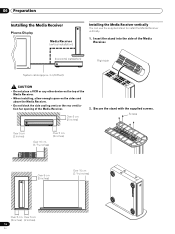
...Preparation Installing the Media Receiver Plasma Display Media Receiver (vertical installation) ACQUISITION TIMER STANDBY ON DATA REC POWER Installing the Media Receiver vertically You can use the supplied stand to install the Media Receiver vertically. 1. Insert the stand into the side of the Media... Receiver. (horizontal installation) POWER REC DATA ON STANDBY TIMER ACQUISITION System cable (approx. 3 m/9.8 feet) Right ...
...Preparation Installing the Media Receiver Plasma Display Media Receiver (vertical installation) ACQUISITION TIMER STANDBY ON DATA REC POWER Installing the Media Receiver vertically You can use the supplied stand to install the Media Receiver vertically. 1. Insert the stand into the side of the Media... Receiver. (horizontal installation) POWER REC DATA ON STANDBY TIMER ACQUISITION System cable (approx. 3 m/9.8 feet) Right ...

Owner's Manual
Page 23
... 1 INPUT 3 HDMI ACACINILNET BLACK WHITE SYSTEM CABLE Noise filter Partially eliminates noise caused by the power source. • Use only the supplied power cord. • Be sure to use the specified power supply voltage; neglecting this can result in fire or electric shock. • For the Plasma Display ...System, a three-core power cord with a ground terminal is not going to a three-pronged outlet ...
... 1 INPUT 3 HDMI ACACINILNET BLACK WHITE SYSTEM CABLE Noise filter Partially eliminates noise caused by the power source. • Use only the supplied power cord. • Be sure to use the specified power supply voltage; neglecting this can result in fire or electric shock. • For the Plasma Display ...System, a three-core power cord with a ground terminal is not going to a three-pronged outlet ...

Owner's Manual
Page 48
... program when its on-air time comes. Icon REC Meaning Preset for recording; REC Preset for recording; For the connections with the supplied VCR controller, see pages 54 and 55. Preset for recording; REC Preset for auto channel select; Preset for auto channel select; ...cancel the presetting by pressing D. An alarm screen appears slightly before the preset timer is about to 8, you are enjoying another TV program. With the power to exit the menu. If watching a TV channel through antenna A or B in total. • In steps 4 to begin: Sun. 1/0 ...
... program when its on-air time comes. Icon REC Meaning Preset for recording; REC Preset for recording; For the connections with the supplied VCR controller, see pages 54 and 55. Preset for recording; REC Preset for auto channel select; Preset for auto channel select; ...cancel the presetting by pressing D. An alarm screen appears slightly before the preset timer is about to 8, you are enjoying another TV program. With the power to exit the menu. If watching a TV channel through antenna A or B in total. • In steps 4 to begin: Sun. 1/0 ...
Owner's Manual
Page 59
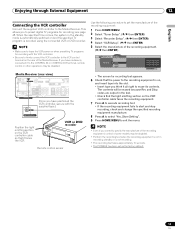
...the VCR controller Connect the supplied VCR controller to preset digital TV programs for recording; The contents will be erased because Rec and Stop codes are output in the test. • Check that the light emitting section on the VCR controller cable so that the power to erase its contents..... 6 Check that it all right to the recording equipment is not recording. • The recording test takes approximately 10 seconds. • The PIONEER has been set as the factory default. 59 En VCR or DVD recorder Remote control sensor Use the following procedure to set the manufacture of...
...the VCR controller Connect the supplied VCR controller to preset digital TV programs for recording; The contents will be erased because Rec and Stop codes are output in the test. • Check that the light emitting section on the VCR controller cable so that the power to erase its contents..... 6 Check that it all right to the recording equipment is not recording. • The recording test takes approximately 10 seconds. • The PIONEER has been set as the factory default. 59 En VCR or DVD recorder Remote control sensor Use the following procedure to set the manufacture of...


