Owner's Manual
Page 4
...Precautions 03 Operational Precautions 04 Supplied Accessories Plasma Display 11 Media Receiver 11 05 Part Names Plasma Display 12 Media Receiver 12 Remote control unit 14 06 Preparation Installing the Plasma Display 15 Installing the Media Receiver 16 Installing the Media Receiver vertically 16 Connecting the...menus 30 Menu operations 30 09 Tuner Setup Setting up TV channels 31 Using Auto Channel Preset 31 Setting for buying this Pioneer product. Please read through these operating instructions so you will know how to operate your favorite channels 37 Setting up TV ...
...Precautions 03 Operational Precautions 04 Supplied Accessories Plasma Display 11 Media Receiver 11 05 Part Names Plasma Display 12 Media Receiver 12 Remote control unit 14 06 Preparation Installing the Plasma Display 15 Installing the Media Receiver 16 Installing the Media Receiver vertically 16 Connecting the...menus 30 Menu operations 30 09 Tuner Setup Setting up TV channels 31 Using Auto Channel Preset 31 Setting for buying this Pioneer product. Please read through these operating instructions so you will know how to operate your favorite channels 37 Setting up TV ...

Owner's Manual
Page 5
...Contents 10 Adjustments and Settings Sleep Timer 40 AV Selection 40 Picture adjustments 41 Pro Adjust 41 Color Management 42 Sound adjustments 43 FOCUS 43 Front Surround 43 Power Control 44 Energy Save 44 No Signal off (AV mode only 44 No Operation ... Remote Control Features Learning function of the remote control unit 62 Using the learning function 62 Presetting manufacture codes 62 Manufacture codes 63 Using the remote control unit to control other devices 64 Receiver control buttons 64 Cable control buttons 65 SAT control buttons 66 VCR control buttons 67 DVD/DVR control...
...Contents 10 Adjustments and Settings Sleep Timer 40 AV Selection 40 Picture adjustments 41 Pro Adjust 41 Color Management 42 Sound adjustments 43 FOCUS 43 Front Surround 43 Power Control 44 Energy Save 44 No Signal off (AV mode only 44 No Operation ... Remote Control Features Learning function of the remote control unit 62 Using the learning function 62 Presetting manufacture codes 62 Manufacture codes 63 Using the remote control unit to control other devices 64 Receiver control buttons 64 Cable control buttons 65 SAT control buttons 66 VCR control buttons 67 DVD/DVR control...

Owner's Manual
Page 10
... in malfunction. The fan motor keeps running until condensation disappears. Infrared rays The Plasma Display releases infrared rays because of its remote control sensor is noisy at a location where its characteristics. If this product, that the fan motor is not affected. If you...into the product, resulting in malfunction. the supplied cleaning cloth or other similar cloths (e.g., cotton and flannel). 03 Operational Precautions PIONEER bears no responsibility for any damages arising from incorrect use of the product by you or other people, malfunctions when in use...
... in malfunction. The fan motor keeps running until condensation disappears. Infrared rays The Plasma Display releases infrared rays because of its remote control sensor is noisy at a location where its characteristics. If this product, that the fan motor is not affected. If you...into the product, resulting in malfunction. the supplied cleaning cloth or other similar cloths (e.g., cotton and flannel). 03 Operational Precautions PIONEER bears no responsibility for any damages arising from incorrect use of the product by you or other people, malfunctions when in use...
Owner's Manual
Page 11
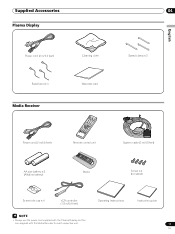
Supplied Accessories Plasma Display Power cord (2 m/6.6 feet) Bead band × 3 Media Receiver Cleaning cloth Warranty card 04 Speed clamp × 3 English Power cord (2 m/6.6 feet) Remote control unit System cable (3 m/9.8 feet) AA size battery × 2 (Alkaline battery) Stand Screw × 4 (for stand) Screw hole cap × 4 VCR controller (1.8 m/5.9 feet) Operating Instructions Instruction guide • Always use the power cord supplied with the Plasma Display and the one supplied with the Media Receiver for each respective unit. 11 En
Supplied Accessories Plasma Display Power cord (2 m/6.6 feet) Bead band × 3 Media Receiver Cleaning cloth Warranty card 04 Speed clamp × 3 English Power cord (2 m/6.6 feet) Remote control unit System cable (3 m/9.8 feet) AA size battery × 2 (Alkaline battery) Stand Screw × 4 (for stand) Screw hole cap × 4 VCR controller (1.8 m/5.9 feet) Operating Instructions Instruction guide • Always use the power cord supplied with the Plasma Display and the one supplied with the Media Receiver for each respective unit. 11 En
Owner's Manual
Page 12
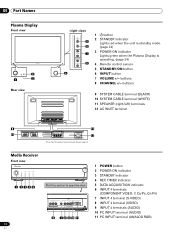
... 2 STANDBY indicator Lights red when the unit is standby mode. (page 24) 3 POWER ON indicator Lights green when the Plasma Display is operating. (page 24) 4 Remote control sensor 5 STANDBY/ON button 6 INPUT button 7 VOLUME +/-
... 2 STANDBY indicator Lights red when the unit is standby mode. (page 24) 3 POWER ON indicator Lights green when the Plasma Display is operating. (page 24) 4 Remote control sensor 5 STANDBY/ON button 6 INPUT button 7 VOLUME +/-
Owner's Manual
Page 14
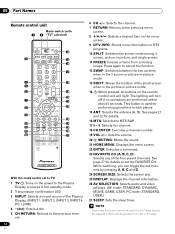
... 23 FAVORITE CH (A, B, C, D): Selects any of the small screen when in the picture-in-picture mode. 14 :When pressed, all buttons on the remote control unit will turn off if no operations are performed within about 5 seconds. See pages 21 and 22 for operating buttons not listed on this page... size. 25 DISPLAY: Displays the channel information. 26 AV SELECTION: Selects audio and video settings. (AV mode: STANDARD, DYNAMIC, MOVIE, GAME, USER. 05 Part Names Remote control unit Mode switch (with 1 2 "TV" selected) 14 3 15 16 17 4 18 5 6 19 20 7 21 8 22 9 23 10 24 11 25 12...
... 23 FAVORITE CH (A, B, C, D): Selects any of the small screen when in the picture-in-picture mode. 14 :When pressed, all buttons on the remote control unit will turn off if no operations are performed within about 5 seconds. See pages 21 and 22 for operating buttons not listed on this page... size. 25 DISPLAY: Displays the channel information. 26 AV SELECTION: Selects audio and video settings. (AV mode: STANDARD, DYNAMIC, MOVIE, GAME, USER. 05 Part Names Remote control unit Mode switch (with 1 2 "TV" selected) 14 3 15 16 17 4 18 5 6 19 20 7 21 8 22 9 23 10 24 11 25 12...
Owner's Manual
Page 20
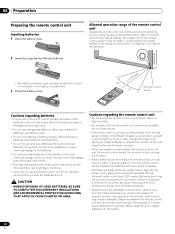
... ones if necessary. • The Plasma Display emits very weak infrared rays from its remote control unit properly or entirely. Allowed operation range of the remote control unit Operate the remote control unit while pointing it . • WHEN DISPOSING OF USED BATTERIES, BE SURE TO ...not mix batteries of the Plasma Display. The distance from the remote control unit or may shorten allowable distances between the remote control unit and the remote control sensor, the remote control unit may not work properly if the remote sensor window of batteries have a shorter life expectancy due to ...
... ones if necessary. • The Plasma Display emits very weak infrared rays from its remote control unit properly or entirely. Allowed operation range of the remote control unit Operate the remote control unit while pointing it . • WHEN DISPOSING OF USED BATTERIES, BE SURE TO ...not mix batteries of the Plasma Display. The distance from the remote control unit or may shorten allowable distances between the remote control unit and the remote control sensor, the remote control unit may not work properly if the remote sensor window of batteries have a shorter life expectancy due to ...

Owner's Manual
Page 22
... the Cable CARD slot as far as it by the cable TV company; See page 21. 2 Hold the tab of the slot cover on the remote control unit. • While watching a broadcast, press ANT to view the image received from the other antenna. • Pressing ANT while watching in the 2-screen mode...
... the Cable CARD slot as far as it by the cable TV company; See page 21. 2 Hold the tab of the slot cover on the remote control unit. • While watching a broadcast, press ANT to view the image received from the other antenna. • Pressing ANT while watching in the 2-screen mode...

Owner's Manual
Page 24
Turning off the power (Standby) 1 Press TV on the remote control unit or STANDBY/ON on the Plasma Display or POWER on the Media Receiver. ... POWER ON STANDBY Power to the Plasma Display and Media Receiver is off . Power to the system is on the remote control unit. The system is in the standby mode. (right view) STANDBY/ ON button Media Receiver • If you...the Plasma Display lights up red. 2 Confirm that the STANDBY indicators light up red, and then press TV on the remote control unit or STANDBY/ON on the Plasma Display or POWER on the Media Receiver to turn the system on. •...
Turning off the power (Standby) 1 Press TV on the remote control unit or STANDBY/ON on the Plasma Display or POWER on the Media Receiver. ... POWER ON STANDBY Power to the Plasma Display and Media Receiver is off . Power to the system is on the remote control unit. The system is in the standby mode. (right view) STANDBY/ ON button Media Receiver • If you...the Plasma Display lights up red. 2 Confirm that the STANDBY indicators light up red, and then press TV on the remote control unit or STANDBY/ON on the Plasma Display or POWER on the Media Receiver to turn the system on. •...
Owner's Manual
Page 25
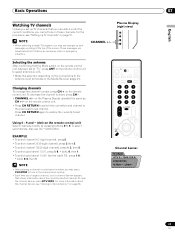
..." on page 31. • When watching a digital TV program, you may press CH ENTER to restore the currently tuned channel. on the remote control unit Select channels directly by TV stations as CH +/- To select subchannels, also use the • (dot) button. EXAMPLE • To select.... Plasma Display (right view) CHANNEL +/- Basic Operations 07 English Watching TV channels Unless you set to "TV", press ANT on the remote control unit to select antenna A or B. • Make this selection depending on the connections to the previously tuned channel. To decrease the channel...
..." on page 31. • When watching a digital TV program, you may press CH ENTER to restore the currently tuned channel. on the remote control unit Select channels directly by TV stations as CH +/- To select subchannels, also use the • (dot) button. EXAMPLE • To select.... Plasma Display (right view) CHANNEL +/- Basic Operations 07 English Watching TV channels Unless you set to "TV", press ANT on the remote control unit to select antenna A or B. • Make this selection depending on the connections to the previously tuned channel. To decrease the channel...
Owner's Manual
Page 26
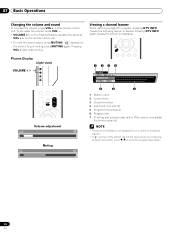
07 Basic Operations Changing the volume and sound To increase the volume, press VOL + on the Plasma Display operates the same as VOL +/- on the remote control unit. Plasma Display (right view) VOLUME +/- A XXXXXXXXXX 12:30pm - 2:00pm 5 6 7 1 Station name 2 Current time 3 Channel number 4 Input (Ant. ...; If " " is shown at the bottom right of the channel banner containing program description, press / to appear. " " appears on the remote control unit. • To mute the sound output, press MUTING. Volume adjustment Muting 1 234 12:33pm WXCD • 1000 Ant. A or Ant...
07 Basic Operations Changing the volume and sound To increase the volume, press VOL + on the Plasma Display operates the same as VOL +/- on the remote control unit. Plasma Display (right view) VOLUME +/- A XXXXXXXXXX 12:30pm - 2:00pm 5 6 7 1 Station name 2 Current time 3 Channel number 4 Input (Ant. ...; If " " is shown at the bottom right of the channel banner containing program description, press / to appear. " " appears on the remote control unit. • To mute the sound output, press MUTING. Volume adjustment Muting 1 234 12:33pm WXCD • 1000 Ant. A or Ant...

Owner's Manual
Page 27
.... Changing the language If you have selected a digital TV program that provides multilanguage services, you can switch among the languages by pressing MTS on the remote control unit. • Conventional TV channels in this case, sound is determined by the cable TV company. In this manual designate TV channels that language. See...
.... Changing the language If you have selected a digital TV program that provides multilanguage services, you can switch among the languages by pressing MTS on the remote control unit. • Conventional TV channels in this case, sound is determined by the cable TV company. In this manual designate TV channels that language. See...
Owner's Manual
Page 34
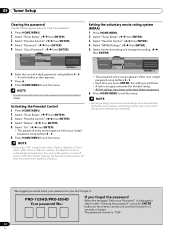
...Control". ( / then ENTER) 4 Select "Status". ( / then ENTER) 5 Select "On". ( / then ENTER) • The password entry screen appears. Enter your 4-digit password using buttons 0 - 9. • A confirmation screen appears. 7 Press A. 8 Press HOME MENU to exit the menu. • The above procedure will reset the password to the factory default (1234). PRO-1120HD/PRO...don't forget it down for 3 seconds or longer. With "Don't Reset" selected, the Parental Control remains off and on the remote control unit and hold it . Enter your 4-digit password using buttons 0 - 9. • Each ...
...Control". ( / then ENTER) 4 Select "Status". ( / then ENTER) 5 Select "On". ( / then ENTER) • The password entry screen appears. Enter your 4-digit password using buttons 0 - 9. • A confirmation screen appears. 7 Press A. 8 Press HOME MENU to exit the menu. • The above procedure will reset the password to the factory default (1234). PRO-1120HD/PRO...don't forget it down for 3 seconds or longer. With "Don't Reset" selected, the Parental Control remains off and on the remote control unit and hold it . Enter your 4-digit password using buttons 0 - 9. • Each ...
Owner's Manual
Page 37
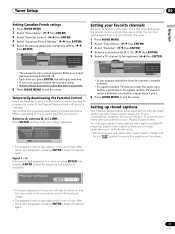
.../ then ENTER) 5 Select the desired rating and change parameters such as subtitles on the remote control unit (40 channels in total). Temporarily deactivating the Parental Control When the Parental Control is equipped with an internal closed captions Your Plasma Display System is working and censors a ...causes the password entry screen to exit the menu. Setting up to 10 TV channels to change the setting. ( / then ENTER) Parental Control Canadian French Ratings Canadian French Ratings E G 8 ans+ Blocked Canadian French Ratings xxxxxxxxxxxxxxxxxxxxx E, G, 8 ans+, 13 ans+, 16 ans+,...
.../ then ENTER) 5 Select the desired rating and change parameters such as subtitles on the remote control unit (40 channels in total). Temporarily deactivating the Parental Control When the Parental Control is equipped with an internal closed captions Your Plasma Display System is working and censors a ...causes the password entry screen to exit the menu. Setting up to 10 TV channels to change the setting. ( / then ENTER) Parental Control Canadian French Ratings Canadian French Ratings E G 8 ans+ Blocked Canadian French Ratings xxxxxxxxxxxxxxxxxxxxx E, G, 8 ans+, 13 ans+, 16 ans+,...

Owner's Manual
Page 44
... screen display, press any button other than VOL +/- This setting is not memorized by pressing STANDBY/ON on the Plasma Display or TV on the remote control unit. 5 Press HOME MENU to exit the menu. • You can also select this function using the computer and a signal is received again, the ...system is switched on the remote control unit. Enable Places the system into the standby mode if no signal is switched on again by the system. 5 Press HOME MENU to exit the...
... screen display, press any button other than VOL +/- This setting is not memorized by pressing STANDBY/ON on the Plasma Display or TV on the remote control unit. 5 Press HOME MENU to exit the menu. • You can also select this function using the computer and a signal is received again, the ...system is switched on the remote control unit. Enable Places the system into the standby mode if no signal is switched on again by the system. 5 Press HOME MENU to exit the...
Owner's Manual
Page 50
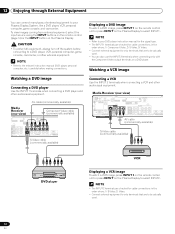
... (commercially available) S-Video cable (commercially available) DVD player VCR Displaying a VCR image To watch a DVD image, press INPUT 1 on the remote control unit or press INPUT on the Plasma Display to select INPUT1. • Refer to your Plasma Display System, like a DVD player, VCR, ...the INPUT 2 terminals when connecting a VCR and other audiovisual equipment. Displaying a DVD image To watch a VCR image, press INPUT 2 on the remote control unit or press INPUT on the Plasma Display to select INPUT2. • The INPUT 2 terminals are checked for cable connections in the order where...
... (commercially available) S-Video cable (commercially available) DVD player VCR Displaying a VCR image To watch a DVD image, press INPUT 1 on the remote control unit or press INPUT on the Plasma Display to select INPUT1. • Refer to your Plasma Display System, like a DVD player, VCR, ...the INPUT 2 terminals when connecting a VCR and other audiovisual equipment. Displaying a DVD image To watch a VCR image, press INPUT 2 on the remote control unit or press INPUT on the Plasma Display to select INPUT2. • The INPUT 2 terminals are checked for cable connections in the order where...

Owner's Manual
Page 51
... and specify the types of digital video signals when digital video signals are not supported. Before starting the menu, press INPUT 1 (or INPUT 3) on the remote control unit or press INPUT on the Plasma Display to exit the menu. HDMI equipment • If you select a parameter other than "Auto", make such a setting...
... and specify the types of digital video signals when digital video signals are not supported. Before starting the menu, press INPUT 1 (or INPUT 3) on the remote control unit or press INPUT on the Plasma Display to exit the menu. HDMI equipment • If you select a parameter other than "Auto", make such a setting...
Owner's Manual
Page 52
... equipment. • Depending on the equipment to be connected, you can prevent unwanted feedback from the game console or camcorder, press INPUT 4 on the remote control unit or press INPUT on the Plasma Display to be specified, check the operation manual that its light emitting section faces the... remote control sensor on the rear of images. Specify the output terminal whose output is output, specify another audio signal type. • For the audio signal ...
... equipment. • Depending on the equipment to be connected, you can prevent unwanted feedback from the game console or camcorder, press INPUT 4 on the remote control unit or press INPUT on the Plasma Display to be specified, check the operation manual that its light emitting section faces the... remote control sensor on the rear of images. Specify the output terminal whose output is output, specify another audio signal type. • For the audio signal ...
Owner's Manual
Page 55
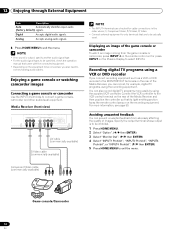
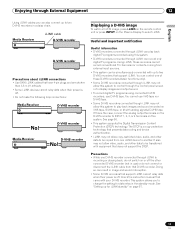
...VHS recorders, use VHS tape nor S-VHS tape. • Some D-VHS recorders connected though i.LINK may not allow this system. Doing so can control one i.LINK device to another. The DTCP is off the other connected D-VHS recorder (not in image and sound interruption. • Some D-VHS ...Media Receiver POWER REC DATA ON STANDBY TIMER ACQUISITION D-VHS recorder Displaying a D-VHS image To watch a D-VHS image, press i.LINK on the remote control unit or press INPUT on page 57. 55 En It also may not allow video, audio, and other data to be simultaneously connected with your...
...VHS recorders, use VHS tape nor S-VHS tape. • Some D-VHS recorders connected though i.LINK may not allow this system. Doing so can control one i.LINK device to another. The DTCP is off the other connected D-VHS recorder (not in image and sound interruption. • Some D-VHS ...Media Receiver POWER REC DATA ON STANDBY TIMER ACQUISITION D-VHS recorder Displaying a D-VHS image To watch a D-VHS image, press i.LINK on the remote control unit or press INPUT on page 57. 55 En It also may not allow video, audio, and other data to be simultaneously connected with your...
Owner's Manual
Page 57
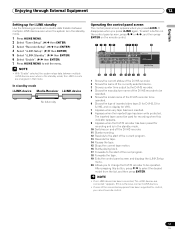
Enjoying through External Equipment 12 English Setting up for recording and is in the standby mode. 10 Switches on the remote control. 1 2 3 45 67 8 9 20 D-VHS4 XXXXXXX XXX No1394 00:00:00 D ON/OFF REC Device List • D-VHS4 A i.LINK Setup • With "Enable"...LINK standby Use the following procedure to enable data transfer between multiple i.LINK devices even when in that mode. appears. Operating the control panel screen The control panel screen appears when you press i.LINK again. In standby mode i.LINK device Media Receiver i.LINK device POWER REC DATA ON ...
Enjoying through External Equipment 12 English Setting up for recording and is in the standby mode. 10 Switches on the remote control. 1 2 3 45 67 8 9 20 D-VHS4 XXXXXXX XXX No1394 00:00:00 D ON/OFF REC Device List • D-VHS4 A i.LINK Setup • With "Enable"...LINK standby Use the following procedure to enable data transfer between multiple i.LINK devices even when in that mode. appears. Operating the control panel screen The control panel screen appears when you press i.LINK again. In standby mode i.LINK device Media Receiver i.LINK device POWER REC DATA ON ...


