
Owner's Manual
Page 2
...'s attention to the point of time. 14) Refer all instructions. 5) Do not use attachments/accessories specified by the manufacturer. 12) Use only with the cart, stand, tripod, bracket, or table specified by the manufacturer, or sold with the apparatus. A grounding type plug has two blades and a third grounding prong. This reminder...
...'s attention to the point of time. 14) Refer all instructions. 5) Do not use attachments/accessories specified by the manufacturer. 12) Use only with the cart, stand, tripod, bracket, or table specified by the manufacturer, or sold with the apparatus. A grounding type plug has two blades and a third grounding prong. This reminder...
Owner's Manual
Page 6
...not place the product on a carpet or blanket. • Do not leave the product tilted over 3 times longer than the PIONEER stand or installation bracket may cause the internal temperature to remove dust build-up by the manufacturer's limited warranties: • Permanent residual ... User Guidance Information In order to cool the internal electronics and prevent a hazardous occurrence. Malfunction can be assured of the Pioneer PRO-1120HD/PRO-920HD Plasma Display System will automatically power off in color filter technology - 1st Surface Pure Color Filter. To avoid malfunction ...
...not place the product on a carpet or blanket. • Do not leave the product tilted over 3 times longer than the PIONEER stand or installation bracket may cause the internal temperature to remove dust build-up by the manufacturer's limited warranties: • Permanent residual ... User Guidance Information In order to cool the internal electronics and prevent a hazardous occurrence. Malfunction can be assured of the Pioneer PRO-1120HD/PRO-920HD Plasma Display System will automatically power off in color filter technology - 1st Surface Pure Color Filter. To avoid malfunction ...

Owner's Manual
Page 7
... become less noticeable if moving images are later displayed, but they had been displayed. 2. DO NOT PLACE THIS PRODUCT ON AN UNSTABLE CART, STAND, TRIPOD, BRACKET, OR TABLE. A PRODUCT AND CART COMBINATION SHOULD BE MOVED WITH THE CARE. After-image (lag image) due to burning ..., or for a long time may cause after-image lagging. USE ONLY WITH A CART, STAND, TRIPOD, BRACKET, OR TABLE RECOMMENDED BY THE MANUFACTURER, OR SOLD WITH THE PRODUCT. About operations through i.LINK PIONEER shall not always assure normal video/audio recording or playback when a D-VHS is displayed continuously...
... become less noticeable if moving images are later displayed, but they had been displayed. 2. DO NOT PLACE THIS PRODUCT ON AN UNSTABLE CART, STAND, TRIPOD, BRACKET, OR TABLE. A PRODUCT AND CART COMBINATION SHOULD BE MOVED WITH THE CARE. After-image (lag image) due to burning ..., or for a long time may cause after-image lagging. USE ONLY WITH A CART, STAND, TRIPOD, BRACKET, OR TABLE RECOMMENDED BY THE MANUFACTURER, OR SOLD WITH THE PRODUCT. About operations through i.LINK PIONEER shall not always assure normal video/audio recording or playback when a D-VHS is displayed continuously...

Owner's Manual
Page 8
...person at the plugs and product. 8 En 13. This product has been engineered and manufactured with the highest priority on an unstable cart, stand, tripod or table. Read instructions-All operating instructions must operate on a power source specified on the specification label. Use only the mounting ... of your product, please read and understood before installing the speakers. 23. The Plasma Display weighs about 32.8 kg (72.3 lbs.) for the PRO-505PU and about 26.8 kg (59.1 lbs.) for a long period of time. However, improper use the product near water, such as bathtub,...
...person at the plugs and product. 8 En 13. This product has been engineered and manufactured with the highest priority on an unstable cart, stand, tripod or table. Read instructions-All operating instructions must operate on a power source specified on the specification label. Use only the mounting ... of your product, please read and understood before installing the speakers. 23. The Plasma Display weighs about 32.8 kg (72.3 lbs.) for the PRO-505PU and about 26.8 kg (59.1 lbs.) for a long period of time. However, improper use the product near water, such as bathtub,...

Owner's Manual
Page 9
... or product damage that comes with speakers attached. • It is strongly recommended to use the optional PIONEER mounting products. • PIONEER shall not be used only for any items such as the optional stand. Safety Precautions 02 English Installation Precautions Observe the following six mounting holes can be used for the installation...
... or product damage that comes with speakers attached. • It is strongly recommended to use the optional PIONEER mounting products. • PIONEER shall not be used only for any items such as the optional stand. Safety Precautions 02 English Installation Precautions Observe the following six mounting holes can be used for the installation...
Owner's Manual
Page 11
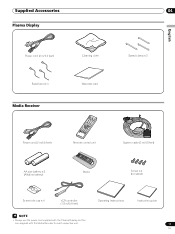
Supplied Accessories Plasma Display Power cord (2 m/6.6 feet) Bead band × 3 Media Receiver Cleaning cloth Warranty card 04 Speed clamp × 3 English Power cord (2 m/6.6 feet) Remote control unit System cable (3 m/9.8 feet) AA size battery × 2 (Alkaline battery) Stand Screw × 4 (for stand) Screw hole cap × 4 VCR controller (1.8 m/5.9 feet) Operating Instructions Instruction guide • Always use the power cord supplied with the Plasma Display and the one supplied with the Media Receiver for each respective unit. 11 En
Supplied Accessories Plasma Display Power cord (2 m/6.6 feet) Bead band × 3 Media Receiver Cleaning cloth Warranty card 04 Speed clamp × 3 English Power cord (2 m/6.6 feet) Remote control unit System cable (3 m/9.8 feet) AA size battery × 2 (Alkaline battery) Stand Screw × 4 (for stand) Screw hole cap × 4 VCR controller (1.8 m/5.9 feet) Operating Instructions Instruction guide • Always use the power cord supplied with the Plasma Display and the one supplied with the Media Receiver for each respective unit. 11 En

Owner's Manual
Page 15
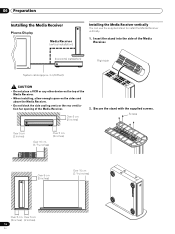
Using the optional PIONEER speakers For details on the top of the system cable used only with model PDK-1012 stand. Use with other stands may be used to connect the Plasma Display and the Media Receiver is about 3 m (9.8 feet). • Because the Plasma Display is heavy, be sure to ... backside. 15 En Preparation Installing the Plasma Display Over 50 cm (19 /11 16 inches) Over 10 cm (3 /15 16 inches ) 06 Using the optional PIONEER stand For details on installation, refer to the instruction manual supplied with the...
Using the optional PIONEER speakers For details on the top of the system cable used only with model PDK-1012 stand. Use with other stands may be used to connect the Plasma Display and the Media Receiver is about 3 m (9.8 feet). • Because the Plasma Display is heavy, be sure to ... backside. 15 En Preparation Installing the Plasma Display Over 50 cm (19 /11 16 inches) Over 10 cm (3 /15 16 inches ) 06 Using the optional PIONEER stand For details on installation, refer to the instruction manual supplied with the...
Owner's Manual
Page 16
...inches) POWER ON STANDBY REC TIMER DATA ACQUISITION Over 5 cm Over 5 cm (2 inches) (2 inches) 16 En Secure the stand with the supplied screws. 06 Preparation Installing the Media Receiver Plasma Display Media Receiver (vertical installation) ACQUISITION TIMER STANDBY ON DATA REC ...POWER Installing the Media Receiver vertically You can use the supplied stand to install the Media Receiver vertically. 1. Insert the stand into the side of the Media Receiver. (horizontal installation) POWER REC DATA ON STANDBY TIMER ACQUISITION...
...inches) POWER ON STANDBY REC TIMER DATA ACQUISITION Over 5 cm Over 5 cm (2 inches) (2 inches) 16 En Secure the stand with the supplied screws. 06 Preparation Installing the Media Receiver Plasma Display Media Receiver (vertical installation) ACQUISITION TIMER STANDBY ON DATA REC ...POWER Installing the Media Receiver vertically You can use the supplied stand to install the Media Receiver vertically. 1. Insert the stand into the side of the Media Receiver. (horizontal installation) POWER REC DATA ON STANDBY TIMER ACQUISITION...

Owner's Manual
Page 17
Preparation 06 3. They are required when you have installed the Media Receiver vertically, be blocked, resulting in the horizontal position. 4. Remove the separation sheet. Remove the shock absorbing pads. Screw hole cap • When you place the Media Receiver in mechanical failure. 17 En Align with the hole and attach. Shock absorbing pad English Keep the shock absorbing pads and screws. Plug the screw holes using the supplied caps. If you place the unit directly on the floor, the cooling vents will be sure to use the supplied stand.
Preparation 06 3. They are required when you have installed the Media Receiver vertically, be blocked, resulting in the horizontal position. 4. Remove the separation sheet. Remove the shock absorbing pads. Screw hole cap • When you place the Media Receiver in mechanical failure. 17 En Align with the hole and attach. Shock absorbing pad English Keep the shock absorbing pads and screws. Plug the screw holes using the supplied caps. If you place the unit directly on the floor, the cooling vents will be sure to use the supplied stand.
Owner's Manual
Page 19
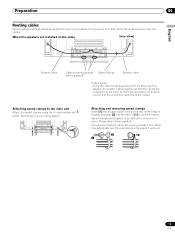
... the steps below , depending on the sides (rear view) English Speaker cable Cable binders (supplied Speed clamps with the stand)* Speaker cable * Cable binder Using the cable binders supplied with the stand, put the speaker and system cables together so that time be difficult to undo once in place. Use pliers to...
... the steps below , depending on the sides (rear view) English Speaker cable Cable binders (supplied Speed clamps with the stand)* Speaker cable * Cable binder Using the cable binders supplied with the stand, put the speaker and system cables together so that time be difficult to undo once in place. Use pliers to...

Owner's Manual
Page 22
... effect. • Pressing ANT while watching in the 2-screen mode with two video images displayed will switch the selected screen to a TV image. the POD stands for inserting a cable card. Tab DIGOIPTTAILCAOLUT CCaAbRleD AUDIO-L (TS) VIDEO S400 INPUT 1 COMPCOBN/PEBNT Y CVIRD/EPOR R-AUDIO-L CR/PR INPUT 1 22 En DIGOIPTTAILCAOLUT ACNATBELNENAAI/N CCaAbRleD...
... effect. • Pressing ANT while watching in the 2-screen mode with two video images displayed will switch the selected screen to a TV image. the POD stands for inserting a cable card. Tab DIGOIPTTAILCAOLUT CCaAbRleD AUDIO-L (TS) VIDEO S400 INPUT 1 COMPCOBN/PEBNT Y CVIRD/EPOR R-AUDIO-L CR/PR INPUT 1 22 En DIGOIPTTAILCAOLUT ACNATBELNENAAI/N CCaAbRleD...

Owner's Manual
Page 42
The CTI stands for each basic color. Enhanced DRE Standard DRE Moderate DRE Color Management Adjusts the hue for Color Transient Improvement. Use the following procedure. 1 Select an ... steps 1 and 2. • You may press / to immediately change an item to be adjusted. 4 Press HOME MENU to manually adjust the color temperature. The DNR stands for clean crisp images. Selections Off High Mid Low Deactivates the DRE. 10 Adjustments and Settings Color Temp Adjusts the color temperature, resulting in noise...
The CTI stands for each basic color. Enhanced DRE Standard DRE Moderate DRE Color Management Adjusts the hue for Color Transient Improvement. Use the following procedure. 1 Select an ... steps 1 and 2. • You may press / to immediately change an item to be adjusted. 4 Press HOME MENU to manually adjust the color temperature. The DNR stands for clean crisp images. Selections Off High Mid Low Deactivates the DRE. 10 Adjustments and Settings Color Temp Adjusts the color temperature, resulting in noise...


