
User Manual
Page 2
NO USER-SERVICEABLE PARTS INSIDE. Be sure that the power supply voltage of the area where this Pioneer product. D3-4-2-1-4_A_En WARNING To prevent a fire hazard, do not place any container filled with the Low Voltage Directive 2006/95/EC and EMC Directive ...
NO USER-SERVICEABLE PARTS INSIDE. Be sure that the power supply voltage of the area where this Pioneer product. D3-4-2-1-4_A_En WARNING To prevent a fire hazard, do not place any container filled with the Low Voltage Directive 2006/95/EC and EMC Directive ...

User Manual
Page 3
... the cord or tie it from the wall socket when left unused for a long period of the fuse. Make sure it damaged, ask your nearest PIONEER authorized service center or your local dealer. To avoid fire hazard, the power cord should be used electronic products free of the product, and to...
... the cord or tie it from the wall socket when left unused for a long period of the fuse. Make sure it damaged, ask your nearest PIONEER authorized service center or your local dealer. To avoid fire hazard, the power cord should be used electronic products free of the product, and to...
User Manual
Page 4
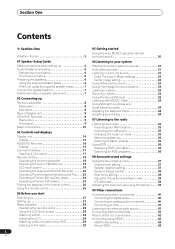
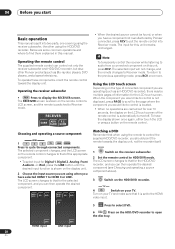
... the built-in FM/AM tuner 19 LCD touch screen 19 Operating the supplied HDD/DVD Recorder . . . . . 20 Operating Pioneer plasma televisions and TVs . . . . 22 Operating a Pioneer Blu-ray Disc player 24 Operating a Pioneer DVD player 25 Putting the batteries in the remote control 26 Using the remote control 26 04 Before you...
... the built-in FM/AM tuner 19 LCD touch screen 19 Operating the supplied HDD/DVD Recorder . . . . . 20 Operating Pioneer plasma televisions and TVs . . . . 22 Operating a Pioneer Blu-ray Disc player 24 Operating a Pioneer DVD player 25 Putting the batteries in the remote control 26 Using the remote control 26 04 Before you...

User Manual
Page 10
WARNING • Pioneer bears no responsibility for accidents resulting from the wall socket. After completing all connections, connect the power cords to switch power off and disconnect the ...
WARNING • Pioneer bears no responsibility for accidents resulting from the wall socket. After completing all connections, connect the power cords to switch power off and disconnect the ...

User Manual
Page 13
...result in the sound. • If the cables' wires happen to be pushed out of the receiver subwoofer. a. For more information, see Operating Pioneer plasma televisions and TVs on page 22 and Audio input settings from Plasma televisions (TV Input) on the side of the HDD/DVD recorder. 7 ...interruptions in malfunction or fire. • After connecting the plugs, pull lightly on the cables to make sure that are connected to a supported Pioneer plasma television, you are connected to an audio input jack on the amp. Poor connections can have audio from the receiver subwoofer, as well ...
...result in the sound. • If the cables' wires happen to be pushed out of the receiver subwoofer. a. For more information, see Operating Pioneer plasma televisions and TVs on page 22 and Audio input settings from Plasma televisions (TV Input) on the side of the HDD/DVD recorder. 7 ...interruptions in malfunction or fire. • After connecting the plugs, pull lightly on the cables to make sure that are connected to a supported Pioneer plasma television, you are connected to an audio input jack on the amp. Poor connections can have audio from the receiver subwoofer, as well ...
User Manual
Page 17
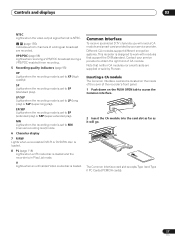
... access the Common Interface. 2 Insert the CA module into the card slot as far as it will need a CA module and smart card provided by Pioneer. Note that support the DVB standard. Different CA modules support different encryption systems. This recorder is loaded. V Lights when an unfinalized Video mode disc is...
... access the Common Interface. 2 Insert the CA module into the card slot as far as it will need a CA module and smart card provided by Pioneer. Note that support the DVB standard. Different CA modules support different encryption systems. This recorder is loaded. V Lights when an unfinalized Video mode disc is...

User Manual
Page 19
.... 11 VOL +/- SURR 14 GENRE SOUND RTRV DIRECT 16 15 18 17 MCACC TEST TONE SOUND 19 20 SLEEP EXIT 21 13 SURR Use to Pioneer's original Advanced Surround mode (page 32). ADV.SURR Use to change the audio setting to select a Surround mode (page 31). LCD touch screen FM/AM...
.... 11 VOL +/- SURR 14 GENRE SOUND RTRV DIRECT 16 15 18 17 MCACC TEST TONE SOUND 19 20 SLEEP EXIT 21 13 SURR Use to Pioneer's original Advanced Surround mode (page 32). ADV.SURR Use to change the audio setting to select a Surround mode (page 31). LCD touch screen FM/AM...

User Manual
Page 22
...23 11 + INPUT + 10 P TV VOL 13 25 - LCD touch screen 8 Number buttons TV/External input mode: Selects a channel. 03 Controls and displays Operating Pioneer plasma televisions and TVs First, refer to Setting up your TV on page 47 for the TV to On/Standby. 3 PAGE Switches pages on the... DTV input modes. 10 P +/- MUTE - 12 12 16 19 22 INF0 EXIT 24 26 + TV VOL 13 MUTE - 1 TV Switches the TV to a Pioneer plasma television. Press ENTER to select the currently highlighted option. 5 HOME MENU Display the HOME MENU screen. 6 RETURN Restores the previous menu screen. 7 Colour (RED...
...23 11 + INPUT + 10 P TV VOL 13 25 - LCD touch screen 8 Number buttons TV/External input mode: Selects a channel. 03 Controls and displays Operating Pioneer plasma televisions and TVs First, refer to Setting up your TV on page 47 for the TV to On/Standby. 3 PAGE Switches pages on the... DTV input modes. 10 P +/- MUTE - 12 12 16 19 22 INF0 EXIT 24 26 + TV VOL 13 MUTE - 1 TV Switches the TV to a Pioneer plasma television. Press ENTER to select the currently highlighted option. 5 HOME MENU Display the HOME MENU screen. 6 RETURN Restores the previous menu screen. 7 Colour (RED...

User Manual
Page 23
... mode: Freezes a frame from a moving image. Displays a TOP Over View page for the CEEFAX/FLOF format. Controls and displays 03 The following only apply to Pioneer plasma televisions: 14 Jumps to exit the channel information 25 Teletext mode: Selects a page. 26 Sets the sound multiplex mode. 23 En Press again to...
... mode: Freezes a frame from a moving image. Displays a TOP Over View page for the CEEFAX/FLOF format. Controls and displays 03 The following only apply to Pioneer plasma televisions: 14 Jumps to exit the channel information 25 Teletext mode: Selects a page. 26 Sets the sound multiplex mode. 23 En Press again to...

User Manual
Page 24
... display information. 13 Number buttons Use to enter title, chapter or track numbers, etc. Press to navigate BD-ROM menus. 03 Controls and displays Operating a Pioneer Blu-ray Disc player RECEIVER TV CTRL SOURCE 1 9 BD 1/2 BD 2/2 123 2 PAGE TOP MENU 3 DISC NAVIGATOR MENU 5 HOME MENU 6 SETUP RETURN 8 10 4 / 11 ZOOM 7 / DISP...
... display information. 13 Number buttons Use to enter title, chapter or track numbers, etc. Press to navigate BD-ROM menus. 03 Controls and displays Operating a Pioneer Blu-ray Disc player RECEIVER TV CTRL SOURCE 1 9 BD 1/2 BD 2/2 123 2 PAGE TOP MENU 3 DISC NAVIGATOR MENU 5 HOME MENU 6 SETUP RETURN 8 10 4 / 11 ZOOM 7 / DISP...
User Manual
Page 25
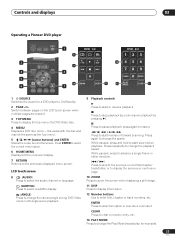
... pages are present. 3 TOP MENU Press to display the top menu of a DVD-Video disc. 4 MENU Displays a DVD disc menu - Controls and displays 03 Operating a Pioneer DVD player RECEIVER TV CTRL SOURCE 2 PAGE TOP MENU 3 DISC NAVIGATOR MENU 5 HOME MENU 6 SETUP RETURN 1 8 9 4 DVD 1/2 / / 10 ZOOM 7 DISP 11 DVD 2/2 123 12 4 5 6 789...
... pages are present. 3 TOP MENU Press to display the top menu of a DVD-Video disc. 4 MENU Displays a DVD disc menu - Controls and displays 03 Operating a Pioneer DVD player RECEIVER TV CTRL SOURCE 2 PAGE TOP MENU 3 DISC NAVIGATOR MENU 5 HOME MENU 6 SETUP RETURN 1 8 9 4 DVD 1/2 / / 10 ZOOM 7 DISP 11 DVD 2/2 123 12 4 5 6 789...
User Manual
Page 28
...Note To temporarily control the receiver while listening to put the remote control into two parts, one covering using the receiver subwoofer, the other Pioneer products such as an HDD/DVD recorder), there may be found, or when you can then operate the desired component. The LCD screen ...changes to that for the selected component, and you have a component not manufactured by Pioneer connected, press RCV to audio from a connected component on this manual. TV 4 Switch on the LCD touch screen of information for the LCD...
...Note To temporarily control the receiver while listening to put the remote control into two parts, one covering using the receiver subwoofer, the other Pioneer products such as an HDD/DVD recorder), there may be found, or when you can then operate the desired component. The LCD screen ...changes to that for the selected component, and you have a component not manufactured by Pioneer connected, press RCV to audio from a connected component on this manual. TV 4 Switch on the LCD touch screen of information for the LCD...
User Manual
Page 31
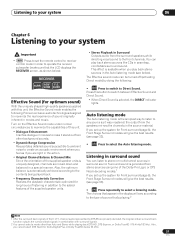
... sources like CDs in the Auto listening mode (see below). The Effective sound mode can be turned off (activating Direct mode) by doing the following Pioneer exclusive audio technologies designed to select the Auto listening mode. The choices that the LCD displays the RECEIVER screen, as shown below 96 kHz). 31...
... sources like CDs in the Auto listening mode (see below). The Effective sound mode can be turned off (activating Direct mode) by doing the following Pioneer exclusive audio technologies designed to select the Auto listening mode. The choices that the LCD displays the RECEIVER screen, as shown below 96 kHz). 31...
User Manual
Page 33
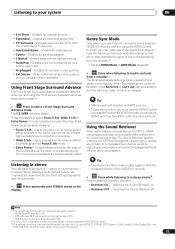
... TV Surround - Provides surround sound for rock and/or pop music • Unplugged - SURR Press to switch between: • Retriever On - compatible Pioneer HDD/DVD recorder connected via HDMI, and have an HDMI Control- Tip • This feature is available only for the following audio streams: •... Dolby TrueHD: over 88.2 kHz • DTS-HD: over after compression. Note 1 You cannot use this function for a Pioneer HDMI Control-compatible HDD/DVD recorder. 3 This setting cannot be determined, No Genre or Can't use of the Genre Sync Mode to have the ...
... TV Surround - Provides surround sound for rock and/or pop music • Unplugged - SURR Press to switch between: • Retriever On - compatible Pioneer HDD/DVD recorder connected via HDMI, and have an HDMI Control- Tip • This feature is available only for the following audio streams: •... Dolby TrueHD: over 88.2 kHz • DTS-HD: over after compression. Note 1 You cannot use this function for a Pioneer HDMI Control-compatible HDD/DVD recorder. 3 This setting cannot be determined, No Genre or Can't use of the Genre Sync Mode to have the ...
User Manual
Page 41
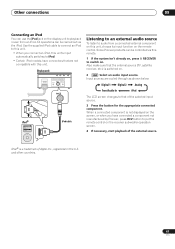
...or when you connect an iPod, this unit's input automatically switches to iPod. • Certain iPod models have connected a component not manufactured by Pioneer, press RCV button to switch on the receiver subwoofer operation screen. 4 If necessary, start playback of the selected input source. 3 Press the... button for the appropriate connected component. iPod® is switched on the remote control. Some Pioneer products can be carried out via this remote. 1 If the system isn't already on, press RECEIVER to put the remote control on ....
...or when you connect an iPod, this unit's input automatically switches to iPod. • Certain iPod models have connected a component not manufactured by Pioneer, press RCV button to switch on the receiver subwoofer operation screen. 4 If necessary, start playback of the selected input source. 3 Press the... button for the appropriate connected component. iPod® is switched on the remote control. Some Pioneer products can be carried out via this remote. 1 If the system isn't already on, press RECEIVER to put the remote control on ....
User Manual
Page 42
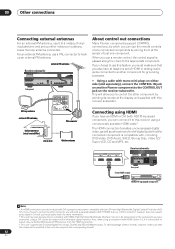
...passed along the chain to the appropriate component. external FM antenna Receiver subwoofer Side panel ANTENNA AM LOOP About control out connections Many Pioneer components support CONTROL connections, by which you also have at the display unit supplied with mono mini-plugs on either indoors or outdoors... For an external AM antenna, use 5 to 6 meters of vinylinsulated wire and set of HDMI or analog audio jacks connected to another Pioneer component to the CONTROL OUT jack on the receiver subwoofer. A DVI connection, however, does not support audio signals. If you choose to...
...passed along the chain to the appropriate component. external FM antenna Receiver subwoofer Side panel ANTENNA AM LOOP About control out connections Many Pioneer components support CONTROL connections, by which you also have at the display unit supplied with mono mini-plugs on either indoors or outdoors... For an external AM antenna, use 5 to 6 meters of vinylinsulated wire and set of HDMI or analog audio jacks connected to another Pioneer component to the CONTROL OUT jack on the receiver subwoofer. A DVI connection, however, does not support audio signals. If you choose to...
User Manual
Page 44
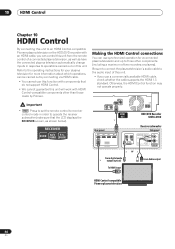
... FM UNBAL 75 Ω L R ANALOG AUDIO IN or From digital audio output (optical) From Audio output To HDMI input HDMI Control-compatible Pioneer plasma television 44 En Be sure to connect the plasma television's audio cable to the audio input of this unit. • If you can ...be carried out by Pioneer. RECEIVER SURR ADV SURR F.S. 10 HDMI Control Chapter 10 HDMI Control By connecting this unit to an HDMI Control-compatible Pioneer plasma television or the HDD/DVD recorder with HDMI Control-compatible components other components ...
... FM UNBAL 75 Ω L R ANALOG AUDIO IN or From digital audio output (optical) From Audio output To HDMI input HDMI Control-compatible Pioneer plasma television 44 En Be sure to connect the plasma television's audio cable to the audio input of this unit. • If you can ...be carried out by Pioneer. RECEIVER SURR ADV SURR F.S. 10 HDMI Control Chapter 10 HDMI Control By connecting this unit to an HDMI Control-compatible Pioneer plasma television or the HDD/DVD recorder with HDMI Control-compatible components other components ...
User Manual
Page 45
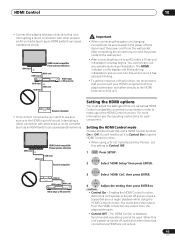
...output HDMI input HDMI cable HDMI OUT Other amps or AV converter Important • When connecting this unit. HDMI input HDMI Control-compatible Pioneer plasma television HDMI cable HDMI OUT Receiver subwoofer Setting the HDMI options You must adjust the settings of this unit as well as a source...it to Control On to use of this function, we recommend that you have a supported source begin playback while using a TV not manufactured by Pioneer, put this unit's HDMI Control function On or Off. After completing all connections, connect the power cords to the wall socket. • ...
...output HDMI input HDMI cable HDMI OUT Other amps or AV converter Important • When connecting this unit. HDMI input HDMI Control-compatible Pioneer plasma television HDMI cable HDMI OUT Receiver subwoofer Setting the HDMI options You must adjust the settings of this unit as well as a source...it to Control On to use of this function, we recommend that you have a supported source begin playback while using a TV not manufactured by Pioneer, put this unit's HDMI Control function On or Off. After completing all connections, connect the power cords to the wall socket. • ...
User Manual
Page 48
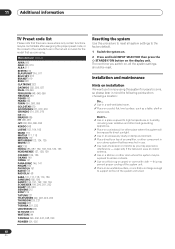
... TELEFUNKEN 222, 223, 224, 225 THOMSON 226, 227 THORN 228 TOSHIBA 231, 232 UNIVERSUM 235 W.HOUSE 239 WATSON 244 YAMAHA 245, 246, 247, 248, 249 PIONEER 001, 002 Resetting the system Use this procedure to the factory default. 1 Switch the system on. 2 Press and hold INPUT SELECTOR then press the STANDBY...
... TELEFUNKEN 222, 223, 224, 225 THOMSON 226, 227 THORN 228 TOSHIBA 231, 232 UNIVERSUM 235 W.HOUSE 239 WATSON 244 YAMAHA 245, 246, 247, 248, 249 PIONEER 001, 002 Resetting the system Use this procedure to the factory default. 1 Switch the system on. 2 Press and hold INPUT SELECTOR then press the STANDBY...
User Manual
Page 50
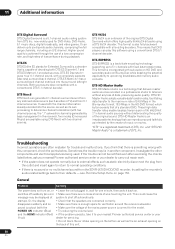
...no multichannel sound from DTS Inc. These high data transfer rates enable lossless transmission of this component, check the points below , ask your nearest Pioneer authorized service center or your lit up to their defaults - and "DTS-HD Master Audio" is achieved through the use of a low compression... technology that DVD players can deliver up ). and the HDMI indicator (Red) • If the problem persists, take it to your nearest Pioneer authorized service center or your dealer to carry out repair work. • If the system does not operate normally due to external effects such ...
...no multichannel sound from DTS Inc. These high data transfer rates enable lossless transmission of this component, check the points below , ask your nearest Pioneer authorized service center or your lit up to their defaults - and "DTS-HD Master Audio" is achieved through the use of a low compression... technology that DVD players can deliver up ). and the HDMI indicator (Red) • If the problem persists, take it to your nearest Pioneer authorized service center or your dealer to carry out repair work. • If the system does not operate normally due to external effects such ...

