
User Manual
Page 17
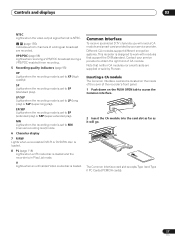
... Common Interface. 2 Insert the CA module into the card slot as far as it will need a CA module and smart card provided by Pioneer. Different CA modules support different encryption systems. This recorder is located on the inside of the cover of CA module. The Common Interface card ... receiving a VPS/PDC broadcast during a VPS/PDC-enabled timer recording. 5 Recording quality indicators (page 95) XP Lights when the recording mode is set to MN (manual recording level) mode. 6 Character display 7 R/RW Lights when a recordable DVD-R or DVD-RW disc is loaded. 8 PL (page 118) Lights when a VR ...
... Common Interface. 2 Insert the CA module into the card slot as far as it will need a CA module and smart card provided by Pioneer. Different CA modules support different encryption systems. This recorder is located on the inside of the cover of CA module. The Common Interface card ... receiving a VPS/PDC broadcast during a VPS/PDC-enabled timer recording. 5 Recording quality indicators (page 95) XP Lights when the recording mode is set to MN (manual recording level) mode. 6 Character display 7 R/RW Lights when a recordable DVD-R or DVD-RW disc is loaded. 8 PL (page 118) Lights when a VR ...
User Manual
Page 28
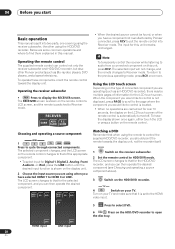
... Press to select DVD. 6 OPEN/ CLOSE Press on your TV. To have a component not manufactured by Pioneer connected, press RCV to that when using the receiver subwoofer, the other Pioneer products such as an HDD/DVD recorder), there may be found, or when you have the display shown once...for this unit remains unchanged. Note To temporarily control the receiver while listening to Receiver mode. 04 Before you start Basic operation This manual is split into Receiver mode. Below are carried out for the selected component, and you would like to control is not displayed, press...
... Press to select DVD. 6 OPEN/ CLOSE Press on your TV. To have a component not manufactured by Pioneer connected, press RCV to that when using the receiver subwoofer, the other Pioneer products such as an HDD/DVD recorder), there may be found, or when you have the display shown once...for this unit remains unchanged. Note To temporarily control the receiver while listening to Receiver mode. 04 Before you start Basic operation This manual is split into Receiver mode. Below are carried out for the selected component, and you would like to control is not displayed, press...
User Manual
Page 34
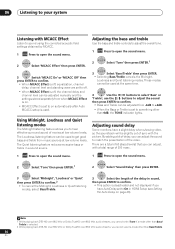
... ENTER.1 ENTER 3 Select 'Bass/Treble' then press ENTER. • Selecting Bass/Treble cancels the Midnight, Loudness and Quiet listening modes. These modes cannot be adjusted manually and the settings stored separately from when MCACC Effect is set to get good bass and treble from -6dB to +6dB. • When the Bass...
... ENTER.1 ENTER 3 Select 'Bass/Treble' then press ENTER. • Selecting Bass/Treble cancels the Midnight, Loudness and Quiet listening modes. These modes cannot be adjusted manually and the settings stored separately from when MCACC Effect is set to get good bass and treble from -6dB to +6dB. • When the Bass...

User Manual
Page 35
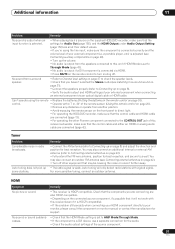
...Mono' then press ENTER. Press TUNE +/- until you reach the frequency you don't have easy access to your favorite stations without having to tune in manually each time. 1 Tune to move rapidly. ENTER 2 Select 'Tuner Setup' then press ENTER. ENTER 3 Select 'Tuner Setup' then press ENTER. ... ENTER. until the frequency display starts to change the displayed frequency. • Auto tuning - Just choose the one that you always have to manually tune in stereo but the reception is weak, you want . There are saved along with the preset. 2 SETUP Press SETUP. repeatedly to move...
...Mono' then press ENTER. Press TUNE +/- until you reach the frequency you don't have easy access to your favorite stations without having to tune in manually each time. 1 Tune to move rapidly. ENTER 2 Select 'Tuner Setup' then press ENTER. ENTER 3 Select 'Tuner Setup' then press ENTER. ... ENTER. until the frequency display starts to change the displayed frequency. • Auto tuning - Just choose the one that you always have to manually tune in stereo but the reception is weak, you want . There are saved along with the preset. 2 SETUP Press SETUP. repeatedly to move...

User Manual
Page 46
... mode. 2 Turn the power ON for the plasma television. Press TV on this device, you would like to Off and adjust the sound delay settings manually (page 34). ENTER 2 Select 'System Setup' then press ENTER. ENTER 4 Adjust the setting then press ENTER to confirm. From this unit is not connected by...
... mode. 2 Turn the power ON for the plasma television. Press TV on this device, you would like to Off and adjust the sound delay settings manually (page 34). ENTER 2 Select 'System Setup' then press ENTER. ENTER 4 Adjust the setting then press ENTER to confirm. From this unit is not connected by...
User Manual
Page 51
... your external component when connecting an external component via HDMI. • Press MUTE on the remote control to turn muting off other Pioneer component connected to Connecting up the volume. • No audio is output from surround speaker. • Refer to Channel level setting... • The radio signal is HDCP-compatible). • If the problem still persists when connecting your monitor, please consult the component or monitor manual or contact the manufacturer for support. a portable player, etc.) is adjusted (see Connecting external antennas on page 42). • Turn off ...
... your external component when connecting an external component via HDMI. • Press MUTE on the remote control to turn muting off other Pioneer component connected to Connecting up the volume. • No audio is output from surround speaker. • Refer to Channel level setting... • The radio signal is HDCP-compatible). • If the problem still persists when connecting your monitor, please consult the component or monitor manual or contact the manufacturer for support. a portable player, etc.) is adjusted (see Connecting external antennas on page 42). • Turn off ...
User Manual
Page 55
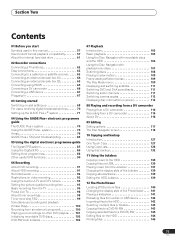
Section Two Contents 01 Before you start Symbols used in this manual 57 Disc/content format playback compatibility 57 About the internal hard disk drive 61 02 Recorder connections Connecting a TV antenna 62 Easy connections 62 Connecting ...
Section Two Contents 01 Before you start Symbols used in this manual 57 Disc/content format playback compatibility 57 About the internal hard disk drive 61 02 Recorder connections Connecting a TV antenna 62 Easy connections 62 Connecting ...
User Manual
Page 56
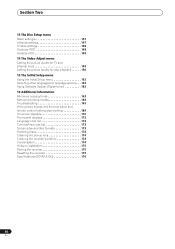
... the Initial Setup menu 152 Selecting other languages for language options. . . 162 Using Software Update (Digital tuner 162 16 Additional information Minimum copying times 163 Manual recording modes 164 Troubleshooting 165 If the picture freezes and the front panel and remote control buttons stop working 169 On-screen displays 170 Front...
... the Initial Setup menu 152 Selecting other languages for language options. . . 162 Using Software Update (Digital tuner 162 16 Additional information Minimum copying times 163 Manual recording modes 164 Troubleshooting 165 If the picture freezes and the front panel and remote control buttons stop working 169 On-screen displays 170 Front...

User Manual
Page 57
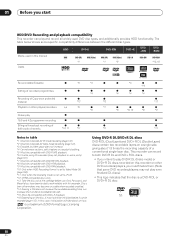
...back when recorded onto a DVD that older models of DVD recorders and DVD writers may not play DVDs recorded under the following table shows older Pioneer DVD recorders' limited compatibility with this will not affect playback. *3 Copy-once protected disc titles will show in the display when you load a...Unfinalized VR mode and Video mode discs may reject DVD-RW ver. 1.2 discs and/or corrupt the data on the recording technique used in this manual The following icons are both compatible with DVD-RW ver. 1.2 discs. HDD HDD DVD Any type of disc. The following file systems1: ISO...
...back when recorded onto a DVD that older models of DVD recorders and DVD writers may not play DVDs recorded under the following table shows older Pioneer DVD recorders' limited compatibility with this will not affect playback. *3 Copy-once protected disc titles will show in the display when you load a...Unfinalized VR mode and Video mode discs may reject DVD-RW ver. 1.2 discs and/or corrupt the data on the recording technique used in this manual The following icons are both compatible with DVD-RW ver. 1.2 discs. HDD HDD DVD Any type of disc. The following file systems1: ISO...
User Manual
Page 58
..., giving about an hour. 01 Before you start HDD/DVD Recording and playback compatibility This recorder can play and record all widely-used in this manual HDD HDD DVD-R DVD-RW DVD+R DVD +RW DVD (VR) *1 DVD (Video) DVD (VR) *1 DVD (Video) *2 DVD+R DVD+RW DVD -RAM DVD-RAM *13, 16...
..., giving about an hour. 01 Before you start HDD/DVD Recording and playback compatibility This recorder can play and record all widely-used in this manual HDD HDD DVD-R DVD-RW DVD+R DVD +RW DVD (VR) *1 DVD (Video) DVD (VR) *1 DVD (Video) *2 DVD+R DVD+RW DVD -RAM DVD-RAM *13, 16...
User Manual
Page 59
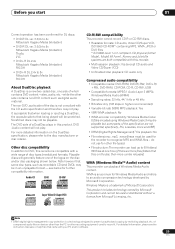
.../ 999 files at one of a DualDisc plays in an unplayable format - Other disc compatibility In addition to recognize MP3 and WMA files - see the instruction manuals or help files that came with the CD audio specification and therefore may be playable but some disc types, such as digital audio material. For...
.../ 999 files at one of a DualDisc plays in an unplayable format - Other disc compatibility In addition to recognize MP3 and WMA files - see the instruction manuals or help files that came with the CD audio specification and therefore may be playable but some disc types, such as digital audio material. For...
User Manual
Page 64
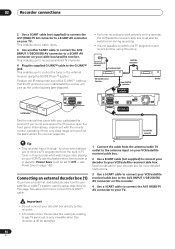
TV G-LINK CONTROL IN G-LINK cable See the manual that the IR receiver on your cable/satellite receiver will pick up the control signals (see Power Save on your VCR/satellite receiver/cable box. 2 ... receiver/cable box must be switched on during recording. • It is off (in the external receiver using the GUIDE Plus+® system. See the manual for your TV. This enables you to record a TV programme from the decoder (for more detailed instructions. 3 Use a SCART cable to connect your VCR (To...
TV G-LINK CONTROL IN G-LINK cable See the manual that the IR receiver on your cable/satellite receiver will pick up the control signals (see Power Save on your VCR/satellite receiver/cable box. 2 ... receiver/cable box must be switched on during recording. • It is off (in the external receiver using the GUIDE Plus+® system. See the manual for your TV. This enables you to record a TV programme from the decoder (for more detailed instructions. 3 Use a SCART cable to connect your VCR (To...
User Manual
Page 65
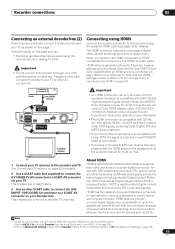
.... Recorder connections 02 Connecting an external decoder box (2) If you only have connected to a Pioneer plasma television, please select the HDMI setup on the display (refer to the supplied manual for more on this). The HDMI connector outputs uncompressed digital video, as well as almost every...TV 2 To SCART AV connector Important • An HDMI connection can : • Record scrambled channels received using the supplied HDMI cable (see Manual CH Setting on a single digital connection for details). If you choose to connect to a DVI connector, you will need to a SCART AV...
.... Recorder connections 02 Connecting an external decoder box (2) If you only have connected to a Pioneer plasma television, please select the HDMI setup on the display (refer to the supplied manual for more on this). The HDMI connector outputs uncompressed digital video, as well as almost every...TV 2 To SCART AV connector Important • An HDMI connection can : • Record scrambled channels received using the supplied HDMI cable (see Manual CH Setting on a single digital connection for details). If you choose to connect to a DVI connector, you will need to a SCART AV...

User Manual
Page 68
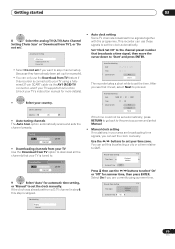
... both the digital and analog TV tuners. • The clock will take a few seconds to download country, TV screen size and language information. (Check the manual that it from the Initial Setup menu; er Save P Start p Navigator Cancel Please use the Setup Navigator, press to select Cancel, then press ENTER to...
... both the digital and analog TV tuners. • The clock will take a few seconds to download country, TV screen size and language information. (Check the manual that it from the Initial Setup menu; er Save P Start p Navigator Cancel Please use the Setup Navigator, press to select Cancel, then press ENTER to...
User Manual
Page 69
...et CH Pr 1 Start Next If the time could not be set automatically, press RETURN to go back to the previous screen and select Manual. • Manual clock setting If no stations in step 6, this by selecting a city or a time relative to set the time. ENTER • .... k SMetatinnugal Clock Setting 1/2 Line System er SaTvieme Zone P England London p NaSviugmatmorer Time Off Press then use the / buttons to set the clock manually. Getting started 03 ENTER 8 Select the analog TV (A.TV) Auto Channel Setting ('Auto Scan' or 'Download from a D.TV channel in your area ...
...et CH Pr 1 Start Next If the time could not be set automatically, press RETURN to go back to the previous screen and select Manual. • Manual clock setting If no stations in step 6, this by selecting a city or a time relative to set the time. ENTER • .... k SMetatinnugal Clock Setting 1/2 Line System er SaTvieme Zone P England London p NaSviugmatmorer Time Off Press then use the / buttons to set the clock manually. Getting started 03 ENTER 8 Select the analog TV (A.TV) Auto Channel Setting ('Auto Scan' or 'Download from a D.TV channel in your area ...
User Manual
Page 70
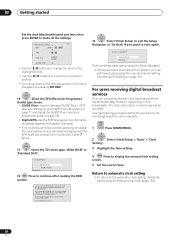
...the TV screen type, 'Wide (16:9)' or 'Standard (4:3)'. er Save Finish Setup p Navigator Go Back That completes basic setup using the manual channel setting. For users receiving digital broadcast services This unit can go back to another. • You can set the clock... If there are blank channels with digital channels). • If no station, you want to keep to display the manual clock setting screen. 5 Set the correct time. See Manual CH Setting on the broadcaster, the clock information received may er Save P As recordings might be accurate. Return to ...
...the TV screen type, 'Wide (16:9)' or 'Standard (4:3)'. er Save Finish Setup p Navigator Go Back That completes basic setup using the manual channel setting. For users receiving digital broadcast services This unit can go back to another. • You can set the clock... If there are blank channels with digital channels). • If no station, you want to keep to display the manual clock setting screen. 5 Set the correct time. See Manual CH Setting on the broadcaster, the clock information received may er Save P As recordings might be accurate. Return to ...

User Manual
Page 73
... 03 • If you cannot receive any channel that channel. • The above table) then you won't be found on . see Setting a manual recording on the recorder during an EPG download, the download is the number on which the channel can be able to group certain channels together, ... GUIDE Plus+ system in the grid; Those that you to the GUIDE Plus+ home screen. • You can still set VIDEO Plus+ recordings and manual recordings - Changing the programme numbers allows you don't get back to decide the order in the Initial Setup menu to the Editor screen: • Press...
... 03 • If you cannot receive any channel that channel. • The above table) then you won't be found on . see Setting a manual recording on the recorder during an EPG download, the download is the number on which the channel can be able to group certain channels together, ... GUIDE Plus+ system in the grid; Those that you to the GUIDE Plus+ home screen. • You can still set VIDEO Plus+ recordings and manual recordings - Changing the programme numbers allows you don't get back to decide the order in the Initial Setup menu to the Editor screen: • Press...
User Manual
Page 79
...scheduled recording. Use the / / / buttons followed by ENTER to select characters from AUTO2, XP, SP, LP, EP, SLP, SEP or a manual recording mode (see , edit and delete scheduled (timer) recordings. Can also be used when recording to edit the recording date, start time, end ...can: • Edit or delete a One-Button-Recording • Set, edit or delete a VIDEO Plus+ recording • Set, edit or delete a manual recording Press the GREEN Action button to go back. 4 Enter a name for more information about scheduled recordings. 2 This mode maximizes the recording quality to a ...
...scheduled recording. Use the / / / buttons followed by ENTER to select characters from AUTO2, XP, SP, LP, EP, SLP, SEP or a manual recording mode (see , edit and delete scheduled (timer) recordings. Can also be used when recording to edit the recording date, start time, end ...can: • Edit or delete a One-Button-Recording • Set, edit or delete a VIDEO Plus+ recording • Set, edit or delete a manual recording Press the GREEN Action button to go back. 4 Enter a name for more information about scheduled recordings. 2 This mode maximizes the recording quality to a ...

User Manual
Page 81
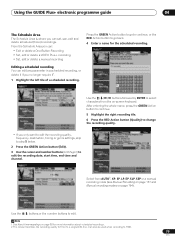
..., followed by the GUIDE Plus+ system you live in an area not yet covered by the GREEN Action button (Next) to confirm. 81 En Setting a manual recording 1 Select 'Schedule' from the Menu bar. Using the GUIDE Plus+ electronic programme guide 04 Setting a VIDEO Plus+® recording 1 Select 'Schedule' ...2 Press the RED Action button (VIDEO Plus+). 3 Use the number buttons (LCD Page 2) to enter a PlusCode programming number. 2 Press the GREEN Action button (Manual). 3 Use the number (LCD Page 2) and / / / buttons to enter the recording date, then press the GREEN Action button (Next).
..., followed by the GUIDE Plus+ system you live in an area not yet covered by the GREEN Action button (Next) to confirm. 81 En Setting a manual recording 1 Select 'Schedule' from the Menu bar. Using the GUIDE Plus+ electronic programme guide 04 Setting a VIDEO Plus+® recording 1 Select 'Schedule' ...2 Press the RED Action button (VIDEO Plus+). 3 Use the number buttons (LCD Page 2) to enter a PlusCode programming number. 2 Press the GREEN Action button (Manual). 3 Use the number (LCD Page 2) and / / / buttons to enter the recording date, then press the GREEN Action button (Next).
User Manual
Page 82
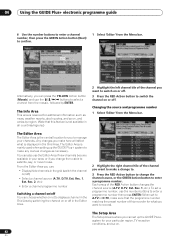
TV On Ext. Rec. 1 On D. TV On D. No. 001 002 003 004 005 007 006 014 017 Alternatively, you make any manual changes as news, weather reports, stock quotes, and so on or off ) • Select a channel source (A.TV, D.TV, Ext. Any changes you can press the ...
TV On Ext. Rec. 1 On D. TV On D. No. 001 002 003 004 005 007 006 014 017 Alternatively, you make any manual changes as news, weather reports, stock quotes, and so on or off ) • Select a channel source (A.TV, D.TV, Ext. Any changes you can press the ...


