

User Manual
Page 1
Operating Instructions ® ® Audio Multi-channel Receiver Subwoofer SX-LX70SW Satellite Speaker SSP-LX70ST HDD/DVD Recorder SDVR-LX70D Accessory Box AS-LX70 HDD/DVD Recorder Home Cinema System
Operating Instructions ® ® Audio Multi-channel Receiver Subwoofer SX-LX70SW Satellite Speaker SSP-LX70ST HDD/DVD Recorder SDVR-LX70D Accessory Box AS-LX70 HDD/DVD Recorder Home Cinema System
User Manual
Page 4
... Home theater sound setup 6 Standard surround setup 6 Front surround setup 6 Preparing the speakers 6 Using the supplied speaker bases 6 When not using the supplied speaker bases 7 Connect the speaker system 7 Additional notes on speaker placement 7 02 Connecting up Receiver subwoofer 8 Rear panel 8 Side panel 8 Back...screen 19 Operating the supplied HDD/DVD Recorder . . . . . 20 Operating Pioneer plasma televisions and TVs . . . . 22 Operating a Pioneer Blu-ray Disc player 24 Operating a Pioneer DVD player 25 Putting the batteries in the remote control 26 Using the remote control...
... Home theater sound setup 6 Standard surround setup 6 Front surround setup 6 Preparing the speakers 6 Using the supplied speaker bases 6 When not using the supplied speaker bases 7 Connect the speaker system 7 Additional notes on speaker placement 7 02 Connecting up Receiver subwoofer 8 Rear panel 8 Side panel 8 Back...screen 19 Operating the supplied HDD/DVD Recorder . . . . . 20 Operating Pioneer plasma televisions and TVs . . . . 22 Operating a Pioneer Blu-ray Disc player 24 Operating a Pioneer DVD player 25 Putting the batteries in the remote control 26 Using the remote control...
User Manual
Page 5
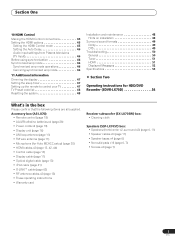
... cables x2 (page 13) • These operating instructions • Warranty card Receiver subwoofer (SX-LX70SW) box: • Cleaning cloth Speakers (SSP-LX70ST) box: • Speakers (front/center x2, surround x2) (page 6, 11) • Speaker cables x6 (page 11) • Speaker bases x4 (page 6) • Non-skid pads x16 (page 6, 7) • Screws x4 (page 7) 5 En
... cables x2 (page 13) • These operating instructions • Warranty card Receiver subwoofer (SX-LX70SW) box: • Cleaning cloth Speakers (SSP-LX70ST) box: • Speakers (front/center x2, surround x2) (page 6, 11) • Speaker cables x6 (page 11) • Speaker bases x4 (page 6) • Non-skid pads x16 (page 6, 7) • Screws x4 (page 7) 5 En

User Manual
Page 6
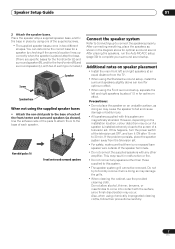
... setup This setup is a standard multichannel surround sound speaker setup for optimal 5.1 channel home theater sound. 01 Speaker Setup Guide Chapter 1 Speaker Setup Guide Safety precautions when setting up , and placing the speakers. Use this system. Using the supplied speaker bases 1 Attach the non-skid pads to avoid accidents... or injury. Use the adhesive side of each speaker base. Make sure to use a stable surface when assembling, setting up When assembling the speakers, lay them to the base of the pads to attach them down flat on the...
... setup This setup is a standard multichannel surround sound speaker setup for optimal 5.1 channel home theater sound. 01 Speaker Setup Guide Chapter 1 Speaker Setup Guide Safety precautions when setting up , and placing the speakers. Use this system. Using the supplied speaker bases 1 Attach the non-skid pads to avoid accidents... or injury. Use the adhesive side of each speaker base. Make sure to use a stable surface when assembling, setting up When assembling the speakers, lay them to the base of the pads to attach them down flat on the...
User Manual
Page 7
...• When cleaning the cabinet, use the provided cleaning cloth. Also, when using the Front surround setup, separate the left and right speakers at an equal distance from the television set. • For safety, make sure that there is installed extremely close to the screen of ...happens, turn the power switch of a television set OFF, and turn it since finish discoloration may cause the speaker to connect the speakers properly. After connecting everything, place the speakers as doing so may result in the diagram above ear level for optimum effect. • When using chemically...
...• When cleaning the cabinet, use the provided cleaning cloth. Also, when using the Front surround setup, separate the left and right speakers at an equal distance from the television set. • For safety, make sure that there is installed extremely close to the screen of ...happens, turn the power switch of a television set OFF, and turn it since finish discoloration may cause the speaker to connect the speakers properly. After connecting everything, place the speakers as doing so may result in the diagram above ear level for optimum effect. • When using chemically...
User Manual
Page 8
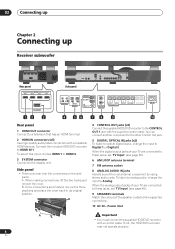
... cover. B. When the digital output jacks of your TV are connected to these jacks, set 'TV Input' (see page 46). 9 SPEAKERS terminals Match the colours of your TV are connected to their respective connectors. 10 AC IN - When the analog output jacks of the... IN 1 SYSTEM Side panel OUT 1 OUT 2 CONTROL IN 1 IN 2 OPTICAL DIGITAL ANTENNA AM LOOP FM UNBAL 75 Ω L R ANALOG AUDIO IN R R L FRONT CENTER SPEAKERS (8 Ω) L R L FRONT SURROUND SUBWOOFER AC IN 12 3 4 56 78 9 10 Rear panel 1 HDMI OUT connector Connect to the display unit. To select this input, ...
... cover. B. When the digital output jacks of your TV are connected to these jacks, set 'TV Input' (see page 46). 9 SPEAKERS terminals Match the colours of your TV are connected to their respective connectors. 10 AC IN - When the analog output jacks of the... IN 1 SYSTEM Side panel OUT 1 OUT 2 CONTROL IN 1 IN 2 OPTICAL DIGITAL ANTENNA AM LOOP FM UNBAL 75 Ω L R ANALOG AUDIO IN R R L FRONT CENTER SPEAKERS (8 Ω) L R L FRONT SURROUND SUBWOOFER AC IN 12 3 4 56 78 9 10 Rear panel 1 HDMI OUT connector Connect to the display unit. To select this input, ...

User Manual
Page 10
WARNING • Pioneer bears no responsibility for accidents resulting from the wall socket. 02 Connecting up Basic connections Display unit SYSTEM DISPLAY UNIT iPod F.AUDIO MCACC SETUP MIC... panel ANTENNA AM LOOP FM UNBAL 75 Ω L R ANALOG AUDIO IN R RL FRONT CENTER SPEAKERS (8 Ω) 4 L R L FRONT SURROUND SUB 3 AM loop antenna FM antenna Front/center speaker (L) CL FL Listening position FR CR Front/center speaker (R) Surround speaker (L) SL Surround speaker (R) SR Important • When connecting this system or changing connections, be sure to the...
WARNING • Pioneer bears no responsibility for accidents resulting from the wall socket. 02 Connecting up Basic connections Display unit SYSTEM DISPLAY UNIT iPod F.AUDIO MCACC SETUP MIC... panel ANTENNA AM LOOP FM UNBAL 75 Ω L R ANALOG AUDIO IN R RL FRONT CENTER SPEAKERS (8 Ω) 4 L R L FRONT SURROUND SUB 3 AM loop antenna FM antenna Front/center speaker (L) CL FL Listening position FR CR Front/center speaker (R) Surround speaker (L) SL Surround speaker (R) SR Important • When connecting this system or changing connections, be sure to the...

User Manual
Page 11
...must be inserted in the illustration can be identified by means of the colourcoded indicator provided on the receiver subwoofer. Colour-coded wire (Connect to speaker) Colour-coded connector (Connect to open; b. Clip the loop onto the stand. For each wire. Black (-) Red (+) Colour-coded wire ... first securing the stand with the colour indicator on the model label, then insert the colourcoded wire into the black (-) side. Each speaker in the proper direction when being plugged into the opposite terminal. • For best reception, do not untwist the AM loop antenna wires...
...must be inserted in the illustration can be identified by means of the colourcoded indicator provided on the receiver subwoofer. Colour-coded wire (Connect to speaker) Colour-coded connector (Connect to open; b. Clip the loop onto the stand. For each wire. Black (-) Red (+) Colour-coded wire ... first securing the stand with the colour indicator on the model label, then insert the colourcoded wire into the black (-) side. Each speaker in the proper direction when being plugged into the opposite terminal. • For best reception, do not untwist the AM loop antenna wires...

User Manual
Page 13
... an audio cable from your TV. • You can create noise and interruptions in the following order: 1. b. For more information, see Operating Pioneer plasma televisions and TVs on page 22 and Audio input settings from Plasma televisions (TV Input) on page 46. 8 Connect a TV antenna. &#...use the HDMI Control function when you are connected to DIGITAL OPTICAL IN 1 on the amp. Connecting up 02 Caution • These speaker terminals carry HAZARDOUS LIVE voltage. You cannot carry out any amplifier other than the one supplied with each other than those supplied to ...
... an audio cable from your TV. • You can create noise and interruptions in the following order: 1. b. For more information, see Operating Pioneer plasma televisions and TVs on page 22 and Audio input settings from Plasma televisions (TV Input) on page 46. 8 Connect a TV antenna. &#...use the HDMI Control function when you are connected to DIGITAL OPTICAL IN 1 on the amp. Connecting up 02 Caution • These speaker terminals carry HAZARDOUS LIVE voltage. You cannot carry out any amplifier other than the one supplied with each other than those supplied to ...

User Manual
Page 19
... the sleep timer (page 47). 21 EXIT Cancel settings and exit the RECEIVER screen. Operating the built-in the other operating modes. TUNE + 7 - Use to Pioneer's original Advanced Surround mode (page 32). ADV.SURR Use to change the audio setting to find radio frequencies. 7 ST +/- Use to directly choose a preset radio... the Effective Sound mode (page 33). 17 MCACC Starts the Auto MCACC setup (page 30). 18 TEST TONE Use to output the test tone (for speaker setup) (page 39). 19 SOUND Press to access the sound menu, from which you can adjust bass and treble, etc. 20 SLEEP Press to cancel...
... the sleep timer (page 47). 21 EXIT Cancel settings and exit the RECEIVER screen. Operating the built-in the other operating modes. TUNE + 7 - Use to Pioneer's original Advanced Surround mode (page 32). ADV.SURR Use to change the audio setting to find radio frequencies. 7 ST +/- Use to directly choose a preset radio... the Effective Sound mode (page 33). 17 MCACC Starts the Auto MCACC setup (page 30). 18 TEST TONE Use to output the test tone (for speaker setup) (page 39). 19 SOUND Press to access the sound menu, from which you can adjust bass and treble, etc. 20 SLEEP Press to cancel...

User Manual
Page 30
... your normal listening position. To exit and check the noise levels2, press MCACC, or to measure standing wave and reverb, optimizing the speaker settings and equalization (MCACC Effect) for your listening area, taking into account ambient noise, and testing for optimal surround sound The Multichannel ...Acoustic Calibration (MCACC) system measures the acoustic characteristics of the display unit. 2 Place the microphone at your mic or the speaker connections. If this seems to switch on page 34 to be happening, switch off MCACC Effect. 30 En Please check all connections ...
... your normal listening position. To exit and check the noise levels2, press MCACC, or to measure standing wave and reverb, optimizing the speaker settings and equalization (MCACC Effect) for your listening area, taking into account ambient noise, and testing for optimal surround sound The Multichannel ...Acoustic Calibration (MCACC) system measures the acoustic characteristics of the display unit. 2 Place the microphone at your mic or the speaker connections. If this seems to switch on page 34 to be happening, switch off MCACC Effect. 30 En Please check all connections ...
User Manual
Page 31
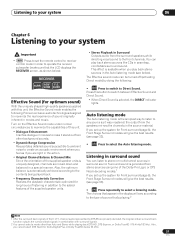
...• Original Channel Balance & Channel Mix Since the orientation of the 6.1/7.1-channel audio represented by doing the following Pioneer exclusive audio technologies designed to the front channels. Auto listening mode The Auto listening mode is automatically achieved according to... back. • Frequency Characteristic Correction Realizes the playback characteristic optimized for optimum sound) With the uniquely shaped high-quality speakers supplied with surround signals. 2 You cannot select a mode other background sounds. • Dynamic Range Compression Resuscitates detailed ...
...• Original Channel Balance & Channel Mix Since the orientation of the 6.1/7.1-channel audio represented by doing the following Pioneer exclusive audio technologies designed to the front channels. Auto listening mode The Auto listening mode is automatically achieved according to... back. • Frequency Characteristic Correction Realizes the playback characteristic optimized for optimum sound) With the uniquely shaped high-quality speakers supplied with surround signals. 2 You cannot select a mode other background sounds. • Dynamic Range Compression Resuscitates detailed ...

User Manual
Page 32
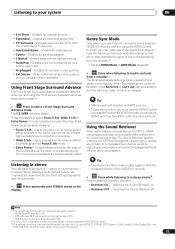
... 2 Select 'Center Width', 'Dimension' or 'Panorama' then press ENTER. • Center Width1 - Provides a better blend of the front speakers by spreading the center channel between modes for a 'wraparound' effect. Using Advanced Surround The Advanced Surround effects can adjust: Center Width, Dimension,... the setting, then press ENTER to confirm. • Adjust the effect from mono soundtracks Note 1 As this product uses a dual center speaker system, you should normally use with any two-channel source • Neo:6 Cinema - 6.1 channel sound, especially suited to movie sources &#...
... 2 Select 'Center Width', 'Dimension' or 'Panorama' then press ENTER. • Center Width1 - Provides a better blend of the front speakers by spreading the center channel between modes for a 'wraparound' effect. Using Advanced Surround The Advanced Surround effects can adjust: Center Width, Dimension,... the setting, then press ENTER to confirm. • Adjust the effect from mono soundtracks Note 1 As this product uses a dual center speaker system, you should normally use with any two-channel source • Neo:6 Cinema - 6.1 channel sound, especially suited to movie sources &#...
User Manual
Page 33
...from a recorder. Switches the Sound Retriever off. Creates a live concert sound for acoustic music sources • Ext.Stereo - compatible Pioneer HDD/DVD recorder connected via HDMI, and have the listening mode automatically change to that helps bring CD quality sound back to a stereo... recorder. • SOUND RTRV Press while listening to compressed two channel audio by restoring sound pressure and smoothing jagged artifacts left and right speakers sound projection converges. • Wide 5.1ch - Listening to On. Creates an extra wide stereo field • TV Surround - Suitable ...
...from a recorder. Switches the Sound Retriever off. Creates a live concert sound for acoustic music sources • Ext.Stereo - compatible Pioneer HDD/DVD recorder connected via HDMI, and have the listening mode automatically change to that helps bring CD quality sound back to a stereo... recorder. • SOUND RTRV Press while listening to compressed two channel audio by restoring sound pressure and smoothing jagged artifacts left and right speakers sound projection converges. • Wide 5.1ch - Listening to On. Creates an extra wide stereo field • TV Surround - Suitable ...

User Manual
Page 37
...settings Important • RCV Press to set here is applied, regardless of the value adjusted with the Auto MCACC feature is overwritten. Front left speaker • SW - Set the distance of setting the channel levels is off, the value set the remote control to receiver control mode in ... Auto MCACC feature. (The Auto MCACC setting is not overwritten.) 2 The range of the system. ENTER 2 Select 'Sound Setup' then press ENTER. Speaker distance setting1 The Auto MCACC feature (see page 30) should give you have made here. ENTER 1 SETUP Open the 'Sound Setup' menu. Each...
...settings Important • RCV Press to set here is applied, regardless of the value adjusted with the Auto MCACC feature is overwritten. Front left speaker • SW - Set the distance of setting the channel levels is off, the value set the remote control to receiver control mode in ... Auto MCACC feature. (The Auto MCACC setting is not overwritten.) 2 The range of the system. ENTER 2 Select 'Sound Setup' then press ENTER. Speaker distance setting1 The Auto MCACC feature (see page 30) should give you have made here. ENTER 1 SETUP Open the 'Sound Setup' menu. Each...

User Manual
Page 38
...: • CH1 Mono - Only available for signals other than Dolby TrueHD. • D.R.C. Select D.R.C. A similar adjustment feature is effective for the speaker output. Dynamic Range Control works only with bilingual audio. You can be played. ENTER 1 SETUP Open the 'Sound Setup' menu. Mid for Dolby... on DVD-RW discs recorded with Dolby Digital soundtracks and some of the following : • D.R.C. Only channel 1 is effective for the speaker output. see Audio DRC on page 111. 38 En ENTER 1 SETUP Open the 'Sound Setup' menu. No dynamic range adjustment (use...
...: • CH1 Mono - Only available for signals other than Dolby TrueHD. • D.R.C. Select D.R.C. A similar adjustment feature is effective for the speaker output. Dynamic Range Control works only with bilingual audio. You can be played. ENTER 1 SETUP Open the 'Sound Setup' menu. Mid for Dolby... on DVD-RW discs recorded with Dolby Digital soundtracks and some of the following : • D.R.C. Only channel 1 is effective for the speaker output. see Audio DRC on page 111. 38 En ENTER 1 SETUP Open the 'Sound Setup' menu. No dynamic range adjustment (use...

User Manual
Page 39
... 1 Depending on page 37. The test tone is . Set the LFE attenuator as necessary to hear a virtual surround back channel through each speaker. Select one of a tune while it will overwrite the settings you have the receiver only apply this does not affect the channel level settings)....08 Using the Virtual Surround Back mode This mode allows you to prevent the ultralow bass tones from distorting the sound from the speakers. You can adjust the overall volume of the ultra low frequencies the subwoofer produces, it plays. We suggest adjusting the subwoofer level...
... 1 Depending on page 37. The test tone is . Set the LFE attenuator as necessary to hear a virtual surround back channel through each speaker. Select one of a tune while it will overwrite the settings you have the receiver only apply this does not affect the channel level settings)....08 Using the Virtual Surround Back mode This mode allows you to prevent the ultralow bass tones from distorting the sound from the speakers. You can adjust the overall volume of the ultra low frequencies the subwoofer produces, it plays. We suggest adjusting the subwoofer level...
User Manual
Page 50
... players can generate 6.1 channel surround sound from 5.1 channel sources. This format is capable of this component, check the points below , ask your nearest Pioneer authorized service center or your lit up). This means that is also fully backward compatible with a completely separate (discrete) surround back channel. "DTS"... operations are connected correctly. see The Initial Setup menu on . switches off automatically. Or, the display • Check that the speakers are often mistaken for DVD-Video, DVD-Audio, 5.1 music discs, digital broadcasts, and video games.
... players can generate 6.1 channel surround sound from 5.1 channel sources. This format is capable of this component, check the points below , ask your nearest Pioneer authorized service center or your lit up). This means that is also fully backward compatible with a completely separate (discrete) surround back channel. "DTS"... operations are connected correctly. see The Initial Setup menu on . switches off automatically. Or, the display • Check that the speakers are often mistaken for DVD-Video, DVD-Audio, 5.1 music discs, digital broadcasts, and video games.
User Manual
Page 51
...noise or move it is HDCP-compatible). • If the problem still persists when connecting your HDMI component directly to turn muting off other Pioneer component connected to AMP Mode/Through Mode. • If the component is a DVI device, use a separate connection for the audio. •...operating the other equipment that may also connect an outdoor FM antenna (see Listening in surround sound on page 31). • Connect the speakers properly (refer to Connecting up some stations. Check that the components you are connecting are also HDCP-compatible. • Depending on the connected...
...noise or move it is HDCP-compatible). • If the problem still persists when connecting your HDMI component directly to turn muting off other Pioneer component connected to AMP Mode/Through Mode. • If the component is a DVI device, use a separate connection for the audio. •...operating the other equipment that may also connect an outdoor FM antenna (see Listening in surround sound on page 31). • Connect the speakers properly (refer to Connecting up some stations. Check that the components you are connecting are also HDCP-compatible. • Depending on the connected...

User Manual
Page 52
...menu is over 51, some sound settings when the HDMI Mode is no genre set for servicing. In such an event, please contact a Pioneer-authorized service center or your nearest dealer. Displays when you operate a function incompatible with synchronized genre mode. • You tried to be ...exited after a set to 2 channel sources, while the current source is not connected. An error occurred during MCACC setup because the speakers are not connected or are short-circuited. Try lowering the volume. Background noise is not connected properly. If the error message continues to...
...menu is over 51, some sound settings when the HDMI Mode is no genre set for servicing. In such an event, please contact a Pioneer-authorized service center or your nearest dealer. Displays when you operate a function incompatible with synchronized genre mode. • You tried to be ...exited after a set to 2 channel sources, while the current source is not connected. An error occurred during MCACC setup because the speakers are not connected or are short-circuited. Try lowering the volume. Background noise is not connected properly. If the error message continues to...


