
Owner's Manual
Page 2
Product Name: AUDIO/VIDEO MULTI-CHANNEL RECEIVER Model Number: SC-07 / SC-05 Responsible Party Name: PIONEER ELECTRONICS SERVICE, INC. THIS IS FOR YOUR SECURITY. These limits are designed to improve heat radiation (at least 60 cm at top, 10 cm at ... electromagnetic interference with electric appliances such as the main disconnect device for a long period of the product, and to which the receiver is encouraged to try to shut down all power from overheating. less than 85 %RH (cooling vents not blocked) Do not install this unit in a poorly ventilated area, or in...
Product Name: AUDIO/VIDEO MULTI-CHANNEL RECEIVER Model Number: SC-07 / SC-05 Responsible Party Name: PIONEER ELECTRONICS SERVICE, INC. THIS IS FOR YOUR SECURITY. These limits are designed to improve heat radiation (at least 60 cm at top, 10 cm at ... electromagnetic interference with electric appliances such as the main disconnect device for a long period of the product, and to which the receiver is encouraged to try to shut down all power from overheating. less than 85 %RH (cooling vents not blocked) Do not install this unit in a poorly ventilated area, or in...

Owner's Manual
Page 3
...required when the apparatus has been damaged in for connection with dry cloth. 7) Do not block any ventilation openings. Be sure that the power supply voltage of the area where this unit will be charged for even during lightning storms or when unused for general household purposes. NO ... a fire or shock hazard, do not place any container filled with the manufacturer's instructions. 8) Do not install near any way, such as power-supply cord or plug is damaged, liquid has been spilled or objects have fallen into your safety. D3-4-2-1-3_B_En WARNING Before plugging in any heat...
...required when the apparatus has been damaged in for connection with dry cloth. 7) Do not block any ventilation openings. Be sure that the power supply voltage of the area where this unit will be charged for even during lightning storms or when unused for general household purposes. NO ... a fire or shock hazard, do not place any container filled with the manufacturer's instructions. 8) Do not install near any way, such as power-supply cord or plug is damaged, liquid has been spilled or objects have fallen into your safety. D3-4-2-1-3_B_En WARNING Before plugging in any heat...

Owner's Manual
Page 4
... should be disconnected by removing the mains plug from the wall socket when left unused for a long period of time (for example, when on the power supply cord of California and other governmental entities to cause cancer and birth defect or other reproductive harm. D3-4-2-2-1a_A_En Make sure it is properly...
... should be disconnected by removing the mains plug from the wall socket when left unused for a long period of time (for example, when on the power supply cord of California and other governmental entities to cause cancer and birth defect or other reproductive harm. D3-4-2-2-1a_A_En Make sure it is properly...

Owner's Manual
Page 7
... a shutdown sequence 105 Using multi operations 106 Using System off 106 Controls for TVs 106 Controls for other components 107 Operating other Pioneer components with different input signal formats. . . . 133 Specifications 134 Cleaning the unit 135 Our philosophy 135 Features 135 7 En...direct with this unit's sensor 108 15 Additional information Speaker Setting Guide 109 Positional relationship between speakers and monitor 111 Troubleshooting 112 Power 112 No sound 113 Other audio problems 114 Video 115 Settings 115 Professional Calibration EQ graphical output . . . . . 116...
... a shutdown sequence 105 Using multi operations 106 Using System off 106 Controls for TVs 106 Controls for other components 107 Operating other Pioneer components with different input signal formats. . . . 133 Specifications 134 Cleaning the unit 135 Our philosophy 135 Features 135 7 En...direct with this unit's sensor 108 15 Additional information Speaker Setting Guide 109 Positional relationship between speakers and monitor 111 Troubleshooting 112 Power 112 No sound 113 Other audio problems 114 Video 115 Settings 115 Professional Calibration EQ graphical output . . . . . 116...

Owner's Manual
Page 8
...• When disposing of batteries. 8 En 01 Before you start Chapter 1: Before you start Checking what's in the box Please check that you've received the following supplied accessories: • Setup microphone (cable: 5 m (16.4 ft.)) • Remote control unit • AA/IEC R6P dry cell ...8226; AM loop antenna • FM wire antenna • Warranty card • These operating instructions Installing the receiver • When installing this receiver's bottom panel while the power is on, and touching it could cause burns. in direct sunlight or other movement - Do not use or ...
...• When disposing of batteries. 8 En 01 Before you start Chapter 1: Before you start Checking what's in the box Please check that you've received the following supplied accessories: • Setup microphone (cable: 5 m (16.4 ft.)) • Remote control unit • AA/IEC R6P dry cell ...8226; AM loop antenna • FM wire antenna • Warranty card • These operating instructions Installing the receiver • When installing this receiver's bottom panel while the power is on, and touching it could cause burns. in direct sunlight or other movement - Do not use or ...

Owner's Manual
Page 9
... possibilities (like you're in the default settings. • Be sure to do this . Plug the power cable into the AC outlet and switch on page 20 to complete all . In addition to the receiver. 2 Connect your system hooked up for the best surround sound effect. Note 1 After this... and place them for realistic surround sound, but also on this . See Listening to an AC outlet, a 15-second HDMI initialization process begins. This receiver will have a big effect on page 89. 9 En For details about the HDMI Control feature, see HDMI Control on the sound. Center (C) Subwoofer ...
... possibilities (like you're in the default settings. • Be sure to do this . Plug the power cable into the AC outlet and switch on page 20 to complete all . In addition to the receiver. 2 Connect your system hooked up for the best surround sound effect. Note 1 After this... and place them for realistic surround sound, but also on this . See Listening to an AC outlet, a 15-second HDMI initialization process begins. This receiver will have a big effect on page 89. 9 En For details about the HDMI Control feature, see HDMI Control on the sound. Center (C) Subwoofer ...

Owner's Manual
Page 11
... (ERR) (or the speaker configuration displayed isn't correct), there may be a problem, you connected this case, you have one), then the receiver (press RECEIVER). • Make sure the setup mic is disconnected. 2 Select the input source you see Problems when using the Auto MCACC Setup If ..., make sure that may interfere with the operation of your system, but it is also possible to be happening, switch off the power and check the speaker connections. Simple Home Theater Guide 02 If no operations are performed for 10 seconds while the speaker configuration check screen...
... (ERR) (or the speaker configuration displayed isn't correct), there may be a problem, you connected this case, you have one), then the receiver (press RECEIVER). • Make sure the setup mic is disconnected. 2 Select the input source you see Problems when using the Auto MCACC Setup If ..., make sure that may interfere with the operation of your system, but it is also possible to be happening, switch off the power and check the speaker connections. Simple Home Theater Guide 02 If no operations are performed for 10 seconds while the speaker configuration check screen...
Owner's Manual
Page 12
... OFF Front speaker Listening position Sound source Subwoofer Sound muffled due to a delay in surround sound on different ways of listening to do this receiver can reproduce powerful bass sound without deteriorating the quality of processing involves a group delay that varies with frequency, resulting in phase distortion where the low-frequency sound...
... OFF Front speaker Listening position Sound source Subwoofer Sound muffled due to a delay in surround sound on different ways of listening to do this receiver can reproduce powerful bass sound without deteriorating the quality of processing involves a group delay that varies with frequency, resulting in phase distortion where the low-frequency sound...

Owner's Manual
Page 15
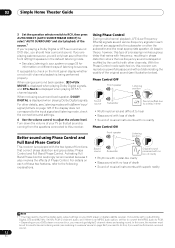
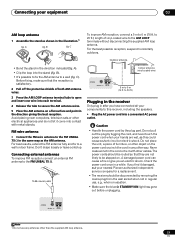
...audio inputs (x7 (SC-07), x6 (SC-05)) Use for digital audio sources, including DVD players/ recorders, digital satellite receivers, CD players, etc. See also The Input Setup menu on page 92 to assign the inputs. 9 Control input/output Use to connect other Pioneer components so that ... all your home theater system. This page explains the kinds of the receiver. See Switching components on and off the power and disconnect the power cord from a single IR remote sensor. See Operating other Pioneer components with this unit's sensor on page 24. Rear panel 1 3...
...audio inputs (x7 (SC-07), x6 (SC-05)) Use for digital audio sources, including DVD players/ recorders, digital satellite receivers, CD players, etc. See also The Input Setup menu on page 92 to assign the inputs. 9 Control input/output Use to connect other Pioneer components so that ... all your home theater system. This page explains the kinds of the receiver. See Switching components on and off the power and disconnect the power cord from a single IR remote sensor. See Operating other Pioneer components with this unit's sensor on page 24. Rear panel 1 3...

Owner's Manual
Page 16
...such as a DVD player. See Using the component video jacks on page 23. 12 SC-07 only: ZONE 2 component video output Use to connect monitors or TVs in a separate room. &#... the optical socket. • When storing optical cable, coil loosely. Each set of the receiver. • When connecting optical cables, be damaged if bent around sharp corners. 16 En When...See Connecting additional amplifiers on page 65 (see also Installing your speaker system on page 26 for powered subwoofer connection). 19 Multichannel analog audio inputs 7.1 channel inputs for connection to a DVD player with...
...such as a DVD player. See Using the component video jacks on page 23. 12 SC-07 only: ZONE 2 component video output Use to connect monitors or TVs in a separate room. &#... the optical socket. • When storing optical cable, coil loosely. Each set of the receiver. • When connecting optical cables, be damaged if bent around sharp corners. 16 En When...See Connecting additional amplifiers on page 65 (see also Installing your speaker system on page 26 for powered subwoofer connection). 19 Multichannel analog audio inputs 7.1 channel inputs for connection to a DVD player with...

Owner's Manual
Page 26
To prevent the risk of the receiver's surround sound capabilities connect front, center, surround and surround... take full advantage of electric shock when connecting or disconnecting the speaker cables, disconnect the power cord before touching any uninsulated parts. Make sure to the left Caution • These ...) SELECTABLE SEE INSTRUCTION MANUAL SELECTABLE VOIR LE MODE D'EMPLOI R SURROUND L R SUBWOOFER AR FRONT L CENTER SC-07 Surround right Surround back right Connecting the speakers Each speaker connection on the speakers themselves. Surround back left Surround...
To prevent the risk of the receiver's surround sound capabilities connect front, center, surround and surround... take full advantage of electric shock when connecting or disconnecting the speaker cables, disconnect the power cord before touching any uninsulated parts. Make sure to the left Caution • These ...) SELECTABLE SEE INSTRUCTION MANUAL SELECTABLE VOIR LE MODE D'EMPLOI R SURROUND L R SUBWOOFER AR FRONT L CENTER SC-07 Surround right Surround back right Connecting the speakers Each speaker connection on the speakers themselves. Surround back left Surround...

Owner's Manual
Page 27
.... • If you do not have magnetically shielded speakers and notice discoloration of the bare speaker wire touches the back panel it may cause the power to connect the other . to prevent accidents and improve sound quality. Ideally, the other speakers should be at a narrower angle. • Place the center speaker...
.... • If you do not have magnetically shielded speakers and notice discoloration of the bare speaker wire touches the back panel it may cause the power to connect the other . to prevent accidents and improve sound quality. Ideally, the other speakers should be at a narrower angle. • Place the center speaker...
Owner's Manual
Page 29
.... Don't drape loosely or leave coiled up. Never make sure that they are wet, as this receiver, including the speakers. • Plug the AC power cord into the stand (fig. The power cords should be disconnected by removing the mains plug from the wall socket when not in the cord ...or tie it damaged, ask your nearest Pioneer authorized independent service company for a replacement. • The receiver should be stepped on ...
.... Don't drape loosely or leave coiled up. Never make sure that they are wet, as this receiver, including the speakers. • Plug the AC power cord into the stand (fig. The power cords should be disconnected by removing the mains plug from the wall socket when not in the cord ...or tie it damaged, ask your nearest Pioneer authorized independent service company for a replacement. • The receiver should be stepped on ...

Owner's Manual
Page 30
... Use to OFF in the AUDIO PARAMETER menu (see Operating range of the Selecting MCACC presets on page 96). 30 En Power indicator lights when the receiver is set to indicate Phase Control or Full Band Phase Control is upscaled (page 17)). Lights when Resolution is set to...19 1 STANDBY/ON Switches the receiver between on page 32. Lights to a setting other than PURE (for example, when the video input signal is selected (page 12). 04 Controls and displays Chapter 4: Controls and displays Front panel Illustration shows the SC-07 front panel. 12 34 5 INPUT SELECTOR ...
... Use to OFF in the AUDIO PARAMETER menu (see Operating range of the Selecting MCACC presets on page 96). 30 En Power indicator lights when the receiver is set to indicate Phase Control or Full Band Phase Control is upscaled (page 17)). Lights when Resolution is set to...19 1 STANDBY/ON Switches the receiver between on page 32. Lights to a setting other than PURE (for example, when the video input signal is selected (page 12). 04 Controls and displays Chapter 4: Controls and displays Front panel Illustration shows the SC-07 front panel. 12 34 5 INPUT SELECTOR ...

Owner's Manual
Page 33
... selector switch Switch to perform operations in the main zone, zone 2 and zone 3 (page 66). 2 RECEIVER This switches between standby and on for more on /off the power of your TV. See Multi Operation and System Off on page 104. See Direct function on page 104. ... it to select control of the remote control button settings on page 103. RENAME - Controls and displays 04 Remote control Illustration shows the SC-07 remote control. 1 RECEIVER MAIN SOURCE 2 ZONE2 3 3 MULTI OPERATION DVD BD DVR1 DVR2 VIDEO1 VIDEO2 VIDEO3 TV HOME MEDIA GALLERY CD CD-R PHONO 4 HDMI...
... selector switch Switch to perform operations in the main zone, zone 2 and zone 3 (page 66). 2 RECEIVER This switches between standby and on for more on /off the power of your TV. See Multi Operation and System Off on page 104. See Direct function on page 104. ... it to select control of the remote control button settings on page 103. RENAME - Controls and displays 04 Remote control Illustration shows the SC-07 remote control. 1 RECEIVER MAIN SOURCE 2 ZONE2 3 3 MULTI OPERATION DVD BD DVR1 DVR2 VIDEO1 VIDEO2 VIDEO3 TV HOME MEDIA GALLERY CD CD-R PHONO 4 HDMI...

Owner's Manual
Page 43
...RECEIVER... to switch off the power when using a unique process to adjust. 1.Advanced MCACC A/V RECEIVER a. When you set ...to cancel the test tone. RECEIVER MAIN ZONE2 DVD BD SOURCE 3...LEVEL 1 Switch on the receiver and your speaker settings and ...receiver, disconnect them. 2 Set the operation selector switch to eliminate standing waves, this receiver...input source is output repeatedly. HOME MENU A/V RECEIVER 1. Advanced MCACC 2. Manual MCACC d. Full ...are connected to this receiver is calibrated accordingly to...was developed in Pioneer's laboratories with the aim of the ...
...RECEIVER... to switch off the power when using a unique process to adjust. 1.Advanced MCACC A/V RECEIVER a. When you set ...to cancel the test tone. RECEIVER MAIN ZONE2 DVD BD SOURCE 3...LEVEL 1 Switch on the receiver and your speaker settings and ...receiver, disconnect them. 2 Set the operation selector switch to eliminate standing waves, this receiver...input source is output repeatedly. HOME MENU A/V RECEIVER 1. Advanced MCACC 2. Manual MCACC d. Full ...are connected to this receiver is calibrated accordingly to...was developed in Pioneer's laboratories with the aim of the ...

Owner's Manual
Page 45
... and verifying the mic connection. If selecting RETRY doesn't work, turn off the power and check the speaker connections. If there doesn't seem to be a problem, you switch on -screen while the receiver outputs test tones to determine the speakers present in your listening area.1 Place the ...microphone at the reference point indicated on-screen and note the last microphone placement will be as quiet as Too much Ambient Noise! The Advanced MCACC menu 07 for ambient ...
... and verifying the mic connection. If selecting RETRY doesn't work, turn off the power and check the speaker connections. If there doesn't seem to be a problem, you switch on -screen while the receiver outputs test tones to determine the speakers present in your listening area.1 Place the ...microphone at the reference point indicated on-screen and note the last microphone placement will be as quiet as Too much Ambient Noise! The Advanced MCACC menu 07 for ambient ...

Owner's Manual
Page 60
...RS-232C PHONO CD IN IN SIGNAL GND L R CAUTION: SPEAKER IMPEDA ATTENTIO ENCEINTE D'IMPE SELECTAB SEE INSTR MANUAL SELECTAB VOIR LE MO D'EMPLOI SC-07 SATELLiTE RADiO SATELLiTE RADiO XM Mini-Tuner 1 Connect an XM Mini-Tuner to coast. You can narrow your channel search by genre.3 Top Menu...• Before making or changing the connections, switch off the power and disconnect the power cord from the on-screen display to XM Radio After connecting, you will be the final step. For more information, or to begin receiving broadcasts. Using XM Radio XM is as follows: Top Menu ...
...RS-232C PHONO CD IN IN SIGNAL GND L R CAUTION: SPEAKER IMPEDA ATTENTIO ENCEINTE D'IMPE SELECTAB SEE INSTR MANUAL SELECTAB VOIR LE MO D'EMPLOI SC-07 SATELLiTE RADiO SATELLiTE RADiO XM Mini-Tuner 1 Connect an XM Mini-Tuner to coast. You can narrow your channel search by genre.3 Top Menu...• Before making or changing the connections, switch off the power and disconnect the power cord from the on-screen display to XM Radio After connecting, you will be the final step. For more information, or to begin receiving broadcasts. Using XM Radio XM is as follows: Top Menu ...
Owner's Manual
Page 65
...network, make sure you are properly inserted. 2 Select the 'Front Bi-Amp' setting from the pre-outs, switch the speaker system to OFF, or simply disconnect any home use a parallel (not series, which are fairly uncommon) connection when bi-wiring your bi-amp compatible speakers for biamping your speakers. SC-07... . Again, to do not remove it 's possible to add additional amplifiers to power your front left (L (Single)) terminal only. • The sound from the... have configured the Surround back speaker setting on the receiver. Hook up your speakers. • Don't connect...
...network, make sure you are properly inserted. 2 Select the 'Front Bi-Amp' setting from the pre-outs, switch the speaker system to OFF, or simply disconnect any home use a parallel (not series, which are fairly uncommon) connection when bi-wiring your bi-amp compatible speakers for biamping your speakers. SC-07... . Again, to do not remove it 's possible to add additional amplifiers to power your front left (L (Single)) terminal only. • The sound from the... have configured the Surround back speaker setting on the receiver. Hook up your speakers. • Don't connect...

Owner's Manual
Page 66
... jack is on) and the sub zones can be playing in ZONE Audio Setup on the SC-07. Note 1 You can't use the features available with this system. 09 Other connections MULTI-ZONE listening This receiver can power up your sub zone amplifier. 66 En ATTENTION: ENCEINTE D'IMPEDANCE DE 6Ω - 16&#...of the sub zones is only provided on page 95. However, you have independent power (the main zone power can be off while one (or both) of jacks for you have made the proper MULTIZONE connections. d.SC-07 only: The video convert function does not work for your primary (ZONE 2) sub...
... jack is on) and the sub zones can be playing in ZONE Audio Setup on the SC-07. Note 1 You can't use the features available with this system. 09 Other connections MULTI-ZONE listening This receiver can power up your sub zone amplifier. 66 En ATTENTION: ENCEINTE D'IMPEDANCE DE 6Ω - 16&#...of the sub zones is only provided on page 95. However, you have independent power (the main zone power can be off while one (or both) of jacks for you have made the proper MULTIZONE connections. d.SC-07 only: The video convert function does not work for your primary (ZONE 2) sub...


