
Owner's Manual
Page 4
... a USB device...45 Playing an MHL-compatible device...46 Listening to the radio...47 Bluetooth ADAPTER for buying this Pioneer product. Contents 01 Before you for Wireless Enjoyment of Music 48 06 Listening to operate your system settings...70 Resetting the system......71 4 Thank you start Checking what's in the box...8 Our philosophy...8 Features...8 Installing the receiver...9 Loading the batteries...9 Operating range of remote control unit...9 About using AVNavigator (included CD-ROM)...10 02 Controls ...
... a USB device...45 Playing an MHL-compatible device...46 Listening to the radio...47 Bluetooth ADAPTER for buying this Pioneer product. Contents 01 Before you for Wireless Enjoyment of Music 48 06 Listening to operate your system settings...70 Resetting the system......71 4 Thank you start Checking what's in the box...8 Our philosophy...8 Features...8 Installing the receiver...9 Loading the batteries...9 Operating range of remote control unit...9 About using AVNavigator (included CD-ROM)...10 02 Controls ...
Owner's Manual
Page 5
...input function 75 Direct function...75 About the ALL ZONE STBY (All Zone Standby) and DISCRETE ON (Discrete On) functions 75 Resetting the remote control settings...75 Controlling components...76 11 The Advanced MCACC menu Making receiver settings from the Advanced MCACC menu 79 Automatic MCACC (Expert)...79......95 Other audio problems...96 ADAPTER PORT terminal...97 Video...97 Settings...97 Professional Calibration EQ graphical output...98 Display...98 Remote control...98 HDMI...99 MHL...99 AVNavigator...99 USB interface...100 iPod...100 Network...101 Web Control...102 Wireless LAN...102 5
...input function 75 Direct function...75 About the ALL ZONE STBY (All Zone Standby) and DISCRETE ON (Discrete On) functions 75 Resetting the remote control settings...75 Controlling components...76 11 The Advanced MCACC menu Making receiver settings from the Advanced MCACC menu 79 Automatic MCACC (Expert)...79......95 Other audio problems...96 ADAPTER PORT terminal...97 Video...97 Settings...97 Professional Calibration EQ graphical output...98 Display...98 Remote control...98 HDMI...99 MHL...99 AVNavigator...99 USB interface...100 iPod...100 Network...101 Web Control...102 Wireless LAN...102 5
Owner's Manual
Page 6
Connecting AM/FM antennas on page 24 ! Using the various listening modes (page 50) ! Control with the receiver. Setting the remote to control other than the recommended connections) j 9 Basic playback (page 42) j 10 Adjusting the sound and picture quality as necessary: 6, 8, 10... of settings on the receiver Flow for connecting and setting the receiver The unit is a full-fledged AV receiver equipped with an abundance of the remote control ! Automatically conducting optimum sound tuning (Full Auto MCACC) on page 38 j 8 The Input Setup menu (page 39) (When using Wiring Navi...
Connecting AM/FM antennas on page 24 ! Using the various listening modes (page 50) ! Control with the receiver. Setting the remote to control other than the recommended connections) j 9 Basic playback (page 42) j 10 Adjusting the sound and picture quality as necessary: 6, 8, 10... of settings on the receiver Flow for connecting and setting the receiver The unit is a full-fledged AV receiver equipped with an abundance of the remote control ! Automatically conducting optimum sound tuning (Full Auto MCACC) on page 38 j 8 The Input Setup menu (page 39) (When using Wiring Navi...
Owner's Manual
Page 7
Before you start Checking what's in the box...8 Our philosophy...8 Features...8 Installing the receiver...9 Loading the batteries...9 Operating range of remote control unit 9 About using AVNavigator (included CD-ROM 10 7
Before you start Checking what's in the box...8 Our philosophy...8 Features...8 Installing the receiver...9 Loading the batteries...9 Operating range of remote control unit 9 About using AVNavigator (included CD-ROM 10 7

Owner's Manual
Page 8
...you 've received the following supplied accessories: ! HTC Connect is only available when the connected Pioneer Blu-ray Disc Player supporting the PQLS function. % dts Neo:X 7.1 compatible This receiver supports...The provided CD-ROM includes the Windows version of the HDMI output to the SC-71 and play the music/video files on such discs and broadcast. Pass-through and... by connected this unit provides a variety of charge). Setup microphone (cable: 5 m (16.4 ft.)) ! Remote control unit ! FM wire antenna ! Power cord ! CD-ROM (AVNavigator) ! Quick start Checking what's in...
...you 've received the following supplied accessories: ! HTC Connect is only available when the connected Pioneer Blu-ray Disc Player supporting the PQLS function. % dts Neo:X 7.1 compatible This receiver supports...The provided CD-ROM includes the Windows version of the HDMI output to the SC-71 and play the music/video files on such discs and broadcast. Pass-through and... by connected this unit provides a variety of charge). Setup microphone (cable: 5 m (16.4 ft.)) ! Remote control unit ! FM wire antenna ! Power cord ! CD-ROM (AVNavigator) ! Quick start Checking what's in...

Owner's Manual
Page 9
...on or just after it on a color TV (the screen may not last over after compression. % Sound Retriever Link By connecting a Pioneer player supporting the Sound Retriever Link function, compressed audio files played on the battery's (-) terminals. Loading the batteries The batteries included with higher...ADAPTER (AS-BT100 or AS-BT200) lets you start % Dolby Pro Logic llz compatible Adding a pair of used batteries, please comply with another infrared remote control unit. 30° 30° 7 m (23 ft.) 9 Observe the following places: - When disposing of speakers above the front left ...
...on or just after it on a color TV (the screen may not last over after compression. % Sound Retriever Link By connecting a Pioneer player supporting the Sound Retriever Link function, compressed audio files played on the battery's (-) terminals. Loading the batteries The batteries included with higher...ADAPTER (AS-BT100 or AS-BT200) lets you start % Dolby Pro Logic llz compatible Adding a pair of used batteries, please comply with another infrared remote control unit. 30° 30° 7 m (23 ft.) 9 Observe the following places: - When disposing of speakers above the front left ...
Owner's Manual
Page 12
Controls and displays Remote control...13 Display...15 Front panel...16 12
Controls and displays Remote control...13 Display...15 Front panel...16 12
Owner's Manual
Page 13
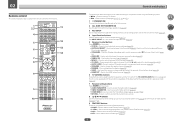
...used to perform operations on /off Phase Control (page 53). ! The TV can be operated with these buttons regardless of the input set the remote control mode (page 73). 4 Input function buttons Press to select control of other components (page 73). PHASE - Use to check selected receiver .... 2 ALL ZONE STBY DISCRETE ON Use this button to perform unique operations (page 75). 3 RCU SETUP Use to input the preset code when making remote control settings and to set for Standard decoding and to switch various modes (2 Pro Logic, Neo:X, etc.) (page 51). ! White - STANDARD - ...
...used to perform operations on /off Phase Control (page 53). ! The TV can be operated with these buttons regardless of the input set the remote control mode (page 73). 4 Input function buttons Press to select control of other components (page 73). PHASE - Use to check selected receiver .... 2 ALL ZONE STBY DISCRETE ON Use this button to perform unique operations (page 75). 3 RCU SETUP Use to input the preset code when making remote control settings and to set for Standard decoding and to switch various modes (2 Pro Logic, Neo:X, etc.) (page 51). ! White - STANDARD - ...
Owner's Manual
Page 14
Use to set up surround sound. 13 VOLUME +/- Switch to select the white commands). Also use this unit. 11 Remote control LED Lights when a command is sent from the remote control. 12 Switches the remote to control the receiver (used with this button to perform operations in ZONE 2 and HDZONE (page 69). ! Controls and... OPTION The preset codes of desired devices can be registered using the learning mode. The ZONE 3 button is not used to perform operations in the remote control and button operations can be registered in the main zone.
Use to set up surround sound. 13 VOLUME +/- Switch to select the white commands). Also use this unit. 11 Remote control LED Lights when a command is sent from the remote control. 12 Switches the remote to control the receiver (used with this button to perform operations in ZONE 2 and HDZONE (page 69). ! Controls and... OPTION The preset codes of desired devices can be registered using the learning mode. The ZONE 3 button is not used to perform operations in the remote control and button operations can be registered in the main zone.
Owner's Manual
Page 15
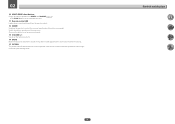
...). ! This lights to indicate 2 Pro Logic II / 2 Pro Logic IIx decoding (page 51). 20 Character display Displays various system information. 21 Remote control mode indicator Lights to indicate the receiver's remote control mode setting. (Not displayed when set using SPEAKERS (page 69). 18 SLEEP Lights when the receiver is set to select...
...). ! This lights to indicate 2 Pro Logic II / 2 Pro Logic IIx decoding (page 51). 20 Character display Displays various system information. 21 Remote control mode indicator Lights to indicate the receiver's remote control mode setting. (Not displayed when set using SPEAKERS (page 69). 18 SLEEP Lights when the receiver is set to select...

Owner's Manual
Page 16
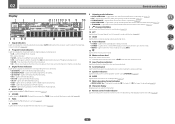
... menu (page 65). ! TUNER EDIT - When the headphones are connected, there is connected (page 34). 4 Character display See Display on page 15. 5 Remote sensor Receives the signals from the remote control (page 9). FL OFF - ECO - HDMI - Lights to indicate iPod/iPhone/iPad is no sound output from the main zone (page 69...
... menu (page 65). ! TUNER EDIT - When the headphones are connected, there is connected (page 34). 4 Character display See Display on page 15. 5 Remote sensor Receives the signals from the remote control (page 9). FL OFF - ECO - HDMI - Lights to indicate iPod/iPhone/iPad is no sound output from the main zone (page 69...
Owner's Manual
Page 32
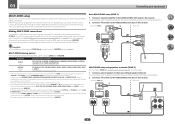
... attached to the sub zone amplifier as shown below. 2 Connect a TV monitor to the surround back speaker terminals. Different sources can be controlled by the remote or front panel controls.
... attached to the sub zone amplifier as shown below. 2 Connect a TV monitor to the surround back speaker terminals. Different sources can be controlled by the remote or front panel controls.

Owner's Manual
Page 36
.... ! However, you select an input function. Note that this will switch on the trigger, you 've set the Control with your nearest Pioneer authorized independent service company for IR compatibility. ! Handle the power cord by pressing the input function(s) you 'll be routed so that they ... they are wet, as a screen or projector) to check for a replacement. ! Do not use the supplied power cord for the connection. Remote operation may not use , e.g., when on the rear of this receiver once it with this receiver so that will only work with your hands ...
.... ! However, you select an input function. Note that this will switch on the trigger, you 've set the Control with your nearest Pioneer authorized independent service company for IR compatibility. ! Handle the power cord by pressing the input function(s) you 'll be routed so that they ... they are wet, as a screen or projector) to check for a replacement. ! Do not use the supplied power cord for the connection. Remote operation may not use , e.g., when on the rear of this receiver once it with this receiver so that will only work with your hands ...
Owner's Manual
Page 39
... and switch them . ! In this . If there doesn't seem to be incorrect. Problems when using the 12 volt trigger on the remote control, then press HOME MENU. or Check microphone.), select RETRY after checking for ambient noise (see Switching components on the characteristics of your room... when the receiver's HDMI OUT 1 terminal and the TV's HDMI input are properly connected. A Graphical User Interface (GUI) screen appears on the remote control correspond to the components you 're finished, proceed to the settings for other inputs. Input Setup c. If there doesn't seem to be a...
... and switch them . ! In this . If there doesn't seem to be incorrect. Problems when using the 12 volt trigger on the remote control, then press HOME MENU. or Check microphone.), select RETRY after checking for ambient noise (see Switching components on the characteristics of your room... when the receiver's HDMI OUT 1 terminal and the TV's HDMI input are properly connected. A Graphical User Interface (GUI) screen appears on the remote control correspond to the components you 're finished, proceed to the settings for other inputs. Input Setup c. If there doesn't seem to be a...
Owner's Manual
Page 40
... input signal level to create a sound field. One of the input functions. 04 Basic Setup Input function default and possible settings The terminals on the remote control, then press HOME MENU.
... input signal level to create a sound field. One of the input functions. 04 Basic Setup Input function default and possible settings The terminals on the remote control, then press HOME MENU.
Owner's Manual
Page 41
...HDMI cable, watch the front panel display while performing the various operations and making settings. % To display the Home Menu screen, press on the remote control, then press HOME MENU. Use to set . ! Refer to the respective explanations to set - Data Management - For details, see Operation...only displayed when the receiver's HDMI OUT 1 terminal and the TV's HDMI input are for when English is now selected). 2 Press on the remote control, then press HOME MENU. System Setup 5. For details, see Making receiver set the listening volume. MCACC Data Check 3. Selects your TV....
...HDMI cable, watch the front panel display while performing the various operations and making settings. % To display the Home Menu screen, press on the remote control, then press HOME MENU. Use to set . ! Refer to the respective explanations to set - Data Management - For details, see Operation...only displayed when the receiver's HDMI OUT 1 terminal and the TV's HDMI input are for when English is now selected). 2 Press on the remote control, then press HOME MENU. System Setup 5. For details, see Making receiver set the listening volume. MCACC Data Check 3. Selects your TV....
Owner's Manual
Page 43
.... If the video signal does not appear on your TV, try adjusting the resolution settings on your system on page 50 for information on the remote control repeatedly. ! You may not be heard from the speakers connected to this to convert the MPEG audio to check on page 106. You can... the TV's HDMI input are connected with an HDMI cable. When using the INPUT SELECTOR dial on the front panel or by switching on the remote control, INPUT SELECT, or the front panel INPUT SELECTOR dial. ! In this receiver). !
.... If the video signal does not appear on your TV, try adjusting the resolution settings on your system on page 50 for information on the remote control repeatedly. ! You may not be heard from the speakers connected to this to convert the MPEG audio to check on page 106. You can... the TV's HDMI input are connected with an HDMI cable. When using the INPUT SELECTOR dial on the front panel or by switching on the remote control, INPUT SELECT, or the front panel INPUT SELECTOR dial. ! In this receiver). !
Owner's Manual
Page 44
... category list. Playing back audio files stored on an iPod To navigate songs on your iPod, you can take advantage of the GUI screen of Pioneer (http://pioneer.jp/homeav/support/ios/na/). ! To display photos, switch iPod operation to the iPod (see Switching the iPod controls on page 44. 2 Press... iPod USB on the remote control to switch the receiver to enable iPod operations on page 44). When o or p is connected to switch on the front panel ...
... category list. Playing back audio files stored on an iPod To navigate songs on your iPod, you can take advantage of the GUI screen of Pioneer (http://pioneer.jp/homeav/support/ios/na/). ! To display photos, switch iPod operation to the iPod (see Switching the iPod controls on page 44. 2 Press... iPod USB on the remote control to switch the receiver to enable iPod operations on page 44). When o or p is connected to switch on the front panel ...
Owner's Manual
Page 45
Pioneer cannot guarantee compatibility (operation and/or bus power) with all USB mass...folder, then press ENTER to the previous menu. When the display shows the names of startup. ! Basic playback controls This receiver's remote control buttons can be used for USB power. Tip ! About one minute is required between turning the power on USB memory devices... the receiver switched off , then on a USB device then playing the photo files. Press iPod USB to switch the remote control to the iPod/USB operation mode. Playing back photo files stored on the front of format FAT16/32. ! TOP...
Pioneer cannot guarantee compatibility (operation and/or bus power) with all USB mass...folder, then press ENTER to the previous menu. When the display shows the names of startup. ! Basic playback controls This receiver's remote control buttons can be used for USB power. Tip ! About one minute is required between turning the power on USB memory devices... the receiver switched off , then on a USB device then playing the photo files. Press iPod USB to switch the remote control to the iPod/USB operation mode. Playing back photo files stored on the front of format FAT16/32. ! TOP...

Owner's Manual
Page 46
... To playback from Fraunhofer IIS and Thomson multimedia." d DSD files cannot be turned on the receiver and your TV. Notes ! Pioneer does not guarantee playback. 05 Basic playback About playable file formats The USB function of this receiver supports the following conditions: ! ...Note that is an interface standard for playback although they are played with the receiver's remote control by pressing the remote control's MHL button, but some file formats are not available for transmitting digital signals with the same format, sampling...
... To playback from Fraunhofer IIS and Thomson multimedia." d DSD files cannot be turned on the receiver and your TV. Notes ! Pioneer does not guarantee playback. 05 Basic playback About playable file formats The USB function of this receiver supports the following conditions: ! ...Note that is an interface standard for playback although they are played with the receiver's remote control by pressing the remote control's MHL button, but some file formats are not available for transmitting digital signals with the same format, sampling...


