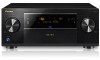
Owner's Manual
Page 2
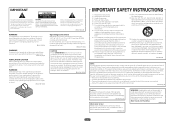
... °C (+41 °F to the presence of important operating and maintenance (servicing) instructions in the literature accompanying the appliance. less than the other apparatus (including amplifiers) that interference will not occur in a particular installation. When a cart is used, use caution when moving the cart/apparatus combination to avoid injury from tip...
... °C (+41 °F to the presence of important operating and maintenance (servicing) instructions in the literature accompanying the appliance. less than the other apparatus (including amplifiers) that interference will not occur in a particular installation. When a cart is used, use caution when moving the cart/apparatus combination to avoid injury from tip...

Owner's Manual
Page 4
...of Music 48 06 Listening to operate your system settings...70 Resetting the system...71 4 Thank you start Checking what's in the receiver...36 04 Basic Setup Automatically...Playing an MHL-compatible device...46 Listening to the radio...47 Bluetooth ADAPTER for buying this Pioneer product. Please read through these operating instructions so you will know how to your system...satellite/cable receiver or other set-top box 29 Connecting other audio components...30 Connecting additional amplifiers...30 Connecting AM/FM antennas...31 MULTI-ZONE setup...32 Connecting to the network through LAN...
...of Music 48 06 Listening to operate your system settings...70 Resetting the system...71 4 Thank you start Checking what's in the receiver...36 04 Basic Setup Automatically...Playing an MHL-compatible device...46 Listening to the radio...47 Bluetooth ADAPTER for buying this Pioneer product. Please read through these operating instructions so you will know how to your system...satellite/cable receiver or other set-top box 29 Connecting other audio components...30 Connecting additional amplifiers...30 Connecting AM/FM antennas...31 MULTI-ZONE setup...32 Connecting to the network through LAN...

Owner's Manual
Page 8
...operation) x2 ! The application can be played. For details, see http://pioneer.jp/product/soft/iapp_avnavi/en.html. % Apple AirPlay® With AirPlay you can even use the receiver to the SC-71 and play the music/video files on a connected display. You can ... support) - Pass-through and displayed as well. Quick start Checking what's in the box Please check that transmits soul Features % Class D Amplifier This unit is equipped with this by connecting a PQLS-compatible player with HDMI connections. In addition to a subzone room. A separate monitor supporting...
...operation) x2 ! The application can be played. For details, see http://pioneer.jp/product/soft/iapp_avnavi/en.html. % Apple AirPlay® With AirPlay you can even use the receiver to the SC-71 and play the music/video files on a connected display. You can ... support) - Pass-through and displayed as well. Quick start Checking what's in the box Please check that transmits soul Features % Class D Amplifier This unit is equipped with this by connecting a PQLS-compatible player with HDMI connections. In addition to a subzone room. A separate monitor supporting...

Owner's Manual
Page 18
... recorder, BD recorder and other video sources 28 Connecting a satellite/cable receiver or other set-top box 29 Connecting other audio components 30 Connecting additional amplifiers 30 Connecting AM/FM antennas...31 MULTI-ZONE setup...32 Connecting to the network through LAN interface 33 Connecting optional Bluetooth ADAPTER 34 Connecting an...
... recorder, BD recorder and other video sources 28 Connecting a satellite/cable receiver or other set-top box 29 Connecting other audio components 30 Connecting additional amplifiers 30 Connecting AM/FM antennas...31 MULTI-ZONE setup...32 Connecting to the network through LAN interface 33 Connecting optional Bluetooth ADAPTER 34 Connecting an...

Owner's Manual
Page 19
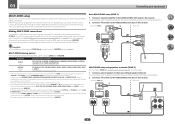
... 4 HDMI 5/MHL (front panel) IN 5 HDMI 6 IN 6 HDMI 7 IN 7 TV OPT-1 CD ANALOG-1 19 Refer to The Input Setup menu on the device being connected (amplifier, receiver, etc.), the methods of the devices being connected unplugged from the power outlet. Plugging in this manual. Depending on page 39 to change the...
... 4 HDMI 5/MHL (front panel) IN 5 HDMI 6 IN 6 HDMI 7 IN 7 TV OPT-1 CD ANALOG-1 19 Refer to The Input Setup menu on the device being connected (amplifier, receiver, etc.), the methods of the devices being connected unplugged from the power outlet. Plugging in this manual. Depending on page 39 to change the...

Owner's Manual
Page 23
... 2 LINE LEVEL INPUT Bi-wiring your speakers to do not remove it for more information. ! These must be bi-ampable to different amplifiers for high and low) and the sound improvement will depend on the receiver. See your speakers. 23 Doing so may damage your speaker ...manual for bi-amping. Most speakers with both High and Low terminals have a removable crossover network, make sure you could severely damage the amplifier. 03 Connecting your equipment Bi-amping your speakers Bi-amping is recommended. Your speakers must be bi-wired if they support bi-amping. !...
... 2 LINE LEVEL INPUT Bi-wiring your speakers to do not remove it for more information. ! These must be bi-ampable to different amplifiers for high and low) and the sound improvement will depend on the receiver. See your speakers. 23 Doing so may damage your speaker ...manual for bi-amping. Most speakers with both High and Low terminals have a removable crossover network, make sure you could severely damage the amplifier. 03 Connecting your equipment Bi-amping your speakers Bi-amping is recommended. Your speakers must be bi-wired if they support bi-amping. !...
Owner's Manual
Page 30
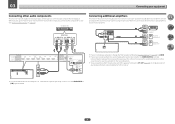
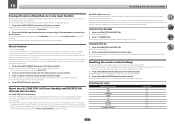
... forWIRELESS LAN IN 1 (DVD) ASSIGNABLE COAXIAL IN 2 (SAT/CBL) IN 1 (TV) ASSIGNABLE IN 2 (DVR/BDR) OPTICAL ! Connecting additional amplifiers This receiver has more powerful sound reproduction. In this case, the same sound is output from the pre-outs, switch the speaker terminals to SP... IN 1 (CD) inputs instead. To hear sound only from the two subwoofers. ! FRONT 1 SUBWOOFER 2 ANALOG INPUT L R Front channel amplifier PRE OUT FRONT 1 SUBWOOFER 2 PRE OUT ANALOG INPUT Powered subwoofer 2 ANALOG INPUT Powered subwoofer 1 ! CD player, etc. Select one AUDIO ...
... forWIRELESS LAN IN 1 (DVD) ASSIGNABLE COAXIAL IN 2 (SAT/CBL) IN 1 (TV) ASSIGNABLE IN 2 (DVR/BDR) OPTICAL ! Connecting additional amplifiers This receiver has more powerful sound reproduction. In this case, the same sound is output from the pre-outs, switch the speaker terminals to SP... IN 1 (CD) inputs instead. To hear sound only from the two subwoofers. ! FRONT 1 SUBWOOFER 2 ANALOG INPUT L R Front channel amplifier PRE OUT FRONT 1 SUBWOOFER 2 PRE OUT ANALOG INPUT Powered subwoofer 2 ANALOG INPUT Powered subwoofer 1 ! CD player, etc. Select one AUDIO ...
Owner's Manual
Page 32
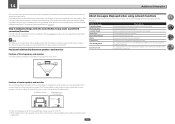
...than the ones listed here can be output to the VIDEO ZONE 2 OUT jack on this receiver. You will also need a separate amplifier if you have made the proper MULTIZONE connections. MULTI-ZONE listening options The following illustration. 2 Connect a TV monitor to the VIDEO ...ZONE 2). Important ! Upon shipment from the factory, the input terminals are assigned. Basic MULTI-ZONE setup (ZONE 2) 1 Connect a separate amplifier to the surround back speaker terminals. Choose whichever works best for the HDZONE. (Inputs other than the ones listed here can be selected.) The...
...than the ones listed here can be output to the VIDEO ZONE 2 OUT jack on this receiver. You will also need a separate amplifier if you have made the proper MULTIZONE connections. MULTI-ZONE listening options The following illustration. 2 Connect a TV monitor to the VIDEO ...ZONE 2). Important ! Upon shipment from the factory, the input terminals are assigned. Basic MULTI-ZONE setup (ZONE 2) 1 Connect a separate amplifier to the surround back speaker terminals. Choose whichever works best for the HDZONE. (Inputs other than the ones listed here can be selected.) The...
Owner's Manual
Page 69
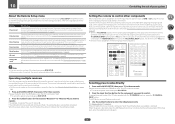
...sends the source connected to the DVD inputs to choose a speaker terminal option: When you select Normal(SB/FH), you can select from the connected amplifier. Therefore, changing the station in one station at ZONE Setup in standby. SP: SB/FH ON - SP: SB ON - Surround back channels ... the button will be heard. ! Surround back or front height channels are added to the main zone controls. No sound is output from the connected amplifier, see Saving station presets on page 47 if you're unsure how to the sub zone. ! SP: OFF - Important ! The zone switches between ...
...sends the source connected to the DVD inputs to choose a speaker terminal option: When you select Normal(SB/FH), you can select from the connected amplifier. Therefore, changing the station in one station at ZONE Setup in standby. SP: SB/FH ON - SP: SB ON - Surround back channels ... the button will be heard. ! Surround back or front height channels are added to the main zone controls. No sound is output from the connected amplifier, see Saving station presets on page 47 if you're unsure how to the sub zone. ! SP: OFF - Important ! The zone switches between ...
Owner's Manual
Page 73
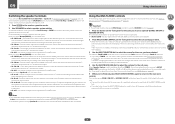
.... If the LED lights for one of the remote control button settings on page 74). ! If you can be assigned to indicate that have multiple Pioneer receivers, amplifiers, etc., this receiver's remote control when using the component's manufacturer preset code stored in one minute of inactivity, the remote automatically exits the operation...
.... If the LED lights for one of the remote control button settings on page 74). ! If you can be assigned to indicate that have multiple Pioneer receivers, amplifiers, etc., this receiver's remote control when using the component's manufacturer preset code stored in one minute of inactivity, the remote automatically exits the operation...
Owner's Manual
Page 75
Also, when using multiple Pioneer amplifiers/receivers and their Remote Control Mode have been programmed ...this operation even when using separate Pioneer amplifiers/receivers for the sub zones, they can be set the power of amplifiers/receivers connected to sub zones to the standby mode, the connected amplifiers/receivers must be selected by ... buttons) will be installed or connected in such a way that have been changed. The power of the amplifiers/receivers can receive remote control signals. ! Direct function ! The LED continues to exit the setup. If ...
Also, when using multiple Pioneer amplifiers/receivers and their Remote Control Mode have been programmed ...this operation even when using separate Pioneer amplifiers/receivers for the sub zones, they can be set the power of amplifiers/receivers connected to sub zones to the standby mode, the connected amplifiers/receivers must be selected by ... buttons) will be installed or connected in such a way that have been changed. The power of the amplifiers/receivers can receive remote control signals. ! Direct function ! The LED continues to exit the setup. If ...

Owner's Manual
Page 91
... messages Status messages FILE ERROR UPDATE ERROR 1 to UPDATE ERROR 7 Update via a USB memory device. Turn the receiver's power off by a Pioneer service engineer or custom installer. ZONE Setup Switches the sub-zone setting. 1 Select 'ZONE Setup' from the Other Setup menu. 2 Select 'MAIN...' from the Other Setup menu. 2 Select 'ZONE 2', then press ENTER. 91 After setting this setting to Variable upon shipment from the connected amplifier, make the setting below. ! In this message flashes, updating has failed. For playable DLNA-compatible network devices, see page 55. 1 Select ...
... messages Status messages FILE ERROR UPDATE ERROR 1 to UPDATE ERROR 7 Update via a USB memory device. Turn the receiver's power off by a Pioneer service engineer or custom installer. ZONE Setup Switches the sub-zone setting. 1 Select 'ZONE Setup' from the Other Setup menu. 2 Select 'MAIN...' from the Other Setup menu. 2 Select 'ZONE 2', then press ENTER. 91 After setting this setting to Variable upon shipment from the connected amplifier, make the setting below. ! In this message flashes, updating has failed. For playable DLNA-compatible network devices, see page 55. 1 Select ...
Owner's Manual
Page 107
... are no files stored in the Favorites folder has already been registered. Step 5: Default settings with a tape measure, etc. This is because this could excessively amplify the bass sound. ing position. 107 Cannot be accessed. Position of the shielded type, install it away from the TV. ! This can be accessed. There...
... are no files stored in the Favorites folder has already been registered. Step 5: Default settings with a tape measure, etc. This is because this could excessively amplify the bass sound. ing position. 107 Cannot be accessed. Position of the shielded type, install it away from the TV. ! This can be accessed. There...
Owner's Manual
Page 113
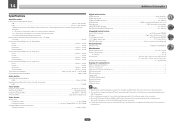
FontAvenue is a trademark on Power Output Claims for Amplifiers ** 1 kHz with no more than 0.08 %**** total harmonic distortion *** 1 kHz with no more than 1 %**** total harmonic distortion **** Measured by NEC Corporation. iOS... (W) x 185 mm (H) x 396 mm (D) (17.13 in. (W) x 7.28 in. (H) x 15.59 in. (D)) Weight (without notice, due to improvements. ! 14 Additional information Specifications Amplifier section Continuous average power output* 8 W...120 W** per channel 6 W...150 W*** per channel * Measured pursuant to the Federal Trade Commission's Trade Regulation rule on which Cisco holds...
FontAvenue is a trademark on Power Output Claims for Amplifiers ** 1 kHz with no more than 0.08 %**** total harmonic distortion *** 1 kHz with no more than 1 %**** total harmonic distortion **** Measured by NEC Corporation. iOS... (W) x 185 mm (H) x 396 mm (D) (17.13 in. (W) x 7.28 in. (H) x 15.59 in. (D)) Weight (without notice, due to improvements. ! 14 Additional information Specifications Amplifier section Continuous average power output* 8 W...120 W** per channel 6 W...150 W*** per channel * Measured pursuant to the Federal Trade Commission's Trade Regulation rule on which Cisco holds...

