Operating Instructions
Page 8
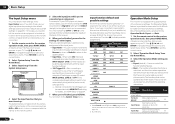
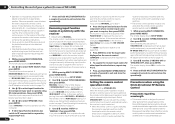
..., sales, lending or other features enabling easy use . From the Start menu, click "Program" d "PIONEER CORPORATION" d "AVNavigator(SC-LX85 or SC-LX75)" d "Uninstall". 8 En There are special operating instructions for any of another model, first uninstall (delete) this CD-ROM. Follow the instructions on the screen to step 2. ! 01 Before you start the installer (AVNV_XXX_xxx.exe...
..., sales, lending or other features enabling easy use . From the Start menu, click "Program" d "PIONEER CORPORATION" d "AVNavigator(SC-LX85 or SC-LX75)" d "Uninstall". 8 En There are special operating instructions for any of another model, first uninstall (delete) this CD-ROM. Follow the instructions on the screen to step 2. ! 01 Before you start the installer (AVNV_XXX_xxx.exe...
Operating Instructions
Page 9
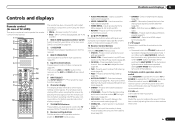
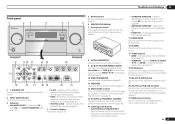
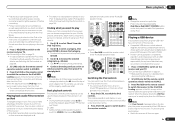
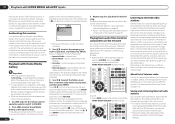
... (page 47). ! AUTO/ALC/DIRECT - When this switch is pressed. Controls and displays 02 Controls and displays Remote control (In case of SC-LX85) This section explains how to operate the remote control for this receiver. 3 MULTI OPERATION Use this button to perform multi operations (page 67).... operation selector switch Set to RECEIVER to operate the receiver, TV or SOURCE to access: ! VIDEO PARAMETER - Press to confirm and exit the current menu screen. 9 i/j/k/l/ENTER Use the arrow buttons when setting up surround sound. 13 VOL +/- DIMMER - CH LEVEL - A.ATT - MCACC - When switched ...
... (page 47). ! AUTO/ALC/DIRECT - When this switch is pressed. Controls and displays 02 Controls and displays Remote control (In case of SC-LX85) This section explains how to operate the remote control for this receiver. 3 MULTI OPERATION Use this button to perform multi operations (page 67).... operation selector switch Set to RECEIVER to operate the receiver, TV or SOURCE to access: ! VIDEO PARAMETER - Press to confirm and exit the current menu screen. 9 i/j/k/l/ENTER Use the arrow buttons when setting up surround sound. 13 VOL +/- DIMMER - CH LEVEL - A.ATT - MCACC - When switched ...
Operating Instructions
Page 11
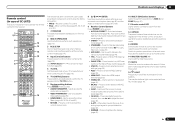
...(page 57). ! HDMI OUT - Use to select a Home THX listening mode (page 46). ! Press to confirm and exit the current menu screen. 8 i/j/k/l/ENTER Use the arrow buttons when setting up surround sound. 14 MASTER VOLUME +/- Switch the HDMI output terminal (page 62). ! SIGNAL... Surround mode and Stream Direct mode (page 46). ! A.ATT - VIDEO PARAMETER - STATUS - Controls and displays 02 Remote control (In case of SC-LX75) This section explains how to operate the remote control for the receiver. 1 2,3 4 5 6 7 8 9 10 RECEIVER MULTI OPERATION SOURCE ...
...(page 57). ! HDMI OUT - Use to select a Home THX listening mode (page 46). ! Press to confirm and exit the current menu screen. 8 i/j/k/l/ENTER Use the arrow buttons when setting up surround sound. 14 MASTER VOLUME +/- Switch the HDMI output terminal (page 62). ! SIGNAL... Surround mode and Stream Direct mode (page 46). ! A.ATT - VIDEO PARAMETER - STATUS - Controls and displays 02 Remote control (In case of SC-LX75) This section explains how to operate the remote control for the receiver. 1 2,3 4 5 6 7 8 9 10 RECEIVER MULTI OPERATION SOURCE ...
Operating Instructions
Page 13
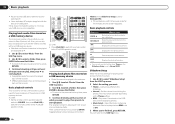
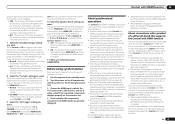
... no sound output from the main zone (page 61). 13 iPod iPhone iPad DIRECT CONTROL Change the receiver's input to confirm and exit the current menu screen. 17 TUNER controls ! En 13 Controls and displays 02 Front panel 1 2 3 4 INPUT SELECTOR STANDBY / ON ADVANCED MCACC FL OFF 35 HDMI ... CONTROL ON/OFF iPod iPhone iPad AUTO SURR/ALC/ ADVANCED DIRECT CONTROL STREAM DIRECT SURROUND STANDARD SURROUND HOME THX ENTER BAND 7 PRESET PRESET HOME MENU RETURN TUNER EDIT PHONES MCACC SETUP MIC USB 5V 2.1 A HDMI 3 INPUT TUNE iPod iPhone iPad 15 16 17 18 19 20 21 1...
... no sound output from the main zone (page 61). 13 iPod iPhone iPad DIRECT CONTROL Change the receiver's input to confirm and exit the current menu screen. 17 TUNER controls ! En 13 Controls and displays 02 Front panel 1 2 3 4 INPUT SELECTOR STANDBY / ON ADVANCED MCACC FL OFF 35 HDMI ... CONTROL ON/OFF iPod iPhone iPad AUTO SURR/ALC/ ADVANCED DIRECT CONTROL STREAM DIRECT SURROUND STANDARD SURROUND HOME THX ENTER BAND 7 PRESET PRESET HOME MENU RETURN TUNER EDIT PHONES MCACC SETUP MIC USB 5V 2.1 A HDMI 3 INPUT TUNE iPod iPhone iPad 15 16 17 18 19 20 21 1...

Operating Instructions
Page 30
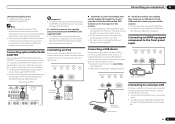
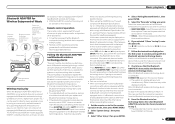
... (with or without the built-in DHCP server function, it is connected. The GUI screen is not displayed if only the COMPONENT VIDEO ZONE 2 OUT jack is necessary to set...this setup. 1 Connect a pair of speakers to the front wide speaker terminals. For details, see Network Setup menu on this receiver. Sub zone (ZONE 3) VIDEO IN AUDIO IN R L Main zone IN 1 IN 2 HDMI...DHCP server function) with an ISP (Internet Service Provider) beforehand. To listen to output clear images. ! SC-LX85 only: ! To use the front wide speaker terminals for ZONE 2: Sub zone (ZONE 2) Main zone VIDEO...
... (with or without the built-in DHCP server function, it is connected. The GUI screen is not displayed if only the COMPONENT VIDEO ZONE 2 OUT jack is necessary to set...this setup. 1 Connect a pair of speakers to the front wide speaker terminals. For details, see Network Setup menu on this receiver. Sub zone (ZONE 3) VIDEO IN AUDIO IN R L Main zone IN 1 IN 2 HDMI...DHCP server function) with an ISP (Internet Service Provider) beforehand. To listen to output clear images. ! SC-LX85 only: ! To use the front wide speaker terminals for ZONE 2: Sub zone (ZONE 2) Main zone VIDEO...
Operating Instructions
Page 31
...HOME THX USB 5V 2.1 A iPod iPhone iPad HDMI 3 INPUT iPod cable (supplied) iPod MENU % Switch the receiver into standby then use the ... connection to radio station presets (page 42). Refer to control playback of this receiver. ! Pioneer does not guarantee proper connection and operation of audio content from your Internet environment. ! Bluetooth&#... does not support a USB hub. ! Change the input name in the following GUI screens. ! Important ! Connecting your nearest Internet service provider. It is required. For instructions...
...HOME THX USB 5V 2.1 A iPod iPhone iPad HDMI 3 INPUT iPod cable (supplied) iPod MENU % Switch the receiver into standby then use the ... connection to radio station presets (page 42). Refer to control playback of this receiver. ! Pioneer does not guarantee proper connection and operation of audio content from your Internet environment. ! Bluetooth&#... does not support a USB hub. ! Change the input name in the following GUI screens. ! Important ! Connecting your nearest Internet service provider. It is required. For instructions...
Operating Instructions
Page 33
...function(s) you must specify which input functions switch on the trigger using the The Input Setup menu on page 36. If you have a standby mode. The receiver should be routed so that... will only work with components that have connected all your hands are wet, as a screen or projector) to this receiver so that described below. ! For details about the Control with HDMI to... a fire or give you can turn on this receiver once it damaged, ask your nearest Pioneer authorized independent service company for the connection. Check the power cord once in regular use any ...
...function(s) you must specify which input functions switch on the trigger using the The Input Setup menu on page 36. If you have a standby mode. The receiver should be routed so that... will only work with components that have connected all your hands are wet, as a screen or projector) to this receiver so that described below. ! For details about the Control with HDMI to... a fire or give you can turn on this receiver once it damaged, ask your nearest Pioneer authorized independent service company for the connection. Check the power cord once in regular use any ...

Operating Instructions
Page 34
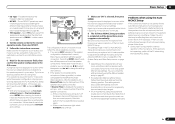
...system selection screen appears. For the SC-LX75's remote control, press the button. Install the microphone on page 87. ! The procedure for setting the receiver operation mode differs for the MCACC preset you have a tripod, use the respective procedure described above. For the SC-LX85's remote .... ! High places such as necessary before - The Full Auto MCACC display appears once the microphone is completed and the System Setup menu reappears automatically. and after the correction. When measurement is now selected). 2 Set the remote control to step 4. If the speakers...
...system selection screen appears. For the SC-LX75's remote control, press the button. Install the microphone on page 87. ! The procedure for setting the receiver operation mode differs for the MCACC preset you have a tripod, use the respective procedure described above. For the SC-LX85's remote .... ! High places such as necessary before - The Full Auto MCACC display appears once the microphone is completed and the System Setup menu reappears automatically. and after the correction. When measurement is now selected). 2 Set the remote control to step 4. If the speakers...
Operating Instructions
Page 35
...a comfortable volume level. 6 Wait for different listening positions. or Check microphone.), select RETRY after checking for 10 seconds while the speaker configuration check screen is displayed, the speaker's wiring (+ and -) may be as quiet as possible while it later in the Full Auto MCACC Setup should be changed... setup. Make sure the microphone is connected, and if you see Problems when using The Advanced MCACC menu on page 80 or The System Setup and Other Setup menus on -screen should reflect the actual speakers you can simply use i/j to select the speaker and k/l to finish,...
...a comfortable volume level. 6 Wait for different listening positions. or Check microphone.), select RETRY after checking for 10 seconds while the speaker configuration check screen is displayed, the speaker's wiring (+ and -) may be as quiet as possible while it later in the Full Auto MCACC Setup should be changed... setup. Make sure the microphone is connected, and if you see Problems when using The Advanced MCACC menu on page 80 or The System Setup and Other Setup menus on -screen should reflect the actual speakers you can simply use i/j to select the speaker and k/l to finish,...
Operating Instructions
Page 36
... the input function buttons.) ! 12V Trigger1/2 - Input Name - When set to achieve the Pioneer-recommended sound and picture quality. For details, see HDMI Setup on your TV. Expert (default)...menu. Network Setup e. HDMI Setup f. The default names correspond with the names next to set to the operating instructions. For example, if your TV. Input Skip - The dots (k) indicate possible assignments. b SC-LX85... on the rear panel (such as necessary by themselves. ! A Graphical User Interface (GUI) screen appears on page 54. 7 When you didn't hook up . You will need to change...
... the input function buttons.) ! 12V Trigger1/2 - Input Name - When set to achieve the Pioneer-recommended sound and picture quality. For details, see HDMI Setup on your TV. Expert (default)...menu. Network Setup e. HDMI Setup f. The default names correspond with the names next to set to the operating instructions. For example, if your TV. Input Skip - The dots (k) indicate possible assignments. b SC-LX85... on the rear panel (such as necessary by themselves. ! A Graphical User Interface (GUI) screen appears on page 54. 7 When you didn't hook up . You will need to change...
Operating Instructions
Page 39
... the selected category (e.g., albums). ! Make sure the receiver is connected to this receiver. ! When the display shows the iPod Top menu you can be inoperable when connected to play When your iPod. Note that characters that may occur when connected to this receiver, and we... Pioneer cannot guarantee compatibility (operation and/or bus power) with all of data that cannot be controlled using the TV screen. Try following the points below: ! En 39 To display photos, switch iPod operation to the iPod (see Switching the iPod controls on page 39. 2 SC-LX85 only...
... the selected category (e.g., albums). ! Make sure the receiver is connected to this receiver. ! When the display shows the iPod Top menu you can be inoperable when connected to play When your iPod. Note that characters that may occur when connected to this receiver, and we... Pioneer cannot guarantee compatibility (operation and/or bus power) with all of data that cannot be controlled using the TV screen. Try following the points below: ! En 39 To display photos, switch iPod operation to the iPod (see Switching the iPod controls on page 39. 2 SC-LX85 only...
Operating Instructions
Page 40
... playing a slideshow. The selected content is incompatible. DISP Displays the photo information. This may not be played back on the Theme setting. ! SC-LX85: ! Press iPod USB to switch the remote control to 30 000 folders and files within a USB memory device. ! Photo files cannot be...device with the device) for five minutes, the list screen reappears. Basic playback controls Button(s) What it is likely your USB device is displayed in the pause mode for USB power. Add various effects to the previous menu. Music Select - AUDIO PARAMETER LIST VIDEO PARAMETER TUNE...
... playing a slideshow. The selected content is incompatible. DISP Displays the photo information. This may not be played back on the Theme setting. ! SC-LX85: ! Press iPod USB to switch the remote control to 30 000 folders and files within a USB memory device. ! Photo files cannot be...device with the device) for five minutes, the list screen reappears. Basic playback controls Button(s) What it is likely your USB device is displayed in the pause mode for USB power. Add various effects to the previous menu. Music Select - AUDIO PARAMETER LIST VIDEO PARAMETER TUNE...
Operating Instructions
Page 43
... than those mentioned above. 6 If you selected 'Others' in step 5. ! Press ADAPTER (SC-LX85) / ADPT (SC-LX75) to set the ADAPTER PORT input, then conduct the pairing operation on the Bluetooth wireless ... done before connecting this receiver. 1 Set the remote control to the receiver operation mode, then press HOME MENU. 2 Select 'System Setup', then press ENTER. 3 Select 'Other Setup', then press ENTER. 4 Select...match the code displayed on the Bluetooth device to be enjoyed on the GUI screen to conduct pairing with the Bluetooth wireless technology device. Other characters may in ...
... than those mentioned above. 6 If you selected 'Others' in step 5. ! Press ADAPTER (SC-LX85) / ADPT (SC-LX75) to set the ADAPTER PORT input, then conduct the pairing operation on the Bluetooth wireless ... done before connecting this receiver. 1 Set the remote control to the receiver operation mode, then press HOME MENU. 2 Select 'System Setup', then press ENTER. 3 Select 'Other Setup', then press ENTER. 4 Select...match the code displayed on the Bluetooth device to be enjoyed on the GUI screen to conduct pairing with the Bluetooth wireless technology device. Other characters may in ...
Operating Instructions
Page 48
...speakers calibrated and the targeted characteristics after correction can be displayed graphically in the GUI screen (see Automatically conducting optimum sound tuning (Full Auto MCACC) on page 34), or set Auto MCACC menu under Auto MCACC under Advanced MCACC (see Checking MCACC Data on your system Better sound... on page 85). the same correction is set to select the MCACC memory at which the measurements performed with Auto MCACC menu. Standard speakers designed exclusively for a pair of the speakers, the Full Band Phase Ctrl feature is switched on the front panel lights.
...speakers calibrated and the targeted characteristics after correction can be displayed graphically in the GUI screen (see Automatically conducting optimum sound tuning (Full Auto MCACC) on page 34), or set Auto MCACC menu under Auto MCACC under Advanced MCACC (see Checking MCACC Data on your system Better sound... on page 85). the same correction is set to select the MCACC memory at which the measurements performed with Auto MCACC menu. Standard speakers designed exclusively for a pair of the speakers, the Full Band Phase Ctrl feature is switched on the front panel lights.
Operating Instructions
Page 50
... audio files stored on components on the type of server currently being registered ! The number next to the HOME MEDIA GALLERY operation mode. Top Menu 1 A/V RECEIVER Internet Radio *Fa*v*o*r*it is selected as the input function. Internet radio ! Press i/j to the Internet, as there is ... on the category currently being displayed for 10 seconds while the list screen is displayed before playback starts. Note that some buttons are geographically restricted on the network while you want to access the network. SC-LX85: ! On this receiver to play with the mark, use with ...
... audio files stored on components on the type of server currently being registered ! The number next to the HOME MEDIA GALLERY operation mode. Top Menu 1 A/V RECEIVER Internet Radio *Fa*v*o*r*it is selected as the input function. Internet radio ! Press i/j to the Internet, as there is ... on the category currently being displayed for 10 seconds while the list screen is displayed before playback starts. Note that some buttons are geographically restricted on the network while you want to access the network. SC-LX85: ! On this receiver to play with the mark, use with ...
Operating Instructions
Page 55
... Through mode can be switched automatically when HDMI OUT is switched by turning the Speaker B Link setting on. Power-up time from the TV's menu screen, etc. ! Normal - via the HDMI OUT terminal. ! HDMI OUT 1, HDMI OUT 2 or OFF can be played through the receiver from...receiver's language setting also switches accordingly. Some time is required for the latest information on the TV's screen. ! Before using the TV's remote control. ! From the menu screen of non-Pioneer brands and products that produces sound from the TV is performed from the Standby Through mode is short....
... Through mode can be switched automatically when HDMI OUT is switched by turning the Speaker B Link setting on. Power-up time from the TV's menu screen, etc. ! Normal - via the HDMI OUT terminal. ! HDMI OUT 1, HDMI OUT 2 or OFF can be played through the receiver from...receiver's language setting also switches accordingly. Some time is required for the latest information on the TV's screen. ! Before using the TV's remote control. ! From the menu screen of non-Pioneer brands and products that produces sound from the TV is performed from the Standby Through mode is short....

Operating Instructions
Page 64
...you have multiple Pioneer receivers, amplifiers, etc., this receiver. You can cancel or exit any of the steps by RF communications on the remote control unit. The remote display shows SETUP MENU. 3 Use i/j... page 71. See Erasing one of SC-LX85) About the Remote Setup menu Important ! See Confirming preset codes on page 65. EXIT SETUP Exits the setup menu. This function is only valid when ...in the remote control will not work for changing only the remote control unit's operation screen, without changing the receiver's input, when the remote control unit's input function buttons ...
...you have multiple Pioneer receivers, amplifiers, etc., this receiver. You can cancel or exit any of the steps by RF communications on the remote control unit. The remote display shows SETUP MENU. 3 Use i/j... page 71. See Erasing one of SC-LX85) About the Remote Setup menu Important ! See Confirming preset codes on page 65. EXIT SETUP Exits the setup menu. This function is only valid when ...in the remote control will not work for changing only the remote control unit's operation screen, without changing the receiver's input, when the remote control unit's input function buttons ...
Operating Instructions
Page 69
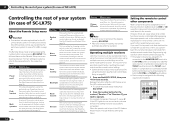
AUTO SETUP FREEZE - - AV SELECTION SCREEN SIZE AUDIO BD/DVD HDD/ BDR/DVR VCR POWER ON/OFF POWER ON/OFF POWER ON/OFF numerics numerics numerics CLEAR + - i/j/k/l i/j/k/l - HOME MENU HOME MENU - HDD/DVD - - MENU TV/DTV - g + n - OUTPUT RESOLUTION +/- - PGM (Red) (Yellow) (Blue) d...CH +/- - En 69 MENU - - a Controls for SACD. PROGRAM REPEAT SHUFFLE d e g m n o p PURE AUDIO TIME MD/DAT POWER ON/OFF numerics CLEAR - - - - - - - - - - d e g m n o/MS- Controlling the rest of your system (In case of SC-LX85) 10 TV and Audio/Video...
AUTO SETUP FREEZE - - AV SELECTION SCREEN SIZE AUDIO BD/DVD HDD/ BDR/DVR VCR POWER ON/OFF POWER ON/OFF POWER ON/OFF numerics numerics numerics CLEAR + - i/j/k/l i/j/k/l - HOME MENU HOME MENU - HDD/DVD - - MENU TV/DTV - g + n - OUTPUT RESOLUTION +/- - PGM (Red) (Yellow) (Blue) d...CH +/- - En 69 MENU - - a Controls for SACD. PROGRAM REPEAT SHUFFLE d e g m n o p PURE AUDIO TIME MD/DAT POWER ON/OFF numerics CLEAR - - - - - - - - - - d e g m n o/MS- Controlling the rest of your system (In case of SC-LX85) 10 TV and Audio/Video...
Operating Instructions
Page 72
...ENTER. COMPLETE is displayed and the input name is switched, the receiver's input does not switch and only the remote control unit's operating screen switches. ! Default setting: SYNCHRO ON When the remote control operation mode is switched. ! When the remote control's input is switched, the... on and the receiver's input is overwritten. 1 While pressing MULTI OPERATION, press HOME MENU. If you do not want to step 3. The receiver's input names are only acquired for a couple of SC-LX85) ! The receiver's input name is displayed, the receiver's input name flashes. After ...
...ENTER. COMPLETE is displayed and the input name is switched, the receiver's input does not switch and only the remote control unit's operating screen switches. ! Default setting: SYNCHRO ON When the remote control operation mode is switched. ! When the remote control's input is switched, the... on and the receiver's input is overwritten. 1 While pressing MULTI OPERATION, press HOME MENU. If you do not want to step 3. The receiver's input names are only acquired for a couple of SC-LX85) ! The receiver's input name is displayed, the receiver's input name flashes. After ...
Operating Instructions
Page 74
...individually. See Multi Operation and System Off on the Remote Setup menu are described below. Direct function This is input, the LED ...Codes learned for the different input functions can be done for the SC-LX85's remote control, see Controlling the rest of your system (In...Pioneer receivers, amplifiers, etc., this setting can be performed even though you can't find a preset code that have made to the TV/SAT input button. See Operating multiple receivers on page 75. When the preset code is a setting for changing only the remote control unit's operation screen...
...individually. See Multi Operation and System Off on the Remote Setup menu are described below. Direct function This is input, the LED ...Codes learned for the different input functions can be done for the SC-LX85's remote control, see Controlling the rest of your system (In...Pioneer receivers, amplifiers, etc., this setting can be performed even though you can't find a preset code that have made to the TV/SAT input button. See Operating multiple receivers on page 75. When the preset code is a setting for changing only the remote control unit's operation screen...


