Owner's Manual
Page 4
After you for buying this Pioneer product. Contents 01 Before you will know how to operate your ...8 Problems when using the Auto MCACC Setup . . . . 10 Playing a source 10 Better sound using Basic Phase Control 10 03 Connecting your equipment Rear panel 11 When making cable connections 12 About the video converter 12 Connecting your TV and... external antennas 20 Plugging in the receiver 20 AC outlet 20 04 Controls and displays Front panel 21 Operating range of remote control unit 22 Display 23 Remote control 24 05 Listening to station presets 32 07 The System Setup menu ...
After you for buying this Pioneer product. Contents 01 Before you will know how to operate your ...8 Problems when using the Auto MCACC Setup . . . . 10 Playing a source 10 Better sound using Basic Phase Control 10 03 Connecting your equipment Rear panel 11 When making cable connections 12 About the video converter 12 Connecting your TV and... external antennas 20 Plugging in the receiver 20 AC outlet 20 04 Controls and displays Front panel 21 Operating range of remote control unit 22 Display 23 Remote control 24 05 Listening to station presets 32 07 The System Setup menu ...

Owner's Manual
Page 5
... components . . . . 51 Selecting preset codes directly 51 Programming signals from other remote controls. . . 51 Erasing one of your speakers 44 Connecting additional amplifiers 44 Using this receiver with a Pioneer plasma display. . . 44 Using the SR+ mode with a Pioneer plasma display 45 09 Other Settings The Input Assign menu 46 The Other Setup menu 47...
... components . . . . 51 Selecting preset codes directly 51 Programming signals from other remote controls. . . 51 Erasing one of your speakers 44 Connecting additional amplifiers 44 Using this receiver with a Pioneer plasma display. . . 44 Using the SR+ mode with a Pioneer plasma display 45 09 Other Settings The Input Assign menu 46 The Other Setup menu 47...
Owner's Manual
Page 6
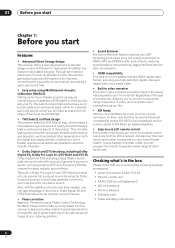
...amplifier power to -use LCD remote control The remote control gives you can take advantage of the built-in Dolby Digital EX and DTS-ES decoders for six-channel surround sound. • Phase correction Based on Pioneer's unique Phase Control Technology, the Basic Phase Control feature incorporated into your TV...up and running in no time, now that you've received the following supplied accessories: • Setup microphone (cable: 16.4 ft.) • Remote control unit • AA/IEC R6P dry cell batteries x2 • AM loop antenna • FM wire antenna • Warranty card • These...
...amplifier power to -use LCD remote control The remote control gives you can take advantage of the built-in Dolby Digital EX and DTS-ES decoders for six-channel surround sound. • Phase correction Based on Pioneer's unique Phase Control Technology, the Basic Phase Control feature incorporated into your TV...up and running in no time, now that you've received the following supplied accessories: • Setup microphone (cable: 16.4 ft.) • Remote control unit • AA/IEC R6P dry cell batteries x2 • AM loop antenna • FM wire antenna • Warranty card • These...
Owner's Manual
Page 8
...) The Auto MCACC Setup measures the acoustic characteristics of the action or concert. See Listening to your speakers as shown below for more on the remote control to set the video input on your TV to your speakers and place them for both channel delay and channel level. Make sure you 're...
...) The Auto MCACC Setup measures the acoustic characteristics of the action or concert. See Listening to your speakers as shown below for more on the remote control to set the video input on your TV to your speakers and place them for both channel delay and channel level. Make sure you 're...
Owner's Manual
Page 10
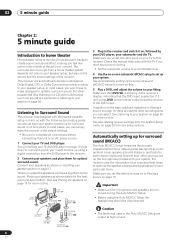
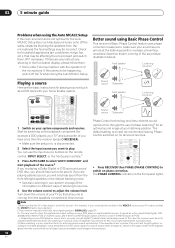
...etc.), that the VIDEO 1 input is now selected.) 2 If you need to PCM. • Depending on the remote control, INPUT SELECT, or the front panel controls.2 Better sound using the Auto MCACC Setup If the room environment is not optimal for the Auto MCACC Setup (too ...Front speaker H A S E C O N T O F Sound F source Subwoofer Listening position ? D.ACCESS +10 CLASS DISC ENTER • Press RECEIVER then PHASE (PHASE CONTROL) to adjust the volume level. You can use of phase matching4 for example a DVD player), your TV1 and subwoofer (if you want multichannel surround sound...
...etc.), that the VIDEO 1 input is now selected.) 2 If you need to PCM. • Depending on the remote control, INPUT SELECT, or the front panel controls.2 Better sound using the Auto MCACC Setup If the room environment is not optimal for the Auto MCACC Setup (too ...Front speaker H A S E C O N T O F Sound F source Subwoofer Listening position ? D.ACCESS +10 CLASS DISC ENTER • Press RECEIVER then PHASE (PHASE CONTROL) to adjust the volume level. You can use of phase matching4 for example a DVD player), your TV1 and subwoofer (if you want multichannel surround sound...

Owner's Manual
Page 21
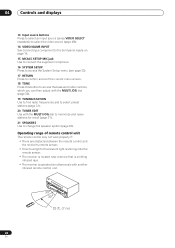
... listening through the multichannel analog inputs). 6 Character display See Display on page 23. 7 Remote sensor Receives the signals from the remote control (see Operating range of remote control unit on page 22). 8 MCACC indicator Lights when Acoustic Calibration EQ (page 35) is...the speakers. 21 En Press to connect headphones. Controls and displays 04 Chapter 4: Controls and displays Front panel 12 3 4 5 6 78 9 10 AUDIO/VIDEO MULTI-CHANNEL RECEIVER VSX-1016TXV STANDBY/ON PHASE CONTROL PHASE ACOUSTIC LISTENING CONTROL EQ MODE MULTI JOG DIGITAL PRECISION PROCESSING DVD ...
... listening through the multichannel analog inputs). 6 Character display See Display on page 23. 7 Remote sensor Receives the signals from the remote control (see Operating range of remote control unit on page 22). 8 MCACC indicator Lights when Acoustic Calibration EQ (page 35) is...the speakers. 21 En Press to connect headphones. Controls and displays 04 Chapter 4: Controls and displays Front panel 12 3 4 5 6 78 9 10 AUDIO/VIDEO MULTI-CHANNEL RECEIVER VSX-1016TXV STANDBY/ON PHASE CONTROL PHASE ACOUSTIC LISTENING CONTROL EQ MODE MULTI JOG DIGITAL PRECISION PROCESSING DVD ...
Owner's Manual
Page 22
Operating range of remote control unit The remote control may not work properly if: • There are obstacles between the remote control and the receiver's remote sensor. • Direct sunlight or fluorescent light is shining onto the remote sensor. • The receiver is located near a device that is emitting infrared rays...21 SPEAKERS Use to select preset stations (page 31). 20 TUNER EDIT Use with another infrared remote control unit. 30 30 DOWN DOWN 23 ft. (7 m) 22 En 04 Controls and displays 13 Input source buttons Press to select an input source (press VIDEO SELECT repeatedly...
Operating range of remote control unit The remote control may not work properly if: • There are obstacles between the remote control and the receiver's remote sensor. • Direct sunlight or fluorescent light is shining onto the remote sensor. • The receiver is located near a device that is emitting infrared rays...21 SPEAKERS Use to select preset stations (page 31). 20 TUNER EDIT Use with another infrared remote control unit. 30 30 DOWN DOWN 23 ft. (7 m) 22 En 04 Controls and displays 13 Input source buttons Press to select an input source (press VIDEO SELECT repeatedly...
Owner's Manual
Page 24
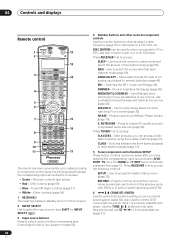
...SHIFT for deck 1 of time before sleep (page 50). Use the TUNE / buttons to find preset stations (page 31). 24 En 04 Controls and displays Remote control RECEIVER INPUT SELECT 1 2 SYSTEM OFF SOURCE 12 13 DVR 2 DVD TV DVR1 TVCTRL 3 XM RADIO CD CD-R TUNER RECEIVER 14 SLEEP SB... THX STANDARD ADV.SURR STEREO MULTI OPE AUTOSURR ACOUSTIC EQ SIGNAL SEL SHIFT EFFECT/CHSEL 16 17 RECEIVER The remote has been conveniently color-coded according to component control using the number buttons (page 31). RETURN - Use Midnight when listening to boost the bass and treble at...
...SHIFT for deck 1 of time before sleep (page 50). Use the TUNE / buttons to find preset stations (page 31). 24 En 04 Controls and displays Remote control RECEIVER INPUT SELECT 1 2 SYSTEM OFF SOURCE 12 13 DVR 2 DVD TV DVR1 TVCTRL 3 XM RADIO CD CD-R TUNER RECEIVER 14 SLEEP SB... THX STANDARD ADV.SURR STEREO MULTI OPE AUTOSURR ACOUSTIC EQ SIGNAL SEL SHIFT EFFECT/CHSEL 16 17 RECEIVER The remote has been conveniently color-coded according to component control using the number buttons (page 31). RETURN - Use Midnight when listening to boost the bass and treble at...
Owner's Manual
Page 25
... THX listening mode (page 27). Switches between stereo and mono reception of the TV. Direct playback bypasses the tone controls and any other components connected to the receiver (see Controlling the rest of the remote control button settings on page 52. ACOUSTIC EQ - LEARNING - SYS OFF - DIRECT F - RESET - READ ID - ... 26). Also use this system assign it to turn on this). You can be accessed when listening to the built-in the remote control LCD. 12 SOURCE Press to the TV CTRL input source button. Use to adjust the volume on page 51): SETUP - The following...
... THX listening mode (page 27). Switches between stereo and mono reception of the TV. Direct playback bypasses the tone controls and any other components connected to the receiver (see Controlling the rest of the remote control button settings on page 52. ACOUSTIC EQ - LEARNING - SYS OFF - DIRECT F - RESET - READ ID - ... 26). Also use this system assign it to turn on this). You can be accessed when listening to the built-in the remote control LCD. 12 SOURCE Press to the TV CTRL input source button. Use to adjust the volume on page 51): SETUP - The following...
Owner's Manual
Page 31
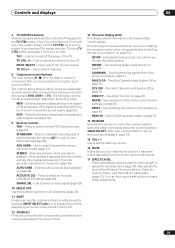
...10 CLASS DISC ENTER TOP MENU TUNE DTVMENU ST SETUP ENTER MENU ST T.EDIT RETURN TUNE GUIDE CATEGORY TV CONTROL BAND TV VOL INPUT SELECT TV CH VOL DTV ON/OFF MPX REC DTV INFO MUTE REC STOP JUKEBOX...10 CLASS DISC ENTER TOP MENU TUNE DTVMENU ST SETUP ENTER MENU ST T.EDIT RETURN TUNE GUIDE CATEGORY TV CONTROL BAND TV VOL INPUT SELECT TV CH VOL DTV ON/OFF MPX REC DTV INFO MUTE REC STOP JUKEBOX... press ST / to FM and AM radio broadcasts using the number buttons on the remote control. 1 Press the TUNER button to select the tuner. 2 Use the BAND button to 106.00 (FM), press 1, 0,...
...10 CLASS DISC ENTER TOP MENU TUNE DTVMENU ST SETUP ENTER MENU ST T.EDIT RETURN TUNE GUIDE CATEGORY TV CONTROL BAND TV VOL INPUT SELECT TV CH VOL DTV ON/OFF MPX REC DTV INFO MUTE REC STOP JUKEBOX...10 CLASS DISC ENTER TOP MENU TUNE DTVMENU ST SETUP ENTER MENU ST T.EDIT RETURN TUNE GUIDE CATEGORY TV CONTROL BAND TV VOL INPUT SELECT TV CH VOL DTV ON/OFF MPX REC DTV INFO MUTE REC STOP JUKEBOX... press ST / to FM and AM radio broadcasts using the number buttons on the remote control. 1 Press the TUNER button to select the tuner. 2 Use the BAND button to 106.00 (FM), press 1, 0,...
Owner's Manual
Page 32
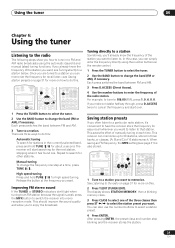
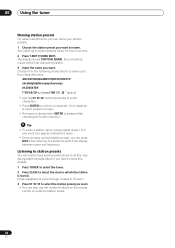
...Listening to station presets below for a name up to confirm a character. ABCDEFGHIJKLMNOPQRSTUVWXYZ abcdefghijklmnopqrstuvwxyz 0123456789 space] • Use the ST / buttons (remote) to select characters. • Press ENTER to four characters long. Choose from the following characters for how to do this . 2 Press ...is stored. 06 Using the tuner Naming station presets For easier identification, you can also use the number buttons on the remote control to recall the station preset. 32 En The display shows STATION NAME, then a blinking cursor at the first character position...
...Listening to station presets below for a name up to confirm a character. ABCDEFGHIJKLMNOPQRSTUVWXYZ abcdefghijklmnopqrstuvwxyz 0123456789 space] • Use the ST / buttons (remote) to select characters. • Press ENTER to four characters long. Choose from the following characters for how to do this . 2 Press ...is stored. 06 Using the tuner Naming station presets For easier identification, you can also use the number buttons on the remote control to recall the station preset. 32 En The display shows STATION NAME, then a blinking cursor at the first character position...

Owner's Manual
Page 33
..., distance and overall balance of the speakers you 're finished, press RETURN. Make customized settings to the receiver, disconnect them. 2 Press RECEIVER on the remote control, then press the SETUP button.2 An on-screen display (OSD) appears on page 8). • Manual MCACC - System Setup 1.Surr Back System 2.Auto... E PHASE S.RETRIEVER D.ACCESS +10 CLASS DISC ENTER TOP MENU TUNE DTVMENU ST SETUP ENTER MENU ST T.EDIT RETURN TUNE GUIDE CATEGORY TV CONTROL BAND TV VOL INPUT SELECT TV CH VOL 1 Switch on the receiver and your front speakers on page 43). 3 When you 've connected...
..., distance and overall balance of the speakers you 're finished, press RETURN. Make customized settings to the receiver, disconnect them. 2 Press RECEIVER on the remote control, then press the SETUP button.2 An on-screen display (OSD) appears on page 8). • Manual MCACC - System Setup 1.Surr Back System 2.Auto... E PHASE S.RETRIEVER D.ACCESS +10 CLASS DISC ENTER TOP MENU TUNE DTVMENU ST SETUP ENTER MENU ST T.EDIT RETURN TUNE GUIDE CATEGORY TV CONTROL BAND TV VOL INPUT SELECT TV CH VOL 1 Switch on the receiver and your front speakers on page 43). 3 When you 've connected...
Owner's Manual
Page 38
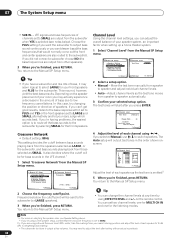
... Crossover Network • Default setting: 80Hz This setting decides the cutoff between bass sounds playing back from the speakers selected as SMALL. Depending on the remote control. If you're having problems, the easiest option is emitted.2 5 When you selected Manual, use / to the Manual SP Setup menu. If you 're finished...
... Crossover Network • Default setting: 80Hz This setting decides the cutoff between bass sounds playing back from the speakers selected as SMALL. Depending on the remote control. If you're having problems, the easiest option is emitted.2 5 When you selected Manual, use / to the Manual SP Setup menu. If you 're finished...

Owner's Manual
Page 41
... Surround™ is stored. About Neural Surround™ Neural Surround™ represents the latest advancement in which allows delivery of a more on the remote control to recall the channel preset. Connecting using a commercially available HDMI cable. HDMI/DVI-equipped component HDMI OUT DIGITAL OUT AUDIO OUT L AUDIO R OPTICAL...OUT IN IN IN OUT IN CD-R/TAPE/MD DVD/LD TV/SAT DVR/VCR1 AM L L OUT IN 3 R OUT OUT DVR/ VSX-1016TXV HDMI IN HDMI/DVI-compatible monitor or plasma display 1 Use an HDMI cable to connect the HDMI IN 1/2 interconnect on this receiver to 30...
... Surround™ is stored. About Neural Surround™ Neural Surround™ represents the latest advancement in which allows delivery of a more on the remote control to recall the channel preset. Connecting using a commercially available HDMI cable. HDMI/DVI-equipped component HDMI OUT DIGITAL OUT AUDIO OUT L AUDIO R OPTICAL...OUT IN IN IN OUT IN CD-R/TAPE/MD DVD/LD TV/SAT DVR/VCR1 AM L L OUT IN 3 R OUT OUT DVR/ VSX-1016TXV HDMI IN HDMI/DVI-compatible monitor or plasma display 1 Use an HDMI cable to connect the HDMI IN 1/2 interconnect on this receiver to 30...

Owner's Manual
Page 45
Other connections 08 Important • If you connect to a Pioneer plasma display using the remote control if you switch the plasma display off , press RECEIVER, then the SR+ button. VIDEO VIDEO/GAME INPUT VIDEO L AUDIO R DIGITAL IN MCACC SETUP MIC ... E SB ch DIMMER PHASE ANALOG ATT MIDNIGHT/ LOUDNESS S.RETRIEVER DVD/LD AUDIO IN TV/SAT AUDIO IN AUDIO/VIDEO MULTI-CHANNEL RECEIVER VSX-1016TXV STANDBY/ON PHASE CONTROL PHASE ACOUSTIC LISTENING CONTROL EQ MODE MULTI JOG DIGITAL PRECISION PROCESSING DVD / LD TV /SAT DVR /VCR1 DVR /VCR2 VIDEO/GAME CD CD-R / TAPE / MD ...
Other connections 08 Important • If you connect to a Pioneer plasma display using the remote control if you switch the plasma display off , press RECEIVER, then the SR+ button. VIDEO VIDEO/GAME INPUT VIDEO L AUDIO R DIGITAL IN MCACC SETUP MIC ... E SB ch DIMMER PHASE ANALOG ATT MIDNIGHT/ LOUDNESS S.RETRIEVER DVD/LD AUDIO IN TV/SAT AUDIO IN AUDIO/VIDEO MULTI-CHANNEL RECEIVER VSX-1016TXV STANDBY/ON PHASE CONTROL PHASE ACOUSTIC LISTENING CONTROL EQ MODE MULTI JOG DIGITAL PRECISION PROCESSING DVD / LD TV /SAT DVR /VCR1 DVR /VCR2 VIDEO/GAME CD CD-R / TAPE / MD ...
Owner's Manual
Page 46
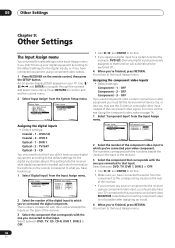
...cables. 1 Press RECEIVER on the back of the receiver. 3 Select the component that corresponds with the numbers beside the inputs on the remote correspond to which terminal so the buttons on the back of the receiver. 3 Select the component that corresponds with the one you '...component video input, you should also have your video component. TV/SAT Optical - 3 - The numbers correspond with the numbers beside the inputs on the remote control, then press the SETUP button. OFF Component - 2 - You return to the Input Assign menu. 46 En Input Assign a.Digital Input b.Component Input...
...cables. 1 Press RECEIVER on the back of the receiver. 3 Select the component that corresponds with the numbers beside the inputs on the remote correspond to which terminal so the buttons on the back of the receiver. 3 Select the component that corresponds with the one you '...component video input, you should also have your video component. TV/SAT Optical - 3 - The numbers correspond with the numbers beside the inputs on the remote control, then press the SETUP button. OFF Component - 2 - You return to the Input Assign menu. 46 En Input Assign a.Digital Input b.Component Input...

Owner's Manual
Page 47
...; MAX - If you are using HDMI, you can make separate audio connections to the Input Assign menu. You return to the corresponding inputs on the remote control, then press the SETUP button. Other Settings 09 Assigning the HDMI inputs • Default settings: HDMI - 1 - Setup - Select between DVD, TV..., DVR 1, DVR 2 or OFF. • Use / and ENTER to do this for Pioneer plasma displays on page 41. • If you connect any video component to the receiver using the receiver. 1 Press RECEIVER on the rear of dynamic...
...; MAX - If you are using HDMI, you can make separate audio connections to the Input Assign menu. You return to the corresponding inputs on the remote control, then press the SETUP button. Other Settings 09 Assigning the HDMI inputs • Default settings: HDMI - 1 - Setup - Select between DVD, TV..., DVR 1, DVR 2 or OFF. • Use / and ENTER to do this for Pioneer plasma displays on page 41. • If you connect any video component to the receiver using the receiver. 1 Press RECEIVER on the rear of dynamic...

Owner's Manual
Page 50
Use the remote control to the factory default settings. • Note that when selecting sources, the display automatically brightens for a few seconds. Dimming the display You can also switch ... fall asleep without worrying about three seconds. The display shows RESET?. 3 Press the front panel ENTER button. Use the front panel controls to the factory default. Use the front panel controls to do this procedure to reset all night. DVD CD DVR 2 TV DVR1 TVCTRL CD-R XM RADIO TUNER RECEIVER SLEEP SR...
Use the remote control to the factory default settings. • Note that when selecting sources, the display automatically brightens for a few seconds. Dimming the display You can also switch ... fall asleep without worrying about three seconds. The display shows RESET?. 3 Press the front panel ENTER button. Use the front panel controls to the factory default. Use the front panel controls to do this procedure to reset all night. DVD CD DVR 2 TV DVR1 TVCTRL CD-R XM RADIO TUNER RECEIVER SLEEP SR...

Owner's Manual
Page 51
.... 2 • When using a Pioneer HDD recorder, please select PIONEER DVR 487, 488, 489 or 493. • When using this receiver's remote control. Controlling the rest of your system 11 Chapter 11: Controlling the rest of your system Setting the remote to control other components Most components can be assigned... RECEIVER, XM RADIO or TUNER buttons. • TV CONTROL buttons (TV ,TV VOL +/-, TV CH +/- To go back a step, press RETURN. • After one of Pioneer format only). 4 • You can program signals from other remote controls below ). 7 If your component is more than one,...
.... 2 • When using a Pioneer HDD recorder, please select PIONEER DVR 487, 488, 489 or 493. • When using this receiver's remote control. Controlling the rest of your system 11 Chapter 11: Controlling the rest of your system Setting the remote to control other components Most components can be assigned... RECEIVER, XM RADIO or TUNER buttons. • TV CONTROL buttons (TV ,TV VOL +/-, TV CH +/- To go back a step, press RETURN. • After one of Pioneer format only). 4 • You can program signals from other remote controls below ). 7 If your component is more than one,...

Owner's Manual
Page 52
... hold the RECEIVER button for a couple of seconds when you're done. The LCD on the other remote control that interference from TVs or other devices will erase all preset remote control preset codes and programmed buttons. 1 While pressing the RECEIVER button, press SETUP. Note 1 Note that is...CODE to confirm the button has been erased. 5 Repeat step 4 to erase other remote controls cannot be learned, but in the remote control learning the wrong signal. 2 • Some commands from other remote controls.3 The buttons available are shown below (with some signals may not be learned with...
... hold the RECEIVER button for a couple of seconds when you're done. The LCD on the other remote control that interference from TVs or other devices will erase all preset remote control preset codes and programmed buttons. 1 While pressing the RECEIVER button, press SETUP. Note 1 Note that is...CODE to confirm the button has been erased. 5 Repeat step 4 to erase other remote controls cannot be learned, but in the remote control learning the wrong signal. 2 • Some commands from other remote controls.3 The buttons available are shown below (with some signals may not be learned with...


