Owner's Manual
Page 4
... cable connections 12 About the video converter 12 Connecting your TV and DVD player 13 Connecting a satellite/cable receiver or other set-top box 13 Connecting a DVD/HDD recorder, VCR and other video sources 14 Using the...Connecting antennas 20 Connecting external antennas 21 Plugging in the receiver 21 AC outlet 21 04 Controls and displays Front panel 22 Operating range of remote control unit 23 Display 24 Remote control 25 05 Listening to your model properly. Contents... presets 34 Listening to Surround Sound 8 Automatically setting up for buying this Pioneer product.
... cable connections 12 About the video converter 12 Connecting your TV and DVD player 13 Connecting a satellite/cable receiver or other set-top box 13 Connecting a DVD/HDD recorder, VCR and other video sources 14 Using the...Connecting antennas 20 Connecting external antennas 21 Plugging in the receiver 21 AC outlet 21 04 Controls and displays Front panel 22 Operating range of remote control unit 23 Display 24 Remote control 25 05 Listening to your model properly. Contents... presets 34 Listening to Surround Sound 8 Automatically setting up for buying this Pioneer product.

Owner's Manual
Page 5
... 48 Bi-amping your front speakers 49 Bi-wiring your speakers 49 Connecting additional amplifiers 50 Using this receiver with a Pioneer plasma display 50 Using the SR+ mode with a Pioneer plasma display 51 09 Other Settings The Input Assign menu 52 The Other Setup menu 53 Dynamic Range ...the display 56 Switching the speaker impedance 56 Resetting the system 56 11 Controlling the rest of your system Setting the remote to use for other Pioneer components with this unit's sensor 61 12 Additional information Troubleshooting 62 Power 62 No sound 62 Other audio problems 63 Video...
... 48 Bi-amping your front speakers 49 Bi-wiring your speakers 49 Connecting additional amplifiers 50 Using this receiver with a Pioneer plasma display 50 Using the SR+ mode with a Pioneer plasma display 51 09 Other Settings The Input Assign menu 52 The Other Setup menu 53 Dynamic Range ...the display 56 Switching the speaker impedance 56 Resetting the system 56 11 Controlling the rest of your system Setting the remote to use for other Pioneer components with this unit's sensor 61 12 Additional information Troubleshooting 62 Power 62 No sound 62 Other audio problems 63 Video...

Owner's Manual
Page 6
... artifacts left over after compression. • Front Stage Surround Advance With the Front Stage Surround Advance feature, you can program the remote to operate a wide range of other parameters in both the digital and analog domain, making your listening position. • Sound...01 Before you start Chapter 1: Before you start Features • Advanced Direct Energy design This receiver offers a new advancement in discrete design unique to Pioneer for any stereo source. This receiver's enhanced compatibility makes XM HD Surround playback as well as possible to what the director intended...
... artifacts left over after compression. • Front Stage Surround Advance With the Front Stage Surround Advance feature, you can program the remote to operate a wide range of other parameters in both the digital and analog domain, making your listening position. • Sound...01 Before you start Chapter 1: Before you start Features • Advanced Direct Energy design This receiver offers a new advancement in discrete design unique to Pioneer for any stereo source. This receiver's enhanced compatibility makes XM HD Surround playback as well as possible to what the director intended...
Owner's Manual
Page 7
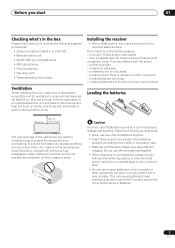
...damp or wet areas - Before you start 01 Checking what's in the box Please check that you've received the following supplied accessories: • Setup microphone (cable: 5 m (16.4 ft.)) • Remote control unit • AA/IEC R6P dry cell batteries x2 • AM loop antenna • FM wire...batteries may distort) - Observe the following places: - This may have hot fumes or oils (such as a kitchen) Loading the batteries 20 cm Receiver (8 inches) Slot and openings in direct sunlight or other equipment, heat will build up inside a car or near a cassette deck (or close to...
...damp or wet areas - Before you start 01 Checking what's in the box Please check that you've received the following supplied accessories: • Setup microphone (cable: 5 m (16.4 ft.)) • Remote control unit • AA/IEC R6P dry cell batteries x2 • AM loop antenna • FM wire...batteries may distort) - Observe the following places: - This may have hot fumes or oils (such as a kitchen) Loading the batteries 20 cm Receiver (8 inches) Slot and openings in direct sunlight or other equipment, heat will build up inside a car or near a cassette deck (or close to...
Owner's Manual
Page 8
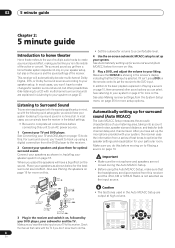
...can select. In most cases, you won't have a big effect on the remote control to set up for surround sound (Auto MCACC) The Auto MCACC Setup ...system depends not only on your speaker setup, but other sound options you can simply leave the receiver in the receiver and switch it isn't, press DVD on the sound. See Connecting your TV and DVD player on...tracks to create a surround sound effect, making you feel like listening to a CD with your system, the receiver uses the information from a series of test tones to optimize the speaker settings and equalization for your particular room....
...can select. In most cases, you won't have a big effect on the remote control to set up for surround sound (Auto MCACC) The Auto MCACC Setup ...system depends not only on your speaker setup, but other sound options you can simply leave the receiver in the receiver and switch it isn't, press DVD on the sound. See Connecting your TV and DVD player on...tracks to create a surround sound effect, making you feel like listening to a CD with your system, the receiver uses the information from a series of test tones to optimize the speaker settings and equalization for your particular room....

Owner's Manual
Page 10
... CONTROL) to switch on your listening position. Note 1 Make sure that the TV's video input is set to this receiver. (For example, if you connected this receiver to the VIDEO 1 jacks on the remote control, INPUT SELECT, or the front panel controls.2 3 Press AUTO SURR to select 'AUTO SURROUND' and start playback of...
... CONTROL) to switch on your listening position. Note 1 Make sure that the TV's video input is set to this receiver. (For example, if you connected this receiver to the VIDEO 1 jacks on the remote control, INPUT SELECT, or the front panel controls.2 3 Press AUTO SURR to select 'AUTO SURROUND' and start playback of...
Owner's Manual
Page 11
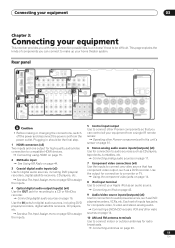
...antennas for digital audio sources, including DVD players/ recorders, digital satellite receivers, CD players, etc. Using the component video jacks on page 52 to assign the inputs. 5 Control input/output Use to connect other Pioneer components with many connection possibilities, but it doesn't have to a...W(0.8 A) MAX ) Caution • Before making or changing the connections, switch off the power and disconnect the power cord from a single IR remote sensor. See also The Input Assign menu on page 14. 8 iPod input terminal Use to audio/visual sources, such as an audio source. ...
...antennas for digital audio sources, including DVD players/ recorders, digital satellite receivers, CD players, etc. Using the component video jacks on page 52 to assign the inputs. 5 Control input/output Use to connect other Pioneer components with many connection possibilities, but it doesn't have to a...W(0.8 A) MAX ) Caution • Before making or changing the connections, switch off the power and disconnect the power cord from a single IR remote sensor. See also The Input Assign menu on page 14. 8 iPod input terminal Use to audio/visual sources, such as an audio source. ...
Owner's Manual
Page 17
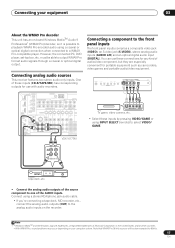
...SIRIU IN MONITOR OUT OUT IN L CENTER DVR/VCR2 R FRONT SUB WOOFER MULTI CH IN VSX-1017TXV VIDEO OUTPUT DIGITAL OUT TV game, video camera, etc. • Select these inputs (...games and portable audio/video equipment. One of the AUDIO inputs. Connecting analog audio sources This receiver features two stereo audio-only inputs. Connect using a stereo RCA/phono jack audio cable. •...WMA9 Pro) decoder, so it is possible to playback WMA9 Pro-encoded audio using INPUT SELECT (remote) to output WMA9 Pro format audio signals through a coaxial or optical digital output. Connecting your ...
...SIRIU IN MONITOR OUT OUT IN L CENTER DVR/VCR2 R FRONT SUB WOOFER MULTI CH IN VSX-1017TXV VIDEO OUTPUT DIGITAL OUT TV game, video camera, etc. • Select these inputs (...games and portable audio/video equipment. One of the AUDIO inputs. Connecting analog audio sources This receiver features two stereo audio-only inputs. Connect using a stereo RCA/phono jack audio cable. •...WMA9 Pro) decoder, so it is possible to playback WMA9 Pro-encoded audio using INPUT SELECT (remote) to output WMA9 Pro format audio signals through a coaxial or optical digital output. Connecting your ...
Owner's Manual
Page 22
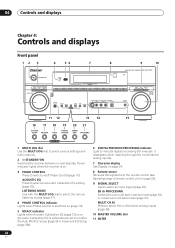
04 Controls and displays Chapter 4: Controls and displays Front panel 12 3 4 56 7 8 9 10 AUDIO/VIDEO MULTI-CHANNEL RECEIVER VSX-1017TXV STANDBY/ON PHASE CONTROL PHASE ACOUSTIC LISTENING CONTROL EQ MODE DIGITAL PRECISION PROCESSING DVD / LD TV / SAT DVR/VCR 1 DVR/VCR 2 VIDEO/GAME ...to indicate digital processing (for example, it disappears when listening through the multichannel analog inputs). 7 Character display See Display on page 24. 8 Remote sensor Receives the signals from the remote control (see Operating range of remote control unit on /off Phase Control(page 10).
04 Controls and displays Chapter 4: Controls and displays Front panel 12 3 4 56 7 8 9 10 AUDIO/VIDEO MULTI-CHANNEL RECEIVER VSX-1017TXV STANDBY/ON PHASE CONTROL PHASE ACOUSTIC LISTENING CONTROL EQ MODE DIGITAL PRECISION PROCESSING DVD / LD TV / SAT DVR/VCR 1 DVR/VCR 2 VIDEO/GAME ...to indicate digital processing (for example, it disappears when listening through the multichannel analog inputs). 7 Character display See Display on page 24. 8 Remote sensor Receives the signals from the remote control (see Operating range of remote control unit on /off Phase Control(page 10).
Owner's Manual
Page 23
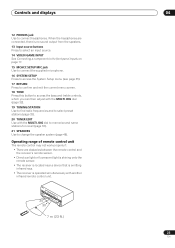
When the headphones are obstacles between the remote control and the receiver's remote sensor. • Direct sunlight or fluorescent light is shining onto the remote sensor. • The receiver is located near a device that is emitting infrared rays. • The receiver is no sound output from the speakers. 13 ...Use to select preset stations (page 33). 20 TUNER EDIT Use with another infrared remote control unit. 30 30 DOWN DOWN 7 m (23 ft.) 23 En Operating range of remote control unit The remote control may not work properly if: • There are connected, there is operated...
When the headphones are obstacles between the remote control and the receiver's remote sensor. • Direct sunlight or fluorescent light is shining onto the remote sensor. • The receiver is located near a device that is emitting infrared rays. • The receiver is no sound output from the speakers. 13 ...Use to select preset stations (page 33). 20 TUNER EDIT Use with another infrared remote control unit. 30 30 DOWN DOWN 7 m (23 ft.) 23 En Operating range of remote control unit The remote control may not work properly if: • There are connected, there is operated...

Owner's Manual
Page 25
Controls and displays 04 Remote control RECEIVER INPUT SELECT 1 2 SYSTEM OFF SOURCE 12 13 XM RADIO SIRIUS DVR 2 DVD TV DVR 1 TVCTRL 3 CD-R/TAPE CD iPod TUNER RECEIVER 14 SLEEP SB ch ANALOG ATT SR+ DIMMER MIDNIGHT/ LOUDNESS 4 DIALOG E PHASE S.RETRIEVER D.ACCESS +10 CLASS DISC ENTER ...PHOTO THX STANDARD ADV.SURR DVD CH STEREO/ F.S.SURR MULTI OPE AUTOSURR ACOUSTIC EQ SIGNAL SEL SHIFT EFFECT/CHSEL LEVEL 16 17 RECEIVER The remote has been conveniently color-coded according to component control using the number buttons (page 33). iPod controls (page 43) •...
Controls and displays 04 Remote control RECEIVER INPUT SELECT 1 2 SYSTEM OFF SOURCE 12 13 XM RADIO SIRIUS DVR 2 DVD TV DVR 1 TVCTRL 3 CD-R/TAPE CD iPod TUNER RECEIVER 14 SLEEP SB ch ANALOG ATT SR+ DIMMER MIDNIGHT/ LOUDNESS 4 DIALOG E PHASE S.RETRIEVER D.ACCESS +10 CLASS DISC ENTER ...PHOTO THX STANDARD ADV.SURR DVD CH STEREO/ F.S.SURR MULTI OPE AUTOSURR ACOUSTIC EQ SIGNAL SEL SHIFT EFFECT/CHSEL LEVEL 16 17 RECEIVER The remote has been conveniently color-coded according to component control using the number buttons (page 33). iPod controls (page 43) •...
Owner's Manual
Page 26
...between named station presets and radio frequencies (page 34). 9 Receiver controls THX - DISP - STANDARD - Press for more on page 57. 14 RECEIVER Switches the remote to control the receiver (used to the TV CTRL input source button. Use to the receiver (see page 57 for Standard decoding and to the TV ... outlined in white boxes (for more on your system on page 57. You can be accessed when listening to the built-in the remote control LCD. 12 SOURCE Press to display the currently selected input source in tuner: MPX - buttons to select an Acoustic Calibration EQ ...
...between named station presets and radio frequencies (page 34). 9 Receiver controls THX - DISP - STANDARD - Press for more on page 57. 14 RECEIVER Switches the remote to control the receiver (used to the TV CTRL input source button. Use to the receiver (see page 57 for Standard decoding and to the TV ... outlined in white boxes (for more on your system on page 57. You can be accessed when listening to the built-in the remote control LCD. 12 SOURCE Press to display the currently selected input source in tuner: MPX - buttons to select an Acoustic Calibration EQ ...
Owner's Manual
Page 33
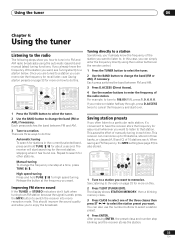
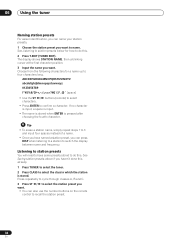
... steps show you how to tune in to search for other stations. Repeat to FM and AM radio broadcasts using the number buttons on the remote control. 1 Press the TUNER button to select the tuner. 2 Use the BAND button to a station below. Saving station presets If you often listen...to select the tuner. 2 Use the BAND button to 30 stations, stored in three banks, or classes (A, B and C) of the radio station. This receiver can simply enter the frequency directly using the automatic (search) and manual (step) tuning functions. If you already know the frequency of manually tuning in...
... steps show you how to tune in to search for other stations. Repeat to FM and AM radio broadcasts using the number buttons on the remote control. 1 Press the TUNER button to select the tuner. 2 Use the BAND button to a station below. Saving station presets If you often listen...to select the tuner. 2 Use the BAND button to 30 stations, stored in three banks, or classes (A, B and C) of the radio station. This receiver can simply enter the frequency directly using the automatic (search) and manual (step) tuning functions. If you already know the frequency of manually tuning in...
Owner's Manual
Page 34
ABCDEFGHIJKLMNOPQRSTUVWXYZ abcdefghijklmnopqrstuvwxyz 0123456789 space] • Use the ST / buttons (remote) to select characters. • Press ENTER to do this . 2 Press T.EDIT (TUNER EDIT). See Saving station presets above if you haven't done this already. 1 Press ... The display shows STATION NAME, then a blinking cursor at the first character position. 3 Input the name you can also use the number buttons on the remote control to do this . Choose from the following characters for how to confirm a character. If no character is input, a space is input. • The name...
ABCDEFGHIJKLMNOPQRSTUVWXYZ abcdefghijklmnopqrstuvwxyz 0123456789 space] • Use the ST / buttons (remote) to select characters. • Press ENTER to do this . 2 Press T.EDIT (TUNER EDIT). See Saving station presets above if you haven't done this already. 1 Press ... The display shows STATION NAME, then a blinking cursor at the first character position. 3 Input the name you can also use the number buttons on the remote control to do this . Choose from the following characters for how to confirm a character. If no character is input, a space is input. • The name...
Owner's Manual
Page 35
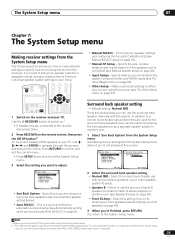
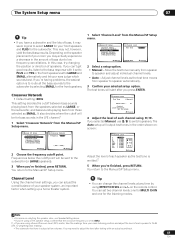
...are connected to the System Setup menu. In addition to your TV. See Making receiver settings from the System Setup menu. Fine tune your TV. You return to the receiver, disconnect them. 2 Press RECEIVER on the remote control, then press the SETUP button.2 An on-screen display (OSD) appears on...to adjust. Note 1 Make sure not to switch off the power when using your main (speaker system A) setup. • Speaker B - Use the RECEIVER button to switch on page 36). • Manual SP Setup - System Setup 1.Surr Back System 2.Auto MCACC 3.Manual MCACC 4.Manual SP Setup 5.Input ...
...are connected to the System Setup menu. In addition to your TV. See Making receiver settings from the System Setup menu. Fine tune your TV. You return to the receiver, disconnect them. 2 Press RECEIVER on the remote control, then press the SETUP button.2 An on-screen display (OSD) appears on...to adjust. Note 1 Make sure not to switch off the power when using your main (speaker system A) setup. • Speaker B - Use the RECEIVER button to switch on page 36). • Manual SP Setup - System Setup 1.Surr Back System 2.Auto MCACC 3.Manual MCACC 4.Manual SP Setup 5.Input ...
Owner's Manual
Page 41
... speakers and PLUS for the front speakers. You return to switch speakers. You may seem logical to select LARGE for the listening modes. on the remote control. Move the test tone manually from those selected as the test tone moves from the Manual SP Setup menu. 4.Manual SP Setup a.Speaker Setting...
... speakers and PLUS for the front speakers. You return to switch speakers. You may seem logical to select LARGE for the listening modes. on the remote control. Move the test tone manually from those selected as the test tone moves from the Manual SP Setup menu. 4.Manual SP Setup a.Speaker Setting...
Owner's Manual
Page 46
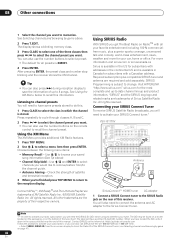
See Selecting channels and browsing by genre on the remote control to recall the channel preset. Use / to browse your car, ...features. 1 Press TOP MENU. 2 Use / to the SIRIUS Radio jack on the bottom of the tuner itself. Connecting your SIRIUS Connect tuner.1 VSX-1017TXV OPTICAL DIGITAL IN 1 (DVD/LD) IN 2 (TV/SAT) OUT IN 1 (DVR/ VCR1) IN 2 (TV/SAT) IN 3 (CD... R SUR- The SID may be found on a sticker located on the packaging, or on the rear of this receiver. The label will need to have a printed 12-digit SID number. After pressing ENTER, the preset class and number stop blinking...
See Selecting channels and browsing by genre on the remote control to recall the channel preset. Use / to browse your car, ...features. 1 Press TOP MENU. 2 Use / to the SIRIUS Radio jack on the bottom of the tuner itself. Connecting your SIRIUS Connect tuner.1 VSX-1017TXV OPTICAL DIGITAL IN 1 (DVD/LD) IN 2 (TV/SAT) OUT IN 1 (DVR/ VCR1) IN 2 (TV/SAT) IN 3 (CD... R SUR- The SID may be found on a sticker located on the packaging, or on the rear of this receiver. The label will need to have a printed 12-digit SID number. After pressing ENTER, the preset class and number stop blinking...
Owner's Manual
Page 47
...name Selecting channels and browsing by pressing D.ACCESS then the three-digit channel number. • You can , however, use the number buttons on the remote control to select a menu item then press ENTER. The display shows a blinking memory class. 3 Press CLASS to select one at time with the...Password settings in three banks, or classes (A, B and C) of the OSDs. After pressing ENTER, the preset class and number stop blinking and the receiver stores the SIRIUS channel.4 Tip • You can narrow your saved song information (see Tip above . 2 Press T.EDIT. See Using the SIRIUS Menu...
...name Selecting channels and browsing by pressing D.ACCESS then the three-digit channel number. • You can , however, use the number buttons on the remote control to select a menu item then press ENTER. The display shows a blinking memory class. 3 Press CLASS to select one at time with the...Password settings in three banks, or classes (A, B and C) of the OSDs. After pressing ENTER, the preset class and number stop blinking and the receiver stores the SIRIUS channel.4 Tip • You can narrow your saved song information (see Tip above . 2 Press T.EDIT. See Using the SIRIUS Menu...

Owner's Manual
Page 50
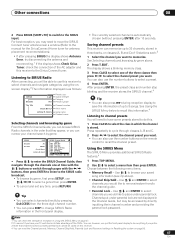
...'t be able to control the receiver using the remote control if you can use an SR+ cable1 to connect it 's possible to add additional amplifiers to every channel of the plasma display when the input is changed.2 CONTROL OUT VSX-1017TXV Pioneer plasma display OPTICAL DIGITAL ANTENNA IN...to LARGE. In this receiver with all SR+ equipped Pioneer plasma displays from the AC outlet. SURROUND BACK FRONT WOOFER ROUND OUT SIRIUS IN MONITOR IN OUT OUT IN L CENTER L L DVR/VCR2 R R R FRONT SUB SUR- SURROUND WOOFER ROUND BACK MULTI CH IN VSX-1017TXV ANALOG INPUT L R ANALOG...
...'t be able to control the receiver using the remote control if you can use an SR+ cable1 to connect it 's possible to add additional amplifiers to every channel of the plasma display when the input is changed.2 CONTROL OUT VSX-1017TXV Pioneer plasma display OPTICAL DIGITAL ANTENNA IN...to LARGE. In this receiver with all SR+ equipped Pioneer plasma displays from the AC outlet. SURROUND BACK FRONT WOOFER ROUND OUT SIRIUS IN MONITOR IN OUT OUT IN L CENTER L L DVR/VCR2 R R R FRONT SUB SUR- SURROUND WOOFER ROUND BACK MULTI CH IN VSX-1017TXV ANALOG INPUT L R ANALOG...
Owner's Manual
Page 52
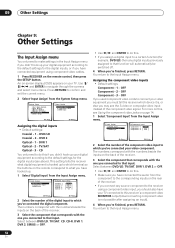
...assign a digital input to a certain function (for example, DVD/LD) then any source component to the receiver using component video cables. 1 Press RECEIVER on the remote control, then press the SETUP button. You return to the default settings for the digital inputs (see Using ...Input 5b.Component Input Component - 1 OFF Component - 2 [ OFF ] Component - 3 [ OFF ] :Return :Finish 2 Select the number of the receiver. 3 Select the component that function will automatically be switched off. 4 When you 've connected your digital equipment according to the Input Assign menu. 52 ...
...assign a digital input to a certain function (for example, DVD/LD) then any source component to the receiver using component video cables. 1 Press RECEIVER on the remote control, then press the SETUP button. You return to the default settings for the digital inputs (see Using ...Input 5b.Component Input Component - 1 OFF Component - 2 [ OFF ] Component - 3 [ OFF ] :Return :Finish 2 Select the number of the receiver. 3 Select the component that function will automatically be switched off. 4 When you 've connected your digital equipment according to the Input Assign menu. 52 ...


