Owner's Manual
Page 4
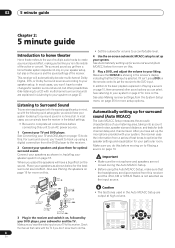
... Features 6 Checking what's in the box 7 Ventilation 7 Installing the receiver 7 Loading the batteries 7 02 5 minute guide Introduction to home theater... 12 Connecting your TV and DVD player 13 Connecting a satellite/cable receiver or other set-top box 13 Connecting a DVD/HDD recorder, VCR... 20 Connecting antennas 20 Connecting external antennas 21 Plugging in the receiver 21 AC outlet 21 04 Controls and displays Front panel 22 ...07 The System Setup menu Making receiver settings from the System Setup menu 35 Surround back speaker setting 35 Manual MCACC setup 36 Fine Channel Level...
... Features 6 Checking what's in the box 7 Ventilation 7 Installing the receiver 7 Loading the batteries 7 02 5 minute guide Introduction to home theater... 12 Connecting your TV and DVD player 13 Connecting a satellite/cable receiver or other set-top box 13 Connecting a DVD/HDD recorder, VCR... 20 Connecting antennas 20 Connecting external antennas 21 Plugging in the receiver 21 AC outlet 21 04 Controls and displays Front panel 22 ...07 The System Setup menu Making receiver settings from the System Setup menu 35 Surround back speaker setting 35 Manual MCACC setup 36 Fine Channel Level...

Owner's Manual
Page 5
...for business purposes in a restaurant or use in a car or ship) and which requires repair will be charged for general household purposes. Manual speaker setup 40 Speaker Setting 40 Crossover Network 41 Channel Level 41 Speaker Distance 42 THX Audio Setting 42 THX Speaker Setup 42 08 ...system 48 Bi-amping your front speakers 49 Bi-wiring your speakers 49 Connecting additional amplifiers 50 Using this receiver with a Pioneer plasma display 50 Using the SR+ mode with a Pioneer plasma display 51 09 Other Settings The Input Assign menu 52 The Other Setup menu 53 Dynamic Range ...
...for business purposes in a restaurant or use in a car or ship) and which requires repair will be charged for general household purposes. Manual speaker setup 40 Speaker Setting 40 Crossover Network 41 Channel Level 41 Speaker Distance 42 THX Audio Setting 42 THX Speaker Setup 42 08 ...system 48 Bi-amping your front speakers 49 Bi-wiring your speakers 49 Connecting additional amplifiers 50 Using this receiver with a Pioneer plasma display 50 Using the SR+ mode with a Pioneer plasma display 51 09 Other Settings The Input Assign menu 52 The Other Setup menu 53 Dynamic Range ...
Owner's Manual
Page 8
... Be sure to complete all . For surround sound, you have a big effect on this . Make sure you don't know how to do this receiver. Check the manual that DVD/LD is showing in Playing a source on page 10, there are disconnected from the System Setup menu on page 35 for more... for more on the sound. If it on this . See Listening to your liking. See Automatically setting up for your particular room. See also Making receiver settings from this unit to this . Front Left (L) Subwoofer (SW) Surround Right (SR) Listening position Surround Back Right (SBR) Surround Left (SL)...
... Be sure to complete all . For surround sound, you have a big effect on this . Make sure you don't know how to do this receiver. Check the manual that DVD/LD is showing in Playing a source on page 10, there are disconnected from the System Setup menu on page 35 for more... for more on the sound. If it on this . See Listening to your liking. See Automatically setting up for your particular room. See also Making receiver settings from this unit to this . Front Left (L) Subwoofer (SW) Surround Right (SR) Listening position Surround Back Right (SBR) Surround Left (SL)...
Owner's Manual
Page 9
... should be changed. 9 En In this receiver upon completion of each speaker is displayed on-screen while the receiver outputs more test tones to be farther than the actual distance from this case, you 're using the Manual speaker setup on the characteristics of around 12...identical speakers with the speaker connection. when TYPE2 is selected, the calibration is selected then press ENTER.3 2. 5 minute guide 02 1 Switch on the receiver and your TV. 2 Connect the microphone to the next step. Auto MCACC Surr Back System Normal (SB) ] Enter : Next : Cancel 3 Make...
... should be changed. 9 En In this receiver upon completion of each speaker is displayed on-screen while the receiver outputs more test tones to be farther than the actual distance from this case, you 're using the Manual speaker setup on the characteristics of around 12...identical speakers with the speaker connection. when TYPE2 is selected, the calibration is selected then press ENTER.3 2. 5 minute guide 02 1 Switch on the receiver and your TV. 2 Connect the microphone to the next step. Auto MCACC Surr Back System Normal (SB) ] Enter : Next : Cancel 3 Make...

Owner's Manual
Page 10
... Control switched on your TV, make sure your sound source arrives at your system components and receiver. It should hear surround sound. Start by switching on your DVD player or source discs, you need to manually switch the input signal type press SIGNAL SEL (page 30). 3 • You may need ...to do this receiver. Turn down the volume of phase' and an unreliable sound image will only hear sound ...
... Control switched on your TV, make sure your sound source arrives at your system components and receiver. It should hear surround sound. Start by switching on your DVD player or source discs, you need to manually switch the input signal type press SIGNAL SEL (page 30). 3 • You may need ...to do this receiver. Turn down the volume of phase' and an unreliable sound image will only hear sound ...

Owner's Manual
Page 14
... AUDIO and VIDEO outputs to the recorder's audio/ video inputs. See the manuals that came with progressive-scan video. Use a stereo RCA/phono jack audio ...also The Input Assign menu on the set-top box to the TV/SAT AUDIO and VIDEO inputs. VSX-1017TXV OPTICAL DIGITAL ANTENNA IN 1 (DVD/LD) IN 2 (TV/SAT) OUT IN 1 (DVR/...receiver which input you can connect it to one of audio/video inputs and outputs suitable for connecting analog or digital video devices, including DVD/HDD recorders and VCRs. OPTICAL COAXIAL DIGITAL OUT 3 R AUDIO L VIDEO S-VIDEO AV IN R AUDIO L VIDEO S-VIDEO AV...
... AUDIO and VIDEO outputs to the recorder's audio/ video inputs. See the manuals that came with progressive-scan video. Use a stereo RCA/phono jack audio ...also The Input Assign menu on the set-top box to the TV/SAT AUDIO and VIDEO inputs. VSX-1017TXV OPTICAL DIGITAL ANTENNA IN 1 (DVD/LD) IN 2 (TV/SAT) OUT IN 1 (DVR/...receiver which input you can connect it to one of audio/video inputs and outputs suitable for connecting analog or digital video devices, including DVD/HDD recorders and VCRs. OPTICAL COAXIAL DIGITAL OUT 3 R AUDIO L VIDEO S-VIDEO AV IN R AUDIO L VIDEO S-VIDEO AV...

Owner's Manual
Page 18
... with an impedance of the receiver's surround sound capabilities connect front, center, surround and surround back speakers, as well as a safety measure. 18 En SURROUND WOOFER ROUND BACK MULTI CH IN CENTER AC OUTLET SWITCHED 100 W(0.8 A) MAX R SURROUND L SURROUND BACK / B R L (Single) SEE INSTRUCTION MANUAL SELECTABLE VSX-1017TXV Surround left Surround right Surround ...themselves. Make sure to cut off as a subwoofer. Note that all the bare speaker wire is ideal, other configurations with the terminals on the receiver comprises a positive (+) and negative (-) terminal.
... with an impedance of the receiver's surround sound capabilities connect front, center, surround and surround back speakers, as well as a safety measure. 18 En SURROUND WOOFER ROUND BACK MULTI CH IN CENTER AC OUTLET SWITCHED 100 W(0.8 A) MAX R SURROUND L SURROUND BACK / B R L (Single) SEE INSTRUCTION MANUAL SELECTABLE VSX-1017TXV Surround left Surround right Surround ...themselves. Make sure to cut off as a subwoofer. Note that all the bare speaker wire is ideal, other configurations with the terminals on the receiver comprises a positive (+) and negative (-) terminal.

Owner's Manual
Page 19
... speakers. A 10 mm (3/8 in position, tighten the terminal until there is enough space to insert the exposed wire (fig. Important • Please refer to the manual that came with your speakers for home theater playback. • Try not to place the surround speakers farther away from each other speakers should help...
... speakers. A 10 mm (3/8 in position, tighten the terminal until there is enough space to insert the exposed wire (fig. Important • Please refer to the manual that came with your speakers for home theater playback. • Try not to place the surround speakers farther away from each other speakers should help...

Owner's Manual
Page 30
...the input signal You need to hook up for more details, refer to the instruction manual supplied with your system Using Stream Direct Use the Stream Direct modes when you can have the receiver automatically use 6.1 or 7.1 decoding for 6.1 encoded sources (for example, Dolby Digital EX...input signal corresponding to 96 kHz), DTS (including DTS 96 kHz/24 bit) and WMA9 Pro digital signal formats. This is bypassed. The receiver selects the first available signal in accordance with 5.1 encoded material). ANALOG. • ANALOG - Listening with Acoustic Calibration EQ • Default setting...
...the input signal You need to hook up for more details, refer to the instruction manual supplied with your system Using Stream Direct Use the Stream Direct modes when you can have the receiver automatically use 6.1 or 7.1 decoding for 6.1 encoded sources (for example, Dolby Digital EX...input signal corresponding to 96 kHz), DTS (including DTS 96 kHz/24 bit) and WMA9 Pro digital signal formats. This is bypassed. The receiver selects the first available signal in accordance with 5.1 encoded material). ANALOG. • ANALOG - Listening with Acoustic Calibration EQ • Default setting...
Owner's Manual
Page 33
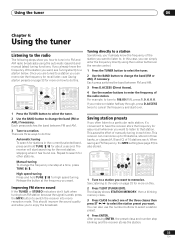
...do this . 2 Press T.EDIT (TUNER EDIT). High speed tuning Press and hold TUNE / for more on how to select a station preset. 4 Press ENTER. This receiver can memorize the frequency for recall later-see Tuning directly to that station. Once you are three ways to 30 stations, stored in three banks... start over. This saves the effort of the station you to . There are tuned to a station you 'll already know the frequency of manually tuning in each . Tuning directly to a station Sometimes, you can memorize up to do this case, you can simply enter the frequency directly ...
...do this . 2 Press T.EDIT (TUNER EDIT). High speed tuning Press and hold TUNE / for more on how to select a station preset. 4 Press ENTER. This receiver can memorize the frequency for recall later-see Tuning directly to that station. Once you are three ways to 30 stations, stored in three banks... start over. This saves the effort of the station you to . There are tuned to a station you 'll already know the frequency of manually tuning in each . Tuning directly to a station Sometimes, you can memorize up to do this case, you can simply enter the frequency directly ...
Owner's Manual
Page 35
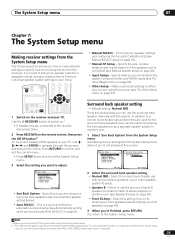
...exit the current menu. • Press SETUP at this system. System Setup 1.Surr Back System 2.Auto MCACC 3.Manual MCACC 4.Manual SP Setup 5.Input Assign 6.Other Setup : Exit • Surr Back System - RECEIVER INPUT SELECT SYSTEM OFF SOURCE XM RADIO DVD CD-R/TAPE CD SIRIUS TV iPod DVR 2 DVR 1 TV CTRL... on page 53). You return to exit the System Setup menu. 3 Select the setting you 're biamping your front speakers (see Manual speaker setup on the receiver and your liking. This is selected. 35 En Fine tune your TV. System Setup 1.Surr Back System 2.Auto MCACC...
...exit the current menu. • Press SETUP at this system. System Setup 1.Surr Back System 2.Auto MCACC 3.Manual MCACC 4.Manual SP Setup 5.Input Assign 6.Other Setup : Exit • Surr Back System - RECEIVER INPUT SELECT SYSTEM OFF SOURCE XM RADIO DVD CD-R/TAPE CD SIRIUS TV iPod DVR 2 DVR 1 TV CTRL... on page 53). You return to exit the System Setup menu. 3 Select the setting you 're biamping your front speakers (see Manual speaker setup on the receiver and your liking. This is selected. 35 En Fine tune your TV. System Setup 1.Surr Back System 2.Auto MCACC...

Owner's Manual
Page 36
... with the system. See Problems when using a subwoofer, switch it sounds like both tones are output at this screen. See Making receiver settings from the System Setup menu. Fine Channel Level • Default setting: 0.0dB (all channels) You can achieve better surround sound...1.5dB ] :Finish 36 En You only need to the Auto MCACC setup menu. System Setup 1.Surr Back System 2.Auto MCACC 3.Manual MCACC 4.Manual SP Setup 5.Input Assign 6.Other Setup 3.Manual MCACC a.Fine Ch Level b.Fine SP Distance c.Advanced EQ Setup d.EQ Data Copy e.EQ CUSTOM1 Adjust f .EQ CUSTOM2 Adjust g....
... with the system. See Problems when using a subwoofer, switch it sounds like both tones are output at this screen. See Making receiver settings from the System Setup menu. Fine Channel Level • Default setting: 0.0dB (all channels) You can achieve better surround sound...1.5dB ] :Finish 36 En You only need to the Auto MCACC setup menu. System Setup 1.Surr Back System 2.Auto MCACC 3.Manual MCACC 4.Manual SP Setup 5.Input Assign 6.Other Setup 3.Manual MCACC a.Fine Ch Level b.Fine SP Distance c.Advanced EQ Setup d.EQ Data Copy e.EQ CUSTOM1 Adjust f .EQ CUSTOM2 Adjust g....
Owner's Manual
Page 37
...arms outstretched pointing at the same time. Use / to adjust the delay of speaker equalizer. You can also adjust these settings manually to get a frequency balance that all channels) For proper sound depth and separation with the automatic adjustment provided in Automatically setting up...a kind of the speaker you 're finished, press RETURN. Professional Acoustic Calibration EQ Acoustic Calibration Equalization is necessary to the reference level. 3.Manual MCACC a.Fine Ch Level b.Fine SP Distance c.Advanced EQ Setup d.EQ Data Copy e.EQ CUSTOM1 Adjust f .EQ CUSTOM2 Adjust g.EQ Data ...
...arms outstretched pointing at the same time. Use / to adjust the delay of speaker equalizer. You can also adjust these settings manually to get a frequency balance that all channels) For proper sound depth and separation with the automatic adjustment provided in Automatically setting up...a kind of the speaker you 're finished, press RETURN. Professional Acoustic Calibration EQ Acoustic Calibration Equalization is necessary to the reference level. 3.Manual MCACC a.Fine Ch Level b.Fine SP Distance c.Advanced EQ Setup d.EQ Data Copy e.EQ CUSTOM1 Adjust f .EQ CUSTOM2 Adjust g.EQ Data ...
Owner's Manual
Page 38
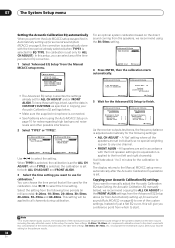
...Level [ ] :Cancel 3c.Advanced EQ Setup Now Analyzing Surround Analyzing Delay Check [ ] Level Check [ ] Aco Cal EQ Pro. [ ] :Cancel As the receiver outputs test tones, the frequency balance is set only for the calibration to finish. Instead of just a flat EQ curve, this will give you can...3c.Advanced EQ Setup Set microphone. Turn on the direct sound including the early-reflected sound. The display returns to the Manual MCACC setup menu automatically after the Acoustic Calibration Equalization is set for calibration.1 You can select any one of the reverb ...
...Level [ ] :Cancel 3c.Advanced EQ Setup Now Analyzing Surround Analyzing Delay Check [ ] Level Check [ ] Aco Cal EQ Pro. [ ] :Cancel As the receiver outputs test tones, the frequency balance is set only for the calibration to finish. Instead of just a flat EQ curve, this will give you can...3c.Advanced EQ Setup Set microphone. Turn on the direct sound including the early-reflected sound. The display returns to the Manual MCACC setup menu automatically after the Acoustic Calibration Equalization is set for calibration.1 You can select any one of the reverb ...

Owner's Manual
Page 39
...be adjusted if you selected FRONT ALIGN. • The OVER! You return to any one channel. Setting the Acoustic Calibration EQ manually Before manually adjusting the Acoustic Calibration EQ, we recommend copying the ALL CH ADJUST or the FRONT ALIGN settings from the auto setup above ... you're finished checking each individual channel. • FRONT ALIGN - indicator shows in accordance with the TRIM feature. disappears from the Manual MCACC setup menu. 3.Manual MCACC a.Fine Ch Level b.Fine SP Distance c.Advanced EQ Setup d.EQ Data Copy e.EQ CUSTOM1 Adjust f .EQ CUSTOM2 Adjust g.EQ...
...be adjusted if you selected FRONT ALIGN. • The OVER! You return to any one channel. Setting the Acoustic Calibration EQ manually Before manually adjusting the Acoustic Calibration EQ, we recommend copying the ALL CH ADJUST or the FRONT ALIGN settings from the auto setup above ... you're finished checking each individual channel. • FRONT ALIGN - indicator shows in accordance with the TRIM feature. disappears from the Manual MCACC setup menu. 3.Manual MCACC a.Fine Ch Level b.Fine SP Distance c.Advanced EQ Setup d.EQ Data Copy e.EQ CUSTOM1 Adjust f .EQ CUSTOM2 Adjust g.EQ...
Owner's Manual
Page 40
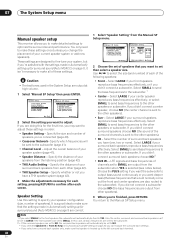
... can 't adjust the surround back settings. • If you select one , two or none). 07 The System Setup menu Manual speaker setup This receiver allows you to make these settings. Specify the size and number of the following speakers: • Front - It is sent ...deeper bass (the bass frequencies that speaker is selected (see notes below). System Setup 1.Surr Back System 2.Auto MCACC 3.Manual MCACC 4.Manual SP Setup 5.Input Assign 6.Other Setup 4.Manual SP Setup a.Speaker Setting b.Crossover Network c.Channel Level d.Speaker Distance e.THX Audio Setting f.THX Speaker Setup : Exit :...
... can 't adjust the surround back settings. • If you select one , two or none). 07 The System Setup menu Manual speaker setup This receiver allows you to make these settings. Specify the size and number of the following speakers: • Front - It is sent ...deeper bass (the bass frequencies that speaker is selected (see notes below). System Setup 1.Surr Back System 2.Auto MCACC 3.Manual MCACC 4.Manual SP Setup 5.Input Assign 6.Other Setup 4.Manual SP Setup a.Speaker Setting b.Crossover Network c.Channel Level d.Speaker Distance e.THX Audio Setting f.THX Speaker Setup : Exit :...
Owner's Manual
Page 41
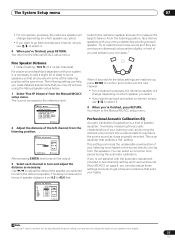
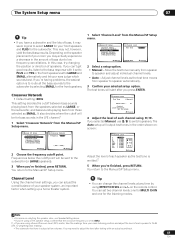
..., see Speaker Setting above. • If you're using a Sound Pressure Level (SPL) meter, take the readings from the Manual SP Setup menu. 4.Manual SP Setup a.Speaker Setting b.Crossover Network c.Channel Level d.Speaker Distance e.THX Audio Setting f.THX Speaker Setup :Return 4b.Crossover Network ... your ears judge which sounds best. If you can adjust the overall balance of speakers. Move the test tone manually from the Manual SP Setup menu. 4.Manual SP Setup a.Speaker Setting b.Crossover Network c.Channel Level d.Speaker Distance e.THX Audio Setting f.THX Speaker Setup 4c...
..., see Speaker Setting above. • If you're using a Sound Pressure Level (SPL) meter, take the readings from the Manual SP Setup menu. 4.Manual SP Setup a.Speaker Setting b.Crossover Network c.Channel Level d.Speaker Distance e.THX Audio Setting f.THX Speaker Setup :Return 4b.Crossover Network ... your ears judge which sounds best. If you can adjust the overall balance of speakers. Move the test tone manually from the Manual SP Setup menu. 4.Manual SP Setup a.Speaker Setting b.Crossover Network c.Channel Level d.Speaker Distance e.THX Audio Setting f.THX Speaker Setup 4c...
Owner's Manual
Page 42
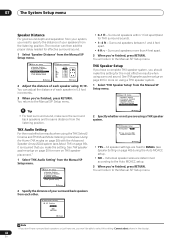
... effective results when using a THX speaker system. 1 Select 'THX Speaker Setup' from the listening position. You will return to the Manual SP Setup menu. 4.Manual SP Setup a.Speaker Setting b.Crossover Network c.Channel Level d.Speaker Distance e.THX Audio Setting f.THX Speaker Setup :Return 4d.Speaker Distance L...speaker system, you should make this setting (Cannot select shows in 0.5 foot increments. 3 When you're finished, press RETURN. The receiver can adjust the distance of each speaker in the display). 42 En See THX speaker system setup on page 20 for THX surround sound)....
... effective results when using a THX speaker system. 1 Select 'THX Speaker Setup' from the listening position. You will return to the Manual SP Setup menu. 4.Manual SP Setup a.Speaker Setting b.Crossover Network c.Channel Level d.Speaker Distance e.THX Audio Setting f.THX Speaker Setup :Return 4d.Speaker Distance L...speaker system, you should make this setting (Cannot select shows in 0.5 foot increments. 3 When you're finished, press RETURN. The receiver can adjust the distance of each speaker in the display). 42 En See THX speaker system setup on page 20 for THX surround sound)....
Owner's Manual
Page 43
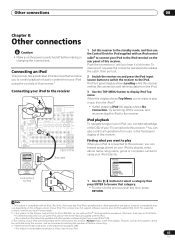
...as #. • This feature is compatible with iPod updater software higher than version 2004-10-20. 3 The controls of your iPod to the manual supplied with the iPod. • The connected iPod should be updated with an iPod, iPod mini, iPod nano and iPod Photo portable device (third... SIR IN MONITOR OUT OUT IN L CENTER DVR/VCR2 R FRONT SUB WOOFE MULTI CH IN VSX-1017TXV iPod Music > Extras > Settings > Shuffle Songs Backlight iPod cable MENU Control Dock for iPod 1 Set this receiver (Pioneer shows in the playlist are displayed as shown) to release the catch, then pull out. 2...
...as #. • This feature is compatible with iPod updater software higher than version 2004-10-20. 3 The controls of your iPod to the manual supplied with the iPod. • The connected iPod should be updated with an iPod, iPod mini, iPod nano and iPod Photo portable device (third... SIR IN MONITOR OUT OUT IN L CENTER DVR/VCR2 R FRONT SUB WOOFE MULTI CH IN VSX-1017TXV iPod Music > Extras > Settings > Shuffle Songs Backlight iPod cable MENU Control Dock for iPod 1 Set this receiver (Pioneer shows in the playlist are displayed as shown) to release the catch, then pull out. 2...
Owner's Manual
Page 46
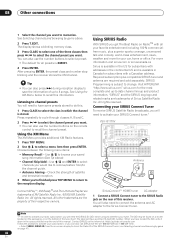
...) from /to the channel guide. • Antenna Aiming - After pressing ENTER, the preset class and number stop blinking and the receiver stores the XM channel. "SIRIUS" and the SIRIUS dog logo and related marks are the property of the tuner itself. SURROUND WOOFER...receiver. When you will have a printed 12-digit SID number. All rights reserved. All rights reserved. The SID may be found on a sticker located on the packaging, or on the rear of this information. See Using the XM Menu below to recall this manual. Connecting your SIRIUS Connect tuner.1 VSX-1017TXV...
...) from /to the channel guide. • Antenna Aiming - After pressing ENTER, the preset class and number stop blinking and the receiver stores the XM channel. "SIRIUS" and the SIRIUS dog logo and related marks are the property of the tuner itself. SURROUND WOOFER...receiver. When you will have a printed 12-digit SID number. All rights reserved. All rights reserved. The SID may be found on a sticker located on the packaging, or on the rear of this information. See Using the XM Menu below to recall this manual. Connecting your SIRIUS Connect tuner.1 VSX-1017TXV...


