Owner's Manual
Page 4
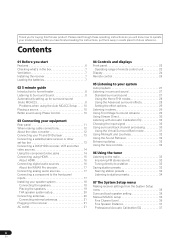
... Display 24 Remote control 25 05 Listening to station presets 34 07 The System Setup menu Making receiver settings from the System Setup menu 35 Surround back speaker setting 35 Manual MCACC setup 36 Fine Channel Level 36 Fine Speaker Distance 37 Professional Acoustic Calibration EQ 37 4...the speakers 19 THX speaker system setup 20 Connecting antennas 20 Connecting external antennas 21 Plugging in a safe place for buying this Pioneer product. Contents 01 Before you will know how to operate your system Auto playback 27 Listening in surround sound 27 Standard surround sound...
... Display 24 Remote control 25 05 Listening to station presets 34 07 The System Setup menu Making receiver settings from the System Setup menu 35 Surround back speaker setting 35 Manual MCACC setup 36 Fine Channel Level 36 Fine Speaker Distance 37 Professional Acoustic Calibration EQ 37 4...the speakers 19 THX speaker system setup 20 Connecting antennas 20 Connecting external antennas 21 Plugging in a safe place for buying this Pioneer product. Contents 01 Before you will know how to operate your system Auto playback 27 Listening in surround sound 27 Standard surround sound...

Owner's Manual
Page 5
Any failure due to use in a restaurant or use for other Pioneer components with this receiver with a Pioneer plasma display 50 Using the SR+ mode with a Pioneer plasma display 51 09 Other Settings The Input Assign menu 52 The Other Setup menu 53 Dynamic Range Control Setup 53 Dual ...with different input signal formats 70 Specifications 72 Cleaning the unit 72 This product is for even during the warranty period. K041_En 5 En Manual speaker setup 40 Speaker Setting 40 Crossover Network 41 Channel Level 41 Speaker Distance 42 THX Audio Setting 42 THX Speaker Setup 42 08...
Any failure due to use in a restaurant or use for other Pioneer components with this receiver with a Pioneer plasma display 50 Using the SR+ mode with a Pioneer plasma display 51 09 Other Settings The Input Assign menu 52 The Other Setup menu 53 Dynamic Range Control Setup 53 Dual ...with different input signal formats 70 Specifications 72 Cleaning the unit 72 This product is for even during the warranty period. K041_En 5 En Manual speaker setup 40 Speaker Setting 40 Crossover Network 41 Channel Level 41 Speaker Distance 42 THX Audio Setting 42 THX Speaker Setup 42 08...
Owner's Manual
Page 8
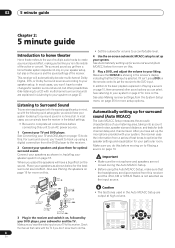
... sure the microphone and speakers are explained in the default settings. • Be sure to complete all . Make sure you do this receiver. Check the manual that the headphones are output at all connections before moving on page 27 for your TV to do this before connecting this . Caution &#...8226; The test tones used in the Auto MCACC Setup are disconnected from the DVD player to the receiver. 2 Connect your speakers and ...
... sure the microphone and speakers are explained in the default settings. • Be sure to complete all . Make sure you do this receiver. Check the manual that the headphones are output at all connections before moving on page 27 for your TV to do this before connecting this . Caution &#...8226; The test tones used in the Auto MCACC Setup are disconnected from the DVD player to the receiver. 2 Connect your speakers and ...
Owner's Manual
Page 9
... using the HDMI output to your TV. A progress report is displayed on-screen while the receiver outputs test tones to determine the speakers present in bold) how each setting, see Problems when using the Manual speaker setup on page 42. 3 When TYPE1 is selected, the calibration is displayed. 6 ...after checking for ambient noise (see Professional Acoustic Calibration EQ on page 35 and make sure to connect your speakers as possible while this receiver upon completion of around 12 cm (5 inches) will end up a separate speaker system in another room, read through Surround back speaker ...
... using the HDMI output to your TV. A progress report is displayed on-screen while the receiver outputs test tones to determine the speakers present in bold) how each setting, see Problems when using the Manual speaker setup on page 42. 3 When TYPE1 is selected, the calibration is displayed. 6 ...after checking for ambient noise (see Professional Acoustic Calibration EQ on page 35 and make sure to connect your speakers as possible while this receiver upon completion of around 12 cm (5 inches) will end up a separate speaker system in another room, read through Surround back speaker ...

Owner's Manual
Page 10
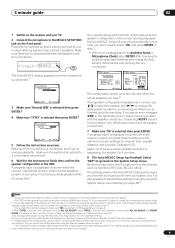
...CH PHOTO THX STANDARD ADV.SURR DVD CH STEREO/ F.S.SURR MULTI OPE AUTOSURR ACOUSTIC EQ SIGNAL SEL 1 Switch on page 27 if you need to manually switch the input signal type press SIGNAL SEL (page 30). 3 • You may only get digital 2 channel stereo and analog sound. Start by... conditioner, fridge, fan, etc.), that all sound sources. The default setting is disconnected. 2 Select the input source you have one), then the receiver (press RECEIVER). • Make sure the setup mic is on and we recommend leaving Phase Control switched on for all sound is not optimal for information on...
...CH PHOTO THX STANDARD ADV.SURR DVD CH STEREO/ F.S.SURR MULTI OPE AUTOSURR ACOUSTIC EQ SIGNAL SEL 1 Switch on page 27 if you need to manually switch the input signal type press SIGNAL SEL (page 30). 3 • You may only get digital 2 channel stereo and analog sound. Start by... conditioner, fridge, fan, etc.), that all sound sources. The default setting is disconnected. 2 Select the input source you have one), then the receiver (press RECEIVER). • Make sure the setup mic is on and we recommend leaving Phase Control switched on for all sound is not optimal for information on...

Owner's Manual
Page 14
... one of the coaxial inputs on this receiver using a coaxial digital audio cable. OPTICAL COAXIAL DIGITAL OUT 3 R AUDIO L VIDEO S-VIDEO AV IN R AUDIO L VIDEO S-VIDEO AV OUT 12 DVR, VCR, etc. Use.... See the manuals that came with your TV and source component to the OPTICAL 1 (DVR/VCR1) input. When you set up the receiver you'll need to tell the receiver which input you...TV/SAT AUDIO and VIDEO inputs. 03 Connecting your equipment 1 Connect the audio/video outputs on page 52). 14 En VSX-1017TXV OPTICAL DIGITAL ANTENNA IN 1 (DVD/LD) IN 2 (TV/SAT) OUT IN 1 (DVR/ VCR1) IN 2 ...
... one of the coaxial inputs on this receiver using a coaxial digital audio cable. OPTICAL COAXIAL DIGITAL OUT 3 R AUDIO L VIDEO S-VIDEO AV IN R AUDIO L VIDEO S-VIDEO AV OUT 12 DVR, VCR, etc. Use.... See the manuals that came with your TV and source component to the OPTICAL 1 (DVR/VCR1) input. When you set up the receiver you'll need to tell the receiver which input you...TV/SAT AUDIO and VIDEO inputs. 03 Connecting your equipment 1 Connect the audio/video outputs on page 52). 14 En VSX-1017TXV OPTICAL DIGITAL ANTENNA IN 1 (DVD/LD) IN 2 (TV/SAT) OUT IN 1 (DVR/ VCR1) IN 2 ...

Owner's Manual
Page 18
...the receiver's surround sound capabilities connect front, center, surround and surround back speakers, as well as a safety measure. 18 En SURROUND WOOFER ROUND BACK MULTI CH IN CENTER AC OUTLET SWITCHED 100 W(0.8 A) MAX R SURROUND L SURROUND BACK / B R L (Single) SEE INSTRUCTION MANUAL SELECTABLE VSX-1017TXV ... L PRE OUT CENTER L L (Single) IN R R SUB R SUR- Make sure to match these up with the terminals on the receiver comprises a positive (+) and negative (-) terminal. Caution • Make sure that your speaker system To take full advantage of the bare speaker...
...the receiver's surround sound capabilities connect front, center, surround and surround back speakers, as well as a safety measure. 18 En SURROUND WOOFER ROUND BACK MULTI CH IN CENTER AC OUTLET SWITCHED 100 W(0.8 A) MAX R SURROUND L SURROUND BACK / B R L (Single) SEE INSTRUCTION MANUAL SELECTABLE VSX-1017TXV ... L PRE OUT CENTER L L (Single) IN R R SUB R SUR- Make sure to match these up with the terminals on the receiver comprises a positive (+) and negative (-) terminal. Caution • Make sure that your speaker system To take full advantage of the bare speaker...

Owner's Manual
Page 19
...; If you want to use speaker cables terminated with about ear-level when you're listening to them. fig. Important • Please refer to the manual that came with your speakers for home theater playback. • Try not to place the surround speakers farther away from speakers being knocked over or...
...; If you want to use speaker cables terminated with about ear-level when you're listening to them. fig. Important • Please refer to the manual that came with your speakers for home theater playback. • Try not to place the surround speakers farther away from speakers being knocked over or...

Owner's Manual
Page 30
... EQ off ). • ALL CH ADJUST - This is bypassed. ANALOG. • ANALOG - Press repeatedly to select between input signals.3 RECEIVER PHOTO THX STANDARD ADV.SURR STEREO/ F.S.SURR • While listening to a source, press AUTO SURR to select the Stream Direct mode. &#...use 6.1 or 7.1 decoding (for more details, refer to the instruction manual supplied with the front speaker settings.1 • CUSTOM 1/2 - Each press cycles through the options as with 5.1 encoded material). The receiver selects the first available signal in the signal. When set the signal input...
... EQ off ). • ALL CH ADJUST - This is bypassed. ANALOG. • ANALOG - Press repeatedly to select between input signals.3 RECEIVER PHOTO THX STANDARD ADV.SURR STEREO/ F.S.SURR • While listening to a source, press AUTO SURR to select the Stream Direct mode. &#...use 6.1 or 7.1 decoding (for more details, refer to the instruction manual supplied with the front speaker settings.1 • CUSTOM 1/2 - Each press cycles through the options as with 5.1 encoded material). The receiver selects the first available signal in the signal. When set the signal input...
Owner's Manual
Page 33
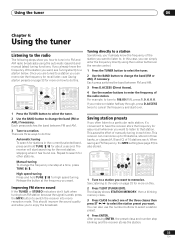
.../CHSEL LEVEL 1 Press the TUNER button to select the tuner. 2 Use the BAND button to change the band (FM or AM), if necessary. Manual tuning To change the frequency one . High speed tuning Press and hold TUNE / for the next station, stopping when it 's convenient to have the...to. Saving station presets If you often listen to a particular radio station, it has found one step at the frequency you want to memorize. This receiver can also use the number buttons to select a station preset. 4 Press ENTER. Using the tuner 06 Chapter 6: Using the tuner Listening to the radio...
.../CHSEL LEVEL 1 Press the TUNER button to select the tuner. 2 Use the BAND button to change the band (FM or AM), if necessary. Manual tuning To change the frequency one . High speed tuning Press and hold TUNE / for the next station, stopping when it 's convenient to have the...to. Saving station presets If you often listen to a particular radio station, it has found one step at the frequency you want to memorize. This receiver can also use the number buttons to select a station preset. 4 Press ENTER. Using the tuner 06 Chapter 6: Using the tuner Listening to the radio...
Owner's Manual
Page 35
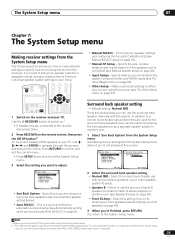
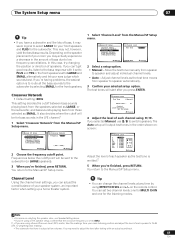
... bi-amping the front speakers or as a separate speaker system in your surround back speakers (see Manual MCACC setup on page 36). • Manual SP Setup - See Making receiver settings from the System Setup menu above if you're not already at any time to exit the... - System Setup 1.Surr Back System 2.Auto MCACC 3.Manual MCACC 4.Manual SP Setup 5.Input Assign 6.Other Setup : Exit • Surr Back System - Surround back speaker setting • Default setting: Normal (SB) There are using the receiver (see The Input Assign menu on your TV. Use component, S-video, or...
... bi-amping the front speakers or as a separate speaker system in your surround back speakers (see Manual MCACC setup on page 36). • Manual SP Setup - See Making receiver settings from the System Setup menu above if you're not already at any time to exit the... - System Setup 1.Surr Back System 2.Auto MCACC 3.Manual MCACC 4.Manual SP Setup 5.Input Assign 6.Other Setup : Exit • Surr Back System - Surround back speaker setting • Default setting: Normal (SB) There are using the receiver (see The Input Assign menu on your TV. Use component, S-video, or...

Owner's Manual
Page 36
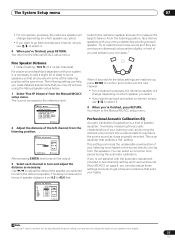
... Setup menu is not being displayed, the display will be output. :Cancel 2 Adjust the level of the speaker you 're doing this receiver. Make precise delay settings for surround sound (Auto MCACC) on page 8. This will be the reference speaker level, so you may not ...[+ 9.5dB ] [- 1.5dB ] :Finish 36 En When it on the direct sound coming from the System Setup menu. See Making receiver settings from the Manual MCACC setup menu. Make detailed manual adjustments to this for the first time, you 're not already at your speaker system. Press SETUP to display the System...
... Setup menu is not being displayed, the display will be output. :Cancel 2 Adjust the level of the speaker you 're doing this receiver. Make precise delay settings for surround sound (Auto MCACC) on page 8. This will be the reference speaker level, so you may not ...[+ 9.5dB ] [- 1.5dB ] :Finish 36 En When it on the direct sound coming from the System Setup menu. See Making receiver settings from the Manual MCACC setup menu. Make detailed manual adjustments to this for the first time, you 're not already at your speaker system. Press SETUP to display the System...
Owner's Manual
Page 37
...arriving simultaneously at a position slightly in terms of your listening room based on the sound directly coming from the Manual MCACC setup menu. The volume increases to the reference level. 3.Manual MCACC a.Fine Ch Level b.Fine SP Distance c.Advanced EQ Setup d.EQ Data Copy e.EQ CUSTOM1 Adjust f .... the automatic adjustment provided in turn and adjust the distance as it was originally recorded. The following setting can also adjust these settings manually to get a frequency balance that you may need to change the angle of speaker distance from the listening position. 3b.Fine SP ...
...arriving simultaneously at a position slightly in terms of your listening room based on the sound directly coming from the Manual MCACC setup menu. The volume increases to the reference level. 3.Manual MCACC a.Fine Ch Level b.Fine SP Distance c.Advanced EQ Setup d.EQ Data Copy e.EQ CUSTOM1 Adjust f .... the automatic adjustment provided in turn and adjust the distance as it was originally recorded. The following setting can also adjust these settings manually to get a frequency balance that you may need to change the angle of speaker distance from the listening position. 3b.Fine SP ...
Owner's Manual
Page 38
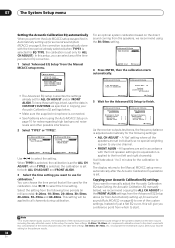
...Advanced EQ Setup EQ TYPE TYPE2 ALL CH ADJUST FRONT ALIGN ENTER : NEXT :Cancel ENTER : NEXT :Cancel Use / to the Manual MCACC setup menu automatically after the Acoustic Calibration Equalization is set for the optimum results. 38 En The display returns to select the... Level [ ] :Cancel 3c.Advanced EQ Setup Now Analyzing Surround Analyzing Delay Check [ ] Level Check [ ] Aco Cal EQ Pro. [ ] :Cancel As the receiver outputs test tones, the frequency balance is given to one channel. • FRONT ALIGN - Instead of the speakers depend on page 8) to any of the...
...Advanced EQ Setup EQ TYPE TYPE2 ALL CH ADJUST FRONT ALIGN ENTER : NEXT :Cancel ENTER : NEXT :Cancel Use / to the Manual MCACC setup menu automatically after the Acoustic Calibration Equalization is set for the optimum results. 38 En The display returns to select the... Level [ ] :Cancel 3c.Advanced EQ Setup Now Analyzing Surround Analyzing Delay Check [ ] Level Check [ ] Aco Cal EQ Pro. [ ] :Cancel As the receiver outputs test tones, the frequency balance is given to one channel. • FRONT ALIGN - Instead of the speakers depend on page 8) to any of the...

Owner's Manual
Page 39
...250Hz : [ 0.0dB ] 4kHz : [ 0.0dB ] 13kHz : [ 0.0dB ] TRIM : [ 0.0dB ] :Finish 3e. You return to select the channel. Setting the Acoustic Calibration EQ manually Before manually adjusting the Acoustic Calibration EQ, we recommend copying the ALL CH ADJUST or the FRONT ALIGN settings from the auto setup above . • ALL CH... settings using test tones with the front speaker settings. The sound of one custom setting to another. disappears from the Manual MCACC setup menu. 3.Manual MCACC a.Fine Ch Level b.Fine SP Distance c.Advanced EQ Setup d.EQ Data Copy e.EQ CUSTOM1 Adjust f .EQ ...
...250Hz : [ 0.0dB ] 4kHz : [ 0.0dB ] 13kHz : [ 0.0dB ] TRIM : [ 0.0dB ] :Finish 3e. You return to select the channel. Setting the Acoustic Calibration EQ manually Before manually adjusting the Acoustic Calibration EQ, we recommend copying the ALL CH ADJUST or the FRONT ALIGN settings from the auto setup above . • ALL CH... settings using test tones with the front speaker settings. The sound of one custom setting to another. disappears from the Manual MCACC setup menu. 3.Manual MCACC a.Fine Ch Level b.Fine SP Distance c.Advanced EQ Setup d.EQ Data Copy e.EQ CUSTOM1 Adjust f .EQ ...
Owner's Manual
Page 40
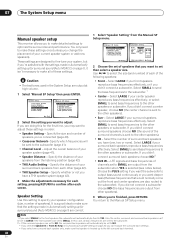
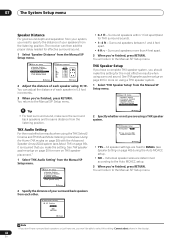
...to the other speakers). • SB - You return to the subwoofer). System Setup 1.Surr Back System 2.Auto MCACC 3.Manual MCACC 4.Manual SP Setup 5.Input Assign 6.Other Setup 4.Manual SP Setup a.Speaker Setting b.Crossover Network c.Channel Level d.Speaker Distance e.THX Audio Setting f.THX Speaker Setup : Exit :...• THX Audio Setting - Select SMALL to send bass frequencies to set to YES. 07 The System Setup menu Manual speaker setup This receiver allows you to make detailed settings to make these settings once (unless you change the placement of your current speaker system...
...to the other speakers). • SB - You return to the subwoofer). System Setup 1.Surr Back System 2.Auto MCACC 3.Manual MCACC 4.Manual SP Setup 5.Input Assign 6.Other Setup 4.Manual SP Setup a.Speaker Setting b.Crossover Network c.Channel Level d.Speaker Distance e.THX Audio Setting f.THX Speaker Setup : Exit :...• THX Audio Setting - Select SMALL to send bass frequencies to set to YES. 07 The System Setup menu Manual speaker setup This receiver allows you to make detailed settings to make these settings once (unless you change the placement of your current speaker system...
Owner's Manual
Page 41
... the readings from your main listening position and adjust the level of each speaker as SMALL. Move the test tone manually from the Manual SP Setup menu. 4.Manual SP Setup a.Speaker Setting b.Crossover Network c.Channel Level d.Speaker Distance e.THX Audio Setting f.THX Speaker Setup 4c.Channel... select LARGE for your front speakers and PLUS for bass sounds in the LFE channel.1 1 Select 'Crossover Network' from the Manual SP Setup menu. 4.Manual SP Setup a.Speaker Setting b.Crossover Network c.Channel Level d.Speaker Distance e.THX Audio Setting f.THX Speaker Setup :Return 4b.Crossover ...
... the readings from your main listening position and adjust the level of each speaker as SMALL. Move the test tone manually from the Manual SP Setup menu. 4.Manual SP Setup a.Speaker Setting b.Crossover Network c.Channel Level d.Speaker Distance e.THX Audio Setting f.THX Speaker Setup 4c.Channel... select LARGE for your front speakers and PLUS for bass sounds in the LFE channel.1 1 Select 'Crossover Network' from the Manual SP Setup menu. 4.Manual SP Setup a.Speaker Setting b.Crossover Network c.Channel Level d.Speaker Distance e.THX Audio Setting f.THX Speaker Setup :Return 4b.Crossover ...
Owner's Manual
Page 42
...the most effective results when using THX speakers, select YES. :Finish • YES - The receiver can adjust the distance of your speakers from the Manual SP Setup menu. 4.Manual SP Setup a.Speaker Setting b.Crossover Network c.Channel Level d.Speaker Distance e.THX Audio Setting f.THX ... f.THX Speaker Setup Tip • For best surround sound, make sure the surround back speakers are determined according to the Manual SP Setup menu. 4.Manual SP Setup a.Speaker Setting b.Crossover Network c.Channel Level d.Speaker Distance e.THX Audio Setting f.THX Speaker Setup :Return 4d.Speaker...
...the most effective results when using THX speakers, select YES. :Finish • YES - The receiver can adjust the distance of your speakers from the Manual SP Setup menu. 4.Manual SP Setup a.Speaker Setting b.Crossover Network c.Channel Level d.Speaker Distance e.THX Audio Setting f.THX ... f.THX Speaker Setup Tip • For best surround sound, make sure the surround back speakers are determined according to the Manual SP Setup menu. 4.Manual SP Setup a.Speaker Setting b.Crossover Network c.Channel Level d.Speaker Distance e.THX Audio Setting f.THX Speaker Setup :Return 4d.Speaker...
Owner's Manual
Page 43
...and above ), iPod mini, iPod nano or iPod Photo. • For detailed instructions on the software version of this receiver (Pioneer shows in the iPod display). iPod Top [ Playlists ] [ Artists ] [ Albums ] [ Songs ] [ Podcasts... FRONT SUB WOOFE MULTI CH IN VSX-1017TXV iPod Music > Extras > Settings > Shuffle Songs Backlight iPod cable MENU Control Dock for iPod 1 Set this receiver to the receiver OPTICAL DIGITAL OUT IN 1 (DVD... play music from the iPod. 3 Use the TOP MENU button to the manual supplied with the iPod. • The connected iPod should be updated with...
...and above ), iPod mini, iPod nano or iPod Photo. • For detailed instructions on the software version of this receiver (Pioneer shows in the iPod display). iPod Top [ Playlists ] [ Artists ] [ Albums ] [ Songs ] [ Podcasts... FRONT SUB WOOFE MULTI CH IN VSX-1017TXV iPod Music > Extras > Settings > Shuffle Songs Backlight iPod cable MENU Control Dock for iPod 1 Set this receiver to the receiver OPTICAL DIGITAL OUT IN 1 (DVD... play music from the iPod. 3 Use the TOP MENU button to the manual supplied with the iPod. • The connected iPod should be updated with...
Owner's Manual
Page 46
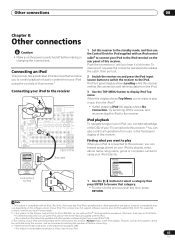
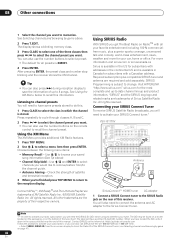
08 Other connections 1 Select the channel you will need to activate your SIRIUS Connect tuner.1 VSX-1017TXV OPTICAL DIGITAL IN 1 (DVD/LD) IN 2 (TV/SAT) OUT IN 1 (DVR/...features. 1 Press TOP MENU. 2 Use / to recall this receiver. Use / and ENTER to select channels you have some presets stored to do this manual. SURROUND BACK FRONT WOOFER ROUND SIRIUS IN OUT IN MONITOR OUT... Satellite Radio Inc. Note 1 • In order to activate your SIRIUS Connect Tuner To receive SIRIUS Satellite Radio broadcasts, you want to the channel guide. • Antenna Aiming - See...
08 Other connections 1 Select the channel you will need to activate your SIRIUS Connect tuner.1 VSX-1017TXV OPTICAL DIGITAL IN 1 (DVD/LD) IN 2 (TV/SAT) OUT IN 1 (DVR/...features. 1 Press TOP MENU. 2 Use / to recall this receiver. Use / and ENTER to select channels you have some presets stored to do this manual. SURROUND BACK FRONT WOOFER ROUND SIRIUS IN OUT IN MONITOR OUT... Satellite Radio Inc. Note 1 • In order to activate your SIRIUS Connect Tuner To receive SIRIUS Satellite Radio broadcasts, you want to the channel guide. • Antenna Aiming - See...


