
Owner's Manual
Page 5
... system 48 Bi-amping your front speakers 49 Bi-wiring your speakers 49 Connecting additional amplifiers 50 Using this receiver with a Pioneer plasma display 50 Using the SR+ mode with a Pioneer plasma display 51 09 Other Settings The Input Assign menu 52 The Other Setup menu 53 Dynamic Range Control ...video recording 55 Reducing the level of an analog signal 55 Using the sleep timer 55 Dimming the display 56 Switching the speaker impedance 56 Resetting the system 56 11 Controlling the rest of your system Setting the remote to use in a car or ship) and which requires repair will...
... system 48 Bi-amping your front speakers 49 Bi-wiring your speakers 49 Connecting additional amplifiers 50 Using this receiver with a Pioneer plasma display 50 Using the SR+ mode with a Pioneer plasma display 51 09 Other Settings The Input Assign menu 52 The Other Setup menu 53 Dynamic Range Control ...video recording 55 Reducing the level of an analog signal 55 Using the sleep timer 55 Dimming the display 56 Switching the speaker impedance 56 Resetting the system 56 11 Controlling the rest of your system Setting the remote to use in a car or ship) and which requires repair will...
Owner's Manual
Page 26
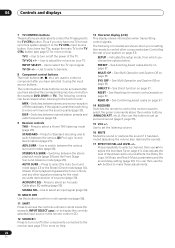
... 30). 10 MULTI OPE Use this system assign it using the input source buttons. SYS OFF - See Direct function on page 58. See Resetting the remote control presets on page 57. Also adjusts the level of FM broadcasts. buttons to make these buttons can be accessed when listening to...(see page 57 for the most accurate reproduction of a source (page 30). See Multi Operation and System Off on /off other components connected to the receiver (see Controlling the rest of the TV. STANDARD - ACOUSTIC EQ - to adjust the level (see page 57 for Standard decoding and to control a ...
... 30). 10 MULTI OPE Use this system assign it using the input source buttons. SYS OFF - See Direct function on page 58. See Resetting the remote control presets on page 57. Also adjusts the level of FM broadcasts. buttons to make these buttons can be accessed when listening to...(see page 57 for the most accurate reproduction of a source (page 30). See Multi Operation and System Off on /off other components connected to the receiver (see Controlling the rest of the TV. STANDARD - ACOUSTIC EQ - to adjust the level (see page 57 for Standard decoding and to control a ...
Owner's Manual
Page 47
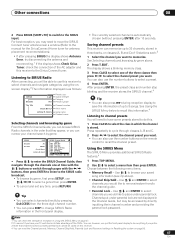
...or switch through classes A, B and C. 2 Press / to select the channel preset you want. • You can also use this receiver to select channels and navigate categories using the onscreen display.2 The information displayed is automatically chosen (without pressing ENTER) after pressing SIRIUS the ... if you want . See Selecting channels and browsing by directly inputting their channel number and providing the parenal lock password. You can reset the Channel presets, Memory, Channel Skip/Add, Parental Lock and Password settings in which the channel is stored. Channels put under parental...
...or switch through classes A, B and C. 2 Press / to select the channel preset you want. • You can also use this receiver to select channels and navigate categories using the onscreen display.2 The information displayed is automatically chosen (without pressing ENTER) after pressing SIRIUS the ... if you want . See Selecting channels and browsing by directly inputting their channel number and providing the parenal lock password. You can reset the Channel presets, Memory, Channel Skip/Add, Parental Lock and Password settings in which the channel is stored. Channels put under parental...

Owner's Manual
Page 56
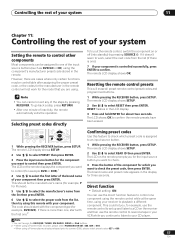
... of the front panel display. The display shows RESET?. 3 Press the front panel ENTER button. Use the front panel controls to do this. • With the receiver in the display to indicate that the receiver has been reset to the factory default settings. • Note that...other functions Dimming the display You can choose between the impedance settings: • SP 6 OHM - Resetting the system Use this system, but it is unplugged. 56 En CD-R/TAPE CD iPod TUNER RECEIVER SLEEP SR+ DIALOG E SB ch DIMMER PHASE ANALOG ATT MIDNIGHT/ LOUDNESS S.RETRIEVER D ACCESS •...
... of the front panel display. The display shows RESET?. 3 Press the front panel ENTER button. Use the front panel controls to do this. • With the receiver in the display to indicate that the receiver has been reset to the factory default settings. • Note that...other functions Dimming the display You can choose between the impedance settings: • SP 6 OHM - Resetting the system Use this system, but it is unplugged. 56 En CD-R/TAPE CD iPod TUNER RECEIVER SLEEP SR+ DIALOG E SB ch DIMMER PHASE ANALOG ATT MIDNIGHT/ LOUDNESS S.RETRIEVER D ACCESS •...
Owner's Manual
Page 57
...codes 637 or 660. 57 En Note 1 You can't assign the RECEIVER, TUNER, XM RADIO, SIRIUS or iPod buttons. 2 • When using a Pioneer HDD recorder, please select PIONEER DVR 487, 488, 489 or 493. • When using a Pioneer plasma display released prior to confirm. The remote LCD display shows SETUP. ...Use this remote with the component type (for the component you want to control (for example DVD or DVR).1 4 Use / to select RESET then press ENTER. Controlling the rest of your system 11 Chapter 11: Controlling the rest of your system Setting the remote to control other...
...codes 637 or 660. 57 En Note 1 You can't assign the RECEIVER, TUNER, XM RADIO, SIRIUS or iPod buttons. 2 • When using a Pioneer HDD recorder, please select PIONEER DVR 487, 488, 489 or 493. • When using a Pioneer plasma display released prior to confirm. The remote LCD display shows SETUP. ...Use this remote with the component type (for the component you want to control (for example DVD or DVR).1 4 Use / to select RESET then press ENTER. Controlling the rest of your system 11 Chapter 11: Controlling the rest of your system Setting the remote to control other...

Owner's Manual
Page 66
...some music files compatible with a Pioneer the connected components can't plasma display on page 53 to your HDMI component through this system. The SR feature only works with the signal path from the Switch off the receiver and reconnect the iPod to the receiver. Use component, S-video, ...made by Pioneer. See Assigning the HDMI inputs on page 50). There are no fluorescent or other strong light shining on to work , try resetting your TV. Re-enter the preset codes. This is an analog or HDMI connection between the units. versions prior to the receiver. operated ...
...some music files compatible with a Pioneer the connected components can't plasma display on page 53 to your HDMI component through this system. The SR feature only works with the signal path from the Switch off the receiver and reconnect the iPod to the receiver. Use component, S-video, ...made by Pioneer. See Assigning the HDMI inputs on page 50). There are no fluorescent or other strong light shining on to work , try resetting your TV. Re-enter the preset codes. This is an analog or HDMI connection between the units. versions prior to the receiver. operated ...


