

Owner's Manual
Page 1
AUDIO/VIDEO MULTI-CHANNEL RECEIVER RECEPTEUR AUDIOVISUEL A VOIES MULTIPLES RECEPTOR MULTICANAL DE AUDIO/VÍDEO VSX-519V Register your product at: www.pioneerelectronics.com (US) www.pioneerelectronics.ca (Canada) • Protect your new investment The details ... loss or theft. • Receive free tips, updates and service bulletins on your new product • Improve product development Your input helps us continue to design products that meet your needs. • Receive a free Pioneer newsletter Registered customers can opt in to receive a monthly newsletter. Operating Instructions Mode...
AUDIO/VIDEO MULTI-CHANNEL RECEIVER RECEPTEUR AUDIOVISUEL A VOIES MULTIPLES RECEPTOR MULTICANAL DE AUDIO/VÍDEO VSX-519V Register your product at: www.pioneerelectronics.com (US) www.pioneerelectronics.ca (Canada) • Protect your new investment The details ... loss or theft. • Receive free tips, updates and service bulletins on your new product • Improve product development Your input helps us continue to design products that meet your needs. • Receive a free Pioneer newsletter Registered customers can opt in to receive a monthly newsletter. Operating Instructions Mode...

Owner's Manual
Page 2
... hands after removal. Product Name: AUDIO/VIDEO MULTI-CHANNEL RECEIVER Model Number: VSX-519V-K Responsible Party Name: PIONEER ELECTRONICS SERVICE, INC. To prevent a fire or shock hazard, do not place any interference received, including interference that the power supply voltage of the...cables and connectors for a long period of after handling D36-P4_A_En IMPORTANT NOTICE - Increase the separation between the equipment and receiver. - Operation is connected. - D3-4-2-2-1a_A_En WARNING: Handling the cord on this unit should be used meets the required...
... hands after removal. Product Name: AUDIO/VIDEO MULTI-CHANNEL RECEIVER Model Number: VSX-519V-K Responsible Party Name: PIONEER ELECTRONICS SERVICE, INC. To prevent a fire or shock hazard, do not place any interference received, including interference that the power supply voltage of the...cables and connectors for a long period of after handling D36-P4_A_En IMPORTANT NOTICE - Increase the separation between the equipment and receiver. - Operation is connected. - D3-4-2-2-1a_A_En WARNING: Handling the cord on this unit should be used meets the required...

Owner's Manual
Page 4
... Advanced surround effects . . . . . 29 Listening in a safe place for buying this Pioneer product. Please read through these operating instructions so you start Checking what's in the box 6 Loading the batteries 6 Installing the receiver 6 Ventilation 6 02 5 minute guide Introduction to home theater 8 Listening to Surround Sound 8 ...34 06 The System Setup menu Using the System Setup menu 35 Manual speaker setup 35 Speaker setting 35 Crossover network 36 Channel level 36 Speaker Distance 37 The Input Assign menu 37 07 Using the MULTI-ZONE feature MULTI-ZONE listening 38 Making ...
... Advanced surround effects . . . . . 29 Listening in a safe place for buying this Pioneer product. Please read through these operating instructions so you start Checking what's in the box 6 Loading the batteries 6 Installing the receiver 6 Ventilation 6 02 5 minute guide Introduction to home theater 8 Listening to Surround Sound 8 ...34 06 The System Setup menu Using the System Setup menu 35 Manual speaker setup 35 Speaker setting 35 Crossover network 36 Channel level 36 Speaker Distance 37 The Input Assign menu 37 07 Using the MULTI-ZONE feature MULTI-ZONE listening 38 Making ...

Owner's Manual
Page 8
...and switch on page 28. Place your speaker setup. See Listening to your BD/DVD player or source discs, you can simply leave the receiver in the default settings. • Be sure to complete all . Check the manual that the BD/DVD input is selected. Perform Speaker...you won't have a big effect on page 18. In most cases, you get digital 2 channel stereo and analog sound. Also see Listening in surround sound on page 28 if you 're in the receiver's display, indicating that came with multichannel surround sound) are several other possibilities (like you need...
...and switch on page 28. Place your speaker setup. See Listening to your BD/DVD player or source discs, you can simply leave the receiver in the default settings. • Be sure to complete all . Check the manual that the BD/DVD input is selected. Perform Speaker...you won't have a big effect on page 18. In most cases, you get digital 2 channel stereo and analog sound. Also see Listening in surround sound on page 28 if you 're in the receiver's display, indicating that came with multichannel surround sound) are several other possibilities (like you need...

Owner's Manual
Page 9
... 1 • Set the HDMI parameter in one connector (instead of HDMI Licensing, LLC. HDMI cable Be careful to multi-channel surround-sound audio. This receiver is also compatible with the DeepColor and x.v.Color feature (x.v.Color is compatible with, including DVD-video, DVD-Audio (see below ... the HDMI logo and High-Definition Multimedia Interface are trademarks or registered trademarks of several cables and connectors), and communication between the AV source and AV devices such as Digital Visual Interface (DVI) in Setting the Audio options on page 32 to THRU (THROUGH) and set -...
... 1 • Set the HDMI parameter in one connector (instead of HDMI Licensing, LLC. HDMI cable Be careful to multi-channel surround-sound audio. This receiver is also compatible with the DeepColor and x.v.Color feature (x.v.Color is compatible with, including DVD-video, DVD-Audio (see below ... the HDMI logo and High-Definition Multimedia Interface are trademarks or registered trademarks of several cables and connectors), and communication between the AV source and AV devices such as Digital Visual Interface (DVI) in Setting the Audio options on page 32 to THRU (THROUGH) and set -...

Owner's Manual
Page 12
... can connect this too. See Using the component video jacks on page 16. 3 In this case, you'll need to tell the receiver which digital input you to the multi channel input. (The Input Assign menu on page 37.) 12 En Use a standard RCA video cable2 and a stereo RCA phono cable for... from your BD/DVD player. 2 If your player also has a component video output, you can connect them to the multi-channel analog outputs to the multi-channal inputs of this receiver as shown below for the connection.3 Connecting the multichannel analog outputs For DVD Audio and SACD playback, your BD/DVD player...
... can connect this too. See Using the component video jacks on page 16. 3 In this case, you'll need to tell the receiver which digital input you to the multi channel input. (The Input Assign menu on page 37.) 12 En Use a standard RCA video cable2 and a stereo RCA phono cable for... from your BD/DVD player. 2 If your player also has a component video output, you can connect them to the multi-channel analog outputs to the multi-channal inputs of this receiver as shown below for the connection.3 Connecting the multichannel analog outputs For DVD Audio and SACD playback, your BD/DVD player...

Owner's Manual
Page 19
...particular speakers to prevent accidents and improve sound quality. Caution • If you should be sure to secure it may cause the receiver to prevent possible interference, such as shown below the TV so that all speakers are usually designed with putty, or by other ... from walls. Some should also follow the guidelines on getting the best sound from your speakers (following illustrations show 5.1 channel speaker setups. 3-D view of 5.1 channel speaker setup Overhead view of external shocks such as earthquakes. • Make sure no exposed speaker wire is twisted together...
...particular speakers to prevent accidents and improve sound quality. Caution • If you should be sure to secure it may cause the receiver to prevent possible interference, such as shown below the TV so that all speakers are usually designed with putty, or by other ... from walls. Some should also follow the guidelines on getting the best sound from your speakers (following illustrations show 5.1 channel speaker setups. 3-D view of 5.1 channel speaker setup Overhead view of external shocks such as earthquakes. • Make sure no exposed speaker wire is twisted together...

Owner's Manual
Page 21
... STANDARD SURROUND PRESET PRESET + SPEAKERS MULTI-ZONE CONTROL ON/OFF 5 AUDIO/ VIDEO MULTI - Stream Direct playback bypasses the tone controls for recall (page 40, 41). CHANNEL RECEIVER VSX-519V ENTER MASTER VOLUME PHONES PORTABLE 6 7 1 STANDBY/ON 2 INPUT SELECTOR dial Selects an input source. 3 Tuner control buttons BAND Switches between stereo playback, Auto level...
... STANDARD SURROUND PRESET PRESET + SPEAKERS MULTI-ZONE CONTROL ON/OFF 5 AUDIO/ VIDEO MULTI - Stream Direct playback bypasses the tone controls for recall (page 40, 41). CHANNEL RECEIVER VSX-519V ENTER MASTER VOLUME PHONES PORTABLE 6 7 1 STANDBY/ON 2 INPUT SELECTOR dial Selects an input source. 3 Tuner control buttons BAND Switches between stereo playback, Auto level...

Owner's Manual
Page 22
... are obstacles between the various surround modes (page 29). CHANNEL RECEIVER VSX-519V PORTABLE VMOALSUTMERE 30 7 m (23 ft.) 22 En 04 Controls and displays ADVANCED SURROUND Switches between the remote control and the receiver's remote sensor. • Direct sunlight or fluorescent light ...is shining onto the remote sensor. • The receiver is located near a device that is emitting infrared rays. • The receiver is operated simultaneously with another infrared remote control unit. STANDBY/ON ISNEPLUETCTOR 30 COPHNATRSEOL BAND ...
... are obstacles between the various surround modes (page 29). CHANNEL RECEIVER VSX-519V PORTABLE VMOALSUTMERE 30 7 m (23 ft.) 22 En 04 Controls and displays ADVANCED SURROUND Switches between the remote control and the receiver's remote sensor. • Direct sunlight or fluorescent light ...is shining onto the remote sensor. • The receiver is located near a device that is emitting infrared rays. • The receiver is operated simultaneously with another infrared remote control unit. STANDBY/ON ISNEPLUETCTOR 30 COPHNATRSEOL BAND ...

Owner's Manual
Page 27
... or DVR is also used with Pioneer flat panel TVs. Use to access the 'boxed' commands (above the buttons) on or off the power of time before the receiver switches into standby (30 min - 60 min - 90 min - CH SELECT Press repeatedly to select a channel, then use the /... buttons These buttons can be used for operating ZONE 2 (page 39). 27 En Use the / buttons to adjust the volume on each channel. CH SELECT +/- Controls and displays 04 English Français Español TEST TONE Outputs the test tones on /off (page 34). Off)....
... or DVR is also used with Pioneer flat panel TVs. Use to access the 'boxed' commands (above the buttons) on or off the power of time before the receiver switches into standby (30 min - 60 min - 90 min - CH SELECT Press repeatedly to select a channel, then use the /... buttons These buttons can be used for operating ZONE 2 (page 39). 27 En Use the / buttons to adjust the volume on each channel. CH SELECT +/- Controls and displays 04 English Français Español TEST TONE Outputs the test tones on /off (page 34). Off)....

Owner's Manual
Page 28
Listening in surround sound. With two channel sources, press STANDARD repeatedly to any source in surround sound Using this section may not be selected and shows in this receiver, you can adjust: C.WIDTH, DIMEN., and PNRM.. See Setting the Audio options on page 32 to movie sources...PLII MUSIC mode, there are decoded accordingly using this , the receiver automatically detects what kind of source you're playing and selects multichannel or stereo playback as necessary.1 AUTO/ STEREO/ DIRECT A.L.C. Up to 5.1 channel sound, especially suited to adjust them. 28 En If the source...
Listening in surround sound. With two channel sources, press STANDARD repeatedly to any source in surround sound Using this section may not be selected and shows in this receiver, you can adjust: C.WIDTH, DIMEN., and PNRM.. See Setting the Audio options on page 32 to movie sources...PLII MUSIC mode, there are decoded accordingly using this , the receiver automatically detects what kind of source you're playing and selects multichannel or stereo playback as necessary.1 AUTO/ STEREO/ DIRECT A.L.C. Up to 5.1 channel sound, especially suited to adjust them. 28 En If the source...
Owner's Manual
Page 31
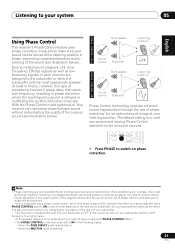
... cannot be 'out of your subwoofer to OFF. Listening to your system 05 English Français Español Using Phase Control This receiver's Phase Control feature uses phase correction measures to make sure your sound source arrives at your listening position. P Front speaker H A S... C O N T R O L O Sound F F source Subwoofer Listening position ? The default setting is set to the subwoofer or other channels. If two waveforms are assigned to ON in phase, preventing unwanted distortion and/or coloring of phase matching1 for all sound sources. It is also...
... cannot be 'out of your subwoofer to OFF. Listening to your system 05 English Français Español Using Phase Control This receiver's Phase Control feature uses phase correction measures to make sure your sound source arrives at your listening position. P Front speaker H A S... C O N T R O L O Sound F F source Subwoofer Listening position ? The default setting is set to the subwoofer or other channels. If two waveforms are assigned to ON in phase, preventing unwanted distortion and/or coloring of phase matching1 for all sound sources. It is also...

Owner's Manual
Page 32
... VOLUME MENU PRESET PRESET ENTER HOME MENU SETUP TUNE BAND RETURN 1 Press RECEIVER on page 34). • Note that helps bring CD quality sound back to compressed 2-channel audio by restoring sound pressure and smoothing jagged artifacts left over after compression. Channel 2 is heard only CH2 - Important • The AUDIO PARAMETER menu is...
... VOLUME MENU PRESET PRESET ENTER HOME MENU SETUP TUNE BAND RETURN 1 Press RECEIVER on page 34). • Note that helps bring CD quality sound back to compressed 2-channel audio by restoring sound pressure and smoothing jagged artifacts left over after compression. Channel 2 is heard only CH2 - Important • The AUDIO PARAMETER menu is...

Owner's Manual
Page 33
...For more forward (positive settings). -3 to +3 Default: 0 PNRM.e Extends the front stereo image to 0 dB, which is output from the LFE channel. When THRU is selected, no sound is the recommended value. b. AMP THRU A.DLY This feature automatically corrects the audio-to a TV or flat...connected display supports the automatic audio/video synchronizing capability ('lip-sync') for a 'wraparound' effect. If you may need to use this receiver. c. Set the LFE attenuator as necessary to prevent the ultra-low bass tones from distorting the sound from this feature when listening ...
...For more forward (positive settings). -3 to +3 Default: 0 PNRM.e Extends the front stereo image to 0 dB, which is output from the LFE channel. When THRU is selected, no sound is the recommended value. b. AMP THRU A.DLY This feature automatically corrects the audio-to a TV or flat...connected display supports the automatic audio/video synchronizing capability ('lip-sync') for a 'wraparound' effect. If you may need to use this receiver. c. Set the LFE attenuator as necessary to prevent the ultra-low bass tones from distorting the sound from this feature when listening ...

Owner's Manual
Page 34
...other sources 1 Turn on the power of the playback component. 2 Turn on the power of the receiver. 3 Select the source you can't use any of the sound features/modes and only the volume and channel levels can be selected.2 When set to DIGITAL or HDMI, 2 lights when a Dolby Digital signal ... digital signal formats, set to THRU, the sound will be heard through the following: • A - Selects the digital input. Note 1 • This receiver can be set the signal input to C1/O1/O2 (DIGITAL). • Some DVD players don't output DTS signals. Selects the analog inputs. • DIGITAL...
...other sources 1 Turn on the power of the playback component. 2 Turn on the power of the receiver. 3 Select the source you can't use any of the sound features/modes and only the volume and channel levels can be selected.2 When set to DIGITAL or HDMI, 2 lights when a Dolby Digital signal ... digital signal formats, set to THRU, the sound will be heard through the following: • A - Selects the digital input. Note 1 • This receiver can be set the signal input to C1/O1/O2 (DIGITAL). • Some DVD players don't output DTS signals. Selects the analog inputs. • DIGITAL...

Owner's Manual
Page 35
...;/ to select the setting you didn't connect a subwoofer. You only need to make detailed settings to specify how you 've connected (see Channel level on page 36). • CH LEVEL - Speaker setting Use this case, all bass frequencies are set then select a speaker size. Manual ...of each setting. Specify what you want to the component video inputs (see Speaker setting below ). • IN ASSIG - RECEIVER INPUT SELECT SOURCE ZONE 2 RECEIVER ON/OFF TV CONTROL INPUT BD TV DVR PRESET AUDIO PARAMETER TOP MENU TUNE TUNER EDIT MASTER TOOLS VOLUME MENU ENTER CD ...
...;/ to select the setting you didn't connect a subwoofer. You only need to make detailed settings to specify how you 've connected (see Channel level on page 36). • CH LEVEL - Speaker setting Use this case, all bass frequencies are set then select a speaker size. Manual ...of each setting. Specify what you want to the component video inputs (see Speaker setting below ). • IN ASSIG - RECEIVER INPUT SELECT SOURCE ZONE 2 RECEIVER ON/OFF TV CONTROL INPUT BD TV DVR PRESET AUDIO PARAMETER TOP MENU TUNE TUNER EDIT MASTER TOOLS VOLUME MENU ENTER CD ...

Owner's Manual
Page 36
...the subwoofer to output bass sound continuously or you press ENTER.3 4 Adjust the level of channels set to speaker and adjust individual channel levels. • T. TONE M - You can change the channel levels by pressing RECEIVER first and then TEST TONE. TONE A - You may need to adjust the level ... ears judge which sounds best. If you selected T. Move the test tone manually from the subwoofer when YES is sent to the subwoofer by pressing RECEIVER first and then starting the following order (depends on speaker settings): L C R SR SL SW...
...the subwoofer to output bass sound continuously or you press ENTER.3 4 Adjust the level of channels set to speaker and adjust individual channel levels. • T. TONE M - You can change the channel levels by pressing RECEIVER first and then TEST TONE. TONE A - You may need to adjust the level ... ears judge which sounds best. If you selected T. Move the test tone manually from the subwoofer when YES is sent to the subwoofer by pressing RECEIVER first and then starting the following order (depends on speaker settings): L C R SR SL SW...

Owner's Manual
Page 39
... the zone you can switch power on/off power in the sub zone. Without pressing the SHIFT button, you have selected. Note 1 If the receiver is in standby, the display is in standby. • Volume level cannot be adjusted with the SHIFT button pressed, press the buttons below .... ENTER MASTER VOLUME PHONES SPEAKERS MULTI-ZONE CONTROL ON/OFF PORTABLE 1 Press the MULTI-ZONE ON/OFF button on • ZONE 2 OFF - CHANNEL RECEIVER VSX-519V PHASE CONTROL BAND TUNE - MULTI Use to select sources. Using the MULTI-ZONE feature 07 English Français Español Using the MULTI...
... the zone you can switch power on/off power in the sub zone. Without pressing the SHIFT button, you have selected. Note 1 If the receiver is in standby, the display is in standby. • Volume level cannot be adjusted with the SHIFT button pressed, press the buttons below .... ENTER MASTER VOLUME PHONES SPEAKERS MULTI-ZONE CONTROL ON/OFF PORTABLE 1 Press the MULTI-ZONE ON/OFF button on • ZONE 2 OFF - CHANNEL RECEIVER VSX-519V PHASE CONTROL BAND TUNE - MULTI Use to select sources. Using the MULTI-ZONE feature 07 English Français Español Using the MULTI...

Owner's Manual
Page 44
... volume level of the player to full, or to prevent the output of a cassette deck. • Move the cassette deck further from your receiver, until the noise disappears. Noise during playback of loud noise from your speakers. During a playback search, noise is output from surround or center ...Connect the speakers properly (refer to page 18). • Refer to Speaker setting on page 35 to check the speaker settings. • Refer to Channel level on page 34). Connecting the speakers on . No sound from a DTS compatible CD player. • This is odd. The display is dark ...
... volume level of the player to full, or to prevent the output of a cassette deck. • Move the cassette deck further from your receiver, until the noise disappears. Noise during playback of loud noise from your speakers. During a playback search, noise is output from surround or center ...Connect the speakers properly (refer to page 18). • Refer to Speaker setting on page 35 to check the speaker settings. • Refer to Channel level on page 34). Connecting the speakers on . No sound from a DTS compatible CD player. • This is odd. The display is dark ...

Owner's Manual
Page 45
...HDMI component directly to your component. • To output signals in the output settings of the source component. • Check that can only receive HDMI video from your display unit. • Since the sound is HDCP-compatible. Then use a separate connection for HDMI compatibility information). Check... • If you want to switch the input source, you'll have to switch functions on audio connections. Change the output settings of channels available from the connected display unit (for example audio output is reduced to page 33). • If the component is a DVI device,...
...HDMI component directly to your component. • To output signals in the output settings of the source component. • Check that can only receive HDMI video from your display unit. • Since the sound is HDCP-compatible. Then use a separate connection for HDMI compatibility information). Check... • If you want to switch the input source, you'll have to switch functions on audio connections. Change the output settings of channels available from the connected display unit (for example audio output is reduced to page 33). • If the component is a DVI device,...


