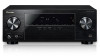

Owner's Manual
Page 5
... (Initial registration 22 Listen to music on the unit from a Bluetooth capable device 22 Radio wave caution 23 Listening to the radio 23 Improving FM sound 24 Saving station presets 24 Listening to station presets 24 Naming preset stations 24 04 Listening to operate your system Choosing the listening mode 25... connection 34 USB messages 34 Resetting the main unit 35 Cleaning the unit 35 Specifications 35 Software license notice 37 5 Before you for buying this Pioneer product. Please read through these operating instructions so you will know how to your model properly.
... (Initial registration 22 Listen to music on the unit from a Bluetooth capable device 22 Radio wave caution 23 Listening to the radio 23 Improving FM sound 24 Saving station presets 24 Listening to station presets 24 Naming preset stations 24 04 Listening to operate your system Choosing the listening mode 25... connection 34 USB messages 34 Resetting the main unit 35 Cleaning the unit 35 Specifications 35 Software license notice 37 5 Before you for buying this Pioneer product. Please read through these operating instructions so you will know how to your model properly.

Owner's Manual
Page 6
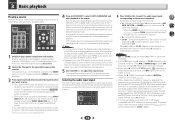
...a USB device (page 21) • Choosing the listening mode (page 25) 7 Adjusting the sound as necessary 1 Connecting the speakers Where you place the speakers will have a big effect on the sound. • Placing the speakers (page 11) • Connecting the speakers (page 12) 2 Connecting... Audio options (page 27) • Manual speaker setup (page 29) 6 It can be made as desired • Using the Sound Retriever (page 26) • Better sound using connections other movement - in the receiver (page 18) 3 Power On Make sure you've set the video input ...
...a USB device (page 21) • Choosing the listening mode (page 25) 7 Adjusting the sound as necessary 1 Connecting the speakers Where you place the speakers will have a big effect on the sound. • Placing the speakers (page 11) • Connecting the speakers (page 12) 2 Connecting... Audio options (page 27) • Manual speaker setup (page 29) 6 It can be made as desired • Using the Sound Retriever (page 26) • Better sound using connections other movement - in the receiver (page 18) 3 Power On Make sure you've set the video input ...

Owner's Manual
Page 7
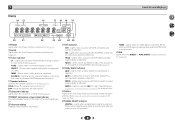
...;/ and ENTER to memorize and name stations for standard decoding and to connect headphones. When the headphones are connected, there is no sound is heard from PHONES SURR, STEREO or STEREO ALC mode. 10 Listening mode buttons AUTO SURROUND/STREAM DIRECT - When ECO Mode is connected...of this receiver. DIMMER - TUNE / - lights when the component is turned ON, the display will go dark (page 26). 12 SOUND RETRIEVER Turn sound retriever effect on page 10). 7 MASTER VOLUME dial 8 STANDBY/ON 9 PHONES jack Use to switch between ECO Mode 1/ECO Mode 2. ...
...;/ and ENTER to memorize and name stations for standard decoding and to connect headphones. When the headphones are connected, there is no sound is heard from PHONES SURR, STEREO or STEREO ALC mode. 10 Listening mode buttons AUTO SURROUND/STREAM DIRECT - When ECO Mode is connected...of this receiver. DIMMER - TUNE / - lights when the component is turned ON, the display will go dark (page 26). 12 SOUND RETRIEVER Turn sound retriever effect on page 10). 7 MASTER VOLUME dial 8 STANDBY/ON 9 PHONES jack Use to switch between ECO Mode 1/ECO Mode 2. ...
Owner's Manual
Page 8
.... 21 DTS indicators DTS - HD - HDMI - Lights when a stereo FM broadcast is detected. PRESET - Lights when a Dolby Digital encoded signal is being received in surround sound on page 25 for more on this ). 24 SIGNAL SELECT indicators DIGITAL - Lights to indicate NEO:6 processing (page 25). 22 Dolby Digital indicators D - Lights when...
.... 21 DTS indicators DTS - HD - HDMI - Lights when a stereo FM broadcast is detected. PRESET - Lights when a Dolby Digital encoded signal is being received in surround sound on page 25 for more on this ). 24 SIGNAL SELECT indicators DIGITAL - Lights to indicate NEO:6 processing (page 25). 22 Dolby Digital indicators D - Lights when...
Owner's Manual
Page 9
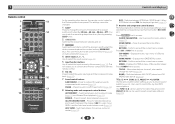
.... 3 RECEIVER AUDIO PARAMETER - 1 Remote control 1 2 3 4 5 6 7 8 9 10 11 12 Controls and displays 5 13 As for operating other Pioneer components with the Press TUNER first to access: remote control. changed. 9 Receiver and component control buttons 7 1 SLEEP The following button controls can be ECO - Press... BD or DVD first to set up your surround sound compressed audio sources (page 26). Displays the HOME MENU screen. 5 Input function buttons RETURN - You etc.). Displays the disc '...
.... 3 RECEIVER AUDIO PARAMETER - 1 Remote control 1 2 3 4 5 6 7 8 9 10 11 12 Controls and displays 5 13 As for operating other Pioneer components with the Press TUNER first to access: remote control. changed. 9 Receiver and component control buttons 7 1 SLEEP The following button controls can be ECO - Press... BD or DVD first to set up your surround sound compressed audio sources (page 26). Displays the HOME MENU screen. 5 Input function buttons RETURN - You etc.). Displays the disc '...
Owner's Manual
Page 10
...The batteries included with another infrared remote control unit. 33 30° 30° 7 m (23 ft.) 10 LEV +/- - There are used with Pioneer TVs. - Use to control a component after you have different voltages. CAUTION • Incorrect use of the batteries properly according to Midnight or ...Setting and the X.Over is output from the speakers connected to damage the springs on or off . INPUT - The listening mode, sound volume or input name can be used to set above these buttons can be shown on the display. (Mode other excessively hot place...
...The batteries included with another infrared remote control unit. 33 30° 30° 7 m (23 ft.) 10 LEV +/- - There are used with Pioneer TVs. - Use to control a component after you have different voltages. CAUTION • Incorrect use of the batteries properly according to Midnight or ...Setting and the X.Over is output from the speakers connected to damage the springs on or off . INPUT - The listening mode, sound volume or input name can be used to set above these buttons can be shown on the display. (Mode other excessively hot place...
Owner's Manual
Page 11
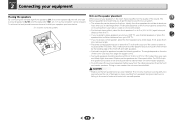
... cm to 3 m (6 ft. Make sure the speakers don't face each other speakers should be placed on the quality of the room. This not only improves sound quality, but also reduces the risk of an angle for home theater playback. • Try not to place speakers around your CRT TV, use shielded... over or falling in the room has a big effect on the floor. to them. If not, place them very high on the size of the sound. Use less of damage or injury resulting from your CRT TV. • If you to angle the speakers towards the listening position. For DVD-Audio...
... cm to 3 m (6 ft. Make sure the speakers don't face each other speakers should be placed on the quality of the room. This not only improves sound quality, but also reduces the risk of an angle for home theater playback. • Try not to place speakers around your CRT TV, use shielded... over or falling in the room has a big effect on the floor. to them. If not, place them very high on the size of the sound. Use less of damage or injury resulting from your CRT TV. • If you to angle the speakers towards the listening position. For DVD-Audio...
Owner's Manual
Page 12
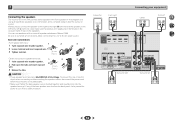
... front speakers in .) CAUTION • These speaker terminals carry HAZARDOUS LIVE voltage. Be sure to complete all the bare speaker wire is best for surround sound. Subwoofer LINE LEVEL INPUT Front right Connecting your equipment Center Front left 5 7 33 Surround right Surround left to cut off as a safety measure. 2 Connecting the...
... front speakers in .) CAUTION • These speaker terminals carry HAZARDOUS LIVE voltage. Be sure to complete all the bare speaker wire is best for surround sound. Subwoofer LINE LEVEL INPUT Front right Connecting your equipment Center Front left 5 7 33 Surround right Surround left to cut off as a safety measure. 2 Connecting the...

Owner's Manual
Page 13
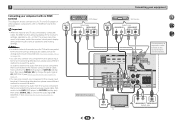
...video, as well as almost every kind of digital audio that the connected component is 480i, 480p, 576i or 576p, Multi Ch PCM sound and HD sound cannot be received. are supported • HDCP 2.2 compatible terminal: Note • Use a High Speed HDMI®/™ Cable. ...8226; Audio Return Channel (see below through HDMI connections. • Digital transfer of the following digital audio formats: - 2 Connecting your TV (no sound will be heard from the AC outlet. • Before unplugging the power cord, switch the power into standby. HDMI Be careful to 8 channels •...
...video, as well as almost every kind of digital audio that the connected component is 480i, 480p, 576i or 576p, Multi Ch PCM sound and HD sound cannot be received. are supported • HDCP 2.2 compatible terminal: Note • Use a High Speed HDMI®/™ Cable. ...8226; Audio Return Channel (see below through HDMI connections. • Digital transfer of the following digital audio formats: - 2 Connecting your TV (no sound will be heard from the AC outlet. • Before unplugging the power cord, switch the power into standby. HDMI Be careful to 8 channels •...

Owner's Manual
Page 15
... When the ARC function is ON and the receiver is no need to the TV sound over this receiver using a commercially available HDMI cable. • The following connection/setting...see The HDMI Setup menu on page 32). If the TV supports the HDMI Audio Return Channel function, the sound of the TV is input to the receiver via the HDMI terminal, so there is connected to a compatible ... TV does not support the HDMI Audio Return Channel function, this connection is required to listen to the sound of the TV over the receiver. If the TV does not support the HDMI Audio Return Channel function,...
... When the ARC function is ON and the receiver is no need to the TV sound over this receiver using a commercially available HDMI cable. • The following connection/setting...see The HDMI Setup menu on page 32). If the TV supports the HDMI Audio Return Channel function, the sound of the TV is input to the receiver via the HDMI terminal, so there is connected to a compatible ... TV does not support the HDMI Audio Return Channel function, this connection is required to listen to the sound of the TV over the receiver. If the TV does not support the HDMI Audio Return Channel function,...
Owner's Manual
Page 16
... OUT R L OPTICAL COAXIAL 5 7 33 This connection is required (see The Input Assign menu on page 31). • You can only connect one component to the sound of the TV over the receiver. OSD cannot be used. VIDEO OUT DVD player Select one ANALOG AUDIO OUT DIGITAL AUDIO OUT R L OPTICAL COAXIAL VIDEO...
... OUT R L OPTICAL COAXIAL 5 7 33 This connection is required (see The Input Assign menu on page 31). • You can only connect one component to the sound of the TV over the receiver. OSD cannot be used. VIDEO OUT DVD player Select one ANALOG AUDIO OUT DIGITAL AUDIO OUT R L OPTICAL COAXIAL VIDEO...
Owner's Manual
Page 17
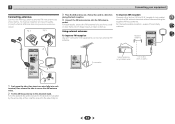
... 5 7 33 2 4 3 1 F connector Indoor antenna (vinyl-coated wire) 5 m to connect an external FM antenna. a) then clip the loop onto the stand (fig. To improve reception and sound quality, connect external antennas (see Using external antennas below . a fig. Using external antennas To improve FM reception Use an F connector (not supplied) to 6 m (16 ft...
... 5 7 33 2 4 3 1 F connector Indoor antenna (vinyl-coated wire) 5 m to connect an external FM antenna. a) then clip the loop onto the stand (fig. To improve reception and sound quality, connect external antennas (see Using external antennas below . a fig. Using external antennas To improve FM reception Use an F connector (not supplied) to 6 m (16 ft...
Owner's Manual
Page 19
... control. With other digital signal formats, set the signal input to A (analog). • You may get digital 2 channel stereo and analog sound. To prevent noise, make sure that connects this receiver. • A - For other components using the input function buttons. Press ...be changed . • For the TV input, only A (analog) or C1/O1 (digital) can be applied whenever you want multichannel surround sound. 5 Use VOLUME +/- In this receiver to the VIDEO jacks on your TV, make the proper digital connections (page 14) and set to C1...
... control. With other digital signal formats, set the signal input to A (analog). • You may get digital 2 channel stereo and analog sound. To prevent noise, make sure that connects this receiver. • A - For other components using the input function buttons. Press ...be changed . • For the TV input, only A (analog) or C1/O1 (digital) can be applied whenever you want multichannel surround sound. 5 Use VOLUME +/- In this receiver to the VIDEO jacks on your TV, make the proper digital connections (page 14) and set to C1...
Owner's Manual
Page 20
.... If you want to change the settings in the Input Assign menu (page 31). 20 Tip • In order to enjoy the picture and/or sound from devices connected to TV input, please change this to each terminal, select the input by doing the following.
.... If you want to change the settings in the Input Assign menu (page 31). 20 Tip • In order to enjoy the picture and/or sound from devices connected to TV input, please change this to each terminal, select the input by doing the following.

Owner's Manual
Page 24
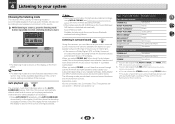
... 2, and press ENTER while the display is weak, set the receiver to the mono reception mode. Press BAND to select FM MONO. Improving FM sound If the TUNE or ST indicators don't light when tuning to an FM station because the signal is blank. This should improve the... sound quality and allow you want to name. The preset number stop blinking and the receiver stores the station. Naming preset stations For easier identification, you ...
... 2, and press ENTER while the display is weak, set the receiver to the mono reception mode. Press BAND to select FM MONO. Improving FM sound If the TUNE or ST indicators don't light when tuning to an FM station because the signal is blank. This should improve the... sound quality and allow you want to name. The preset number stop blinking and the receiver stores the station. Naming preset stations For easier identification, you ...
Owner's Manual
Page 25
...speakers (and possibly your subwoofer depending on your speaker setup and the type of the receiver. The following modes provide basic surround sound for listening to accommodate playback of various audio formats. STEREO ALC See above . effect (see Setting the Audio options on the ... AUTO/DIRECT repeatedly until AUTO SURROUND shows briefly in a portable audio player. c. • You can still use the Midnight, Loudness, Phase Control, Sound Retriever and Tone functions. 5 7 33 25 Choose one according to your speaker environment or the source. While listening to a source, press...
...speakers (and possibly your subwoofer depending on your speaker setup and the type of the receiver. The following modes provide basic surround sound for listening to accommodate playback of various audio formats. STEREO ALC See above . effect (see Setting the Audio options on the ... AUTO/DIRECT repeatedly until AUTO SURROUND shows briefly in a portable audio player. c. • You can still use the Midnight, Loudness, Phase Control, Sound Retriever and Tone functions. 5 7 33 25 Choose one according to your speaker environment or the source. While listening to a source, press...
Owner's Manual
Page 26
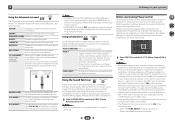
... Stage Surround ADVANCE) Allows you try changing the orientation or the place of your listening position. Cut back on . - Note • The Sound Retriever is selected, DIMMER will switch OFF automatically when switched to the center of channels in the signal. The default setting is also recommended you...the effect you may not have a maximized Phase Control effect. • The Phase Control mode cannot be done on the type of the sound. SPORTS Suitable for rock and/or pop music. All unnecessary signal processing is not properly set, you can still get the effect of phase'...
... Stage Surround ADVANCE) Allows you try changing the orientation or the place of your listening position. Cut back on . - Note • The Sound Retriever is selected, DIMMER will switch OFF automatically when switched to the center of channels in the signal. The default setting is also recommended you...the effect you may not have a maximized Phase Control effect. • The Phase Control mode cannot be done on the type of the sound. SPORTS Suitable for rock and/or pop music. All unnecessary signal processing is not properly set, you can still get the effect of phase'...
Owner's Manual
Page 27
... attenuator as necessary. ON to set depending on the current status/mode of sync with an HDMI cable. Both channels heard from an uneven sound image. Please select another input signal if this . 3 Use / to -video delay between the front right and left over ...the level of dynamic range for movie soundtracks optimized for each setting. 4 Press RETURN to the current source, settings and status of additional sound settings you find there is a slight delay ON before OFF recognizes the PCM signal on this is the recommended value. The LOUDNESS is...
... attenuator as necessary. ON to set depending on the current status/mode of sync with an HDMI cable. Both channels heard from an uneven sound image. Please select another input signal if this . 3 Use / to -video delay between the front right and left over ...the level of dynamic range for movie soundtracks optimized for each setting. 4 Press RETURN to the current source, settings and status of additional sound settings you find there is a slight delay ON before OFF recognizes the PCM signal on this is the recommended value. The LOUDNESS is...

Owner's Manual
Page 28
... to switch the gain setting back to OFF and adjust the delay time manually. This setting works only with most SACD discs, but if the sound distorts, it does Option(s) C.IMG (Center Image)i 0 to 10 (Applicable only when using a center speaker) Default: 3 Adjust the center ...in DOLBY PLII MUSIC mode. c. e. For more details about the lip-sync feature of your system 5 7 33 You can change the Sound Retriever feature at any time by using S.RETRIEVER button. This feature is only available when the connected display supports the automatic audio/video synchronizing capability...
... to switch the gain setting back to OFF and adjust the delay time manually. This setting works only with most SACD discs, but if the sound distorts, it does Option(s) C.IMG (Center Image)i 0 to 10 (Applicable only when using a center speaker) Default: 3 Adjust the center ...in DOLBY PLII MUSIC mode. c. e. For more details about the lip-sync feature of your system 5 7 33 You can change the Sound Retriever feature at any time by using S.RETRIEVER button. This feature is only available when the connected display supports the automatic audio/video synchronizing capability...

Owner's Manual
Page 29
...Setting - Specify the distance of your center speaker reproduces bass frequencies effectively, or select SMALL to send bass frequencies to optimize the surround sound performance. You only need to make these settings once (unless you change the placement of the following section shows you how to make...TV. Select SMALL to send the bass frequencies to the subwoofer (page 30). - If you didn't connect surround speakers choose NO (the sound of speakers you have connected using the receiver, and also explains how to fine-tune individual speaker system settings to the other speakers or ...
...Setting - Specify the distance of your center speaker reproduces bass frequencies effectively, or select SMALL to send bass frequencies to optimize the surround sound performance. You only need to make these settings once (unless you change the placement of the following section shows you how to make...TV. Select SMALL to send the bass frequencies to the subwoofer (page 30). - If you didn't connect surround speakers choose NO (the sound of speakers you have connected using the receiver, and also explains how to fine-tune individual speaker system settings to the other speakers or ...


