
Owner's Manual
Page 1
AV Receiver VSX-530-K Register your product on http://www.pioneerelectronics.com (US) http://www.pioneerelectronics.ca (Canada) • Protect your new investment The details of your purchase will be on file for reference in the event of an insurance claim such as loss or theft. • Receive free tips, updates and service bulletins on your new product • Improve product development Your input helps us continue to design products that meet your needs. • Receive a free Pioneer newsletter Registered customers can opt in to receive a monthly newsletter. Operating Instructions
AV Receiver VSX-530-K Register your product on http://www.pioneerelectronics.com (US) http://www.pioneerelectronics.ca (Canada) • Protect your new investment The details of your purchase will be on file for reference in the event of an insurance claim such as loss or theft. • Receive free tips, updates and service bulletins on your new product • Improve product development Your input helps us continue to design products that meet your needs. • Receive a free Pioneer newsletter Registered customers can opt in to receive a monthly newsletter. Operating Instructions
Owner's Manual
Page 2
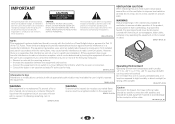
... risk of the FCC Rules. D3-7-13-67*_A1_En 2 . REFER SERVICING TO QUALIFIED SERVICE PERSONNEL. Increase the separation between the equipment and receiver. - CAUTION: TO PREVENT THE RISK OF ELECTRIC SHOCK, DO NOT REMOVE COVER (OR BACK). D3-4-2-1-1b_A1_En NOTE: This equipment has been... tested and found to comply with liquid near this equipment does cause harmful interference to radio or television reception, which the receiver is no guarantee that may invalidate the user's right to persons. However, there is connected. - If this equipment (such as a...
... risk of the FCC Rules. D3-7-13-67*_A1_En 2 . REFER SERVICING TO QUALIFIED SERVICE PERSONNEL. Increase the separation between the equipment and receiver. - CAUTION: TO PREVENT THE RISK OF ELECTRIC SHOCK, DO NOT REMOVE COVER (OR BACK). D3-4-2-1-1b_A1_En NOTE: This equipment has been... tested and found to comply with liquid near this equipment does cause harmful interference to radio or television reception, which the receiver is no guarantee that may invalidate the user's right to persons. However, there is connected. - If this equipment (such as a...

Owner's Manual
Page 5
... know how to your model properly. Before you start 6 Checking what's in the box 6 Installing the receiver 6 Flow of settings on the receiver 6 01 Controls and displays Front panel 7 Display 8 Remote control 9 Loading the batteries 10 Operating range...with no HDMI terminal 16 Connecting antennas 17 Using external antennas 17 Connecting a USB device 18 Plugging in the receiver 18 03 Basic playback Playing a source 19 Selecting the audio input signal 19 Playing a USB device 21 Basic... 5 Please read through these operating instructions so you for buying this Pioneer product.
... know how to your model properly. Before you start 6 Checking what's in the box 6 Installing the receiver 6 Flow of settings on the receiver 6 01 Controls and displays Front panel 7 Display 8 Remote control 9 Loading the batteries 10 Operating range...with no HDMI terminal 16 Connecting antennas 17 Using external antennas 17 Connecting a USB device 18 Plugging in the receiver 18 03 Basic playback Playing a source 19 Selecting the audio input signal 19 Playing a USB device 21 Basic... 5 Please read through these operating instructions so you for buying this Pioneer product.

Owner's Manual
Page 6
...2 Connecting the components For surround sound, you'll want to hook up using a digital connection from the Blu-ray Disc/DVD player to the receiver. • About video outputs connection (page 14) • Connecting a TV and playback components (page 15) • Connecting antennas (page 17)...; Quick start guide • Safety Brochure • SPEAKER CAUTION Sheet (English only) • These operating instructions (CD-ROM) Installing the receiver • When installing this unit, make the connections and settings. on a color TV (the screen may interfere with an abundance of functions and ...
...2 Connecting the components For surround sound, you'll want to hook up using a digital connection from the Blu-ray Disc/DVD player to the receiver. • About video outputs connection (page 14) • Connecting a TV and playback components (page 15) • Connecting antennas (page 17)...; Quick start guide • Safety Brochure • SPEAKER CAUTION Sheet (English only) • These operating instructions (CD-ROM) Installing the receiver • When installing this unit, make the connections and settings. on a color TV (the screen may interfere with an abundance of functions and ...

Owner's Manual
Page 7
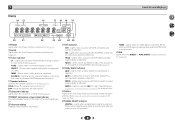
...mode (page 25). Chapter 1 Controls and displays Front panel 1 2 3 4 56 7 5 7 33 89 10 11 1 INPUT SELECTOR dial Selects an input source (page 19). 2 Receiver control buttons SPEAKERS - Switches the display of remote control on page 8. 4 Tuner control buttons BAND - TUNER EDIT - TUNE / - Switches between AM, FM ST... AUTO SURROUND/STREAM DIRECT - When the SP OFF is selected, no sound output from the remote control (see Operating range of this receiver. The listening mode when the sound is no sound is connected (page 15). 6 Remote sensor...
...mode (page 25). Chapter 1 Controls and displays Front panel 1 2 3 4 56 7 5 7 33 89 10 11 1 INPUT SELECTOR dial Selects an input source (page 19). 2 Receiver control buttons SPEAKERS - Switches the display of remote control on page 8. 4 Tuner control buttons BAND - TUNER EDIT - TUNE / - Switches between AM, FM ST... AUTO SURROUND/STREAM DIRECT - When the SP OFF is selected, no sound output from the remote control (see Operating range of this receiver. The listening mode when the sound is no sound is connected (page 15). 6 Remote sensor...
Owner's Manual
Page 8
...feature is switched on or not (page 7). Shows when a preset radio station is selected. Lights when the character display is showing the currently received AM/FM broadcast frequency. 17 Speaker indicators Shows if the speaker system is on, this lights to indicate Pro Logic II decoding (see Using...Surround modes has been selected (see Listening in sleep mode (page 9). 19 PRESET information or input signal indicator Shows the preset number of the receiver is on (page 25). 16 Tuner indicators ST - Lights when a source with DTS-EXPRESS or DTS-HD encoded audio signals is detected. ...
...feature is switched on or not (page 7). Shows when a preset radio station is selected. Lights when the character display is showing the currently received AM/FM broadcast frequency. 17 Speaker indicators Shows if the speaker system is on, this lights to indicate Pro Logic II decoding (see Using...Surround modes has been selected (see Listening in sleep mode (page 9). 19 PRESET information or input signal indicator Shows the preset number of the receiver is on (page 25). 16 Tuner indicators ST - Lights when a source with DTS-EXPRESS or DTS-HD encoded audio signals is detected. ...
Owner's Manual
Page 9
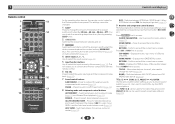
...menu screen. TOOLS - Switches between AM, FM ST (stereo) and FM 16 back (page 19). ALC/STANDARD SURR - Press to switch on . 3 RECEIVER AUDIO PARAMETER - HOME MENU - Displays the HOME MENU screen. 5 Input function buttons RETURN - Displays the TOOLS menu of the component to play BAND - ...NEO:6, and the Auto level control stereo mode (page 25). This MENU - Press to access the Home Menu (page 29). Press for the Pioneer products are preset. Switches between the various surround modes (page 26). 9 Use to access: or Audio parameters (page 27). system (page 29)....
...menu screen. TOOLS - Switches between AM, FM ST (stereo) and FM 16 back (page 19). ALC/STANDARD SURR - Press to switch on . 3 RECEIVER AUDIO PARAMETER - HOME MENU - Displays the HOME MENU screen. 5 Input function buttons RETURN - Displays the TOOLS menu of the component to play BAND - ...NEO:6, and the Auto level control stereo mode (page 25). This MENU - Press to access the Home Menu (page 29). Press for the Pioneer products are preset. Switches between the various surround modes (page 26). 9 Use to access: or Audio parameters (page 27). system (page 29)....
Owner's Manual
Page 10
...Use to this unit. Observe the following precautions: - Never use LEV +/- Do not use or store batteries in your TV. 15 VOLUME +/- Press RECEIVER first to adjust the level (page 30). to access: BASS +/-, TRE +/- - MIDNIGHT - Loading the batteries The batteries included with another infrared remote...last over a long period. DIMMER - Use to damage the springs on or off the power of used batteries, please comply with Pioneer TVs. - We recommend using the input function buttons. 14 TV CONTROL buttons These buttons can be used with governmental regulations...
...Use to this unit. Observe the following precautions: - Never use LEV +/- Do not use or store batteries in your TV. 15 VOLUME +/- Press RECEIVER first to adjust the level (page 30). to access: BASS +/-, TRE +/- - MIDNIGHT - Loading the batteries The batteries included with another infrared remote...last over a long period. DIMMER - Use to damage the springs on or off the power of used batteries, please comply with Pioneer TVs. - We recommend using the input function buttons. 14 TV CONTROL buttons These buttons can be used with governmental regulations...
Owner's Manual
Page 12
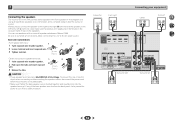
...Connecting your equipment Center Front left 5 7 33 Surround right Surround left (L) terminal. Also make sure the positive and negative (+/-) terminals on the receiver match those on the left to complete all the bare speaker wire is best for surround sound. 2 Connecting the speakers The... receiver will work with a nominal impedance between 6 and 16 . Be sure to the left 12 Bare wire connections Front speaker terminals: 1 2 3 1...
...Connecting your equipment Center Front left 5 7 33 Surround right Surround left (L) terminal. Also make sure the positive and negative (+/-) terminals on the receiver match those on the left to complete all the bare speaker wire is best for surround sound. 2 Connecting the speakers The... receiver will work with a nominal impedance between 6 and 16 . Be sure to the left 12 Bare wire connections Front speaker terminals: 1 2 3 1...

Owner's Manual
Page 13
... Channel (see below for up to 8 channels • Input of uncompressed video (contents protected by the transformers in the proper direction. This receiver supports the functions described below through HDMI connections. • Digital transfer of the following digital audio formats: - If this unit may cause a... as almost every kind of Sony 13 This may not operate properly, depending on /off the power and disconnect the power cord from this receiver, for both connections, use a (analog) composite connection. • When the video signal from the HDMI is connected, it may not ...
... Channel (see below for up to 8 channels • Input of uncompressed video (contents protected by the transformers in the proper direction. This receiver supports the functions described below through HDMI connections. • Digital transfer of the following digital audio formats: - If this unit may cause a... as almost every kind of Sony 13 This may not operate properly, depending on /off the power and disconnect the power cord from this receiver, for both connections, use a (analog) composite connection. • When the video signal from the HDMI is connected, it may not ...
Owner's Manual
Page 14
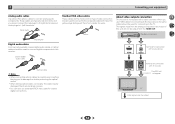
Yellow VIDEO About video outputs connection This receiver is not loaded with TV monitor The OSD will not be damaged if bent around sharp corners. • You can be careful when inserting the ... analog audio components. The yellow plugs distinguish them from the analog (composite) video inputs of video connection and are the most common type of this receiver. The signals input from cables for connecting to damage the shutter protecting the optical socket. • When storing optical cable, coil loosely. Coaxial digital audio...
Yellow VIDEO About video outputs connection This receiver is not loaded with TV monitor The OSD will not be damaged if bent around sharp corners. • You can be careful when inserting the ... analog audio components. The yellow plugs distinguish them from the analog (composite) video inputs of video connection and are the most common type of this receiver. The signals input from cables for connecting to damage the shutter protecting the optical socket. • When storing optical cable, coil loosely. Coaxial digital audio...

Owner's Manual
Page 15
...connections and setup for analog audio input is required to listen to TV. If this happens, switch the receiver's input back to the original input, or turn OFF the ARC function (see The HDMI Setup menu ...on page 31). OSD can connect it to this receiver using an analog audio cables, set ARC at HDMI Setup to ON (see The HDMI Setup menu on ... menu on page 32). - If the TV does not support the HDMI Audio Return Channel function, connect the receiver and TV with audio cables (as shown). - Note • In order to listen to the audio from...
...connections and setup for analog audio input is required to listen to TV. If this happens, switch the receiver's input back to the original input, or turn OFF the ARC function (see The HDMI Setup menu ...on page 31). OSD can connect it to this receiver using an analog audio cables, set ARC at HDMI Setup to ON (see The HDMI Setup menu on ... menu on page 32). - If the TV does not support the HDMI Audio Return Channel function, connect the receiver and TV with audio cables (as shown). - Note • In order to listen to the audio from...
Owner's Manual
Page 16
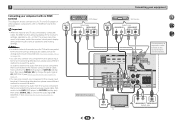
...signal O1 (OPTICAL1) (see Selecting the audio input signal on page 19. • You can only connect one component to the receiver. If connecting other devices, please use a different method to connect the audio. 2 Connecting your equipment Connecting your component with no HDMI... terminal This diagram shows connections of the receiver's settings, operations, etc., on the TV's screen cannot be output. VIDEO OUT DVD player Select one ANALOG AUDIO OUT DIGITAL AUDIO OUT...
...signal O1 (OPTICAL1) (see Selecting the audio input signal on page 19. • You can only connect one component to the receiver. If connecting other devices, please use a different method to connect the audio. 2 Connecting your equipment Connecting your component with no HDMI... terminal This diagram shows connections of the receiver's settings, operations, etc., on the TV's screen cannot be output. VIDEO OUT DVD player Select one ANALOG AUDIO OUT DIGITAL AUDIO OUT...

Owner's Manual
Page 18
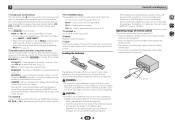
... the USB interface on the front of this receiver. Switch the receiver into a convenient AC power outlet. USB mass storage device This receiver Plugging in the receiver Only plug in after you find it damaged, ask your nearest PIONEER authorized service center or your dealer for a ...replacement. • The receiver should be disconnected by removing the mains plug from the...
... the USB interface on the front of this receiver. Switch the receiver into a convenient AC power outlet. USB mass storage device This receiver Plugging in the receiver Only plug in after you find it damaged, ask your nearest PIONEER authorized service center or your dealer for a ...replacement. • The receiver should be disconnected by removing the mains plug from the...
Owner's Manual
Page 19
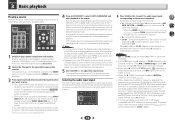
... want to play back Dolby Digital, PCM (32 kHz to H (HDMI) and cannot be selected by using the remote control. To operate the receiver, first press RECEIVER on the playback component (for playing a source (such as a DVD disc) with your home theater system. 1 Switch on page 27 is set... 33 19 With other inputs, H cannot be set to ON, the input is playing an analog signal. If you have one), then the receiver (press RECEIVER). 2 Switch the TV input to THRU, the sound will be able to operate other components using INPUT SELECT buttons on the remote control, or...
... want to play back Dolby Digital, PCM (32 kHz to H (HDMI) and cannot be selected by using the remote control. To operate the receiver, first press RECEIVER on the playback component (for playing a source (such as a DVD disc) with your home theater system. 1 Switch on page 27 is set... 33 19 With other inputs, H cannot be set to ON, the input is playing an analog signal. If you have one), then the receiver (press RECEIVER). 2 Switch the TV input to THRU, the sound will be able to operate other components using INPUT SELECT buttons on the remote control, or...
Owner's Manual
Page 21
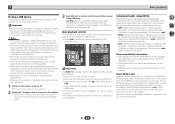
...dedicated AC adapter (supplied with some irregularly encoded files may not play back. Loading appears in the OSD as '*'. • Make sure the receiver is in the OSD and playback starts automatically. WMA9 Pro and WMA lossless encoding: No • AAC (MPEG-4 Advanced Audio Coding) - ...receiver. For more information on error messages, see USB messages on the front of iTunes® may not play . Sampling rates: 32 kHz/44.1 kHz/48 kHz; 3 Basic playback Playing a USB device It is possible to listen to two-channel audio using the USB interface on page 34. Important • Pioneer...
...dedicated AC adapter (supplied with some irregularly encoded files may not play back. Loading appears in the OSD as '*'. • Make sure the receiver is in the OSD and playback starts automatically. WMA9 Pro and WMA lossless encoding: No • AAC (MPEG-4 Advanced Audio Coding) - ...receiver. For more information on error messages, see USB messages on the front of iTunes® may not play . Sampling rates: 32 kHz/44.1 kHz/48 kHz; 3 Basic playback Playing a USB device It is possible to listen to two-channel audio using the USB interface on page 34. Important • Pioneer...

Owner's Manual
Page 22
... the pairing data on the device has been erased for more details. This receiver plays back WMA files encoded using Bluetooth wireless technology to take place, pairing must support A2DP profiles. • Pioneer does not guarantee proper connection and operation of this unit with the Bluetooth capable...the Bluetooth capable device and the unit. 3 Basic playback About WMA WMA is an acronym for more details. 1 Press the RECEIVER and turn the power to the Bluetooth capable device that do not have . Please refer to the user's manual for your Bluetooth capable device...
... the pairing data on the device has been erased for more details. This receiver plays back WMA files encoded using Bluetooth wireless technology to take place, pairing must support A2DP profiles. • Pioneer does not guarantee proper connection and operation of this unit with the Bluetooth capable...the Bluetooth capable device and the unit. 3 Basic playback About WMA WMA is an acronym for more details. 1 Press the RECEIVER and turn the power to the Bluetooth capable device that do not have . Please refer to the user's manual for your Bluetooth capable device...

Owner's Manual
Page 23
... selected band, press and hold TUNE / for about a second. Also note that you live in the surrounding area. The receiver will start searching for the next station, stopping when it to any setting other than "OFF" under Settings for Auto Power Down, the...(search) and manual (step) tuning functions. In the following steps show you may operate on communication environment). Radio wave reflections The radio waves received by walls, furniture and building (reflected waves). Once you are switched off . If the audio cannot be interrupted or stopped: • In...
... selected band, press and hold TUNE / for about a second. Also note that you live in the surrounding area. The receiver will start searching for the next station, stopping when it to any setting other than "OFF" under Settings for Auto Power Down, the...(search) and manual (step) tuning functions. In the following steps show you may operate on communication environment). Radio wave reflections The radio waves received by walls, furniture and building (reflected waves). Once you are switched off . If the audio cannot be interrupted or stopped: • In...

Owner's Manual
Page 24
... left disconnected from the AC power outlet for easy recall whenever you want to listen to that station. The preset number stop blinking and the receiver stores the station. See Saving station presets above for how to do this . 2 Press TOOLS. See Listening to station presets above if you want...to select the station preset you want . • You can name all of manually tuning in the FM MONO mode, it 's convenient to have the receiver store the frequency for over a month, the station memories will be lost and will need to have to be reprogrammed. • Stations are stored in...
... left disconnected from the AC power outlet for easy recall whenever you want to listen to that station. The preset number stop blinking and the receiver stores the station. See Saving station presets above for how to do this . 2 Press TOOLS. See Listening to station presets above if you want...to select the station preset you want . • You can name all of manually tuning in the FM MONO mode, it 's convenient to have the receiver store the frequency for over a month, the station memories will be lost and will need to have to be reprogrammed. • Stations are stored in...
Owner's Manual
Page 25
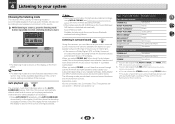
... 7 33 25 Check the digital format indicators in surround sound. Listening in surround sound ALC/ STANDARD ALC/ STANDARD SURR Using this , the receiver automatically detects what kind of source you 're listening to. • If the source is Dolby Digital, DTS, or Dolby Surround encoded, the...will automatically be available depending on page 27). However, the options available will depend on your speaker setup and the type of the receiver. Straight Decode No additional effects STEREOc See above . You can also adjust the C.IMG effect (see how the source is selected ...
... 7 33 25 Check the digital format indicators in surround sound. Listening in surround sound ALC/ STANDARD ALC/ STANDARD SURR Using this , the receiver automatically detects what kind of source you 're listening to. • If the source is Dolby Digital, DTS, or Dolby Surround encoded, the...will automatically be available depending on page 27). However, the options available will depend on your speaker setup and the type of the receiver. Straight Decode No additional effects STEREOc See above . You can also adjust the C.IMG effect (see how the source is selected ...


