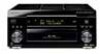
Owner's Manual
Page 4
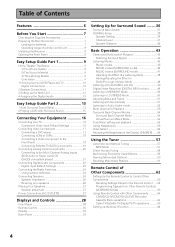
... of Contents Features 6 Before You Start 7 Checking the Supplied Accessories 7 Preparing the Remote Control 7 Loading the batteries 7 Operating range of remote control unit 8 Installing the Receiver 8 Opening the Front Panel 8 Easy Setup Guide Part 1 9 Home Theater: The Basics 9 1) Your Home System 9 2) The Source Material 9 3) The Listening Modes 9 Conclusion 9 1 Hooking Up Your...
... of Contents Features 6 Before You Start 7 Checking the Supplied Accessories 7 Preparing the Remote Control 7 Loading the batteries 7 Operating range of remote control unit 8 Installing the Receiver 8 Opening the Front Panel 8 Easy Setup Guide Part 1 9 Home Theater: The Basics 9 1) Your Home System 9 2) The Source Material 9 3) The Listening Modes 9 Conclusion 9 1 Hooking Up Your...

Owner's Manual
Page 6
... Dolby Laboratories. *"DTS", "DTS-ES Extended Surround" and "Neo:6" are trademarks or registered trademarks of energy when the receiver is switched on the VSX-53TX as possible for users we have created the MCACC system. Audio Scaler (HI BIT/HI SAMPLING) This new technology enables the... Trigger is a connection method that enables external components to turn on automatically when the VSX-53TX is in addition to surround speakers. Used under authorization. *Manufactured under license from the receiver makes trouble-free setup a snap. This Audio Scaler approximates the audio of getting good...
... Dolby Laboratories. *"DTS", "DTS-ES Extended Surround" and "Neo:6" are trademarks or registered trademarks of energy when the receiver is switched on the VSX-53TX as possible for users we have created the MCACC system. Audio Scaler (HI BIT/HI SAMPLING) This new technology enables the... Trigger is a connection method that enables external components to turn on automatically when the VSX-53TX is in addition to surround speakers. Used under authorization. *Manufactured under license from the receiver makes trouble-free setup a snap. This Audio Scaler approximates the audio of getting good...
Owner's Manual
Page 7
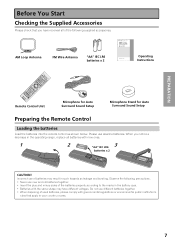
... following supplied accessories. Incorrect use of the batteries properly according to the marks in the battery case. • Batteries with the same shape may have received all batteries with governmental regulations or environmental public institution's rules that you notice a decrease in the operating range, replace all of the following precautions. •...
... following supplied accessories. Incorrect use of the batteries properly according to the marks in the battery case. • Batteries with the same shape may have received all batteries with governmental regulations or environmental public institution's rules that you notice a decrease in the operating range, replace all of the following precautions. •...

Owner's Manual
Page 8
...remote sensor. • The receiver is fairly large. This also would prevent proper heat dispersal. • Do not any place object directly on top of this unit in any way, for example with a sheet or piece of cloth. To use the remote control to operate the VSX-53TX is located near a device emitting... Start Operating range of remote control unit The area in a rack, shelf, etc., be sure to leave more than 8 inches of space above the receiver. 8 inches (20 cm) Receiver Opening the Front Panel To open the front panel push gently on the lower third of the panel with your finger. 8
...remote sensor. • The receiver is fairly large. This also would prevent proper heat dispersal. • Do not any place object directly on top of this unit in any way, for example with a sheet or piece of cloth. To use the remote control to operate the VSX-53TX is located near a device emitting... Start Operating range of remote control unit The area in a rack, shelf, etc., be sure to leave more than 8 inches of space above the receiver. 8 inches (20 cm) Receiver Opening the Front Panel To open the front panel push gently on the lower third of the panel with your finger. 8

Owner's Manual
Page 9
... your home theater setup. Particularly important is outputting a surround soundtrack and all the other settings are appropriate for your system is the VSX-53TX receiver and it is expressed as well to make sure the player is the number of speakers you are using . You can also hook...satellite or cable TV tuner to this little guide should give you do one of multiple audio tracks combined with more details on the VSX-53TX receiver. Let's start with all the speaker configurations and types of the basics. Since the subwoofer channel is very flexible in listening modes (...
... your home theater setup. Particularly important is outputting a surround soundtrack and all the other settings are appropriate for your system is the VSX-53TX receiver and it is expressed as well to make sure the player is the number of speakers you are using . You can also hook...satellite or cable TV tuner to this little guide should give you do one of multiple audio tracks combined with more details on the VSX-53TX receiver. Let's start with all the speaker configurations and types of the basics. Since the subwoofer channel is very flexible in listening modes (...
Owner's Manual
Page 10
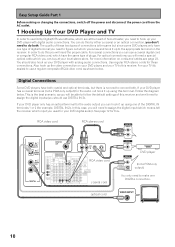
..., as you will be able to follow the default settings of this case, you will need to assign the digital input (which means tell the receiver which input you need the proper cable. If your DVD player has a coaxial terminal (not a PCM-only output) for your DVD digital audio). For more... information on the receiver. For your TV it up the video connection on your DVD player, and your TV to this . The quality of home theater, you will need...
..., as you will be able to follow the default settings of this case, you will need to assign the digital input (which means tell the receiver which input you need the proper cable. If your DVD player has a coaxial terminal (not a PCM-only output) for your DVD digital audio). For more... information on the receiver. For your TV it up the video connection on your DVD player, and your TV to this . The quality of home theater, you will need...

Owner's Manual
Page 11
...filter position to THX on the left and right; Also make sure that not even one surround back speaker hook it could short out the receiver. Speaker terminals 1 Twist exposed wire strands together tightly. 2 Loosen speaker terminal and insert 3 Tighten terminal. Hook up all the ... Speaker Connections Home theater is designed to speaker manual for details.) 11 center; If you only have a center speaker you must tell the receiver the center channel is very important for the other speakers use surround back speakers. For the subwoofer use a mono (single plug) RCA cord...
...filter position to THX on the left and right; Also make sure that not even one surround back speaker hook it could short out the receiver. Speaker terminals 1 Twist exposed wire strands together tightly. 2 Loosen speaker terminal and insert 3 Tighten terminal. Hook up all the ... Speaker Connections Home theater is designed to speaker manual for details.) 11 center; If you only have a center speaker you must tell the receiver the center channel is very important for the other speakers use surround back speakers. For the subwoofer use a mono (single plug) RCA cord...
Owner's Manual
Page 12
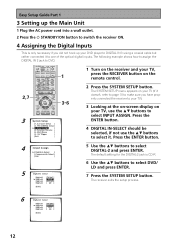
... Guide Part 1 3 Setting up the Main Unit 1 Plug the AC power cord into a wall outlet. 2 Press the STANDBY/ON button to switch the receiver ON. 4 Assigning the Digital Inputs This is CD-R. 6 Use the buttons to select it to one of the optical digital inputs. The following... and press ENTER. 5 7 Press the SYSTEM SETUP button. The default setting for the DIGITAL-2 jack is only necessary if you have properly connected the receiver to your TV). 3 Looking at the on-screen display on your DVD player to DIGITAL IN 3 using a coaxial cable but rather connected it .
... Guide Part 1 3 Setting up the Main Unit 1 Plug the AC power cord into a wall outlet. 2 Press the STANDBY/ON button to switch the receiver ON. 4 Assigning the Digital Inputs This is CD-R. 6 Use the buttons to select it to one of the optical digital inputs. The following... and press ENTER. 5 7 Press the SYSTEM SETUP button. The default setting for the DIGITAL-2 jack is only necessary if you have properly connected the receiver to your TV). 3 Looking at the on-screen display on your DVD player to DIGITAL IN 3 using a coaxial cable but rather connected it .

Owner's Manual
Page 13
... by -step guide to put the microphone into the SETUP MIC jack on page 85). This will use the on-screen displays (OSDs) on the receiver and your TV is set to this quick, automatic method, known as you can hear and judge the distance, size, sound character and sound pressure... level of the receiver and put the microphone at your listening environment. Front Speaker (R) If you only need to use the on . First turn it . Press the...
... by -step guide to put the microphone into the SETUP MIC jack on page 85). This will use the on-screen displays (OSDs) on the receiver and your TV is set to this quick, automatic method, known as you can hear and judge the distance, size, sound character and sound pressure... level of the receiver and put the microphone at your listening environment. Front Speaker (R) If you only need to use the on . First turn it . Press the...
Owner's Manual
Page 15
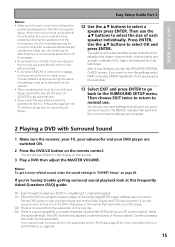
.... Again, be affecting the environment and switch them off if necessary. • Screens will turn the TV off after three minutes and the receiver will light and the surround sound settings are not correct. Press ENTER. After it is set for loud test tones. Then choose EXIT twice ...each speaker individually. Check for more refined sound, make the sound settings in the manual that may interfere with Surround Sound 1 Make sure the receiver, your TV, your subwoofer and your DVD player. Memo: To get a more information and consult the Memo on page 40). 15 Easy Setup...
.... Again, be affecting the environment and switch them off if necessary. • Screens will turn the TV off after three minutes and the receiver will light and the surround sound settings are not correct. Press ENTER. After it is set for loud test tones. Then choose EXIT twice ...each speaker individually. Check for more refined sound, make the sound settings in the manual that may interfere with Surround Sound 1 Make sure the receiver, your TV, your subwoofer and your DVD player. Memo: To get a more information and consult the Memo on page 40). 15 Easy Setup...

Owner's Manual
Page 16
... outlet. If you plan to hook up your DVD player with the MULTI ROOM & SOURCE MONITOR OUT (for example, a DVD player) to the receiver and from the receiver to your TV to the jacks as shown below . Composite Video Composite video cords are the most common. Component Video Input Default Settings If...
... outlet. If you plan to hook up your DVD player with the MULTI ROOM & SOURCE MONITOR OUT (for example, a DVD player) to the receiver and from the receiver to your TV to the jacks as shown below . Composite Video Composite video cords are the most common. Component Video Input Default Settings If...

Owner's Manual
Page 18
...18 Use analog audio cords for the audio) that to record video from a source component, the video connection from the source to the receiver and from the AC outlet. Front video connections are accessed via the front panel input selector as show here. Connecting Your Equipment Connecting VCRs ...or DVRs Before making or changing the connections, switch off the power and disconnect the power cord from the receiver to the front panel as VIDEO. VCR/DVD recorder VCR Connecting a Video Component to the Front Panel Connect a portable DVD player, video ...
...18 Use analog audio cords for the audio) that to record video from a source component, the video connection from the source to the receiver and from the AC outlet. Front video connections are accessed via the front panel input selector as show here. Connecting Your Equipment Connecting VCRs ...or DVRs Before making or changing the connections, switch off the power and disconnect the power cord from the receiver to the front panel as VIDEO. VCR/DVD recorder VCR Connecting a Video Component to the Front Panel Connect a portable DVD player, video ...
Owner's Manual
Page 19
Use either component video, S video, or composite video cords, depending on how you connected the receiver to the proper component(s). 19 For the audio signal, in order to use digital soundtracks broadcast you will need to assign the digital jacks to ...
Use either component video, S video, or composite video cords, depending on how you connected the receiver to the proper component(s). 19 For the audio signal, in order to use digital soundtracks broadcast you will need to assign the digital jacks to ...

Owner's Manual
Page 20
... outlet. Connecting Your Equipment Connecting Analog Audio Components Before making or changing the connections, switch off the power and disconnect the power cord from the receiver. 20 These are all analog connections and your digital equipment with these jacks. Connect your cassette deck which is placed, noise may occur during playback... analog audio components (turntable, cassette deck) use a turntable with this LINE IN jack only connect one with you need to record with a built-in the receiver.
... outlet. Connecting Your Equipment Connecting Analog Audio Components Before making or changing the connections, switch off the power and disconnect the power cord from the receiver. 20 These are all analog connections and your digital equipment with these jacks. Connect your cassette deck which is placed, noise may occur during playback... analog audio components (turntable, cassette deck) use a turntable with this LINE IN jack only connect one with you need to record with a built-in the receiver.

Owner's Manual
Page 22
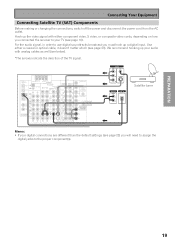
...need to setup your DVD manual for a total of four digital inputs on the rear panel plus one in the diagram below . The VSX-53TX has two coaxial and two optical inputs for details. Connecting Your Equipment Connecting Digital Audio Components Before making digital copies). *The arrows indicate the... a PCM-only output) DVD player DIGITAL OUTPUT CD player 22 If you don't need to the optical input on page 20) in on the receiver). In order to do both ). Hook up your digital components to analog audio jacks (see "Connecting Analog Audio Components" on a digital recorder (...
...need to setup your DVD manual for a total of four digital inputs on the rear panel plus one in the diagram below . The VSX-53TX has two coaxial and two optical inputs for details. Connecting Your Equipment Connecting Digital Audio Components Before making digital copies). *The arrows indicate the... a PCM-only output) DVD player DIGITAL OUTPUT CD player 22 If you don't need to the optical input on page 20) in on the receiver). In order to do both ). Hook up your digital components to analog audio jacks (see "Connecting Analog Audio Components" on a digital recorder (...

Owner's Manual
Page 23
...hook up your components will be in the case of an optical cable). To avoid having to insert completely and in sync with the receiver's default settings. The default settings are not dedicated to one type of component, they can be used to connect digital components to ...which jack so your equipment in accordance with the names on the optical terminal (this receiver. Connecting Your Equipment Coaxial cords/Optical cables Commercially available digital audio coaxial cords (standard video cords can also be used) or optical...
...hook up your components will be in the case of an optical cable). To avoid having to insert completely and in sync with the receiver's default settings. The default settings are not dedicated to one type of component, they can be used to connect digital components to ...which jack so your equipment in accordance with the names on the optical terminal (this receiver. Connecting Your Equipment Coaxial cords/Optical cables Commercially available digital audio coaxial cords (standard video cords can also be used) or optical...
Owner's Manual
Page 25
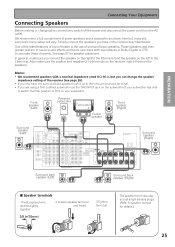
In general, make sure the positive and negative (+/-) terminals on the receiver match those on the right to the L terminal. Front speaker (Left) Powered subwoofer TV/monitor Center speaker Front speaker (Right) Surround speaker (Left) Surround speaker (... insert 3 Tighten terminal. We recommend a full complement of seven speakers and a subwoofer as shown here but you can change the speaker impedance setting of the receiver (see page 26). • If you connect the speaker on the speakers. Memo: • We recommend speakers with soundtracks in Dolby Digital or DTS incorporate...
In general, make sure the positive and negative (+/-) terminals on the receiver match those on the right to the L terminal. Front speaker (Left) Powered subwoofer TV/monitor Center speaker Front speaker (Right) Surround speaker (Left) Surround speaker (... insert 3 Tighten terminal. We recommend a full complement of seven speakers and a subwoofer as shown here but you can change the speaker impedance setting of the receiver (see page 26). • If you connect the speaker on the speakers. Memo: • We recommend speakers with soundtracks in Dolby Digital or DTS incorporate...

Owner's Manual
Page 26
... (the default setting). Use any speaker rated between 6 Ω -16 Ω . If you use a banana plug for the other one. The receiver will be bi-wireable (that is to connect one wire in the normal way, and use a parallel (not series) connection when doing so. To bi...8486; impedance setting.) (This display indicates a 6Ωless than 8 Ω impedance speakers, you need to change the speaker impedance for VSX-53TX but difficult method of wiring speakers will reset to the new impedance setting. less than 8Ω impedance setting.) Bi-wiring your speakers must ...
... (the default setting). Use any speaker rated between 6 Ω -16 Ω . If you use a banana plug for the other one. The receiver will be bi-wireable (that is to connect one wire in the normal way, and use a parallel (not series) connection when doing so. To bi...8486; impedance setting.) (This display indicates a 6Ωless than 8 Ω impedance speakers, you need to change the speaker impedance for VSX-53TX but difficult method of wiring speakers will reset to the new impedance setting. less than 8Ω impedance setting.) Bi-wiring your speakers must ...
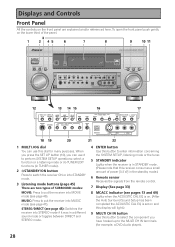
Owner's Manual
Page 28
... to the MULTI CH IN terminals (for many purposes. select a function or a listening mode or do TUNER EDIT functions (in the standby mode.) 6 Remote sensor Receives the signals from the remote control. 7 Display (See page 33) 8 MCACC indicator (see pages 13 and 49) Lights when the ACOUSTIC CAL EQ is on... You can use this button to select the component you can use it to perform SYSTEM SETUP operations; STEREO/DIRECT (see page 45): Switches the receiver into STEREO mode if it was in a different sound mode or toggles between DIRECT and STEREO mode. 4 ENTER button Use this button to enter ...
... to the MULTI CH IN terminals (for many purposes. select a function or a listening mode or do TUNER EDIT functions (in the standby mode.) 6 Remote sensor Receives the signals from the remote control. 7 Display (See page 33) 8 MCACC indicator (see pages 13 and 49) Lights when the ACOUSTIC CAL EQ is on... You can use this button to select the component you can use it to perform SYSTEM SETUP operations; STEREO/DIRECT (see page 45): Switches the receiver into STEREO mode if it was in a different sound mode or toggles between DIRECT and STEREO mode. 4 ENTER button Use this button to enter ...

Owner's Manual
Page 29
... for connecting a portable DVD player or video camera (etc.), that has an S video out. If there are analog and digital signals input, the receiver automatically selects the digital signal. TUNER EDIT Press to memorize and name a station for private listening (no sound will be heard through the speakers). 19...select the function or use of the following: AUTO - DIGITAL - CLASS Press repeatedly to use the multi room feature (requires an optional IR receiver). ON/OFF button Use to set up mic here. This is set up your system and get proper surround sound. 22 VIDEO INPUT jacks ...
... for connecting a portable DVD player or video camera (etc.), that has an S video out. If there are analog and digital signals input, the receiver automatically selects the digital signal. TUNER EDIT Press to memorize and name a station for private listening (no sound will be heard through the speakers). 19...select the function or use of the following: AUTO - DIGITAL - CLASS Press repeatedly to use the multi room feature (requires an optional IR receiver). ON/OFF button Use to set up mic here. This is set up your system and get proper surround sound. 22 VIDEO INPUT jacks ...


