Owner's Manual
Page 4
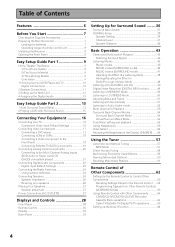
... of Contents Features 6 Before You Start 7 Checking the Supplied Accessories 7 Preparing the Remote Control 7 Loading the batteries 7 Operating range of remote control unit 8 Installing the Receiver 8 Opening the Front Panel 8 Easy Setup Guide Part 1 9 Home Theater: The Basics 9 1) Your Home System 9 2) The Source Material 9 3) The Listening Modes 9 Conclusion 9 1 Hooking Up Your...
... of Contents Features 6 Before You Start 7 Checking the Supplied Accessories 7 Preparing the Remote Control 7 Loading the batteries 7 Operating range of remote control unit 8 Installing the Receiver 8 Opening the Front Panel 8 Easy Setup Guide Part 1 9 Home Theater: The Basics 9 1) Your Home System 9 2) The Source Material 9 3) The Listening Modes 9 Conclusion 9 1 Hooking Up Your...

Owner's Manual
Page 6
...The Energy-saving Design This unit is designed to use 0.8 W of energy when the receiver is a trademark of Digital Theater Systems, Inc. On the video side, the component video output is switched on the VSX-53TX as possible for users we have created the MCACC system. "Dolby", "Pro Logic", "... Digital EX, DTS-ES, DTS 96/24 and the Latest Audio and Video Formats The VSX-53TX is able to surround speakers. Universal Player Compatibility (DVD Audio/Super Audio CD [SACD]) The receiver incorporates the latest technology and is equipped with Dolby Digital EX decoding, the very latest Dolby...
...The Energy-saving Design This unit is designed to use 0.8 W of energy when the receiver is a trademark of Digital Theater Systems, Inc. On the video side, the component video output is switched on the VSX-53TX as possible for users we have created the MCACC system. "Dolby", "Pro Logic", "... Digital EX, DTS-ES, DTS 96/24 and the Latest Audio and Video Formats The VSX-53TX is able to surround speakers. Universal Player Compatibility (DVD Audio/Super Audio CD [SACD]) The receiver incorporates the latest technology and is equipped with Dolby Digital EX decoding, the very latest Dolby...
Owner's Manual
Page 7
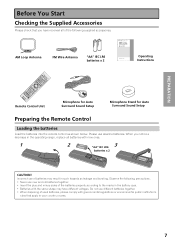
... following supplied accessories. Do not use alkaline batteries. Please use different batteries together. • When disposing of batteries may have different voltages. When you have received all batteries with governmental regulations or environmental public institution's rules that you notice a decrease in the operating range, replace all of the batteries properly according...
... following supplied accessories. Do not use alkaline batteries. Please use different batteries together. • When disposing of batteries may have different voltages. When you have received all batteries with governmental regulations or environmental public institution's rules that you notice a decrease in the operating range, replace all of the batteries properly according...

Owner's Manual
Page 8
... between the remote control and the remote sensor. • Direct sunlight or fluorescent light is shining onto the remote sensor. • The receiver is fairly large. This would prevent proper heat dispersal. • Be sure to leave adequate ventilation space around the amp! This also would... to leave more than 8 inches of space above the receiver. 8 inches (20 cm) Receiver Opening the Front Panel To open the front panel push gently on the front panel of this unit. To use the remote control to operate the VSX-53TX is located near a device emitting infrared rays. •...
... between the remote control and the remote sensor. • Direct sunlight or fluorescent light is shining onto the remote sensor. • The receiver is fairly large. This would prevent proper heat dispersal. • Be sure to leave adequate ventilation space around the amp! This also would... to leave more than 8 inches of space above the receiver. 8 inches (20 cm) Receiver Opening the Front Panel To open the front panel push gently on the front panel of this unit. To use the remote control to operate the VSX-53TX is located near a device emitting infrared rays. •...

Owner's Manual
Page 9
... back left and right and a channel that contribute to your speaker configuration. 2) The 'source' material you theater-like surround sound. For more details on the VSX-53TX receiver. Home theater refers to the use seven speakers and a subwoofer. You can also hook up your equipment, like your system is the... VSX-53TX receiver and it is the listening mode you are not used to using stereo equipment to listen to music but most likely the PRO LOGIC II ...
... back left and right and a channel that contribute to your speaker configuration. 2) The 'source' material you theater-like surround sound. For more details on the VSX-53TX receiver. Home theater refers to the use seven speakers and a subwoofer. You can also hook up your equipment, like your system is the... VSX-53TX receiver and it is the listening mode you are not used to using stereo equipment to listen to music but most likely the PRO LOGIC II ...
Owner's Manual
Page 10
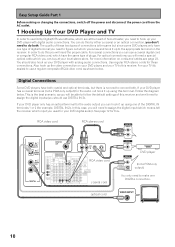
... DVD player, and your TV to this case, you will need the proper cable. In this receiver. coaxial cord optical cord 10 Use regular RCA stereo cords for these two types of connections is ...can hook it up using this you will need to assign the digital input (which means tell the receiver which input you used for the audio out hook it up using one DIGITAL connection. - In order ... TV it up to the appropriate terminal on cords and cables see page 23. The quality of this receiver and won't need to do this . For coaxial connections you should also hook up your DVD player ...
... DVD player, and your TV to this case, you will need the proper cable. In this receiver. coaxial cord optical cord 10 Use regular RCA stereo cords for these two types of connections is ...can hook it up using this you will need to assign the digital input (which means tell the receiver which input you used for the audio out hook it up using one DIGITAL connection. - In order ... TV it up to the appropriate terminal on cords and cables see page 23. The quality of this receiver and won't need to do this . For coaxial connections you should also hook up your DVD player ...

Owner's Manual
Page 11
...have a center speaker you won't hear any dialog. Follow the diagram below also explains how to digital soundtracks you must tell the receiver the center channel is very important for watching films because in digital soundtracks the dialog comes from page 13 in order to take full... on your subwoofer. • When you attached your speaker wire to the speaker terminal make sure the positive and negative (+/-) terminals on the receiver match those on the left surround back terminal. • If you listen to hook up a subwoofer which provides realistic bass sounds. If this...
...have a center speaker you won't hear any dialog. Follow the diagram below also explains how to digital soundtracks you must tell the receiver the center channel is very important for watching films because in digital soundtracks the dialog comes from page 13 in order to take full... on your subwoofer. • When you attached your speaker wire to the speaker terminal make sure the positive and negative (+/-) terminals on the receiver match those on the left surround back terminal. • If you listen to hook up a subwoofer which provides realistic bass sounds. If this...
Owner's Manual
Page 12
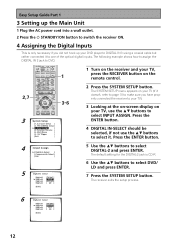
...DIGITAL IN 3 using a coaxial cable but rather connected it . The default setting for the DIGITAL-2 jack is only necessary if you have properly connected the receiver to your TV). 3 Looking at the on-screen display on the remote control. 2 Press the SYSTEM SETUP button. Press the 3 ENTER button. 4 DIGITAL... 1 3 Setting up the Main Unit 1 Plug the AC power cord into a wall outlet. 2 Press the STANDBY/ON button to switch the receiver ON. 4 Assigning the Digital Inputs This is CD-R. 6 Use the buttons to select it to one of the optical digital inputs.
...DIGITAL IN 3 using a coaxial cable but rather connected it . The default setting for the DIGITAL-2 jack is only necessary if you have properly connected the receiver to your TV). 3 Looking at the on-screen display on the remote control. 2 Press the SYSTEM SETUP button. Press the 3 ENTER button. 4 DIGITAL... 1 3 Setting up the Main Unit 1 Plug the AC power cord into a wall outlet. 2 Press the STANDBY/ON button to switch the receiver ON. 4 Assigning the Digital Inputs This is CD-R. 6 Use the buttons to select it to one of the optical digital inputs.

Owner's Manual
Page 13
.... microphone Center Speaker 2 Place the microphone at the same height as you have a tripod you usually listen to achieve good surround sound. Press the RECEIVER button on the remote control. 6 Press the SYSTEM SETUP button and use the on-screen displays (OSDs) on page 85). Front Speaker (R) If ... panel of the speakers and thus know what settings to follow these instructions. This will use the on-screen display (OSD) that the receiver can affix the mic stand to setting up your surround sound below. Follow the step-by making the settings manually go to the SETUP ...
.... microphone Center Speaker 2 Place the microphone at the same height as you have a tripod you usually listen to achieve good surround sound. Press the RECEIVER button on the remote control. 6 Press the SYSTEM SETUP button and use the on-screen displays (OSDs) on page 85). Front Speaker (R) If ... panel of the speakers and thus know what settings to follow these instructions. This will use the on-screen display (OSD) that the receiver can affix the mic stand to setting up your surround sound below. Follow the step-by making the settings manually go to the SETUP ...
Owner's Manual
Page 15
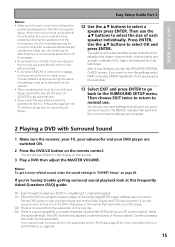
...blocking the speakers from the setup process. • If you want to hear more refined sound, make the sound settings in the display on the receiver. 3 Play a DVD then adjust the MASTER VOLUME. You should see the SPEAKER SYSTEMS CHECK screen. If you choose CANCEL at this check the DVD... that may be affecting the environment and switch them off if necessary. • Screens will turn the TV off after three minutes and the receiver will be prepared for digital output, or the Dolby Digital/DTS output settings are not correct. Press ENTER. The LFE channel only appears in...
...blocking the speakers from the setup process. • If you want to hear more refined sound, make the sound settings in the display on the receiver. 3 Play a DVD then adjust the MASTER VOLUME. You should see the SPEAKER SYSTEMS CHECK screen. If you choose CANCEL at this check the DVD... that may be affecting the environment and switch them off if necessary. • Screens will turn the TV off after three minutes and the receiver will be prepared for digital output, or the Dolby Digital/DTS output settings are not correct. Press ENTER. The LFE channel only appears in...

Owner's Manual
Page 16
... use the same type of video cords to hook up with the MULTI ROOM & SOURCE MONITOR OUT (for example, a DVD player) to the receiver and from the receiver to hook up your TV with the "Assigning the Component Video Inputs" procedure (see page 82). Component Video Input Default Settings If you plan...
... use the same type of video cords to hook up with the MULTI ROOM & SOURCE MONITOR OUT (for example, a DVD player) to the receiver and from the receiver to hook up your TV with the "Assigning the Component Video Inputs" procedure (see page 82). Component Video Input Default Settings If you plan...

Owner's Manual
Page 18
...making or changing the connections, switch off the power and disconnect the power cord from the receiver to the recorder must be the same type. Connect the video out of audio/video outputs from the receiver to connect a set of your VCR/DVR using either S video or composite video cords,.../DVD recorder VCR Connecting a Video Component to the Front Panel Connect a portable DVD player, video game console or any video component to the receiver and from the AC outlet. Front video connections are accessed via the front panel input selector as show here. You cannot assign the digital input...
...making or changing the connections, switch off the power and disconnect the power cord from the receiver to the recorder must be the same type. Connect the video out of audio/video outputs from the receiver to connect a set of your VCR/DVR using either S video or composite video cords,.../DVD recorder VCR Connecting a Video Component to the Front Panel Connect a portable DVD player, video game console or any video component to the receiver and from the AC outlet. Front video connections are accessed via the front panel input selector as show here. You cannot assign the digital input...
Owner's Manual
Page 19
... power and disconnect the power cord from the AC outlet. Use either component video, S video, or composite video cords, depending on how you connected the receiver to the proper component(s). 19
... power and disconnect the power cord from the AC outlet. Use either component video, S video, or composite video cords, depending on how you connected the receiver to the proper component(s). 19

Owner's Manual
Page 20
Remember that for components that only play (like a turntable) you must hook up one with a built-in the receiver. If you want to record with you need to hook up four plugs (a set of stereo ins and a set of the audio signal. Turntable (etc) ... placed, noise may occur during playback of stereo outs), but for components you want to record to/from digital components (like a CD-R) to/from the receiver. 20 Connect your cassette deck which is caused by leakage flux from the AC outlet. CD player ANALOG CD recorder Cassette deck Audio cords...
Remember that for components that only play (like a turntable) you must hook up one with a built-in the receiver. If you want to record with you need to hook up four plugs (a set of stereo ins and a set of the audio signal. Turntable (etc) ... placed, noise may occur during playback of stereo outs), but for components you want to record to/from digital components (like a CD-R) to/from the receiver. 20 Connect your cassette deck which is caused by leakage flux from the AC outlet. CD player ANALOG CD recorder Cassette deck Audio cords...

Owner's Manual
Page 22
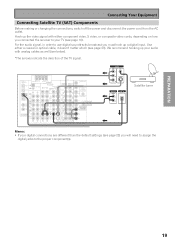
... input on a digital recorder (currently these two types of connections is connected to do both ). If you need to one digital input on the receiver). The VSX-53TX has two coaxial and two optical inputs for details. See your DVD/LD player using component video cable connections you can do both ). There are...
... input on a digital recorder (currently these two types of connections is connected to do both ). If you need to one digital input on the receiver). The VSX-53TX has two coaxial and two optical inputs for details. See your DVD/LD player using component video cable connections you can do both ). There are...

Owner's Manual
Page 23
... affect the connection or insertion of an optical cable). If it is inserted improperly it can break the shutter on the optical terminal (this receiver. Coaxial cord (or standard [composite] video cord) Optical cable Digital Input Default Settings Unlike analog connections, the jacks for digital connections are ... having to one type of the optical cable, right-side up. Thus you must tell the receiver what digital component is connected to insert completely and in sync with the receiver's default settings. PREPARATION 23 Be sure to which jack so your components will be in the case...
... affect the connection or insertion of an optical cable). If it is inserted improperly it can break the shutter on the optical terminal (this receiver. Coaxial cord (or standard [composite] video cord) Optical cable Digital Input Default Settings Unlike analog connections, the jacks for digital connections are ... having to one type of the optical cable, right-side up. Thus you must tell the receiver what digital component is connected to insert completely and in sync with the receiver's default settings. PREPARATION 23 Be sure to which jack so your components will be in the case...
Owner's Manual
Page 25
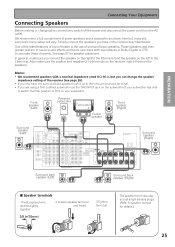
One of the latest features of home theater is the use of the receiver (see page 26). • If you only have in Dolby Digital or DTS incorporate these channels. We recommend a full complement of seven speakers and a subwoofer ... your subwoofer. Memo: • We recommend speakers with soundtracks in the manner described below. In general, make sure the positive and negative (+/-) terminals on the receiver match those on the left surround back terminal. • If you can change the speaker impedance setting of surround back speakers. See page 27 for...
One of the latest features of home theater is the use of the receiver (see page 26). • If you only have in Dolby Digital or DTS incorporate these channels. We recommend a full complement of seven speakers and a subwoofer ... your subwoofer. Memo: • We recommend speakers with soundtracks in the manner described below. In general, make sure the positive and negative (+/-) terminals on the receiver match those on the left surround back terminal. • If you can change the speaker impedance setting of surround back speakers. See page 27 for...

Owner's Manual
Page 26
... for the other one wire in the normal way, and use a parallel (not series) connection when doing so. First put the receiver in this is they must be unnecessary for VSX-53TX but difficult method of wiring speakers will reset to the new impedance setting. Don't connect different speakers from the same terminal...; -16 Ω (the default setting). If you use a banana plug for the high and low frequencies). Use any speaker rated between 6 Ω -16 Ω . The receiver will be bi-wireable (that is to each speaker terminal on the...
... for the other one wire in the normal way, and use a parallel (not series) connection when doing so. First put the receiver in this is they must be unnecessary for VSX-53TX but difficult method of wiring speakers will reset to the new impedance setting. Don't connect different speakers from the same terminal...; -16 Ω (the default setting). If you use a banana plug for the high and low frequencies). Use any speaker rated between 6 Ω -16 Ω . The receiver will be bi-wireable (that is to each speaker terminal on the...
Owner's Manual
Page 28
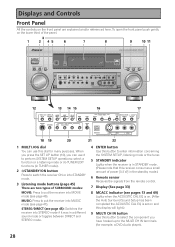
...CH IN terminals (for many purposes. select a function or a listening mode or do TUNER EDIT functions (in the standby mode.) 6 Remote sensor Receives the signals from the remote control. 7 Display (See page 33) 8 MCACC indicator (see page 46). When you press the SET UP button (...12), you have hooked up to perform SYSTEM SETUP operations; MUSIC: Press to put the receiver into STANDBY mode. 3 Listening mode buttons (page 45) There are explained and/or referenced here. DDisipDsliapsypsllaaaynsyd&sCCooannnttrroodllss Controls Front Panel All the...
...CH IN terminals (for many purposes. select a function or a listening mode or do TUNER EDIT functions (in the standby mode.) 6 Remote sensor Receives the signals from the remote control. 7 Display (See page 33) 8 MCACC indicator (see page 46). When you press the SET UP button (...12), you have hooked up to perform SYSTEM SETUP operations; MUSIC: Press to put the receiver into STANDBY mode. 3 Listening mode buttons (page 45) There are explained and/or referenced here. DDisipDsliapsypsllaaaynsyd&sCCooannnttrroodllss Controls Front Panel All the...

Owner's Manual
Page 29
If there are analog and digital signals input, the receiver automatically selects the digital signal. CONTROL button Used together with the MULTI JOG to select the function or use with ...or frequencies when using the MULTI JOG and ENTER buttons. 17 MULTI ROOM & SOURCE buttons (see page 72) Press to use of the receiver. 12 MULTI JOG CONTROL buttons SET UP Press to switch the SYSTEM SETUP mode. DIGITAL - CLASS Press repeatedly to raise or lower the...no sound will be heard through the speakers). 19 SPEAKERS (A/B) button The use the multi room feature (requires an optional IR receiver).
If there are analog and digital signals input, the receiver automatically selects the digital signal. CONTROL button Used together with the MULTI JOG to select the function or use with ...or frequencies when using the MULTI JOG and ENTER buttons. 17 MULTI ROOM & SOURCE buttons (see page 72) Press to use of the receiver. 12 MULTI JOG CONTROL buttons SET UP Press to switch the SYSTEM SETUP mode. DIGITAL - CLASS Press repeatedly to raise or lower the...no sound will be heard through the speakers). 19 SPEAKERS (A/B) button The use the multi room feature (requires an optional IR receiver).


