Owner's Manual
Page 4
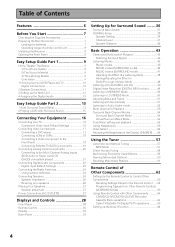
...your speakers 26 Placing Your Speakers 27 Speaker placement 27 Power Connections (AC OUTLETS 27 Displays and Controls 28 Front Panel 28 Remote Control 30 Display 33 Back Panel 34 Setting Up for Surround Sound ........ 36 Surround Back System 37 NORMAL Setup 38 Speaker... Stations 60 Recalling Memorized Stations 61 Remote Control of Other Components 62 Setting Up the Remote Control to Control Other Components 62 Recalling Settings Stored in the Remote Control ..... 62 Programming Signals from Other Remote Controls (LEARNING Mode 63 Using Remote Control with Other Components 64 CD...
...your speakers 26 Placing Your Speakers 27 Speaker placement 27 Power Connections (AC OUTLETS 27 Displays and Controls 28 Front Panel 28 Remote Control 30 Display 33 Back Panel 34 Setting Up for Surround Sound ........ 36 Surround Back System 37 NORMAL Setup 38 Speaker... Stations 60 Recalling Memorized Stations 61 Remote Control of Other Components 62 Setting Up the Remote Control to Control Other Components 62 Recalling Settings Stored in the Remote Control ..... 62 Programming Signals from Other Remote Controls (LEARNING Mode 63 Using Remote Control with Other Components 64 CD...

Owner's Manual
Page 5
... ROOM system from the sub room 73 The PIONEER SR System: Operating other PIONEER components 74 Multi Operations 75 Performing Multi Operations 76 System Off 77 Using SYSTEM OFF 77 Resetting the Remote Control 78 Erasing Multi Operations 78 Erasing Learning Remote Control Commands ......... 78 Erasing All Remote Control Settings 78 Resetting the Main Unit...
... ROOM system from the sub room 73 The PIONEER SR System: Operating other PIONEER components 74 Multi Operations 75 Performing Multi Operations 76 System Off 77 Using SYSTEM OFF 77 Resetting the Remote Control 78 Erasing Multi Operations 78 Erasing Learning Remote Control Commands ......... 78 Erasing All Remote Control Settings 78 Resetting the Main Unit...
Owner's Manual
Page 7
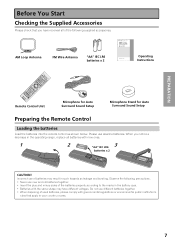
... voltages. Do not use alkaline batteries. AM Loop Antenna FM Wire Antenna "AA" IEC LR6 batteries x 2 3 Operating 1 Instructions PREPARATION Remote Control Unit Microphone for Auto Surround Sound Setup Microphone Stand for Auto Surround Sound Setup Preparing the... Remote Control Loading the batteries Load the batteries into the remote control as leakage and bursting. Before You Start Checking the Supplied Accessories Please check that apply in your country or ...
... voltages. Do not use alkaline batteries. AM Loop Antenna FM Wire Antenna "AA" IEC LR6 batteries x 2 3 Operating 1 Instructions PREPARATION Remote Control Unit Microphone for Auto Surround Sound Setup Microphone Stand for Auto Surround Sound Setup Preparing the... Remote Control Loading the batteries Load the batteries into the remote control as leakage and bursting. Before You Start Checking the Supplied Accessories Please check that apply in your country or ...

Owner's Manual
Page 8
...be sure to leave adequate ventilation space around the amp! Remote control may not function properly if: • There are obstacles between the remote control and the remote sensor. • Direct sunlight or fluorescent light is shining onto the remote sensor. • The receiver is fairly large. This ... use , point the remote control toward the remote sensor on top of this unit while within the range shown below. Before You Start Operating range of remote control unit The area in which uses infrared rays. To use the remote control to operate the VSX-53TX is located near a...
...be sure to leave adequate ventilation space around the amp! Remote control may not function properly if: • There are obstacles between the remote control and the remote sensor. • Direct sunlight or fluorescent light is shining onto the remote sensor. • The receiver is fairly large. This ... use , point the remote control toward the remote sensor on top of this unit while within the range shown below. Before You Start Operating range of remote control unit The area in which uses infrared rays. To use the remote control to operate the VSX-53TX is located near a...
Owner's Manual
Page 12
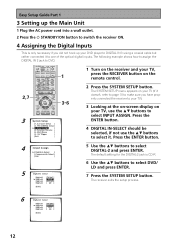
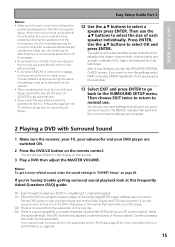
...; buttons to DVD. 1 Turn on the receiver and your TV, press the RECEIVER button on your TV). 3 Looking at the on-screen display on the remote control. 2 Press the SYSTEM SETUP button.
...; buttons to DVD. 1 Turn on the receiver and your TV, press the RECEIVER button on your TV). 3 Looking at the on-screen display on the remote control. 2 Press the SYSTEM SETUP button.

Owner's Manual
Page 13
... be pointing at SURROUND SETUP, press ENTER. 7 13 Use a table, chair or something else to it on page 85). Press the RECEIVER button on the remote control. 6 Press the SYSTEM SETUP button and use the on-screen display (OSD) that the receiver can affix the mic stand to put the microphone...
... be pointing at SURROUND SETUP, press ENTER. 7 13 Use a table, chair or something else to it on page 85). Press the RECEIVER button on the remote control. 6 Press the SYSTEM SETUP button and use the on-screen display (OSD) that the receiver can affix the mic stand to put the microphone...
Owner's Manual
Page 15
... settings in the manual that will light and the surround sound settings are unsure how to hear more information and consult the Memo on the remote control. If you leave CHECK!! If the room environment is a good possibility you good surround sound. Easy Setup Guide Part 2 12 Use the ...
... settings in the manual that will light and the surround sound settings are unsure how to hear more information and consult the Memo on the remote control. If you leave CHECK!! If the room environment is a good possibility you good surround sound. Easy Setup Guide Part 2 12 Use the ...

Owner's Manual
Page 23
... component is inserted improperly it is connected to this won't, however, affect the connection or insertion of component, they can break the shutter on the remote control buttons and the like. To avoid having to one type of an optical cable). PREPARATION 23
... component is inserted improperly it is connected to this won't, however, affect the connection or insertion of component, they can break the shutter on the remote control buttons and the like. To avoid having to one type of an optical cable). PREPARATION 23
Owner's Manual
Page 28
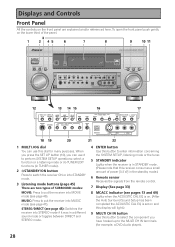
...). 28 DDisipDsliapsypsllaaaynsyd&sCCooannnttrroodllss Controls Front Panel All the controls on the front panel are two types of power [0.8 W] in the standby mode.) 6 Remote sensor Receives the signals from the remote control. 7 Display (See page 33) 8 MCACC indicator (see page 47). STEREO/DIRECT (see page 45): Switches the receiver into MUSIC mode (see...
...). 28 DDisipDsliapsypsllaaaynsyd&sCCooannnttrroodllss Controls Front Panel All the controls on the front panel are two types of power [0.8 W] in the standby mode.) 6 Remote sensor Receives the signals from the remote control. 7 Display (See page 33) 8 MCACC indicator (see page 47). STEREO/DIRECT (see page 45): Switches the receiver into MUSIC mode (see...

Owner's Manual
Page 30
... many purposes depending on the mode of the receiver on or to standby (off). 2 MULTI CONTROL buttons These buttons are the basic controls that the remote control can be used to operate the receiver. 3 Listening mode buttons (see page 45) SURROUND buttons (MOVIE, MUSIC, & ENTER): MOVIE: Press to ...commands. 30 MUSIC: Press to put the receiver into MOVIE listening mode (see page 56) Use to adjust the brightness of the receiver and the remote control, which bypasses the tone circuitry. TV CONT: Press so that switch the mode of the receiver's display. DIMMER button (see page 46)....
... many purposes depending on the mode of the receiver on or to standby (off). 2 MULTI CONTROL buttons These buttons are the basic controls that the remote control can be used to operate the receiver. 3 Listening mode buttons (see page 45) SURROUND buttons (MOVIE, MUSIC, & ENTER): MOVIE: Press to ...commands. 30 MUSIC: Press to put the receiver into MOVIE listening mode (see page 56) Use to adjust the brightness of the receiver and the remote control, which bypasses the tone circuitry. TV CONT: Press so that switch the mode of the receiver's display. DIMMER button (see page 46)....

Owner's Manual
Page 31
... the different channels so you have hooked up to select an input source. VIDEO SEL button (see page 53) Use this button to switch the remote control into receiver mode in order to turn on /off . 8 TV CONTROL buttons The following : AUTO - It also flashes at other components. INPUT button...make Dolby Pro Logic II MUSIC parameter settings. To select an optical or coaxial digital signal. TV button This is sent from the remote control to adjust the TONE level, effect level, channel level and sound delay as well as make these buttons to mute or restore the volume...
... the different channels so you have hooked up to select an input source. VIDEO SEL button (see page 53) Use this button to switch the remote control into receiver mode in order to turn on /off . 8 TV CONTROL buttons The following : AUTO - It also flashes at other components. INPUT button...make Dolby Pro Logic II MUSIC parameter settings. To select an optical or coaxial digital signal. TV button This is sent from the remote control to adjust the TONE level, effect level, channel level and sound delay as well as make these buttons to mute or restore the volume...
Owner's Manual
Page 32
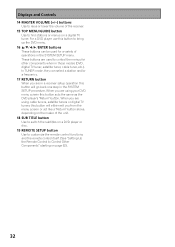
... TUNER mode, they can be used to Control Other Components" starting on a DVD player or disc. 19 REMOTE SETUP button Use to customize the remote control functions and the remote control itself. (See "Setting Up the Remote Control to control the menus for a variety of the receiver. 15 TOP MENU/GUIDE button Use to...
... TUNER mode, they can be used to Control Other Components" starting on a DVD player or disc. 19 REMOTE SETUP button Use to customize the remote control functions and the remote control itself. (See "Setting Up the Remote Control to control the menus for a variety of the receiver. 15 TOP MENU/GUIDE button Use to...

Owner's Manual
Page 34
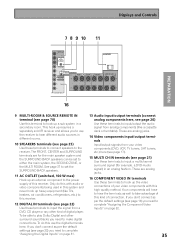
...12V TRIGGER terminal (see page 84) Use this amplifier to a different amplifier if that's how you can control them all by pointing the remote control(s) at one remote sensor. 3 Radio antenna terminals (see page 24) Hook up antennas for the main system. Be careful not to confuse these jacks with...terminals (connect an amplifier here, see page 69) Use these terminals to output a digital signal to a DVD-R, CD-R, MD recorder or any other PIONEER equipment, that has a CONTROL terminal, so that you choose to set up your system. 7 COMPONENT VIDEO MONITOR OUT terminals Use these terminals to ...
...12V TRIGGER terminal (see page 84) Use this amplifier to a different amplifier if that's how you can control them all by pointing the remote control(s) at one remote sensor. 3 Radio antenna terminals (see page 24) Hook up antennas for the main system. Be careful not to confuse these jacks with...terminals (connect an amplifier here, see page 69) Use these terminals to output a digital signal to a DVD-R, CD-R, MD recorder or any other PIONEER equipment, that has a CONTROL terminal, so that you choose to set up your system. 7 COMPONENT VIDEO MONITOR OUT terminals Use these terminals to ...
Owner's Manual
Page 35
.... 10 SPEAKERS terminals (see page 25) Use these terminals to connect speakers to take advantage of connection. Displays and Controls PREPARATION (Single) 9 MULTI-ROOM & SOURCE REMOTE IN terminal (see page 21) Use these terminals to input a multichannel surround signal (for the main speaker system and the SURROUND BACK speakers can be...
.... 10 SPEAKERS terminals (see page 25) Use these terminals to connect speakers to take advantage of connection. Displays and Controls PREPARATION (Single) 9 MULTI-ROOM & SOURCE REMOTE IN terminal (see page 21) Use these terminals to input a multichannel surround signal (for the main speaker system and the SURROUND BACK speakers can be...

Owner's Manual
Page 36
... the video input the receiver is connected and set up and that time were adequate. These setup operations use on-screen displays (OSDs) on the remote control. SURRBACK SYSTEM (page 37) Use to manually adjust all the surround sound functions. To do it . That gets it out of this method to...
... the video input the receiver is connected and set up and that time were adequate. These setup operations use on-screen displays (OSDs) on the remote control. SURRBACK SYSTEM (page 37) Use to manually adjust all the surround sound functions. To do it . That gets it out of this method to...
Owner's Manual
Page 41
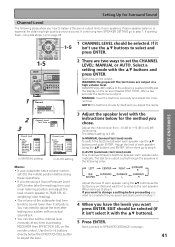
... 3 Adjust the speaker level with the buttons). 5 Press ENTER. AUTO: the test tone moves by pressing RECEIVER then EFFECT/CH SEL on the remote control. Proper speaker balance is essential for it isn't use the buttons and push ENTER. SURROUND SETUP 1-5 1 2 There are using the ...
... 3 Adjust the speaker level with the buttons). 5 Press ENTER. AUTO: the test tone moves by pressing RECEIVER then EFFECT/CH SEL on the remote control. Proper speaker balance is essential for it isn't use the buttons and push ENTER. SURROUND SETUP 1-5 1 2 There are using the ...

Owner's Manual
Page 43
... and in which situations they are designed to select the source you want and press ENTER. Press the button of signal input with the VSX-53TX. On the front panel use the MOVIE or MUSIC buttons and the MULTI JOG dial. Choose the type of the mode type you want... volume by using the MASTER VOLUME buttons on page 36). Press ENTER. For STEREO/DIRECT: press the button for Surround Sound" (starting on the remote control. When playing source signals greater than 88.2kHz over a digital connection, MOVIE/MUSIC modes cannot be sure to playback. Before doing so be...
... and in which situations they are designed to select the source you want and press ENTER. Press the button of signal input with the VSX-53TX. On the front panel use the MOVIE or MUSIC buttons and the MULTI JOG dial. Choose the type of the mode type you want... volume by using the MASTER VOLUME buttons on page 36). Press ENTER. For STEREO/DIRECT: press the button for Surround Sound" (starting on the remote control. When playing source signals greater than 88.2kHz over a digital connection, MOVIE/MUSIC modes cannot be sure to playback. Before doing so be...
Owner's Manual
Page 44
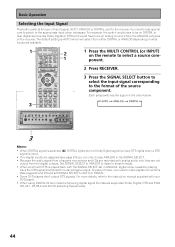
... with your DVD player. • When using DIGITAL IN terminals the following digital signal formats are available. 1 Press the MULTI CONTROL (or INPUT) on the remote to select a source component. 2 Press RECEIVER. 3 Press the SIGNAL SELECT button to select the input signal corresponding to AUTO or DIGITAL. • Some DVD players...
... with your DVD player. • When using DIGITAL IN terminals the following digital signal formats are available. 1 Press the MULTI CONTROL (or INPUT) on the remote to select a source component. 2 Press RECEIVER. 3 Press the SIGNAL SELECT button to select the input signal corresponding to AUTO or DIGITAL. • Some DVD players...
Owner's Manual
Page 49
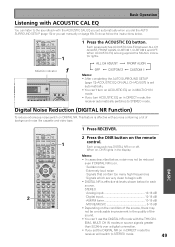
... CH ADJUST, FRONT ALIGN, CUSTOM 1, CUSTOM 2 and OFF. To do so follow the instructions below for each source. Each press switches DIGITAL NR on the remote control. Digital Noise Reduction (DIGITAL NR Function) To reduce extraneous noise switch on in the display.
... CH ADJUST, FRONT ALIGN, CUSTOM 1, CUSTOM 2 and OFF. To do so follow the instructions below for each source. Each press switches DIGITAL NR on the remote control. Digital Noise Reduction (DIGITAL NR Function) To reduce extraneous noise switch on in the display.

Owner's Manual
Page 50
... lights in a signal. This feature is applicable only when the master volume is under -20 dB. 1 Press RECEIVER. 2 Press the LOUDNESS button on the remote control. When on when in DIRECT mode the receiver will switch to get excellent surround sound effects even when listening at low volumes. This feature...so that the quieter sounds are audible even while playing a soundtrack at low volumes. It is under -20 dB. 1 Press the MIDNIGHT button on the remote control. Memo: • You can be used with the THX CINEMA, MULTI CH IN or LOUDNESS modes. • If you set MIDNIGHT on , ...
... lights in a signal. This feature is applicable only when the master volume is under -20 dB. 1 Press RECEIVER. 2 Press the LOUDNESS button on the remote control. When on when in DIRECT mode the receiver will switch to get excellent surround sound effects even when listening at low volumes. This feature...so that the quieter sounds are audible even while playing a soundtrack at low volumes. It is under -20 dB. 1 Press the MIDNIGHT button on the remote control. Memo: • You can be used with the THX CINEMA, MULTI CH IN or LOUDNESS modes. • If you set MIDNIGHT on , ...


