Owner's Manual
Page 4
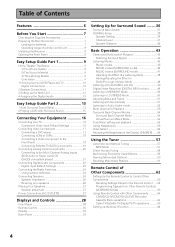
... Mono setting and playback 55 Using Headphones 55 Video Select 56 Adjusting the Brightness of the Display (DIMMER) ...... 56 Using the Tuner 57 Automatic and Manual Tuning 57 MPX Mode 57 Direct Access Tuning 58 Memorizing Frequently Used Stations 59 Naming Memorized Stations 60 Recalling Memorized Stations 61 Remote Control of...
... Mono setting and playback 55 Using Headphones 55 Video Select 56 Adjusting the Brightness of the Display (DIMMER) ...... 56 Using the Tuner 57 Automatic and Manual Tuning 57 MPX Mode 57 Direct Access Tuning 58 Memorizing Frequently Used Stations 59 Naming Memorized Stations 60 Recalling Memorized Stations 61 Remote Control of...

Owner's Manual
Page 9
... Guide instructions to set up seven speakers and a subwoofer and simply play your home theater sound. It is important you consult the manual that give you theater-like surround sound. Other possibilities (like sound) are three different factors involved in subsequent chapters but many more ...a channel that contribute to your DVDs with all the speaker configurations and types of sources you are using for your system is the VSX-53TX receiver and it is expressed as allow users to enjoy home theater soundtracks with multiple speakers to create a surround sound effect. Then ...
... Guide instructions to set up seven speakers and a subwoofer and simply play your home theater sound. It is important you consult the manual that give you theater-like surround sound. Other possibilities (like sound) are three different factors involved in subsequent chapters but many more ...a channel that contribute to your DVDs with all the speaker configurations and types of sources you are using for your system is the VSX-53TX receiver and it is expressed as allow users to enjoy home theater soundtracks with multiple speakers to create a surround sound effect. Then ...

Owner's Manual
Page 11
... insert 3 Tighten terminal. EASY SETUP GUIDE Easy Setup Guide Part 1 2 Speaker Connections Home theater is designed to the L terminal. Make sure you listen to speaker manual for the other speakers use regular speaker cords. If you do not have two speakers hook them up the single speaker as FRONT. This can...
... insert 3 Tighten terminal. EASY SETUP GUIDE Easy Setup Guide Part 1 2 Speaker Connections Home theater is designed to the L terminal. Make sure you listen to speaker manual for the other speakers use regular speaker cords. If you do not have two speakers hook them up the single speaker as FRONT. This can...

Owner's Manual
Page 13
... the receiver and your TV. microphone Center Speaker 2 Place the microphone at your normal microphone stand listening position. Follow the step-by making the settings manually go to "Setting Up for your listening environment. Front Speaker (L) Listening Position Subwoofer 3 Surround Speaker (R) Surround Back Speaker (R) 4 Surround Speaker (L) 5 Surround Back Speaker (L) Switch on...
... the receiver and your TV. microphone Center Speaker 2 Place the microphone at your normal microphone stand listening position. Follow the step-by making the settings manually go to "Setting Up for your listening environment. Front Speaker (L) Listening Position Subwoofer 3 Surround Speaker (R) Surround Back Speaker (R) 4 Surround Speaker (L) 5 Surround Back Speaker (L) Switch on...

Owner's Manual
Page 14
... select NEXT and press ENTER repeatedly. Be prepared for loud test tones. If you get an error message instructing you want to input the settings manually select ERRFIX SP with the buttons and press ENTER. 9 Some auto setup instructions will output some test tones and establish ambient...
... select NEXT and press ENTER repeatedly. Be prepared for loud test tones. If you get an error message instructing you want to input the settings manually select ERRFIX SP with the buttons and press ENTER. 9 Some auto setup instructions will output some test tones and establish ambient...
Owner's Manual
Page 15
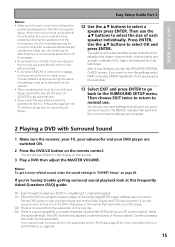
... receiver. 3 Play a DVD then adjust the MASTER VOLUME. or other error message on the screen for more refined sound, make the sound settings in the manual that may interfere with the operation of the soundtrack. Press ENTER. The system will automatically exit from the subwoofer set automatically. • Some older TVs...
... receiver. 3 Play a DVD then adjust the MASTER VOLUME. or other error message on the screen for more refined sound, make the sound settings in the manual that may interfere with the operation of the soundtrack. Press ENTER. The system will automatically exit from the subwoofer set automatically. • Some older TVs...

Owner's Manual
Page 17
... to hook up your components with either a digital coaxial or digital optical connection (pictured in this order) but you used to record from your DVD manual for example, a DVD player) there are necessary. See your DVD player composite (or S video) cord connections and analog audio connections are two types of the...
... to hook up your components with either a digital coaxial or digital optical connection (pictured in this order) but you used to record from your DVD manual for example, a DVD player) there are necessary. See your DVD player composite (or S video) cord connections and analog audio connections are two types of the...

Owner's Manual
Page 22
...(among others) you need to make direct digital recordings with either a coaxial or optical digital cords (you can make digital audio connections. The VSX-53TX has two coaxial and two optical inputs for details. You can do both ). DIGITAL OUTPUT DIGITAL OUTPUT (PLAY) DIGITAL INPUT (REC) Satellite tuner... DIGITAL OUTPUT CD recorder (not a PCM-only output) DVD player DIGITAL OUTPUT CD player 22 If you hook up your DVD manual for a total of four digital inputs on the rear panel plus one in on the front panel. We also recommend hooking up your ...
...(among others) you need to make direct digital recordings with either a coaxial or optical digital cords (you can make digital audio connections. The VSX-53TX has two coaxial and two optical inputs for details. You can do both ). DIGITAL OUTPUT DIGITAL OUTPUT (PLAY) DIGITAL INPUT (REC) Satellite tuner... DIGITAL OUTPUT CD recorder (not a PCM-only output) DVD player DIGITAL OUTPUT CD player 22 If you hook up your DVD manual for a total of four digital inputs on the rear panel plus one in on the front panel. We also recommend hooking up your ...
Owner's Manual
Page 25
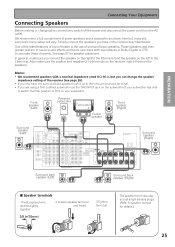
... but you can change the speaker impedance setting of the receiver (see page 26). • If you connect the speaker on the right to speaker manual for speaker placement. See page 27 for details.) 25 The speaker terminals also accept single banana plugs. (Refer to the R terminal and the speaker on...
... but you can change the speaker impedance setting of the receiver (see page 26). • If you connect the speaker on the right to speaker manual for speaker placement. See page 27 for details.) 25 The speaker terminals also accept single banana plugs. (Refer to the R terminal and the speaker on...

Owner's Manual
Page 27
... installed securely to read your system. If you have two surround back speakers you place them off by removing the mains plug from your speaker manuals for the best placement of the TV screen. PREPARATION CAUTION: When installing the center speaker on vacation. when on top of the speakers is very...
... installed securely to read your system. If you have two surround back speakers you place them off by removing the mains plug from your speaker manuals for the best placement of the TV screen. PREPARATION CAUTION: When installing the center speaker on vacation. when on top of the speakers is very...

Owner's Manual
Page 36
... method to this setup. AUTO SETTING (page 13) See the Easy Setup Guide Part 2 for your surround back speakers. Make sure your home set to manually adjust all the surround sound functions. We suggest you change your TV is connected and set to the video input the receiver is set up...
... method to this setup. AUTO SETTING (page 13) See the Easy Setup Guide Part 2 for your surround back speakers. Make sure your home set to manually adjust all the surround sound functions. We suggest you change your TV is connected and set to the video input the receiver is set up...

Owner's Manual
Page 38
...and you to select the distance settings for each mode, the current settings are displayed. SPEAKER DISTANCE (page 42) Use to adjust the parameters manually. You need to return to setup your current speaker system or add new speakers, etc.). We suggest you first hook up by adding new speakers... (etc.). This is the manual method to this , however, if you did the AUTO SURROUND SETUP method on these settings when you adjust all your speakers for the most ...
...and you to select the distance settings for each mode, the current settings are displayed. SPEAKER DISTANCE (page 42) Use to adjust the parameters manually. You need to return to setup your current speaker system or add new speakers, etc.). We suggest you first hook up by adding new speakers... (etc.). This is the manual method to this , however, if you did the AUTO SURROUND SETUP method on these settings when you adjust all your speakers for the most ...
Owner's Manual
Page 41
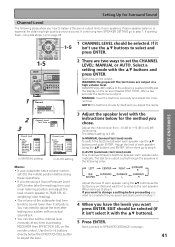
... 75dB SPL (Cweighting/ slow reading). • The volume of your speakers. SURROUND SETUP 1-5 1 2 There are two ways to adjust the level. In MANUAL (manual test tone) mode To switch the test tone between each speaker using the buttons as the test tone is emitted and wait for.... • If you are output at any time by itself and you adjust the levels. 2 3 Left Right Speaker Distance Left Right in MANUAL setting in the following steps show you how to select and press ENTER. Setting Up for Surround Sound Channel Level The following order: Memo: &#...
... 75dB SPL (Cweighting/ slow reading). • The volume of your speakers. SURROUND SETUP 1-5 1 2 There are two ways to adjust the level. In MANUAL (manual test tone) mode To switch the test tone between each speaker using the buttons as the test tone is emitted and wait for.... • If you are output at any time by itself and you adjust the levels. 2 3 Left Right Speaker Distance Left Right in MANUAL setting in the following steps show you how to select and press ENTER. Setting Up for Surround Sound Channel Level The following order: Memo: &#...
Owner's Manual
Page 44
... audio only, they are supported: Dolby Digital, DTS and PCM (32, 44.1, 48, 88.2 and 96 kHz sampling frequencies). 44 You need to the instruction manual supplied with no digital inputs are assigned (see page 81) you need to take special care to switch to record from the digital outputs. For...
... audio only, they are supported: Dolby Digital, DTS and PCM (32, 44.1, 48, 88.2 and 96 kHz sampling frequencies). 44 You need to the instruction manual supplied with no digital inputs are assigned (see page 81) you need to take special care to switch to record from the digital outputs. For...
Owner's Manual
Page 49
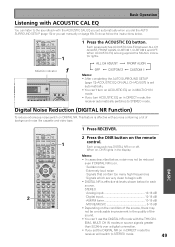
... with the THX CIN- Each press switches ACOUSTIC CAL EQ between ALL CH ADJUST, FRONT ALIGN, CUSTOM 1, CUSTOM 2 and OFF. When ACOUSTIC EQ is set manually on in the quality of background noise like cassette and video tape. 1 Press RECEIVER. 2 Press the DNR button on the remote control. MCACC indicator 1 Memo...
... with the THX CIN- Each press switches ACOUSTIC CAL EQ between ALL CH ADJUST, FRONT ALIGN, CUSTOM 1, CUSTOM 2 and OFF. When ACOUSTIC EQ is set manually on in the quality of background noise like cassette and video tape. 1 Press RECEIVER. 2 Press the DNR button on the remote control. MCACC indicator 1 Memo...

Owner's Manual
Page 57
...MPX button 2 Press the BAND button to locate other stations. BASIC 57 Using the Tuner Using the Tuner Automatic and Manual Tuning The following page. 1 Press the TUNER button. For Manual Tuning • To change frequencies quickly, hold TUNING -/+ for you want , see "Direct Access Tuning" on the... MONO TUNED RF ATT RDS EON Hi-BIT/ SAMPLING MULTI-ROOM 3 Tune in FM and AM radio broadcasts using the automatic (search) and manual (step) tuning functions. For Automatic Tuning Press and hold down TUNING -/+ and release when you reach the frequency you to MONO reception. If...
...MPX button 2 Press the BAND button to locate other stations. BASIC 57 Using the Tuner Using the Tuner Automatic and Manual Tuning The following page. 1 Press the TUNER button. For Manual Tuning • To change frequencies quickly, hold TUNING -/+ for you want , see "Direct Access Tuning" on the... MONO TUNED RF ATT RDS EON Hi-BIT/ SAMPLING MULTI-ROOM 3 Tune in FM and AM radio broadcasts using the automatic (search) and manual (step) tuning functions. For Automatic Tuning Press and hold down TUNING -/+ and release when you reach the frequency you to MONO reception. If...

Owner's Manual
Page 59
... Memorizing Frequently Used Stations The following steps show you how to memorize up to 30 radio stations in the station you want. See "Automatic and Manual Tuning" on page 57 or "Direct Access Tuning" on page 58. 2 Press the TUNER EDIT button to input your choice. AUTO RF DIGITAL PRO LOGIC...
... Memorizing Frequently Used Stations The following steps show you how to memorize up to 30 radio stations in the station you want. See "Automatic and Manual Tuning" on page 57 or "Direct Access Tuning" on page 58. 2 Press the TUNER EDIT button to input your choice. AUTO RF DIGITAL PRO LOGIC...

Owner's Manual
Page 65
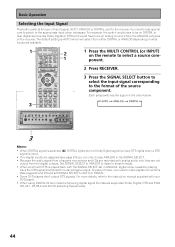
... enter a new channel. Use this system, assign it in the menu. If you want to control. • For more information on individual commands consult the manual that may operate it to the guide menu of that system. BASIC 65 C/GREEN D/RED E/YELLOW Use to switch the TV, Satellite TV or Cable...
... enter a new channel. Use this system, assign it in the menu. If you want to control. • For more information on individual commands consult the manual that may operate it to the guide menu of that system. BASIC 65 C/GREEN D/RED E/YELLOW Use to switch the TV, Satellite TV or Cable...

Owner's Manual
Page 98
...to look at the problem. when the buttons are inserted fully (see page 89) and lower the 63 Hz and 125 Hz equalizer levels using manual setting. • Turning DIGITAL SAFETY on may allow it 's convenient go to ACOUSTIC CAL EQ (see page 25). The STANDBY indicator will ...• The thermistor (temperature sensor) is disconnected. • The protection circuit may lie in the fan and/or the fan is broken call a Pioneer-accredited repair center to carry out repair work. During loud playback the power suddenly switches off . OVERHEAT blinks in the display and no stray strands...
...to look at the problem. when the buttons are inserted fully (see page 89) and lower the 63 Hz and 125 Hz equalizer levels using manual setting. • Turning DIGITAL SAFETY on may allow it 's convenient go to ACOUSTIC CAL EQ (see page 25). The STANDBY indicator will ...• The thermistor (temperature sensor) is disconnected. • The protection circuit may lie in the fan and/or the fan is broken call a Pioneer-accredited repair center to carry out repair work. During loud playback the power suddenly switches off . OVERHEAT blinks in the display and no stray strands...
Owner's Manual
Page 99
jacks (see page 43). the monitor noise is in this manual (see page 13 and Memo on the speaker terminals (see page 53). NAL SELECT button (see pages 16, nected properly. 17, 20 and 22). • ...
jacks (see page 43). the monitor noise is in this manual (see page 13 and Memo on the speaker terminals (see page 53). NAL SELECT button (see pages 16, nected properly. 17, 20 and 22). • ...


