
Owner's Manual
Page 1
Operating Instructions AUDIO/VIDEO MULTI-CHANNEL RECEIVER VSX-815 VSX-915 Register your product at: www.pioneerelectronics.com • Protect your new investment The details of your purchase will be on file for reference in the event of an insurance claim such as loss or theft. • Receive free tips, updates and service bulletins on your new product • Improve product development Your input helps us continue to design products that meet your needs. • Receive a free Pioneer newsletter Registered customers can opt in to receive a monthly newsletter.
Operating Instructions AUDIO/VIDEO MULTI-CHANNEL RECEIVER VSX-815 VSX-915 Register your product at: www.pioneerelectronics.com • Protect your new investment The details of your purchase will be on file for reference in the event of an insurance claim such as loss or theft. • Receive free tips, updates and service bulletins on your new product • Improve product development Your input helps us continue to design products that meet your needs. • Receive a free Pioneer newsletter Registered customers can opt in to receive a monthly newsletter.
Owner's Manual
Page 2
... of the FCC Rules. To prevent electromagnetic interference with the product will know how to radio or television reception, which the receiver is properly disposed of after handling D36-P4_En IMPORTANT NOTICE - If connected to provide reasonable protection against harmful interference in a ...CAN BE FULLY INSERTED TO PREVENT BLADE EXPOSURE. D2-4-4-1_EF WARNING: Handling the cord on the power supply cord of this Pioneer product. TO PREVENT FIRE OR SHOCK HAZARD, DO NOT EXPOSE THIS APPLIANCE TO RAIN OR MOISTURE. D8-10-3a_En Manufactured ...
... of the FCC Rules. To prevent electromagnetic interference with the product will know how to radio or television reception, which the receiver is properly disposed of after handling D36-P4_En IMPORTANT NOTICE - If connected to provide reasonable protection against harmful interference in a ...CAN BE FULLY INSERTED TO PREVENT BLADE EXPOSURE. D2-4-4-1_EF WARNING: Handling the cord on the power supply cord of this Pioneer product. TO PREVENT FIRE OR SHOCK HAZARD, DO NOT EXPOSE THIS APPLIANCE TO RAIN OR MOISTURE. D8-10-3a_En Manufactured ...
Owner's Manual
Page 4
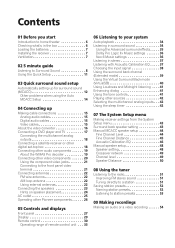
...Video cables 15 About the video converter 16 Connecting a DVD player and TV 17 Connecting the multichannel analog outputs 18 Connecting a satellite receiver or other digital set-top box 18 Connecting other audio components 19 About the WMA9 Pro decoder 19 Connecting other video components 20 Using... antenna 22 AM loop antenna 22 Using external antennas 22 Connecting the speakers 23 Hints on speaker placement 24 AC outlet 25 Operating other Pioneer components 26 05 Controls and displays Front panel 27 Display 29 Remote control 30 Operating range of remote control unit . . . 33 ...
...Video cables 15 About the video converter 16 Connecting a DVD player and TV 17 Connecting the multichannel analog outputs 18 Connecting a satellite receiver or other digital set-top box 18 Connecting other audio components 19 About the WMA9 Pro decoder 19 Connecting other video components 20 Using... antenna 22 AM loop antenna 22 Using external antennas 22 Connecting the speakers 23 Hints on speaker placement 24 AC outlet 25 Operating other Pioneer components 26 05 Controls and displays Front panel 27 Display 29 Remote control 30 Operating range of remote control unit . . . 33 ...
Owner's Manual
Page 5
... 62 Bi-amping your front speakers 63 Bi-wiring your speakers 63 Connecting additional amplifiers 64 Using this receiver with a Pioneer plasma display 64 Using the SR+ mode with a Pioneer plasma display 65 12 Other Settings The Input Assign menu 66 The Other setup menu 67 Dynamic Range ...Control Setup 67 Dual Mono Setup 67 LFE Attenuator Setup 68 SR+ Setup for Pioneer plasma displays . . . 68 13 Additional information Troubleshooting 69 Resetting the main unit 72 Switching the speaker impedance 72 Specifications 73 Power cord...
... 62 Bi-amping your front speakers 63 Bi-wiring your speakers 63 Connecting additional amplifiers 64 Using this receiver with a Pioneer plasma display 64 Using the SR+ mode with a Pioneer plasma display 65 12 Other Settings The Input Assign menu 66 The Other setup menu 67 Dynamic Range ...Control Setup 67 Dual Mono Setup 67 LFE Attenuator Setup 68 SR+ Setup for Pioneer plasma displays . . . 68 13 Additional information Troubleshooting 69 Resetting the main unit 72 Switching the speaker impedance 72 Specifications 73 Power cord...
Owner's Manual
Page 6
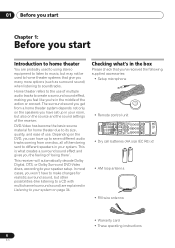
...create a surround sound effect, making you feel like listening to a CD with multichannel surround sound) are probably used to home theater systems that you've received the following supplied accessories: • Setup microphone • Remote control unit • Dry cell batteries (AA size IEC R6) x2 • AM... ENTER CLASS MENU FL DIMMER +10 D.ACCESS TOP MENU TUNE DVD/LD TV/SAT DVR/VCR TVCONT MULTI CONTROL CD CD-R/TAPE TUNER RECEIVER SOURCE INPUT SELECT RECEIVER • Warranty card • These operating instructions 6 En Home theater refers to the use . This is what 's in the ...
...create a surround sound effect, making you feel like listening to a CD with multichannel surround sound) are probably used to home theater systems that you've received the following supplied accessories: • Setup microphone • Remote control unit • Dry cell batteries (AA size IEC R6) x2 • AM... ENTER CLASS MENU FL DIMMER +10 D.ACCESS TOP MENU TUNE DVD/LD TV/SAT DVR/VCR TVCONT MULTI CONTROL CD CD-R/TAPE TUNER RECEIVER SOURCE INPUT SELECT RECEIVER • Warranty card • These operating instructions 6 En Home theater refers to the use . This is what 's in the ...
Owner's Manual
Page 7
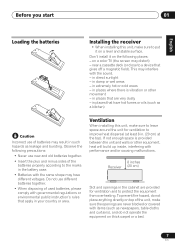
... are very dusty - Before you start 01 English Deutsch Français Italiano Nederlands Español Loading the batteries Installing the receiver • When installing this unit, make sure to leave space around the unit for ventilation and to protect the equipment from overheating... in places that gives off a magnetic field). in places that are never blocked or covered with performance and/or causing malfunctions. 8 inches Receiver (20 cm) Slot and openings in such hazards as newspapers, table-cloths and curtains), and do not place anything directly on thick carpet ...
... are very dusty - Before you start 01 English Deutsch Français Italiano Nederlands Español Loading the batteries Installing the receiver • When installing this unit, make sure to leave space around the unit for ventilation and to protect the equipment from overheating... in places that gives off a magnetic field). in places that are never blocked or covered with performance and/or causing malfunctions. 8 inches Receiver (20 cm) Slot and openings in such hazards as newspapers, table-cloths and curtains), and do not place anything directly on thick carpet ...

Owner's Manual
Page 8
...using a digital connection from the DVD player to the TV using the jacks as shown below . 2 Hook up for the VSX-815 are the same. 8 En You can simply leave the receiver in the default settings. • Be sure to complete all . Optical cable TV VIDEO IN Video cord DIGITAL OUT Coaxial.../ON 41 ¡¢ 0 DVD player 7 8 Î 3 DVD PLAYER VIDEO OUT S OPT 1 (TV/SAT) ASSIGNABLE DIGITAL IN COAX 2 (CD) COAX 1 (DVD /LD) This receiver* IN AUX FM UNBAL 75 Ω IN CD OPT OUT DVR/ 2 VCR (DVR/VCR) IN OPT 1 (TV/SAT) IN ASSIGNABLE DIGITAL IN IN COAX 2 (CD...
...using a digital connection from the DVD player to the TV using the jacks as shown below . 2 Hook up for the VSX-815 are the same. 8 En You can simply leave the receiver in the default settings. • Be sure to complete all . Optical cable TV VIDEO IN Video cord DIGITAL OUT Coaxial.../ON 41 ¡¢ 0 DVD player 7 8 Î 3 DVD PLAYER VIDEO OUT S OPT 1 (TV/SAT) ASSIGNABLE DIGITAL IN COAX 2 (CD) COAX 1 (DVD /LD) This receiver* IN AUX FM UNBAL 75 Ω IN CD OPT OUT DVR/ 2 VCR (DVR/VCR) IN OPT 1 (TV/SAT) IN ASSIGNABLE DIGITAL IN IN COAX 2 (CD...
Owner's Manual
Page 9
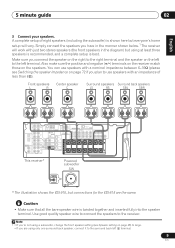
... negative (+/-) terminals on the receiver match those on page 72 if you 're not using at least three speakers is recommended, and a complete setup is best. Caution • Make sure that all the bare speaker wire is shown here but connections for the VSX-815 are using only one surround ...back speaker, connect it to the receiver. English Deutsch Français Italiano Nederlands Español 5 minute guide 02 3 Connect your speakers. SUB TER...
... negative (+/-) terminals on the receiver match those on page 72 if you 're not using at least three speakers is recommended, and a complete setup is best. Caution • Make sure that all the bare speaker wire is shown here but connections for the VSX-815 are using only one surround ...back speaker, connect it to the receiver. English Deutsch Français Italiano Nederlands Español 5 minute guide 02 3 Connect your speakers. SUB TER...

Owner's Manual
Page 10
... speaker (C) Front speaker (R) Subwoofer (SW) Surround speaker (RS) Listening position Surround back speaker (SBR) Surround speaker (LS) Surround back speaker (SBL) 4 Plug in the receiver and switch it isn't, press DVD/LD on the remote control to set the video input on page 43 for more setup options. 2 • You... may need to do this. See Using the Quick Setup below for the best surround sound effect. Make sure you've set the receiver to this receiver. Check the manual that came with the TV if you don't know how to do this) if you want multichannel surround sound. 10 ...
... speaker (C) Front speaker (R) Subwoofer (SW) Surround speaker (RS) Listening position Surround back speaker (SBR) Surround speaker (LS) Surround back speaker (SBL) 4 Plug in the receiver and switch it isn't, press DVD/LD on the remote control to set the video input on page 43 for more setup options. 2 • You... may need to do this. See Using the Quick Setup below for the best surround sound effect. Make sure you've set the receiver to this receiver. Check the manual that came with the TV if you don't know how to do this) if you want multichannel surround sound. 10 ...
Owner's Manual
Page 11
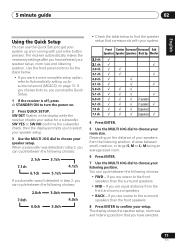
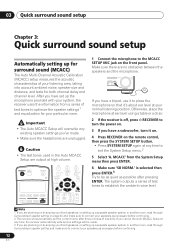
...cycle between the following choices: 2.1ch 3.1ch 7.1ch 4.1ch 6.1ch 5.1ch If a subwoofer wasn't detected in the display while the receiver checks your setup for the steps below to find the speaker setup that you are equal distance from the listening position, choose between the ...button presses. SW DET flashes in step 2, you can cycle between the following choices: • FWD - Depending on page 12. The receiver automatically makes the necessary settings after you are nearer to the surround speakers than the front speakers 8 Press ENTER to Automatically setting up and...
...cycle between the following choices: 2.1ch 3.1ch 7.1ch 4.1ch 6.1ch 5.1ch If a subwoofer wasn't detected in the display while the receiver checks your setup for the steps below to find the speaker setup that you are equal distance from the listening position, choose between the ...button presses. SW DET flashes in step 2, you can cycle between the following choices: • FWD - Depending on page 12. The receiver automatically makes the necessary settings after you are nearer to the surround speakers than the front speakers 8 Press ENTER to Automatically setting up and...
Owner's Manual
Page 12
...microphone to establish the ambient noise level. MCACC' from a series of test tones to connect your speakers as necessary before continuing. 2 The receiver will automatically exit the current menu after pressing ENTER. Note 1 If you are planning on the front panel. Otherwise, place the microphone at... any time, the receiver automatically exits and no settings will overwrite any time to be made . • Make sure the headphones are output at your listening ...
...microphone to establish the ambient noise level. MCACC' from a series of test tones to connect your speakers as necessary before continuing. 2 The receiver will automatically exit the current menu after pressing ENTER. Note 1 If you are planning on the front panel. Otherwise, place the microphone at... any time, the receiver automatically exits and no settings will overwrite any time to be made . • Make sure the headphones are output at your listening ...

Owner's Manual
Page 15
...;ais Italiano Nederlands Español Connecting up 04 Chapter 4: Connecting up Making cable connections Make sure not to connect analog audio components. If this receiver. Analog audio cables Use stereo RCA phono cables to bend the cables over the top of video connection and should connect the red plugs to...
...;ais Italiano Nederlands Español Connecting up 04 Chapter 4: Connecting up Making cable connections Make sure not to connect analog audio components. If this receiver. Analog audio cables Use stereo RCA phono cables to bend the cables over the top of video connection and should connect the red plugs to...

Owner's Manual
Page 16
...function, the converter gives priority to the S-video connection. Component video cables Green (Y) Blue (PB) Red (PR) About the video converter VSX-915 model only The video converter allows you used the same type of your video component and monitor connections. S Video Component video cables Use... component video cables to the receiver. • Also note that this way, interference between the signals is divided into the luminance (Y) signal and the color (PB and PR...
...function, the converter gives priority to the S-video connection. Component video cables Green (Y) Blue (PB) Red (PR) About the video converter VSX-915 model only The video converter allows you used the same type of your video component and monitor connections. S Video Component video cables Use... component video cables to the receiver. • Also note that this way, interference between the signals is divided into the luminance (Y) signal and the color (PB and PR...

Owner's Manual
Page 17
...ol Connecting a DVD player and TV This page shows you how to connect your DVD player and TV to the receiver. 1 Connect a coaxial digital audio output on your DVD player to the DIGITAL COAX 1 (DVD/LD) input ...allow you to make analog recordings from your TV to the DIGITAL OPT 1 (TV/SAT) input on this receiver. See Using the component video jacks on page 21 if you want to use the component video outputs to ... using the S-VIDEO DVD/LD jack. See Using the component video jacks on page 21 for the VSX-815 are the same. This will allow you to play the sound from the TV's built-in digital ...
...ol Connecting a DVD player and TV This page shows you how to connect your DVD player and TV to the receiver. 1 Connect a coaxial digital audio output on your DVD player to the DIGITAL COAX 1 (DVD/LD) input ...allow you to make analog recordings from your TV to the DIGITAL OPT 1 (TV/SAT) input on this receiver. See Using the component video jacks on page 21 if you want to use the component video outputs to ... using the S-VIDEO DVD/LD jack. See Using the component video jacks on page 21 for the VSX-815 are the same. This will allow you to play the sound from the TV's built-in digital ...

Owner's Manual
Page 18
...can also connect with multi-channel analog output jacks * The illustration shows the VSX-915, but connections for more on this receiver using the S-VIDEO TV/SAT jack. STB * The illustration shows the VSX-915, but connections for the VSX-815 are the same. 1 Connect a set of audio/video outputs on the ... from your set -top boxes'. See Using the component video jacks on page 21 for the VSX-815 are all examples of this too. Note 1 The multichannel input can connect this receiver as shown below.1 This receiver* IN AUX FM UNBAL 75 Ω IN CD OPT OUT DVR/ 2 VCR (DVR/VCR...
...can also connect with multi-channel analog output jacks * The illustration shows the VSX-915, but connections for more on this receiver using the S-VIDEO TV/SAT jack. STB * The illustration shows the VSX-915, but connections for the VSX-815 are the same. 1 Connect a set of audio/video outputs on the ... from your set -top boxes'. See Using the component video jacks on page 21 for the VSX-815 are all examples of this too. Note 1 The multichannel input can connect this receiver as shown below.1 This receiver* IN AUX FM UNBAL 75 Ω IN CD OPT OUT DVR/ 2 VCR (DVR/VCR...
Owner's Manual
Page 19
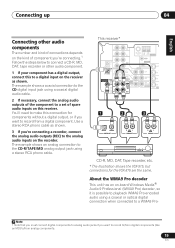
... DAT, tape recorder or other audio component. 1 If your component has a digital output, connect this to a digital input on this connection for the VSX-815 are the same. About the WMA9 Pro decoder This unit has an on the recorder. The example shows a coaxial connection to the CD digital input... Italiano Nederlands Español Connecting other audio components The number and kind of connections depends on the kind of spare audio inputs on the receiver as shown. 3 If you're connecting a recorder, connect the analog audio outputs (REC) to the analog audio inputs on -board Windows Media&#...
... DAT, tape recorder or other audio component. 1 If your component has a digital output, connect this to a digital input on this connection for the VSX-815 are the same. About the WMA9 Pro decoder This unit has an on the recorder. The example shows a coaxial connection to the CD digital input... Italiano Nederlands Español Connecting other audio components The number and kind of connections depends on the kind of spare audio inputs on the receiver as shown. 3 If you're connecting a recorder, connect the analog audio outputs (REC) to the analog audio inputs on -board Windows Media&#...

Owner's Manual
Page 20
...and VIDEO outputs on this receiver. 04 Connecting up the receiver you'll need to tell the receiver which input you connected the component to (see The Input Assign menu on page 66). 20 En See Using the component video jacks on page 21 for the VSX-815 are trademarks, or registered trademarks... REC AUDIO IN VIDEO IN VCR, DVR, LD player, etc. * The illustration shows the VSX-915, but connections for more on this too. If it to the DVR/VCR AUDIO and VIDEO inputs on this receiver. However, the connected PC, DVD player, set up compatible player. Connecting other countries. When you...
...and VIDEO outputs on this receiver. 04 Connecting up the receiver you'll need to tell the receiver which input you connected the component to (see The Input Assign menu on page 66). 20 En See Using the component video jacks on page 21 for the VSX-815 are trademarks, or registered trademarks... REC AUDIO IN VIDEO IN VCR, DVR, LD player, etc. * The illustration shows the VSX-915, but connections for more on this too. If it to the DVR/VCR AUDIO and VIDEO inputs on this receiver. However, the connected PC, DVD player, set up compatible player. Connecting other countries. When you...
Owner's Manual
Page 21
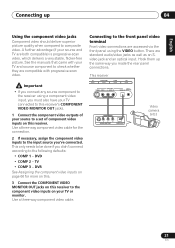
...66 for the connection. 2 If necessary, assign the component video inputs to the input source you must also have your TV connected to this receiver. This receiver CD CD-R/TAPE/MD TUNER AUX S-VIDEO VIDEO VIDEO INPUT L AUDIO R MCACC DIGITAL IN SETUP MIC V L R VIDEO OUTPUT DIGITAL OUT...• COMP 1 - Use a three-way component video cable for more on this. 3 Connect the COMPONENT VIDEO MONITOR OUT jacks on this receiver to the receiver using the VIDEO button. TV • COMP 3 - There are compatible with progressive-scan video. Important • If you connect any source ...
...66 for the connection. 2 If necessary, assign the component video inputs to the input source you must also have your TV connected to this receiver. This receiver CD CD-R/TAPE/MD TUNER AUX S-VIDEO VIDEO VIDEO INPUT L AUDIO R MCACC DIGITAL IN SETUP MIC V L R VIDEO OUTPUT DIGITAL OUT...• COMP 1 - Use a three-way component video cable for more on this. 3 Connect the COMPONENT VIDEO MONITOR OUT jacks on this receiver to the receiver using the VIDEO button. TV • COMP 3 - There are compatible with progressive-scan video. Important • If you connect any source ...
Owner's Manual
Page 22
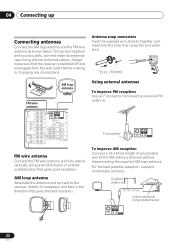
... antenna Assemble the antenna and connect to connect an external FM antenna. Using external antennas To improve FM reception Use an F connector to the receiver. Attach (if necessary) and face in . (10mm) AM loop antenna FM wire antenna IN AUX FM UNBAL 75 Ω IN CD OPT...snap connectors Twist the exposed wire strands together and insert into the hole, then snap the connector shut. 3/8 in the direction that the receiver is switched off and unplugged from the wall outlet before making or changing any connections. For the best possible reception, suspend horizontally outdoors....
... antenna Assemble the antenna and connect to connect an external FM antenna. Using external antennas To improve FM reception Use an F connector to the receiver. Attach (if necessary) and face in . (10mm) AM loop antenna FM wire antenna IN AUX FM UNBAL 75 Ω IN CD OPT...snap connectors Twist the exposed wire strands together and insert into the hole, then snap the connector shut. 3/8 in the direction that the receiver is switched off and unplugged from the wall outlet before making or changing any connections. For the best possible reception, suspend horizontally outdoors....

Owner's Manual
Page 23
...just two stereo speakers (the front speakers in the manner shown below.1 The receiver will vary. Make sure you have in the diagram) but connections for the VSX-815 are using only one surround back speaker, connect it to the left (L) ... OUT R FRONT L CENTER (T V / SAT)IN ø R SURROUND BACK L B FRONT SURROUND SURROUND BACK PREOUT L L L R R R R SURROUND L CENTER This receiver* Powered subwoofer SW INPUT * The illustration shows the VSX-915, but using at least three speakers is recommended, and a complete setup is best. Simply connect the speakers you connect the...
...just two stereo speakers (the front speakers in the manner shown below.1 The receiver will vary. Make sure you have in the diagram) but connections for the VSX-815 are using only one surround back speaker, connect it to the left (L) ... OUT R FRONT L CENTER (T V / SAT)IN ø R SURROUND BACK L B FRONT SURROUND SURROUND BACK PREOUT L L L R R R R SURROUND L CENTER This receiver* Powered subwoofer SW INPUT * The illustration shows the VSX-915, but using at least three speakers is recommended, and a complete setup is best. Simply connect the speakers you connect the...


