Owner's Manual
Page 4
... the receiver 7 Ventilation 7 02 5 minute guide Listening to Surround Sound 8 Using the Quick Setup 11 03 Quick surround sound setup Automatically setting up for surround sound (MCACC 12 Other problems when using the Auto MCACC Setup 14 04 Connecting up Making cable connections 15 Analog audio cables...antenna 22 AM loop antenna 22 Using external antennas 22 Connecting the speakers 23 Hints on speaker placement 24 AC outlet 25 Operating other Pioneer components 26 05 Controls and displays Front panel 27 Display 29 Remote control 30 Operating range of remote control unit . . . 33...
... the receiver 7 Ventilation 7 02 5 minute guide Listening to Surround Sound 8 Using the Quick Setup 11 03 Quick surround sound setup Automatically setting up for surround sound (MCACC 12 Other problems when using the Auto MCACC Setup 14 04 Connecting up Making cable connections 15 Analog audio cables...antenna 22 AM loop antenna 22 Using external antennas 22 Connecting the speakers 23 Hints on speaker placement 24 AC outlet 25 Operating other Pioneer components 26 05 Controls and displays Front panel 27 Display 29 Remote control 30 Operating range of remote control unit . . . 33...
Owner's Manual
Page 5
...front speakers 63 Bi-wiring your speakers 63 Connecting additional amplifiers 64 Using this receiver with a Pioneer plasma display 64 Using the SR+ mode with a Pioneer plasma display 65 12 Other Settings The Input Assign menu 66 The Other setup menu 67 Dynamic Range Control Setup 67 Dual ...Mono Setup 67 LFE Attenuator Setup 68 SR+ Setup for Pioneer plasma displays . . . 68 13 Additional information Troubleshooting...
...front speakers 63 Bi-wiring your speakers 63 Connecting additional amplifiers 64 Using this receiver with a Pioneer plasma display 64 Using the SR+ mode with a Pioneer plasma display 65 12 Other Settings The Input Assign menu 66 The Other setup menu 67 Dynamic Range Control Setup 67 Dual ...Mono Setup 67 LFE Attenuator Setup 68 SR+ Setup for Pioneer plasma displays . . . 68 13 Additional information Troubleshooting...
Owner's Manual
Page 6
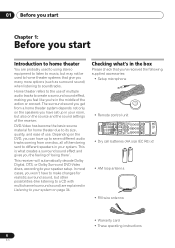
... you the feeling of 'being sent to different speakers in Listening to your system on the source and the sound settings of them being there'. In most cases, you won't have set up in the box Please check that give you many more options (such as surround sound) when listening to soundtracks...
... you the feeling of 'being sent to different speakers in Listening to your system on the source and the sound settings of them being there'. In most cases, you won't have set up in the box Please check that give you many more options (such as surround sound) when listening to soundtracks...

Owner's Manual
Page 8
... INPUT CD-R IN / TAPE / MD SUB WOOFER PREOUT Video cord * The illustration shows the VSX-915, but connections for surround sound in the default settings. • Be sure to DVD. For surround sound, you hook up for the VSX-815 are the same. 8 En You can simply leave the receiver in no time at...
... INPUT CD-R IN / TAPE / MD SUB WOOFER PREOUT Video cord * The illustration shows the VSX-915, but connections for surround sound in the default settings. • Be sure to DVD. For surround sound, you hook up for the VSX-815 are the same. 8 En You can simply leave the receiver in no time at...
Owner's Manual
Page 9
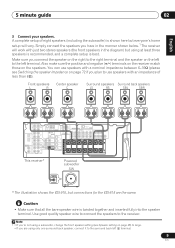
... 5 minute guide 02 3 Connect your speakers. Make sure you 're not using a subwoofer, change the front speaker setting (see Switching the speaker impedance on page 48) to use speakers with an impedance of eight speakers (including the subwoofer)...FRONT SURROUND SURROUND BACK PREOUT L L L R R R R SURROUND L CENTER This receiver* Powered subwoofer SW INPUT * The illustration shows the VSX-915, but connections for the VSX-815 are using at least three speakers is recommended, and a complete setup is twisted together and inserted fully into the speaker terminal. Caution •...
... 5 minute guide 02 3 Connect your speakers. Make sure you 're not using a subwoofer, change the front speaker setting (see Switching the speaker impedance on page 48) to use speakers with an impedance of eight speakers (including the subwoofer)...FRONT SURROUND SURROUND BACK PREOUT L L L R R R R SURROUND L CENTER This receiver* Powered subwoofer SW INPUT * The illustration shows the VSX-915, but connections for the VSX-815 are using at least three speakers is recommended, and a complete setup is twisted together and inserted fully into the speaker terminal. Caution •...

Owner's Manual
Page 10
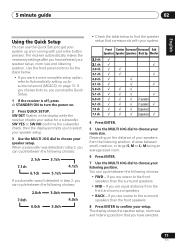
... get digital 2 channel stereo and analog sound. 02 5 minute guide Make sure that the speaker cable you're using is properly prepared with about the settings.1 6 Play a DVD, and adjust the volume to your liking. Unscrew the terminal a few turns until the wire is selected. B). C). Place your DVD player or... speakers will have a big effect on the remote control to this ) if you want multichannel surround sound. 10 En Note 1 See also Making receiver settings from each wire, with the TV if you 're unsure about 3/8 in. (10 mm) of insulator stripped from the System Setup menu on page ...
... get digital 2 channel stereo and analog sound. 02 5 minute guide Make sure that the speaker cable you're using is properly prepared with about the settings.1 6 Play a DVD, and adjust the volume to your liking. Unscrew the terminal a few turns until the wire is selected. B). C). Place your DVD player or... speakers will have a big effect on the remote control to this ) if you want multichannel surround sound. 10 En Note 1 See also Making receiver settings from each wire, with the TV if you 're unsure about 3/8 in. (10 mm) of insulator stripped from the System Setup menu on page ...
Owner's Manual
Page 11
... display shows the speaker setup, room size and listening position that corresponds with just a few button presses. The receiver automatically makes the necessary settings after you are nearer to choose your room size. SW DET flashes in step 2, you are nearer to the surround speakers than the surround... • Check the table below . • If you can skip the Quick Setup. 1 If the receiver is off, press STANDBY/ON to Automatically setting up and running with your system. 4 Press ENTER. 5 Use the MULTI JOG dial to the front speakers than the front speakers 8 Press ENTER to ...
... display shows the speaker setup, room size and listening position that corresponds with just a few button presses. The receiver automatically makes the necessary settings after you are nearer to choose your room size. SW DET flashes in step 2, you are nearer to the surround speakers than the surround... • Check the table below . • If you can skip the Quick Setup. 1 If the receiver is off, press STANDBY/ON to Automatically setting up and running with your system. 4 Press ENTER. 5 Use the MULTI JOG dial to the front speakers than the front speakers 8 Press ENTER to ...
Owner's Manual
Page 12
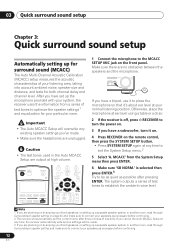
...microphone so that it on. 4 Press RECEIVER on the front panel. 03 Quick surround sound setup Chapter 3: Quick surround sound setup Automatically setting up for surround sound (MCACC) The Auto Multi-Channel Acoustic Calibration (MCACC) setup measures the acoustic characteristics of test tones to turn it... will overwrite any time, the receiver automatically exits and no obstacles between the speakers and the microphone. Make sure there are no settings will be as quiet as possible after three minutes of test tones to connect your listening area, taking into account ambient noise, ...
...microphone so that it on. 4 Press RECEIVER on the front panel. 03 Quick surround sound setup Chapter 3: Quick surround sound setup Automatically setting up for surround sound (MCACC) The Auto Multi-Channel Acoustic Calibration (MCACC) setup measures the acoustic characteristics of test tones to turn it... will overwrite any time, the receiver automatically exits and no obstacles between the speakers and the microphone. Make sure there are no settings will be as quiet as possible after three minutes of test tones to connect your listening area, taking into account ambient noise, ...
Owner's Manual
Page 13
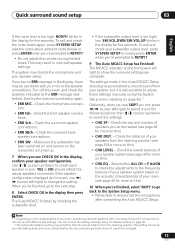
... for five seconds. Make sure the subwoofer has been switched on and volume on the subwoofer is also possible to adjust these settings manually using the Speaker setting on the front panel will end up /down ) to disconnect the microphone after completing the Auto MCACC Setup. To exit and... delay and room characteristics into account) and generally does not need to be a problem with cone sizes of speakers you 're prompted to change the setting. The Auto MCACC finishes by the ERR message (see page 46 for more on this ) • CHK EQ - Check the surround speaker connections. ...
... for five seconds. Make sure the subwoofer has been switched on and volume on the subwoofer is also possible to adjust these settings manually using the Speaker setting on the front panel will end up /down ) to disconnect the microphone after completing the Auto MCACC Setup. To exit and... delay and room characteristics into account) and generally does not need to be a problem with cone sizes of speakers you 're prompted to change the setting. The Auto MCACC finishes by the ERR message (see page 46 for more on this ) • CHK EQ - Check the surround speaker connections. ...
Owner's Manual
Page 14
... be incorrect. Check for the Auto MCACC Setup (too much background noise, echo off the walls, obstacles blocking the speakers from the microphone) the final settings may interfere with the operation of the microphone. 03 Quick surround sound setup Other problems when using the Auto MCACC Setup If the room environment...
... be incorrect. Check for the Auto MCACC Setup (too much background noise, echo off the walls, obstacles blocking the speakers from the microphone) the final settings may interfere with the operation of the microphone. 03 Quick surround sound setup Other problems when using the Auto MCACC Setup If the room environment...

Owner's Manual
Page 17
...this receiver to the DIGITAL OPT 1 (TV/SAT) input on this receiver. Use a coaxial digital audio cable for the VSX-815 are the same. When you set up 04 English Deutsch Français Italiano Nederlands Español Connecting a DVD player and TV This page shows you how... PREOUT DVD IN /LD S-VIDEO This receiver* 2 1 COAXIAL DIGITAL OUT R AUDIO L ANALOG OUT VIDEO OUT DVD player * The illustration shows the VSX-915, but connections for the connection.1 2 Connect the composite video output and the stereo analog audio outputs2 on this receiver. Use a standard RCA video cable3...
...this receiver to the DIGITAL OPT 1 (TV/SAT) input on this receiver. Use a coaxial digital audio cable for the VSX-815 are the same. When you set up 04 English Deutsch Français Italiano Nederlands Español Connecting a DVD player and TV This page shows you how... PREOUT DVD IN /LD S-VIDEO This receiver* 2 1 COAXIAL DIGITAL OUT R AUDIO L ANALOG OUT VIDEO OUT DVD player * The illustration shows the VSX-915, but connections for the connection.1 2 Connect the composite video output and the stereo analog audio outputs2 on this receiver. Use a standard RCA video cable3...

Owner's Manual
Page 18
... video output, you can also connect with multi-channel analog output jacks * The illustration shows the VSX-915, but connections for the VSX-815 are all examples of audio/video outputs on the set-top box component to the TV/SAT AUDIO and VIDEO inputs on this receiver.2 Use a stereo ...box to (see The Input Assign menu on this receiver. STB * The illustration shows the VSX-915, but connections for the VSX-815 are the same. 1 Connect a set of so-called `set-top boxes'. When you set up Connecting the multichannel analog outputs For DVD Audio and SACD playback, your DVD player may ...
... video output, you can also connect with multi-channel analog output jacks * The illustration shows the VSX-915, but connections for the VSX-815 are all examples of audio/video outputs on the set-top box component to the TV/SAT AUDIO and VIDEO inputs on this receiver.2 Use a stereo ...box to (see The Input Assign menu on this receiver. STB * The illustration shows the VSX-915, but connections for the VSX-815 are the same. 1 Connect a set of so-called `set-top boxes'. When you set up Connecting the multichannel analog outputs For DVD Audio and SACD playback, your DVD player may ...
Owner's Manual
Page 19
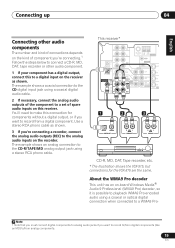
...to the CD-R/TAPE/MD analog output jack using a coaxial digital audio cable. 2 If necessary, connect the analog audio outputs of the component to a set of component you 're connecting a recorder, connect the analog audio outputs (REC) to the analog audio inputs on the recorder. This receiver* IN AUX...If your component has a digital output, connect this to a digital input on the receiver as shown. You'll need to make this connection for the VSX-815 are the same. About the WMA9 Pro decoder This unit has an on-board Windows Media® Audio 9 Professional (WMA9 Pro) decoder, so it ...
...to the CD-R/TAPE/MD analog output jack using a coaxial digital audio cable. 2 If necessary, connect the analog audio outputs of the component to a set of component you 're connecting a recorder, connect the analog audio outputs (REC) to the analog audio inputs on the recorder. This receiver* IN AUX...If your component has a digital output, connect this to a digital input on the receiver as shown. You'll need to make this connection for the VSX-815 are the same. About the WMA9 Pro decoder This unit has an on-board Windows Media® Audio 9 Professional (WMA9 Pro) decoder, so it ...

Owner's Manual
Page 20
... R OUT L PLAY AUDIO OUT VIDEO OUT R IN L REC AUDIO IN VIDEO IN VCR, DVR, LD player, etc. * The illustration shows the VSX-915, but connections for the VSX-815 are trademarks, or registered trademarks of audio/video inputs on the recorder to a digital input on this too. If it only has an... optical digital output, you can also connect with S-video using the S-VIDEO DVR/VCR OUT jack. 3 If your set -top box, etc. If ...
... R OUT L PLAY AUDIO OUT VIDEO OUT R IN L REC AUDIO IN VIDEO IN VCR, DVR, LD player, etc. * The illustration shows the VSX-915, but connections for the VSX-815 are trademarks, or registered trademarks of audio/video inputs on the recorder to a digital input on this too. If it only has an... optical digital output, you can also connect with S-video using the S-VIDEO DVR/VCR OUT jack. 3 If your set -top box, etc. If ...
Owner's Manual
Page 21
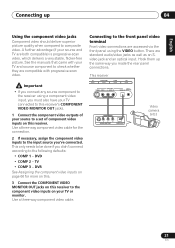
... input, you must also have your TV connected to this receiver's COMPONENT VIDEO MONITOR OUT jacks. 1 Connect the component video outputs of your source to a set of component video inputs on this receiver. See the manuals that came with your source and TV are compatible with progressive-scan video. Connecting to...
... input, you must also have your TV connected to this receiver's COMPONENT VIDEO MONITOR OUT jacks. 1 Connect the component video outputs of your source to a set of component video inputs on this receiver. See the manuals that came with your source and TV are compatible with progressive-scan video. Connecting to...

Owner's Manual
Page 23
... three speakers is recommended, and a complete setup is best. Make sure you have in the diagram) but connections for the VSX-815 are using only one surround back speaker, connect it to the left (L) terminal. 23 En English Deutsch Français Italiano... SURROUND BACK PREOUT L L L R R R R SURROUND L CENTER This receiver* Powered subwoofer SW INPUT * The illustration shows the VSX-915, but using a subwoofer, change the front speaker setting (see Speaker setting on the left to the surround back left terminal. Use good quality speaker wire to connect the speakers to use...
... three speakers is recommended, and a complete setup is best. Make sure you have in the diagram) but connections for the VSX-815 are using only one surround back speaker, connect it to the left (L) terminal. 23 En English Deutsch Français Italiano... SURROUND BACK PREOUT L L L R R R R SURROUND L CENTER This receiver* Powered subwoofer SW INPUT * The illustration shows the VSX-915, but using a subwoofer, change the front speaker setting (see Speaker setting on the left to the surround back left terminal. Use good quality speaker wire to connect the speakers to use...
Owner's Manual
Page 25
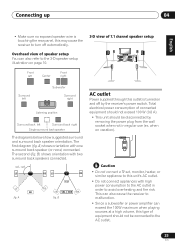
... right Listening position Surround back left Surround back right Single surround back speaker . The first diagram (fig. AC OUTLET Caution • Do not connect a TV set, monitor, heater, or similar appliance to this type of connected equipment should not exceed 100 W (0.8 A). • This unit should not be disconnected by the receiver...
... right Listening position Surround back left Surround back right Single surround back speaker . The first diagram (fig. AC OUTLET Caution • Do not connect a TV set, monitor, heater, or similar appliance to this type of connected equipment should not exceed 100 W (0.8 A). • This unit should not be disconnected by the receiver...

Owner's Manual
Page 26
... Note 1 • If you want to control all your components using this receiver's remote control, refer to Controlling the rest of other Pioneer components Many Pioneer components have at least one component. When you use a remote control, the control signal is passed along the chain to the appropriate component.1 Note... you also have SR CONTROL jacks which can be able to control this feature, make sure that you use just the remote sensor of one set of analog audio or video jacks connected to CONTROL terminal of your system on page 55. • If you have connected a remote control ...
... Note 1 • If you want to control all your components using this receiver's remote control, refer to Controlling the rest of other Pioneer components Many Pioneer components have at least one component. When you use a remote control, the control signal is passed along the chain to the appropriate component.1 Note... you also have SR CONTROL jacks which can be able to control this feature, make sure that you use just the remote sensor of one set of analog audio or video jacks connected to CONTROL terminal of your system on page 55. • If you have connected a remote control ...

Owner's Manual
Page 27
... input source. 2 Character display See Display on page 29. 3 MCACC indicator Lights when Acoustic Calibration EQ (page 37) is on (Acoustic Calibration EQ is automatically set to ALL CH ADJUST after the Auto MCACC Setup (page 12) or EQ Auto Setup (page 46) is complete). 4 ENTER 5 MULTI JOG dial Use the...
... input source. 2 Character display See Display on page 29. 3 MCACC indicator Lights when Acoustic Calibration EQ (page 37) is on (Acoustic Calibration EQ is automatically set to ALL CH ADJUST after the Auto MCACC Setup (page 12) or EQ Auto Setup (page 46) is complete). 4 ENTER 5 MULTI JOG dial Use the...

Owner's Manual
Page 28
... accurate reproduction of an analog input signal to prevent distortion. 15 SPEAKERS Use to change the speaker system (page 62) and to change the impedance setting (page 72). 16 EXTENDED MODE Selects the surround back channel mode (page 39) or virtual surround back mode (page 40). 17 ACOUSTIC EQ Press to... select an Acoustic Calibration EQ setting (page 37). 18 BAND Switches between the tuner AM and FM bands (page 51). 19 TUNING / STATION buttons Selects the frequency (page 51) and ...
... accurate reproduction of an analog input signal to prevent distortion. 15 SPEAKERS Use to change the speaker system (page 62) and to change the impedance setting (page 72). 16 EXTENDED MODE Selects the surround back channel mode (page 39) or virtual surround back mode (page 40). 17 ACOUSTIC EQ Press to... select an Acoustic Calibration EQ setting (page 37). 18 BAND Switches between the tuner AM and FM bands (page 51). 19 TUNING / STATION buttons Selects the frequency (page 51) and ...


