Owner's Manual
Page 4
... the receiver 7 Ventilation 7 02 5 minute guide Listening to Surround Sound 8 Using the Quick Setup 11 03 Quick surround sound setup Automatically setting up for surround sound (MCACC 12 Other problems when using the Auto MCACC Setup 14 04 Connecting up Making cable connections 15 Analog audio cables...antenna 22 AM loop antenna 22 Using external antennas 22 Connecting the speakers 23 Hints on speaker placement 24 AC outlet 25 Operating other Pioneer components 26 05 Controls and displays Front panel 27 Display 29 Remote control 30 Operating range of remote control unit . . . ...
... the receiver 7 Ventilation 7 02 5 minute guide Listening to Surround Sound 8 Using the Quick Setup 11 03 Quick surround sound setup Automatically setting up for surround sound (MCACC 12 Other problems when using the Auto MCACC Setup 14 04 Connecting up Making cable connections 15 Analog audio cables...antenna 22 AM loop antenna 22 Using external antennas 22 Connecting the speakers 23 Hints on speaker placement 24 AC outlet 25 Operating other Pioneer components 26 05 Controls and displays Front panel 27 Display 29 Remote control 30 Operating range of remote control unit . . . ...
Owner's Manual
Page 5
...front speakers 63 Bi-wiring your speakers 63 Connecting additional amplifiers 64 Using this receiver with a Pioneer plasma display 64 Using the SR+ mode with a Pioneer plasma display 65 12 Other Settings The Input Assign menu 66 The Other setup menu 67 Dynamic Range Control Setup 67 Dual ...Mono Setup 67 LFE Attenuator Setup 68 SR+ Setup for Pioneer plasma displays . . . 68 13 Additional information Troubleshooting...
...front speakers 63 Bi-wiring your speakers 63 Connecting additional amplifiers 64 Using this receiver with a Pioneer plasma display 64 Using the SR+ mode with a Pioneer plasma display 65 12 Other Settings The Input Assign menu 66 The Other setup menu 67 Dynamic Range Control Setup 67 Dual ...Mono Setup 67 LFE Attenuator Setup 68 SR+ Setup for Pioneer plasma displays . . . 68 13 Additional information Troubleshooting...
Owner's Manual
Page 6
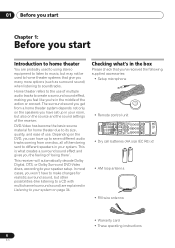
... card • These operating instructions 6 En Depending on the DVD, you can have up in your room, but also on the source and the sound settings of them being there'. 01 Before you start Chapter 1: Before you start Introduction to home theater You are explained in Listening to your speaker setup... be used to home theater systems that you the feeling of 'being sent to create a surround sound effect, making you feel like you won't have set up to seven different audio tracks coming from one disc, all of the receiver. This is what 's in your system on the speakers you have...
... card • These operating instructions 6 En Depending on the DVD, you can have up in your room, but also on the source and the sound settings of them being there'. 01 Before you start Chapter 1: Before you start Introduction to home theater You are explained in Listening to your speaker setup... be used to home theater systems that you the feeling of 'being sent to create a surround sound effect, making you feel like you won't have set up to seven different audio tracks coming from one disc, all of the receiver. This is what 's in your system on the speakers you have...

Owner's Manual
Page 8
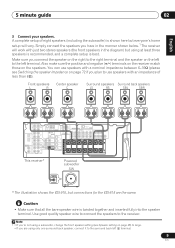
... V D 5.1CH REC INPUT CD-R IN / TAPE / MD SUB WOOFER PREOUT Video cord * The illustration shows the VSX-915, but connections for surround sound in no time at all connections before connecting this with the following quick setup guide, you... from the DVD player to the receiver. You can simply leave the receiver in the default settings. • Be sure to complete all . Use a video cord to connect the video ... AC power source. 1 Hook up using the jacks as shown below . 2 Hook up for the VSX-815 are the same. 8 En 02 5 minute guide Chapter 2: 5 minute guide Listening to Surround Sound ...
... V D 5.1CH REC INPUT CD-R IN / TAPE / MD SUB WOOFER PREOUT Video cord * The illustration shows the VSX-915, but connections for surround sound in no time at all connections before connecting this with the following quick setup guide, you... from the DVD player to the receiver. You can simply leave the receiver in the default settings. • Be sure to complete all . Use a video cord to connect the video ... AC power source. 1 Hook up using the jacks as shown below . 2 Hook up for the VSX-815 are the same. 8 En 02 5 minute guide Chapter 2: 5 minute guide Listening to Surround Sound ...
Owner's Manual
Page 9
...3 Connect your speakers. A complete setup of less than 8Ω). You can use speakers with a nominal impedance between 6-16Ω (please see Speaker setting on page 48) to the left (L) terminal. 9 En Caution • Make sure that all the bare speaker wire is best. Use good quality ... shown here but connections for the VSX-815 are using at least three speakers is recommended, and a complete setup is twisted together and inserted fully into the speaker terminal. Note 1 • If you're not using a subwoofer, change the front speaker setting (see Switching the speaker impedance on...
...3 Connect your speakers. A complete setup of less than 8Ω). You can use speakers with a nominal impedance between 6-16Ω (please see Speaker setting on page 48) to the left (L) terminal. 9 En Caution • Make sure that all the bare speaker wire is best. Use good quality ... shown here but connections for the VSX-815 are using at least three speakers is recommended, and a complete setup is twisted together and inserted fully into the speaker terminal. Note 1 • If you're not using a subwoofer, change the front speaker setting (see Switching the speaker impedance on...

Owner's Manual
Page 10
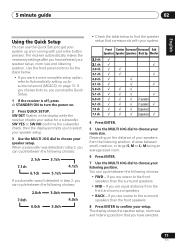
... and adjust the volume to output Dolby Digital, DTS and 88.2/96kHz PCM (2 channel) audio (see Listening in . (10mm) fig. Make sure you've set to STANDARD (see your DVD player's manual for more on this .3 Front speaker (L) Center speaker (C) Front speaker (R) Subwoofer (SW) Surround speaker (RS) ... came with the exposed wire strands twisted together (fig. B fig. Place your subwoofer and the TV. Note 1 See also Making receiver settings from each wire, with the TV if you want multichannel surround sound. 10 En 02 5 minute guide Make sure that the speaker cable you...
... and adjust the volume to output Dolby Digital, DTS and 88.2/96kHz PCM (2 channel) audio (see Listening in . (10mm) fig. Make sure you've set to STANDARD (see your DVD player's manual for more on this .3 Front speaker (L) Center speaker (C) Front speaker (R) Subwoofer (SW) Surround speaker (RS) ... came with the exposed wire strands twisted together (fig. B fig. Place your subwoofer and the TV. Note 1 See also Making receiver settings from each wire, with the TV if you want multichannel surround sound. 10 En 02 5 minute guide Make sure that the speaker cable you...
Owner's Manual
Page 11
...4.1ch 6.1ch 5.1ch If a subwoofer wasn't detected in the display while the receiver checks your listening position. The receiver automatically makes the necessary settings after you to select your speaker setup. 3 Use the MULTI JOG dial to choose your speakers from the front and surround speakers • BACK...Use the front panel controls for the steps below to find the speaker setup that you want a more complete setup option, refer to Automatically setting up and running with your system. 4 Press ENTER. 5 Use the MULTI JOG dial to choose your setup. You can cycle between the ...
...4.1ch 6.1ch 5.1ch If a subwoofer wasn't detected in the display while the receiver checks your listening position. The receiver automatically makes the necessary settings after you to select your speaker setup. 3 Use the MULTI JOG dial to choose your speakers from the front and surround speakers • BACK...Use the front panel controls for the steps below to find the speaker setup that you want a more complete setup option, refer to Automatically setting up and running with your system. 4 Press ENTER. 5 Use the MULTI JOG dial to choose your setup. You can cycle between the ...
Owner's Manual
Page 12
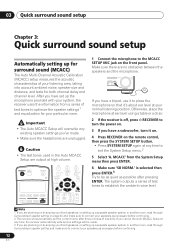
...after pressing ENTER. TUNER AUX T MCACC R DIGITAL IN SETUP MIC MASTER VOLUME DOWN UP If you are unplugged. If you are no settings will overwrite any time to connect your normal listening position. RECEIVER INPUT SELECT SOURCE DVD/LD TV/SAT DVR/VCR TVCONT MULTI CONTROL CD ...speakers as necessary before continuing. 12 En MCACC' from a series of inactivity. Make sure there are planning on bi-amping your front speakers, or setting up a separate speaker system in the Auto MCACC Setup are output at ear level using a table or a chair. 2 If the receiver is ...
...after pressing ENTER. TUNER AUX T MCACC R DIGITAL IN SETUP MIC MASTER VOLUME DOWN UP If you are unplugged. If you are no settings will overwrite any time to connect your normal listening position. RECEIVER INPUT SELECT SOURCE DVD/LD TV/SAT DVR/VCR TVCONT MULTI CONTROL CD ...speakers as necessary before continuing. 12 En MCACC' from a series of inactivity. Make sure there are planning on bi-amping your front speakers, or setting up a separate speaker system in the Auto MCACC Setup are output at ear level using a table or a chair. 2 If the receiver is ...
Owner's Manual
Page 13
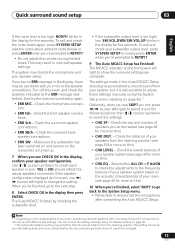
... adjustments to the frequency balance of your speaker system based on the acoustic characteristics of around 5 inches (12cm) will light to show the surround settings are complete. Note 1 • Depending on the subwoofer is too high/ low, SW.VOL.DWN/SW.VOL.UP blinks in the display, ... sound setup 03 English Deutsch Français Italiano Nederlands Español If the noise level is also possible to adjust these settings manually using the Speaker setting on page 43).1 Optionally, when you see page 48 for five seconds. Check the front speaker connections. • ERR Sch - Use ...
... adjustments to the frequency balance of your speaker system based on the acoustic characteristics of around 5 inches (12cm) will light to show the surround settings are complete. Note 1 • Depending on the subwoofer is too high/ low, SW.VOL.DWN/SW.VOL.UP blinks in the display, ... sound setup 03 English Deutsch Français Italiano Nederlands Español If the noise level is also possible to adjust these settings manually using the Speaker setting on page 43).1 Optionally, when you see page 48 for five seconds. Check the front speaker connections. • ERR Sch - Use ...
Owner's Manual
Page 14
... if necessary. Check for the Auto MCACC Setup (too much background noise, echo off the walls, obstacles blocking the speakers from the microphone) the final settings may interfere with the operation of the microphone. If this seems to be incorrect.
... if necessary. Check for the Auto MCACC Setup (too much background noise, echo off the walls, obstacles blocking the speakers from the microphone) the final settings may interfere with the operation of the microphone. If this seems to be incorrect.

Owner's Manual
Page 17
... audio outputs from your DVD player. 3 For better quality, you can also connect with S-video using the S-VIDEO MONITOR OUT jack. When you set up 04 English Deutsch Français Italiano Nederlands Español Connecting a DVD player and TV This page shows you how to connect your... Connecting the multichannel analog outputs below for how to connect it to the optical input on this receiver. Use a coaxial digital audio cable for the VSX-815 are the same. Use a stereo RCA phono cable to the composite video jack.4 DIGITAL AUDIO OUT OPTICAL 4 TV ANALOG AUDIO OUT R L VIDEO IN 3 ...
... audio outputs from your DVD player. 3 For better quality, you can also connect with S-video using the S-VIDEO MONITOR OUT jack. When you set up 04 English Deutsch Français Italiano Nederlands Español Connecting a DVD player and TV This page shows you how to connect your... Connecting the multichannel analog outputs below for how to connect it to the optical input on this receiver. Use a coaxial digital audio cable for the VSX-815 are the same. Use a stereo RCA phono cable to the composite video jack.4 DIGITAL AUDIO OUT OPTICAL 4 TV ANALOG AUDIO OUT R L VIDEO IN 3 ...

Owner's Manual
Page 18
STB * The illustration shows the VSX-915, but connections for the VSX-815 are the same. 1 Connect a set of the coaxial inputs on this. 4 If your satellite/cable receiver doesn't have 5.1 channel analog outputs.In this case, you can connect this too. However, ... audio/video outputs on the set -top box component to the DIGITAL OPT 1 (TV/SAT) input on page 66). 18 En If it only has a coaxial digital output, you can also connect with multi-channel analog output jacks * The illustration shows the VSX-915, but connections for the VSX-815 are all examples of...
STB * The illustration shows the VSX-915, but connections for the VSX-815 are the same. 1 Connect a set of the coaxial inputs on this. 4 If your satellite/cable receiver doesn't have 5.1 channel analog outputs.In this case, you can connect this too. However, ... audio/video outputs on the set -top box component to the DIGITAL OPT 1 (TV/SAT) input on page 66). 18 En If it only has a coaxial digital output, you can also connect with multi-channel analog output jacks * The illustration shows the VSX-915, but connections for the VSX-815 are all examples of...
Owner's Manual
Page 19
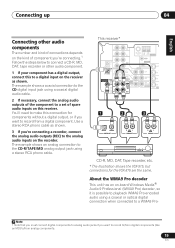
... to the CD digital input jack using a coaxial digital audio cable. 2 If necessary, connect the analog audio outputs of the component to a set of component you want to record from analog components. 19 En Note 1 Note that you must connect digital components to analog audio jacks if you...tape recorder or other audio components The number and kind of connections depends on the kind of spare audio inputs on this connection for the VSX-815 are the same. Connecting up 04 English Deutsch Français Italiano Nederlands Español Connecting other audio component. 1 If your component ...
... to the CD digital input jack using a coaxial digital audio cable. 2 If necessary, connect the analog audio outputs of the component to a set of component you want to record from analog components. 19 En Note 1 Note that you must connect digital components to analog audio jacks if you...tape recorder or other audio components The number and kind of connections depends on the kind of spare audio inputs on this connection for the VSX-815 are the same. Connecting up 04 English Deutsch Français Italiano Nederlands Español Connecting other audio component. 1 If your component ...

Owner's Manual
Page 20
... cable for the audio connection and a standard RCA video cable for the VSX-815 are trademarks, or registered trademarks of audio/video outputs on the recorder to... IN VIDEO IN VCR, DVR, LD player, etc. * The illustration shows the VSX-915, but connections for the video connection.1 2 Connect a set of audio/video inputs on the recorder to the DVR/VCR AUDIO and VIDEO inputs on...also connect with S-video using the S-VIDEO DVR/VCR IN jack. However, the connected PC, DVD player, set up compatible player. If your video component doesn't have a digital audio output, omit this . 2 For...
... cable for the audio connection and a standard RCA video cable for the VSX-815 are trademarks, or registered trademarks of audio/video outputs on the recorder to... IN VIDEO IN VCR, DVR, LD player, etc. * The illustration shows the VSX-915, but connections for the video connection.1 2 Connect a set of audio/video inputs on the recorder to the DVR/VCR AUDIO and VIDEO inputs on...also connect with S-video using the S-VIDEO DVR/VCR IN jack. However, the connected PC, DVD player, set up compatible player. If your video component doesn't have a digital audio output, omit this . 2 For...
Owner's Manual
Page 21
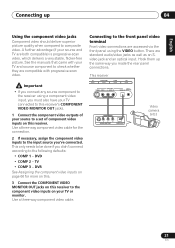
... DIGITAL IN SETUP MIC V L R VIDEO OUTPUT DIGITAL OUT Video camera (etc.) 21 En DVD • COMP 2 - See the manuals that came with your source to a set of your TV and source component to check whether they are compatible with progressive-scan video. Hook them up 04 Using the component video jacks...
... DIGITAL IN SETUP MIC V L R VIDEO OUTPUT DIGITAL OUT Video camera (etc.) 21 En DVD • COMP 2 - See the manuals that came with your source to a set of your TV and source component to check whether they are compatible with progressive-scan video. Hook them up 04 Using the component video jacks...

Owner's Manual
Page 23
... shown below.1 The receiver will vary. Simply connect the speakers you plan to use speakers with a nominal impedance between 6-16Ω (please see Speaker setting on the left to the left (L) terminal. 23 En SUB TER WOOFER R L COMPONENT VIDEO (DVR/ VCR) IN π ASSIGNABLE Y PB PR...but everyone's home setup will work with an impedance of eight speakers (including the subwoofer) is shown here but connections for the VSX-815 are using only one surround back speaker, connect it to the surround back left terminal. Front speakers Center speaker L R C Surround...
... shown below.1 The receiver will vary. Simply connect the speakers you plan to use speakers with a nominal impedance between 6-16Ω (please see Speaker setting on the left to the left (L) terminal. 23 En SUB TER WOOFER R L COMPONENT VIDEO (DVR/ VCR) IN π ASSIGNABLE Y PB PR...but everyone's home setup will work with an impedance of eight speakers (including the subwoofer) is shown here but connections for the VSX-815 are using only one surround back speaker, connect it to the surround back left terminal. Front speakers Center speaker L R C Surround...
Owner's Manual
Page 25
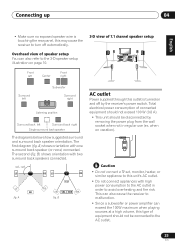
The first diagram (fig. AC OUTLET Caution • Do not connect a TV set, monitor, heater, or similar appliance to this unit's AC outlet. • Do not connect appliances with high power consumption to the AC outlet in regular ...
The first diagram (fig. AC OUTLET Caution • Do not connect a TV set, monitor, heater, or similar appliance to this unit's AC outlet. • Do not connect appliances with high power consumption to the AC outlet in regular ...

Owner's Manual
Page 26
... CONTROL jacks which can be able to control this feature, make sure that you also have at least one component. 04 Connecting up Operating other Pioneer products Note 1 • If you want to control all your components using this receiver's remote control, refer to Controlling the rest of your system on... a remote control, the control signal is passed along the chain to the appropriate component.1 Note that if you use just the remote sensor of one set of analog audio or video jacks connected to another component for grounding purposes.
... CONTROL jacks which can be able to control this feature, make sure that you also have at least one component. 04 Connecting up Operating other Pioneer products Note 1 • If you want to control all your components using this receiver's remote control, refer to Controlling the rest of your system on... a remote control, the control signal is passed along the chain to the appropriate component.1 Note that if you use just the remote sensor of one set of analog audio or video jacks connected to another component for grounding purposes.

Owner's Manual
Page 27
... input source. 2 Character display See Display on page 29. 3 MCACC indicator Lights when Acoustic Calibration EQ (page 37) is on (Acoustic Calibration EQ is automatically set to ALL CH ADJUST after the Auto MCACC Setup (page 12) or EQ Auto Setup (page 46) is complete). 4 ENTER 5 MULTI JOG dial Use the...
... input source. 2 Character display See Display on page 29. 3 MCACC indicator Lights when Acoustic Calibration EQ (page 37) is on (Acoustic Calibration EQ is automatically set to ALL CH ADJUST after the Auto MCACC Setup (page 12) or EQ Auto Setup (page 46) is complete). 4 ENTER 5 MULTI JOG dial Use the...

Owner's Manual
Page 28
... connected, there is no sound output from the speakers. 8 LISTENING MODE buttons STANDARD Press for Standard decoding and to select an Acoustic Calibration EQ setting (page 37). 18 BAND Switches between direct and stereo playback. STEREO/DIRECT (AUTO SURR) Switches between the tuner AM and FM bands (page ... reproduction of an analog input signal to prevent distortion. 15 SPEAKERS Use to change the speaker system (page 62) and to change the impedance setting (page 72). 16 EXTENDED MODE Selects the surround back channel mode (page 39) or virtual surround back mode (page 40). 17 ACOUSTIC EQ...
... connected, there is no sound output from the speakers. 8 LISTENING MODE buttons STANDARD Press for Standard decoding and to select an Acoustic Calibration EQ setting (page 37). 18 BAND Switches between direct and stereo playback. STEREO/DIRECT (AUTO SURR) Switches between the tuner AM and FM bands (page ... reproduction of an analog input signal to prevent distortion. 15 SPEAKERS Use to change the speaker system (page 62) and to change the impedance setting (page 72). 16 EXTENDED MODE Selects the surround back channel mode (page 39) or virtual surround back mode (page 40). 17 ACOUSTIC EQ...


