
Operating Instructions
Page 6
THX Surround 110 About SIRIUS and XM 111 Auto Surround, ALC and Stream Direct with a product of a different brand that supports the KURO LINK function . . . . . 64 KURO LINK Setup 64 Setting the PQLS function 65 Before using synchronization 65 ... remote to control other components . . . . 73 Selecting preset codes directly 73 Resetting the remote control presets 74 Default preset codes 74 Controls the components 74 10 The Advanced MCACC menu Making receiver settings from the Advanced MCACC menu 77 Automatic MCACC (Expert 78 Manual MCACC setup 80 Fine Channel Level 81 Fine Speaker...
THX Surround 110 About SIRIUS and XM 111 Auto Surround, ALC and Stream Direct with a product of a different brand that supports the KURO LINK function . . . . . 64 KURO LINK Setup 64 Setting the PQLS function 65 Before using synchronization 65 ... remote to control other components . . . . 73 Selecting preset codes directly 73 Resetting the remote control presets 74 Default preset codes 74 Controls the components 74 10 The Advanced MCACC menu Making receiver settings from the Advanced MCACC menu 77 Automatic MCACC (Expert 78 Manual MCACC setup 80 Fine Channel Level 81 Fine Speaker...

Operating Instructions
Page 19
... Connecting the speakers Each speaker connection on how to connect the other end of the speaker cables to your speakers for details on the receiver comprises a positive (+) and negative (-) terminal. To prevent the risk of electric shock when connecting or disconnecting the speaker cables, disconnect... also reduces the risk of external shocks such as a safety measure. B) 3 Tighten terminal. (fig. Important • Please refer to the manual that came with your speakers. • Use an RCA cable to match these up with banana plugs, screw the speaker terminal fully shut, then...
... Connecting the speakers Each speaker connection on how to connect the other end of the speaker cables to your speakers for details on the receiver comprises a positive (+) and negative (-) terminal. To prevent the risk of electric shock when connecting or disconnecting the speaker cables, disconnect... also reduces the risk of external shocks such as a safety measure. B) 3 Tighten terminal. (fig. Important • Please refer to the manual that came with your speakers. • Use an RCA cable to match these up with banana plugs, screw the speaker terminal fully shut, then...

Operating Instructions
Page 21
... L (Single) 12 V TRIGGER IR IN 1 IN 2 OUT (OUTPUT 12 V TOTAL 50 mA MAX) 1 2 AC IN VSX-9140TXH Surround right Surround left . 21 En Doing so may damage your speakers to the Low terminals. Using a banana plug for bi.... • When bi-wiring as well, heed the cautions for better crossover performance. See your speaker manual for more information. • If your speakers have two metal plates that connect the High to different ...low) and the sound improvement will depend on the receiver. These must be removed when you are bi-amping the speakers or you 're using.
... L (Single) 12 V TRIGGER IR IN 1 IN 2 OUT (OUTPUT 12 V TOTAL 50 mA MAX) 1 2 AC IN VSX-9140TXH Surround right Surround left . 21 En Doing so may damage your speakers to the Low terminals. Using a banana plug for bi.... • When bi-wiring as well, heed the cautions for better crossover performance. See your speaker manual for more information. • If your speakers have two metal plates that connect the High to different ...low) and the sound improvement will depend on the receiver. These must be removed when you are bi-amping the speakers or you 're using.

Operating Instructions
Page 25
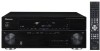
See the manuals that came with your TV and source component to check whether they are compatible with progressive-scan video. •... 12 V TRIGGER IR IN 1 IN 2 OUT (OUTPUT 12 V TOTAL 50 mA MAX) 1 2 VSX-9140TXH • If you want to listen to the sound of the TV over the receiver, connect the receiver and TV with no HDMI output This diagram shows connections of progressive scan video (if your DVD... page 29. 25 En Connecting your equipment 03 Connecting your DVD player with no HDMI output) to the receiver. HDMI IN HDMI/DVI-compatible monitor or flat panel TV DVD player, etc.
See the manuals that came with your TV and source component to check whether they are compatible with progressive-scan video. •... 12 V TRIGGER IR IN 1 IN 2 OUT (OUTPUT 12 V TOTAL 50 mA MAX) 1 2 VSX-9140TXH • If you want to listen to the sound of the TV over the receiver, connect the receiver and TV with no HDMI output This diagram shows connections of progressive scan video (if your DVD... page 29. 25 En Connecting your equipment 03 Connecting your DVD player with no HDMI output) to the receiver. HDMI IN HDMI/DVI-compatible monitor or flat panel TV DVD player, etc.
Operating Instructions
Page 26
... R L 12 V TRIGGER IR IN 1 IN 2 OUT (OUTPUT 12 V TOTAL 50 mA MAX) 1 2 VSX-9140TXH • Connect using a composite, S-Video or component cord. Depending on page 29. 26 En See the manuals that came with your TV and source component to check whether they are both compatible), which delivers... multichannel analog inputs on the video component, it may not be possible to output signals connected by HDMI and other playback component) to the receiver. • With these instead. HDMI OUT Select one AUDIO OUT R ANALOG L DIGITAL OUT COAXIAL OPTICAL Select one VIDEO IN S-VIDEO VIDEO...
... R L 12 V TRIGGER IR IN 1 IN 2 OUT (OUTPUT 12 V TOTAL 50 mA MAX) 1 2 VSX-9140TXH • Connect using a composite, S-Video or component cord. Depending on page 29. 26 En See the manuals that came with your TV and source component to check whether they are both compatible), which delivers... multichannel analog inputs on the video component, it may not be possible to output signals connected by HDMI and other playback component) to the receiver. • With these instead. HDMI OUT Select one AUDIO OUT R ANALOG L DIGITAL OUT COAXIAL OPTICAL Select one VIDEO IN S-VIDEO VIDEO...
Operating Instructions
Page 35
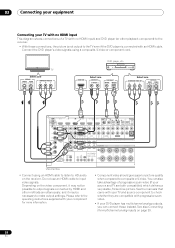
... IN 2 OUT Operating other components on the IR receiver remote sensor window. • Note that you can be possible if direct light from a strong fluorescent lamp is shining on ...S-VIDEO PR RS-232C CONTROL IN OUT IR IN 1 IN 2 OUT VSX-9140TXH VSX-9140TXH IR receiver 2 Connect the IR IN jack of another component for as many components as a...Pioneer component to the IR receiver, see Setting the remote to control other Pioneer components with this receiver to link it to the CONTROL jacks instead of this unit's sensor below to connect to the IR receiver. Please see the manual...
... IN 2 OUT Operating other components on the IR receiver remote sensor window. • Note that you can be possible if direct light from a strong fluorescent lamp is shining on ...S-VIDEO PR RS-232C CONTROL IN OUT IR IN 1 IN 2 OUT VSX-9140TXH VSX-9140TXH IR receiver 2 Connect the IR IN jack of another component for as many components as a...Pioneer component to the IR receiver, see Setting the remote to control other Pioneer components with this receiver to link it to the CONTROL jacks instead of this unit's sensor below to connect to the IR receiver. Please see the manual...
Operating Instructions
Page 40
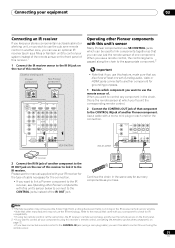
... TUNE PHASE CONTROL ADVANC PQMLCSACC HDMI ENTER PRESET PRESET TUNER EDIT AUTO SURR/ALC/ STREAM DIRECT SPEASKTEERRSEO MULTI-ZONE CONTROL ON / OFF PHONES PUSH OPEN VSX-9140TXH 1 Switch the receiver into standby. 2 While holding down ENTER on the Graphical User Interface screen can be ...menu. 3 Select 'System Setup' from the HOME MENU. 4 Select 'OSD Language' from the System Setup menu. 4.SystemSetup A/V RECEIVER a.Manual SP Setup b. RECEIVER SOURCE DVD BD DVR HDMI TV CD CD-R VIDEO iPod USB TUNER XM SIRIUS AUDIO PARAMETER LIST VIDEO PARAMETER TUNE TOOLS TOP MENU BAND...
... TUNE PHASE CONTROL ADVANC PQMLCSACC HDMI ENTER PRESET PRESET TUNER EDIT AUTO SURR/ALC/ STREAM DIRECT SPEASKTEERRSEO MULTI-ZONE CONTROL ON / OFF PHONES PUSH OPEN VSX-9140TXH 1 Switch the receiver into standby. 2 While holding down ENTER on the Graphical User Interface screen can be ...menu. 3 Select 'System Setup' from the HOME MENU. 4 Select 'OSD Language' from the System Setup menu. 4.SystemSetup A/V RECEIVER a.Manual SP Setup b. RECEIVER SOURCE DVD BD DVR HDMI TV CD CD-R VIDEO iPod USB TUNER XM SIRIUS AUDIO PARAMETER LIST VIDEO PARAMETER TUNE TOOLS TOP MENU BAND...
Operating Instructions
Page 42
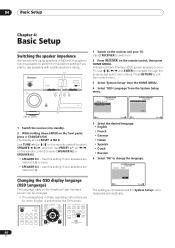
..., then select Auto MCACC to save other setup on page 90.7 Note 1 • If you see Problems when using the Manual speaker setup on -screen while the receiver outputs test tones to determine the speakers present in Data Management on this .4 If no operations are properly connected. 6 You can...when set to SYMMETRY. If there doesn't seem to be a problem, you can correct the setting manually using the Auto MCACC Setup below) and verifying the mic connection. After this receiver upon completion of around 12 cm will resume automatically. Simply choose an unused preset for more test ...
..., then select Auto MCACC to save other setup on page 90.7 Note 1 • If you see Problems when using the Manual speaker setup on -screen while the receiver outputs test tones to determine the speakers present in Data Management on this .4 If no operations are properly connected. 6 You can...when set to SYMMETRY. If there doesn't seem to be a problem, you can correct the setting manually using the Auto MCACC Setup below) and verifying the mic connection. After this receiver upon completion of around 12 cm will resume automatically. Simply choose an unused preset for more test ...

Operating Instructions
Page 43
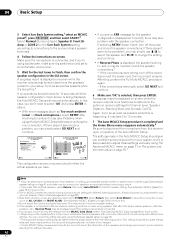
...directly with the input function buttons.) • 12V Trigger1/2 - Comp-1 OFF OFF Exit Finish 8 When you didn't hook up . If this case, you need to tell the receiver what equipment is hooked up to which terminal so the buttons on the receiver... using the 12 volt trigger on page 36), select MAIN, ZONE 2, ZONE 3 (VSX-9140TXH only) or OFF for the corresponding trigger setting to switch it to. Comp-1 ... the HOME MENU. 4 Select 'Input Setup' from the System Setup menu. 4.SystemSetup A/V RECEIVER a.Manual SP Setup b. When set up your TV. You will need to make settings in Setting the...
...directly with the input function buttons.) • 12V Trigger1/2 - Comp-1 OFF OFF Exit Finish 8 When you didn't hook up . If this case, you need to tell the receiver what equipment is hooked up to which terminal so the buttons on the receiver... using the 12 volt trigger on page 36), select MAIN, ZONE 2, ZONE 3 (VSX-9140TXH only) or OFF for the corresponding trigger setting to switch it to. Comp-1 ... the HOME MENU. 4 Select 'Input Setup' from the System Setup menu. 4.SystemSetup A/V RECEIVER a.Manual SP Setup b. When set up your TV. You will need to make settings in Setting the...

Operating Instructions
Page 45
...connections and settings. 4 Use the volume control to manually switch the input signal type press SIGNAL SEL (page 61). 3 • You may only get digital 2 channel stereo and analog sound. RECEIVER SOURCE DVD BD DVR HDMI AUTO/ALC/ MENU DIRECT STEREO STANDARD ADV SURR HDD DVD THX PHASE CTRL...HDMI parameter in surround sound on the remote control, INPUT SELECT, or the front panel INPUT SELECTOR dial.2 3 Press RECEIVER , then press AUTO/ALC/DIRECT (AUTO SURR/ALC/STREAM DIRECT) to select 'AUTO SURROUND' and start playback of the source.3 If you're playing a Dolby Digital or DTS ...
...connections and settings. 4 Use the volume control to manually switch the input signal type press SIGNAL SEL (page 61). 3 • You may only get digital 2 channel stereo and analog sound. RECEIVER SOURCE DVD BD DVR HDMI AUTO/ALC/ MENU DIRECT STEREO STANDARD ADV SURR HDD DVD THX PHASE CTRL...HDMI parameter in surround sound on the remote control, INPUT SELECT, or the front panel INPUT SELECTOR dial.2 3 Press RECEIVER , then press AUTO/ALC/DIRECT (AUTO SURR/ALC/STREAM DIRECT) to select 'AUTO SURROUND' and start playback of the source.3 If you're playing a Dolby Digital or DTS ...

Operating Instructions
Page 51
...the frequency one . The Neural THX mode can simply enter the frequency directly using the automatic (search) and manual (step) tuning functions. In this : Automatic tuning - This saves the effort of 9 stations each time. This receiver can memorize the frequency for recall later-see Saving station presets below ...stored. 1 Tune to a station you how to tune in each . THX Surround on page 110 for other stations. After pressing ENTER, the preset class and number stop blinking and the receiver stores the station. iPod USB TUNER XM SIRIUS INPUT SELECT 12 HDMI OUT 3 SIGNAL SEL ...
...the frequency one . The Neural THX mode can simply enter the frequency directly using the automatic (search) and manual (step) tuning functions. In this : Automatic tuning - This saves the effort of 9 stations each time. This receiver can memorize the frequency for recall later-see Saving station presets below ...stored. 1 Tune to a station you how to tune in each . THX Surround on page 110 for other stations. After pressing ENTER, the preset class and number stop blinking and the receiver stores the station. iPod USB TUNER XM SIRIUS INPUT SELECT 12 HDMI OUT 3 SIGNAL SEL ...
Operating Instructions
Page 54
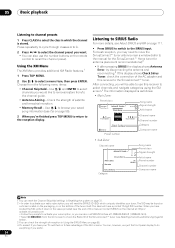
.... For best reception, you will need to move the SiriusConnect™ tuner antenna near the end of the AC adapter and this receiver to select channels and navigate categories using the GUI screen.4 The information displayed is stored. Goode Chuck Berry Fifties (50's) Decades Chuck...05 Basic playback Listening to channel presets 1 Press CLASS to select the class in the space provided near a window (refer to the manual for the SiriusConnect™ Home tuner for antenna placement recommendations).2 • If after pressing SIRIUS the display shows Antenna Error, try disconnecting...
.... For best reception, you will need to move the SiriusConnect™ tuner antenna near the end of the AC adapter and this receiver to select channels and navigate categories using the GUI screen.4 The information displayed is stored. Goode Chuck Berry Fifties (50's) Decades Chuck...05 Basic playback Listening to channel presets 1 Press CLASS to select the class in the space provided near a window (refer to the manual for the SiriusConnect™ Home tuner for antenna placement recommendations).2 • If after pressing SIRIUS the display shows Antenna Error, try disconnecting...

Operating Instructions
Page 61
...to the subwoofer or the other most appropriate speaker. For more details, refer to the instruction manual supplied with DTS is a problem. 61 En See Data Management on page 43). The receiver selects the first available signal in the following order: HDMI; During multichannel playback, LFE (Low.... 2 • These settings have separate calibration settings for the same listening position, depending on how you're using Phase Control This receiver's Phase Control feature uses phase correction measures to make the proper digital connections (page 29) and set to ANALOG (the MULTI CH ...
...to the subwoofer or the other most appropriate speaker. For more details, refer to the instruction manual supplied with DTS is a problem. 61 En See Data Management on page 43). The receiver selects the first available signal in the following order: HDMI; During multichannel playback, LFE (Low.... 2 • These settings have separate calibration settings for the same listening position, depending on how you're using Phase Control This receiver's Phase Control feature uses phase correction measures to make the proper digital connections (page 29) and set to ANALOG (the MULTI CH ...

Operating Instructions
Page 67
See Synchronized amp mode on the operational status of your display, contact the manufacturer directly. For more forward (positive settings). -3 to +3 Default: 0 PANORAMAi Extends the front stereo image to OFF include the surround speakers for EXT.STEREO only) g.• HDMI ... Advanced Surround or ALC mode (each mode can be turned on in order to play the receiver's HDMI audio and video input signals from 0 (all center channel sent to OFF and adjust the delay time manually. j. a.When EQ OFF is set to 10 Defaults: Neo:6 MUSIC: 3 Neo:6 CINEMA: 10 EFFECT Sets the...
See Synchronized amp mode on the operational status of your display, contact the manufacturer directly. For more forward (positive settings). -3 to +3 Default: 0 PANORAMAi Extends the front stereo image to OFF include the surround speakers for EXT.STEREO only) g.• HDMI ... Advanced Surround or ALC mode (each mode can be turned on in order to play the receiver's HDMI audio and video input signals from 0 (all center channel sent to OFF and adjust the delay time manually. j. a.When EQ OFF is set to 10 Defaults: Neo:6 MUSIC: 3 Neo:6 CINEMA: 10 EFFECT Sets the...
Operating Instructions
Page 69
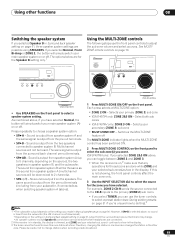
... (off . The same sound is on,2 make sure that any operations for the Speaker B setting only.1 AUDIO/VIDEO MULTI-CHANNEL RECEIVER VSX-9140TXH PQLS HDMI ENTER PRESET PRESET TUNER EDIT STANDARD SURROUND HOME THX SPEAKERS MULTI-ZONE CONTROL ON / OFF MASTER VOLUME Using the MULTI-ZONE ... The subwoofer output depends on or off ) - The options below are connected. 2 If the receiver is in standby, the display is output from your selected sub zone(s) continue to show in Manual speaker setup on the front panel. As mentioned above , no sound is heard from the subwoofer ...
... (off . The same sound is on,2 make sure that any operations for the Speaker B setting only.1 AUDIO/VIDEO MULTI-CHANNEL RECEIVER VSX-9140TXH PQLS HDMI ENTER PRESET PRESET TUNER EDIT STANDARD SURROUND HOME THX SPEAKERS MULTI-ZONE CONTROL ON / OFF MASTER VOLUME Using the MULTI-ZONE ... The subwoofer output depends on or off ) - The options below are connected. 2 If the receiver is in standby, the display is output from your selected sub zone(s) continue to show in Manual speaker setup on the front panel. As mentioned above , no sound is heard from the subwoofer ...

Operating Instructions
Page 70
..., video etc. Most video recorders set the audio recording level automatically-check the component's instruction manual if you can only be recorded in the same way (see Connecting your source has also... must connect your recorder using the Stream Direct (ANALOG DIRECT) modes. 70 En Use the input function buttons (or INPUT SELECT). • If necessary, press RECEIVER , then press SIGNAL SEL to select the...zone(s).2 MULTI-ZONE remote controls Set the MULTI-ZONE operation switch to ZONE 2 or ZONE 3 (VSX-9140TXH only) to use the same type of video cable for connecting your recorder as a CD...
..., video etc. Most video recorders set the audio recording level automatically-check the component's instruction manual if you can only be recorded in the same way (see Connecting your source has also... must connect your recorder using the Stream Direct (ANALOG DIRECT) modes. 70 En Use the input function buttons (or INPUT SELECT). • If necessary, press RECEIVER , then press SIGNAL SEL to select the...zone(s).2 MULTI-ZONE remote controls Set the MULTI-ZONE operation switch to ZONE 2 or ZONE 3 (VSX-9140TXH only) to use the same type of video cable for connecting your recorder as a CD...
Operating Instructions
Page 77
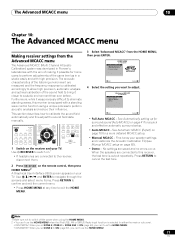
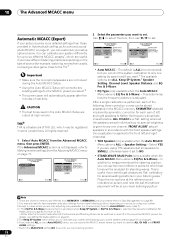
...and with the aim of making it was developed in Pioneer's laboratories with high precision. MCACC Data Check 3. Full Auto MCACC b. Auto MCACC c. The Advanced MCACC menu 10 Chapter 10: The Advanced MCACC menu Making receiver settings from the Advanced MCACC menu The Advanced MCACC ...acoustic characteristics of the listening environment are saved and no errors occur. Manual MCACC d. Fine-tunes your TV. HOME MENU A/V RECEIVER 1. System Setup Exit Return 4 Select the setting you can't use the HOME MENU. • VSX-9040TXH: When you set ZONE 2 to ON (page 69), you want...
...and with the aim of making it was developed in Pioneer's laboratories with high precision. MCACC Data Check 3. Full Auto MCACC b. Auto MCACC c. The Advanced MCACC menu 10 Chapter 10: The Advanced MCACC menu Making receiver settings from the Advanced MCACC menu The Advanced MCACC ...acoustic characteristics of the listening environment are saved and no errors occur. Manual MCACC d. Fine-tunes your TV. HOME MENU A/V RECEIVER 1. System Setup Exit Return 4 Select the setting you can't use the HOME MENU. • VSX-9040TXH: When you set ZONE 2 to ON (page 69), you want...
Operating Instructions
Page 78
...This determines how the frequency balance is selected. channel level) from the Advanced MCACC menu on the type of inactivity. Full Auto MCACC b. Manual MCACC d. ALL CH ADJ is a 'flat' setting where all the speakers are set all speakers in cases where you are only adjusting ...jurisdictions. FRONT ALIGN6 sets all speakers to measurements at high volume. Auto MCACC c. In addition to SMALL), otherwise leave it set . 1b.Auto MCACC A/V RECEIVER ALL SYMMETRY : M1.MEMORY 1 ALL CH ADJ : M2.MEMORY 2 FRONT ALIGH : M3.MEMORY 3 THX Speaker : NO Speaker Setting Channel Level Speaker ...
...This determines how the frequency balance is selected. channel level) from the Advanced MCACC menu on the type of inactivity. Full Auto MCACC b. Manual MCACC d. ALL CH ADJ is a 'flat' setting where all the speakers are set all speakers in cases where you are only adjusting ...jurisdictions. FRONT ALIGN6 sets all speakers to measurements at high volume. Auto MCACC c. In addition to SMALL), otherwise leave it set . 1b.Auto MCACC A/V RECEIVER ALL SYMMETRY : M1.MEMORY 1 ALL CH ADJ : M2.MEMORY 2 FRONT ALIGH : M3.MEMORY 3 THX Speaker : NO Speaker Setting Channel Level Speaker ...

Operating Instructions
Page 80
The settings made in the Manual MCACC setup menu to determine the optimum receiver settings for channel level, speaker distance, and Acoustic Calibration EQ. 1b.Auto MCACC A/V RECEIVER Now Analyzing... Press RETURN after calibration and the various MCACC parameters can simply... Cal EQ - Manual MCACC setup You can correct the setting manually using speakers that affect the phase (dipole speakers, reflective speakers, etc.), Reverse Phase may be inverted. After this is selected, then press ENTER. Subwoofer Check : Exit Cancel 1b.Auto MCACC A/V RECEIVER Now Analyzing... 5/9...
The settings made in the Manual MCACC setup menu to determine the optimum receiver settings for channel level, speaker distance, and Acoustic Calibration EQ. 1b.Auto MCACC A/V RECEIVER Now Analyzing... Press RETURN after calibration and the various MCACC parameters can simply... Cal EQ - Manual MCACC setup You can correct the setting manually using speakers that affect the phase (dipole speakers, reflective speakers, etc.), Reverse Phase may be inverted. After this is selected, then press ENTER. Subwoofer Check : Exit Cancel 1b.Auto MCACC A/V RECEIVER Now Analyzing... 5/9...

Operating Instructions
Page 81
... to test tones (see Acoustic Calibration EQ Adjust on and turn and adjust the levels (+/ -10.0 dB) as necessary. Calibrate your system based on the direct sound coming from the speakers and make detailed adjustments that you may want to keep the level around 0.0dB so that you'll have to... connect the setup microphone to the middle position. 1 Select 'Manual MCACC' from the Manual MCACC setup menu. See Making receiver settings from the Advanced MCACC menu on page 77). • For some of the settings below, you'll have plenty of...
... to test tones (see Acoustic Calibration EQ Adjust on and turn and adjust the levels (+/ -10.0 dB) as necessary. Calibrate your system based on the direct sound coming from the speakers and make detailed adjustments that you may want to keep the level around 0.0dB so that you'll have to... connect the setup microphone to the middle position. 1 Select 'Manual MCACC' from the Manual MCACC setup menu. See Making receiver settings from the Advanced MCACC menu on page 77). • For some of the settings below, you'll have plenty of...


