Owner's Manual
Page 1
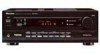
AUDIO/VIDEO MULTI-CHANNEL RECEIVER VSX-D209 Operating Instructions
AUDIO/VIDEO MULTI-CHANNEL RECEIVER VSX-D209 Operating Instructions

Owner's Manual
Page 2
... with the instructions, may cause harmful interference to which can cause a fire or give you find it damaged, ask your nearest PIONEER authorized service center or your dealer for your model properly. POWER-CORD CAUTION Handle the power cord by turning the equipment off dust... IMPORTANT The lightning flash with other chemicals on or near this equipment does cause harmful interference to radio or television reception, which the receiver is encouraged to try to persons. This equipment has been tested and found to comply with a soft cloth dipped in a residential installation...
... with the instructions, may cause harmful interference to which can cause a fire or give you find it damaged, ask your nearest PIONEER authorized service center or your dealer for your model properly. POWER-CORD CAUTION Handle the power cord by turning the equipment off dust... IMPORTANT The lightning flash with other chemicals on or near this equipment does cause harmful interference to radio or television reception, which the receiver is encouraged to try to persons. This equipment has been tested and found to comply with a soft cloth dipped in a residential installation...
Owner's Manual
Page 5
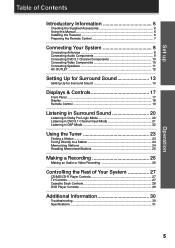
SSetetupup OpOerpaetriaotnion Table of Contents Introductory Information 6 Checking the Supplied Accessories 6 Using this Manual 6 Installing the Receiver 6 Preparing the Remote Control 7 Connecting Your System 8 Connecting Antennas 8 Connecting Audio Components 9 Connecting DVD 5.1 Channel Components 10 Connecting Video Components 10 Connecting Speakers 11 AC ...
SSetetupup OpOerpaetriaotnion Table of Contents Introductory Information 6 Checking the Supplied Accessories 6 Using this Manual 6 Installing the Receiver 6 Preparing the Remote Control 7 Connecting Your System 8 Connecting Antennas 8 Connecting Audio Components 9 Connecting DVD 5.1 Channel Components 10 Connecting Video Components 10 Connecting Speakers 11 AC ...
Owner's Manual
Page 6
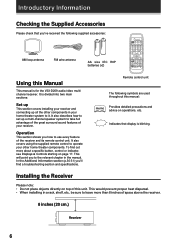
...covers using the supplied remote control to take full advantage of the great surround sound features of this Manual This manual is for the VSX-D209 audio/video multichannel receiver. TAPE MD CD-R ! $ $ ! 1 2 3 4 * 5 6 TV VOL. It also describes how to set... 8 CHANNEL STATION D. Introductory Information Checking the Supplied Accessories Please check that display is blinking. Operation This section shows you 've received the following symbols are used throughout this manual: memo Provides detailed precautions and advice on page 17. It is divided into two ...
...covers using the supplied remote control to take full advantage of the great surround sound features of this Manual This manual is for the VSX-D209 audio/video multichannel receiver. TAPE MD CD-R ! $ $ ! 1 2 3 4 * 5 6 TV VOL. It also describes how to set... 8 CHANNEL STATION D. Introductory Information Checking the Supplied Accessories Please check that display is blinking. Operation This section shows you 've received the following symbols are used throughout this manual: memo Provides detailed precautions and advice on page 17. It is divided into two ...
Owner's Manual
Page 7
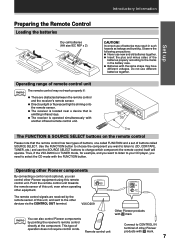
...together. ¶ Insert the plus and minus sides of the batteries properly according to the marks in such hazards as leakage and bursting. VSX-D209 Other Pioneer products with Î mark. 7 Observe the following precautions: ¶ Never use of other devices via the CONTROL OUT terminal. Do ...may result in the battery case. ¶ Batteries with the same shape may not work properly if: ¶ There are received by pointing the receiver's remote control directly at the component. This type of buttons called SOURCE SELECT. Use the FUNCTION button to choose the component ...
...together. ¶ Insert the plus and minus sides of the batteries properly according to the marks in such hazards as leakage and bursting. VSX-D209 Other Pioneer products with Î mark. 7 Observe the following precautions: ¶ Never use of other devices via the CONTROL OUT terminal. Do ...may result in the battery case. ¶ Batteries with the same shape may not work properly if: ¶ There are received by pointing the receiver's remote control directly at the component. This type of buttons called SOURCE SELECT. Use the FUNCTION button to choose the component ...
Owner's Manual
Page 8
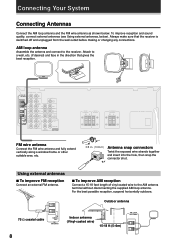
... antenna Connect the FM wire antenna and fully extend vertically along a window frame or other suitable area, etc. 3/8 in the direction that the receiver is switched off and unplugged from the wall outlet before making or changing any connections. Attach to a wall, etc. (if desired) and face... FM reception Connect an external FM antenna. 7 To improve AM reception Connect a 15-18 feet length of vinyl-coated wire to the receiver. AM loop antenna Assemble the antenna and connect to the AM antenna terminal without disconnecting the supplied AM loop antenna. Outdoor antenna 75 Ω...
... antenna Connect the FM wire antenna and fully extend vertically along a window frame or other suitable area, etc. 3/8 in the direction that the receiver is switched off and unplugged from the wall outlet before making or changing any connections. Attach to a wall, etc. (if desired) and face... FM reception Connect an external FM antenna. 7 To improve AM reception Connect a 15-18 feet length of vinyl-coated wire to the receiver. AM loop antenna Assemble the antenna and connect to the AM antenna terminal without disconnecting the supplied AM loop antenna. Outdoor antenna 75 Ω...

Owner's Manual
Page 9
... connecting equipment, always make sure the power switched off and the power cord is placed, noise caused by leakage flux from the transformer in the receiver may occur during playback. Connect red plugs to R (right), white plugs to VIDINEO L (left), and the yellow plugs to push home the plugs into their... Your System Connecting Audio Components Connect your audio components as shown below. R Cassette deck placement Depending on where the cassette deck is disconnected from the receiver. 9
... connecting equipment, always make sure the power switched off and the power cord is placed, noise caused by leakage flux from the transformer in the receiver may occur during playback. Connect red plugs to R (right), white plugs to VIDINEO L (left), and the yellow plugs to push home the plugs into their... Your System Connecting Audio Components Connect your audio components as shown below. R Cassette deck placement Depending on where the cassette deck is disconnected from the receiver. 9

Owner's Manual
Page 10
... L R SURROUND OUT PUT L SUB WOOFER CENTER VODEO OUT R Components equipped with both 2 channel and 5.1 channel audio output formats. When connecting equipment, make sure that the receiver is switched off and the power cord disconnected from a DVD player, multi channel decoder equipped with 5.1 analog outputs to switch between the two input methods...
... L R SURROUND OUT PUT L SUB WOOFER CENTER VODEO OUT R Components equipped with both 2 channel and 5.1 channel audio output formats. When connecting equipment, make sure that the receiver is switched off and the power cord disconnected from a DVD player, multi channel decoder equipped with 5.1 analog outputs to switch between the two input methods...

Owner's Manual
Page 11
... FRONT SPEAKERS RL CENTER SPEAKER SURROUND SPEAKERS RL AC OUTLET Surround (left) Speaker terminals Use good quality speaker wire to connect the speakers to the receiver. 1 Twist around 1/2 inch of 8 Ω to 16 Ω. When connecting equipment, always make sure the power switched off and the power cord is disconnected from...
... FRONT SPEAKERS RL CENTER SPEAKER SURROUND SPEAKERS RL AC OUTLET Surround (left) Speaker terminals Use good quality speaker wire to connect the speakers to the receiver. 1 Twist around 1/2 inch of 8 Ω to 16 Ω. When connecting equipment, always make sure the power switched off and the power cord is disconnected from...

Owner's Manual
Page 12
... near a wall; Some are installed securely to get the most out of connected equipment should be placed on and off by the receiver's STANDBY/ ON button. To achieve the best possible surround sound, install your particular speakers to prevent accidents and improve sound quality. ... best. memo • This unit should not exceed 100 W (0.8 A). Follow the guidelines on . CAUTION! Doing so can also cause the receiver to be floorstanding, while others should be placed away from the listening position than the front and center speakers. Do not connect a heater, TV...
... near a wall; Some are installed securely to get the most out of connected equipment should be placed on and off by the receiver's STANDBY/ ON button. To achieve the best possible surround sound, install your particular speakers to prevent accidents and improve sound quality. ... best. memo • This unit should not exceed 100 W (0.8 A). Follow the guidelines on . CAUTION! Doing so can also cause the receiver to be floorstanding, while others should be placed away from the listening position than the front and center speakers. Do not connect a heater, TV...
Owner's Manual
Page 13
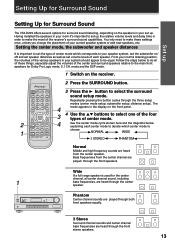
...3 3 STEREO2 3 PHANTOM2 Normal Middle and high frequency sounds are heard through the front stereo speakers. 13 You only need to make the most of the receiver's surround sound capabilities. mode and the DSP mode. 1 Switch on / off and set speaker distances as well as set volume levels of each center mode...-R ! $ $ ! 1 2 3 4 TV FUNC. @ * & # 5 6 7 8 TV VOL. Follow the steps below explaining each speaker. Set up Setting Up for Surround Sound Setting Up for Surround Sound The VSX-D209 offers several options for Dolby Pro Logic mode, 5.1 CH.
...3 3 STEREO2 3 PHANTOM2 Normal Middle and high frequency sounds are heard through the front stereo speakers. 13 You only need to make the most of the receiver's surround sound capabilities. mode and the DSP mode. 1 Switch on / off and set speaker distances as well as set volume levels of each center mode...-R ! $ $ ! 1 2 3 4 TV FUNC. @ * & # 5 6 7 8 TV VOL. Follow the steps below explaining each speaker. Set up Setting Up for Surround Sound Setting Up for Surround Sound The VSX-D209 offers several options for Dolby Pro Logic mode, 5.1 CH.

Owner's Manual
Page 14
...and the surround speakers should arrive to make the distance settings if your front and surround speakers are finished setting up the delay time the receiver will allow for 6, 8,10 this. Alternatively, you can set the distance accordingly. ACCESS TOP MENU FQ CLASS MENU TEST TONE SORROUND ENTER... FQ MPX SET UP 2 DSP MODE MUTING CH. Telling the receiver how far your system has surround speakers. 14 For true surround sound effect the sound from your front speakers. You can set the ...
...and the surround speakers should arrive to make the distance settings if your front and surround speakers are finished setting up the delay time the receiver will allow for 6, 8,10 this. Alternatively, you can set the distance accordingly. ACCESS TOP MENU FQ CLASS MENU TEST TONE SORROUND ENTER... FQ MPX SET UP 2 DSP MODE MUTING CH. Telling the receiver how far your system has surround speakers. 14 For true surround sound effect the sound from your front speakers. You can set the ...

Owner's Manual
Page 15
... FL DIMMER MASTER VOLUME AV MULTI-CHANNEL RECEIVER REMOTE CONTROL UNIT Î 3 Press the CH. Adjust the speaker volume so it seems the same as the previous speaker from your normal listening position. ... MENU TEST TONE SORROUND ENTER FQ MPX SET UP 2 DSP MODE MUTING CH. EFFECT 9 0 $ ! 3 4 & # 7 8 CHANNEL STATION D. SELECT button. SELECT LEVEL RECEIVER FUNCTION FL DIMMER MASTER VOLUME AV MULTI-CHANNEL RECEIVER REMOTE CONTROL UNIT Î 2 Press the SURROUND button. 3 Press the TEST TONE button. Setting up speaker levels for the subwoofer •...
... FL DIMMER MASTER VOLUME AV MULTI-CHANNEL RECEIVER REMOTE CONTROL UNIT Î 3 Press the CH. Adjust the speaker volume so it seems the same as the previous speaker from your normal listening position. ... MENU TEST TONE SORROUND ENTER FQ MPX SET UP 2 DSP MODE MUTING CH. EFFECT 9 0 $ ! 3 4 & # 7 8 CHANNEL STATION D. SELECT button. SELECT LEVEL RECEIVER FUNCTION FL DIMMER MASTER VOLUME AV MULTI-CHANNEL RECEIVER REMOTE CONTROL UNIT Î 2 Press the SURROUND button. 3 Press the TEST TONE button. Setting up speaker levels for the subwoofer •...

Owner's Manual
Page 16
... in . ACCESS TOP MENU FQ CLASS MENU TEST TONE SORROUND ENTER FQ MPX SET UP 2 DSP MODE MUTING CH. SELECT LEVEL RECEIVER FUNCTION FL DIMMER MASTER VOLUME AV MULTI-CHANNEL RECEIVER REMOTE CONTROL UNIT Î 1 Use the DSP MODE button to a moderate level. 3 Press the CH. You can set in your normal...
... in . ACCESS TOP MENU FQ CLASS MENU TEST TONE SORROUND ENTER FQ MPX SET UP 2 DSP MODE MUTING CH. SELECT LEVEL RECEIVER FUNCTION FL DIMMER MASTER VOLUME AV MULTI-CHANNEL RECEIVER REMOTE CONTROL UNIT Î 1 Use the DSP MODE button to a moderate level. 3 Press the CH. You can set in your normal...
Owner's Manual
Page 17
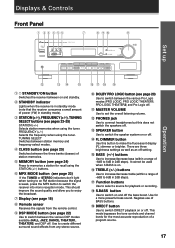
...tuning to an FM station because the signal is weak, press the MPX button to switch between on and standby. 2 STANDBY indicator Lights when the receiver is on or off setting. @ BASS (+/-) buttons Use to increase/decrease bass (within a range of a program source. 17 Set up Operation... = ~! @ 1 STANDBY/ON button Switches the receiver between the various DSP modes available (HALL, JAZZ, DANCE, THEATER1, THEATER2) and DSP off . - There are three brightness settings as well as an off...
...tuning to an FM station because the signal is weak, press the MPX button to switch between on and standby. 2 STANDBY indicator Lights when the receiver is on or off setting. @ BASS (+/-) buttons Use to increase/decrease bass (within a range of a program source. 17 Set up Operation... = ~! @ 1 STANDBY/ON button Switches the receiver between the various DSP modes available (HALL, JAZZ, DANCE, THEATER1, THEATER2) and DSP off . - There are three brightness settings as well as an off...

Owner's Manual
Page 18
.... 7 SPEAKER indicator Shows if the speaker system is on (see page 20). 2 DSP indicator Lights when any Dolby Pro Logic mode is being received. This function bypasses all tone, balance, DSP and Dolby Surround effects. 4 MONITOR indicator Lights when MONITOR is using the MPX MODE button (see page..., DANCE, THEATER1 and THEATER2) after selection (see note % page.17). 9 CHARACTER display Shows the radio frequency or function (DVD/LD, CD, etc.) receiver is selected to hear a recording as it's being received in auto stereo mode. 6 MASTER VOLUME LEVEL Shows the overall volume level.
.... 7 SPEAKER indicator Shows if the speaker system is on (see page 20). 2 DSP indicator Lights when any Dolby Pro Logic mode is being received. This function bypasses all tone, balance, DSP and Dolby Surround effects. 4 MONITOR indicator Lights when MONITOR is using the MPX MODE button (see page..., DANCE, THEATER1 and THEATER2) after selection (see note % page.17). 9 CHARACTER display Shows the radio frequency or function (DVD/LD, CD, etc.) receiver is selected to hear a recording as it's being received in auto stereo mode. 6 MASTER VOLUME LEVEL Shows the overall volume level.

Owner's Manual
Page 19
...volumes for deck 1 of setting the speaker levels (see page 15 & 2324) Use this button to put the remote control (NOT the receiver) in tuner mode. In particular, it's used to select the type of center mode, turn to input a station directly. SELECT button... button (see page. 13-16). These buttons are three brightness settings as well as an off subwoofer option and select delay time for PIONEER components connected to the VSX-D209. 2 NUMBER/PLAYER COMMAND buttons (see page. 25, 29) Use to set the relative speaker volumes. Displays & Controls Operation Remote Control 1 2 3...
...volumes for deck 1 of setting the speaker levels (see page 15 & 2324) Use this button to put the remote control (NOT the receiver) in tuner mode. In particular, it's used to select the type of center mode, turn to input a station directly. SELECT button... button (see page. 13-16). These buttons are three brightness settings as well as an off subwoofer option and select delay time for PIONEER components connected to the VSX-D209. 2 NUMBER/PLAYER COMMAND buttons (see page. 25, 29) Use to set the relative speaker volumes. Displays & Controls Operation Remote Control 1 2 3...
Owner's Manual
Page 20
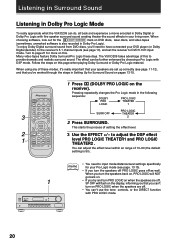
... back on this. EFFECT 9 0 $ ! 3 4 & # 7 8 CHANNEL STATION D. Listening in Surround Sound Listening in Dolby Pro Logic Mode To really appreciate what the VSX-D209 can adjust the effect level within an range of 10-90 (the default settinig is also recorded in Dolby Pro Logic). The... VSX-D209 takes advantage of this page when playing Dolby Surround or Dolby Pro Logic material. To enjoy Dolby Digital surround sound from DVD discs, you'll need to have connected your DVD player (or Dolby Digital decoder) to the receiver's 5.1 channel inputs (see page...
... back on this. EFFECT 9 0 $ ! 3 4 & # 7 8 CHANNEL STATION D. Listening in Surround Sound Listening in Dolby Pro Logic Mode To really appreciate what the VSX-D209 can adjust the effect level within an range of 10-90 (the default settinig is also recorded in Dolby Pro Logic). The... VSX-D209 takes advantage of this page when playing Dolby Surround or Dolby Pro Logic material. To enjoy Dolby Digital surround sound from DVD discs, you'll need to have connected your DVD player (or Dolby Digital decoder) to the receiver's 5.1 channel inputs (see page...
Owner's Manual
Page 21
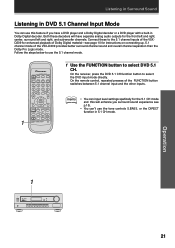
...and the other inputs. Operation 1 21 EFFECT 9 0 $ ! 3 4 & # 7 8 CHANNEL STATION D. On the receiver, press the DVD 5.1 CH function button to select DVD 5.1 CH. SELECT LEVEL RECEIVER FUNCTION FL DIMMER MASTER VOLUME AV MULTI-CHANNEL RECEIVER REMOTE CONTROL UNIT Î 1 Use the FUNCTION button to select the DVD input mode directly...CH mode and this feature if you have separate analog audio outputs for instructions on connecting up. 5.1 channel mode of the VSX-D209 provides better surround-channel sound and overall channel separation than the Dolby Pro Logic mode.
...and the other inputs. Operation 1 21 EFFECT 9 0 $ ! 3 4 & # 7 8 CHANNEL STATION D. On the receiver, press the DVD 5.1 CH function button to select DVD 5.1 CH. SELECT LEVEL RECEIVER FUNCTION FL DIMMER MASTER VOLUME AV MULTI-CHANNEL RECEIVER REMOTE CONTROL UNIT Î 1 Use the FUNCTION button to select the DVD input mode directly...CH mode and this feature if you have separate analog audio outputs for instructions on connecting up. 5.1 channel mode of the VSX-D209 provides better surround-channel sound and overall channel separation than the Dolby Pro Logic mode.

Owner's Manual
Page 22
Long delay and reverb decay times create a sense of music being played in the following sequence: TV CONT. SELECT LEVEL RECEIVER FUNCTION FL DIMMER MASTER VOLUME 3 Use the EFFECT +/- You can 't use the tone controls, or the DIRECT function with DSP mode. 22 TAPE MD CD-R 3 $...DSP on when the speakes are off . • You can adjust the effect level within an range of 10-90 (the default AV MULTI-CHANNEL RECEIVER REMOTE CONTROL UNIT Î settinig is to adjust the 1 DSP effect level. JAZZ Simulates the acoustic environment of a large classical concert hall. DANCE...
Long delay and reverb decay times create a sense of music being played in the following sequence: TV CONT. SELECT LEVEL RECEIVER FUNCTION FL DIMMER MASTER VOLUME 3 Use the EFFECT +/- You can 't use the tone controls, or the DIRECT function with DSP mode. 22 TAPE MD CD-R 3 $...DSP on when the speakes are off . • You can adjust the effect level within an range of 10-90 (the default AV MULTI-CHANNEL RECEIVER REMOTE CONTROL UNIT Î settinig is to adjust the 1 DSP effect level. JAZZ Simulates the acoustic environment of a large classical concert hall. DANCE...


