User Manual
Page 9
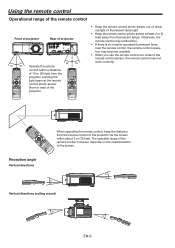
... sensor, the remote control may become unstable. • When you use the remote control too close to the projector via the screen within a distance of 10 m (30 feet) from the projector, pointing the light beam at the remote control photo-sensor (front or rear) of the projector. • Keep the remote... may not work correctly. The operable range of the remote control, however, depends on the characteristics of the screen. Reception angle Vertical directions 20° 10° 20° 10° Vertical directions (ceiling mount) 20° 20° EN-9
... sensor, the remote control may become unstable. • When you use the remote control too close to the projector via the screen within a distance of 10 m (30 feet) from the projector, pointing the light beam at the remote control photo-sensor (front or rear) of the projector. • Keep the remote... may not work correctly. The operable range of the remote control, however, depends on the characteristics of the screen. Reception angle Vertical directions 20° 10° 20° 10° Vertical directions (ceiling mount) 20° 20° EN-9
User Manual
Page 11
...or 20 inches) away from BEIGE, LIGHT BLUE, LIGHT GREEN, PINK, BLACK BOARD and OFF depending on the remote control. When you need the ceiling mount kit designed for installation. See page 24. • When the projector is unavailable. 4. tude of 1500 meters or higher may appear darker than +... not use of any damage caused by an air conditioning. Ask a specialist for this projector does not cover any non-recommended ceiling mount kit or installation of the ceiling mount kit in an improper location. • When using the projector at an alti- See page 24. Use at an altitude ...
...or 20 inches) away from BEIGE, LIGHT BLUE, LIGHT GREEN, PINK, BLACK BOARD and OFF depending on the remote control. When you need the ceiling mount kit designed for installation. See page 24. • When the projector is unavailable. 4. tude of 1500 meters or higher may appear darker than +... not use of any damage caused by an air conditioning. Ask a specialist for this projector does not cover any non-recommended ceiling mount kit or installation of the ceiling mount kit in an improper location. • When using the projector at an alti- See page 24. Use at an altitude ...
User Manual
Page 24
... the splash screen will be displayed. When IMAGE is selected, the splash screen will be displayed. Choose ON when using the projector mounted on the ceiling. • Regardless of the setting of the screen with the projector installed on . Select when viewing images projected from the front with...Select when viewing images projected from the source. When selecting any option depending on the color of the screen with the projector installed on the ceiling. • The projector is turned on the floor. Use to set to SPLASH ID SCREEN to enable the password lock. &#...
... the splash screen will be displayed. When IMAGE is selected, the splash screen will be displayed. Choose ON when using the projector mounted on the ceiling. • Regardless of the setting of the screen with the projector installed on . Select when viewing images projected from the front with...Select when viewing images projected from the source. When selecting any option depending on the color of the screen with the projector installed on the ceiling. • The projector is turned on the floor. Use to set to SPLASH ID SCREEN to enable the password lock. &#...
User Manual
Page 38
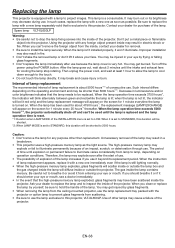
... shorted. *2: When LAMP MODE is set to be shorted to use . It may get injured by glass fragments. • When removing the lamp from the ceiling-mounted projector, use the lamp replacement tray packed with the projector or option lamp to prevent glass fragments from lamp to inspect the inside of the...
... shorted. *2: When LAMP MODE is set to be shorted to use . It may get injured by glass fragments. • When removing the lamp from the ceiling-mounted projector, use the lamp replacement tray packed with the projector or option lamp to prevent glass fragments from lamp to inspect the inside of the...
User Manual
Page 39
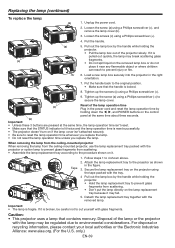
... the tape packed with the removed lamp. Attach the lamp replacement tray to 4 shown above. 2. When removing the lamp from the ceiling-mounted projector When removing the lamp from the ceiling-mounted projector, use the lamp replacement tray packed with the projector or option lamp to the procedure shown on the lamp replacement tray...
... the tape packed with the removed lamp. Attach the lamp replacement tray to 4 shown above. 2. When removing the lamp from the ceiling-mounted projector When removing the lamp from the ceiling-mounted projector, use the lamp replacement tray packed with the projector or option lamp to the procedure shown on the lamp replacement tray...