

User Manual
Page 3
......15 Image adjustment ...18 Advanced feature...20 Lamp replacement ...22 Troubleshooting ...23 Indicators ...26 Specifications ...27 Declaration of Conformity Model Number : XD110U/XD110R/SD110U/SD110R Trade Name : MITSUBISHI ELECTRIC Responsible party :... Mitsubishi Digital Electronics America, Inc. 9351 Jeronimo Road, Irvine, CA 92618 U.S.A Telephone number : +1-(949) 465-6000 This device complies with Part 15 of their respective holders. Other brand or product names are all trademarks of Apple Computer Inc. DLP...
......15 Image adjustment ...18 Advanced feature...20 Lamp replacement ...22 Troubleshooting ...23 Indicators ...26 Specifications ...27 Declaration of Conformity Model Number : XD110U/XD110R/SD110U/SD110R Trade Name : MITSUBISHI ELECTRIC Responsible party :... Mitsubishi Digital Electronics America, Inc. 9351 Jeronimo Road, Irvine, CA 92618 U.S.A Telephone number : +1-(949) 465-6000 This device complies with Part 15 of their respective holders. Other brand or product names are all trademarks of Apple Computer Inc. DLP...

User Manual
Page 5
...and bottom plate. The heated air outlet grilles and bottom plate may cause trouble or explosion of the lamp. • Do not place the projector near any heat-producing device under the projector to Part 15 of installation For safety's sake, do not put any equipment that to radio or... air-conditioning unit or heater to avoid the air outlet and inlet grilles from being exposed to lamp breakage, fire, electric shock or other equipment. Do not modify the projector. If the projector is dropped and the cabinet is operating. Do not block the air inlet and outlet grilles. ENGLISH...
...and bottom plate. The heated air outlet grilles and bottom plate may cause trouble or explosion of the lamp. • Do not place the projector near any heat-producing device under the projector to Part 15 of installation For safety's sake, do not put any equipment that to radio or... air-conditioning unit or heater to avoid the air outlet and inlet grilles from being exposed to lamp breakage, fire, electric shock or other equipment. Do not modify the projector. If the projector is dropped and the cabinet is operating. Do not block the air inlet and outlet grilles. ENGLISH...

User Manual
Page 7
ENGLISH Bottom side 3 1 2 Remote control 14 1 13 2 3 12 10 5 4 11 9 8 7 6 This model does not have this function. 1 Lamp cover 2 Adjustment feet (rear) 3 Adjustment feet (front) Caution: Do not replace the lamp immediately after using the projector because the lamp would be extremely hot and it may cause burns. 1 ON button 2 STILL button 3 AUTO POSITION button...
ENGLISH Bottom side 3 1 2 Remote control 14 1 13 2 3 12 10 5 4 11 9 8 7 6 This model does not have this function. 1 Lamp cover 2 Adjustment feet (rear) 3 Adjustment feet (front) Caution: Do not replace the lamp immediately after using the projector because the lamp would be extremely hot and it may cause burns. 1 ON button 2 STILL button 3 AUTO POSITION button...

User Manual
Page 12
... Use the appropriate cord for protecting the lens. Caution: • Plug in the wall outlet. 3. Press the foot adjustment buttons next to the projector. 2. button on a flat screen installed at 120 V. Press the S (or +) button. Plug the power cord in the power cord firmly..., not the power cord. • Do not plug in the keystone adjustment varies depending on the installation conditions of the lamp. Note that position. 4. For SD110U/SD110R only • When the 720p or 1080i signal is indicated. Important: • If necessary, rotate the adjustment feet (front...
... Use the appropriate cord for protecting the lens. Caution: • Plug in the wall outlet. 3. Press the foot adjustment buttons next to the projector. 2. button on a flat screen installed at 120 V. Press the S (or +) button. Plug the power cord in the power cord firmly..., not the power cord. • Do not plug in the keystone adjustment varies depending on the installation conditions of the lamp. Note that position. 4. For SD110U/SD110R only • When the 720p or 1080i signal is indicated. Important: • If necessary, rotate the adjustment feet (front...

User Manual
Page 13
...Indicator STATUS - The selected signal format is on the remote control to the projector first. 2. Choose your projector, please do not display the same stationary images for long period. 6. In this case, wait for the lamp to light up . During the warm-up when the POWER button is turned ...images supplied from VIDEO to light the indicator. 3. Wait a few minutes and try to light the lamp again. • After the POWER button is pressed, the image may flicker before the projector is cooled down completely after turn-on the screen. • The COMPUTER and VIDEO buttons don't ...
...Indicator STATUS - The selected signal format is on the remote control to the projector first. 2. Choose your projector, please do not display the same stationary images for long period. 6. In this case, wait for the lamp to light up . During the warm-up when the POWER button is turned ...images supplied from VIDEO to light the indicator. 3. Wait a few minutes and try to light the lamp again. • After the POWER button is pressed, the image may flicker before the projector is cooled down completely after turn-on the screen. • The COMPUTER and VIDEO buttons don't ...

User Manual
Page 14
.... The STATUS indicator will go out and the STATUS indicator will start blinking. • Though the lamp goes out at this projector just by pressing the 16:9 button again. To light the lamp again, press the POWER button (or OFF button). Press the AUTO POSITION button. • If ... out. Important: • When a letterboxed image is running, turn off the projector. 1. Then unplug the power cord from the wall outlet. • The lamp can turn on , allow the projector to cool down the projector while the STATUS indicator is blink- To cancel muting, press the MUTE button again...
.... The STATUS indicator will go out and the STATUS indicator will start blinking. • Though the lamp goes out at this projector just by pressing the 16:9 button again. To light the lamp again, press the POWER button (or OFF button). Press the AUTO POSITION button. • If ... out. Important: • When a letterboxed image is running, turn off the projector. 1. Then unplug the power cord from the wall outlet. • The lamp can turn on , allow the projector to cool down the projector while the STATUS indicator is blink- To cancel muting, press the MUTE button again...
User Manual
Page 15
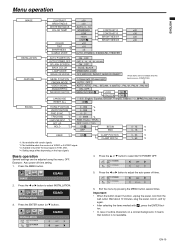
... ±10 TINT *1 ±10 SHARPNESS *1 ±5 GAMMA MODE AUTO, DYNAMIC, STANDARD, THEATER INSTALLATION FEATURE AUTO POWER ON AUTO POWER OFF SPLASH SCREEN BACK COLOR LAMP MODE IMAGE REVERSE MENU POSITION CINEMA MODE *3 VIDEO SIGNAL ANAMORPHIC PASSWORD FUNCTION LANGUAGE RESET ALL ON , OFF OFF, 5, 10, 15, 30, 60 min ON , OFF...
... ±10 TINT *1 ±10 SHARPNESS *1 ±5 GAMMA MODE AUTO, DYNAMIC, STANDARD, THEATER INSTALLATION FEATURE AUTO POWER ON AUTO POWER OFF SPLASH SCREEN BACK COLOR LAMP MODE IMAGE REVERSE MENU POSITION CINEMA MODE *3 VIDEO SIGNAL ANAMORPHIC PASSWORD FUNCTION LANGUAGE RESET ALL ON , OFF OFF, 5, 10, 15, 30, 60 min ON , OFF...

User Manual
Page 16
...flicker. Choose ON opt. LAMP MODE Use to turn -on the lamp. Use the remote control to change the setting of LAMP MODE frequently. • When LAMP MODE has been set the time elapsed before the projector enters the stand-by mode when the lamp is reduced, resulting in the... contrast. Select MIRROR for normal use , select AUTO. When LOW is chosen, the lamp brightness is kept low and the projector operating noise is off. Select AUTO for rear projection with the tabletop-mounted projector. Menu operation (continued) 1 IMAGE CONTRAST Use to adjust the image brightness.
...flicker. Choose ON opt. LAMP MODE Use to turn -on the lamp. Use the remote control to change the setting of LAMP MODE frequently. • When LAMP MODE has been set the time elapsed before the projector enters the stand-by mode when the lamp is reduced, resulting in the... contrast. Select MIRROR for normal use , select AUTO. When LOW is chosen, the lamp brightness is kept low and the projector operating noise is off. Select AUTO for rear projection with the tabletop-mounted projector. Menu operation (continued) 1 IMAGE CONTRAST Use to adjust the image brightness.

User Manual
Page 20
Important: • Do not display a still picture for the lamp to display a still image): Press the STILL button on the remote control again. Switch the pages using the PAGE UP or DOWN button on the ... B) USB cable (option) to page-up before connecting the USB cable. Page-up and page-down the presentation data using the remote control, connect the projector with a USB port are supported. • Wait for a long time because the afterimages may persist on the remote control. Advanced feature Still To stop the...
Important: • Do not display a still picture for the lamp to display a still image): Press the STILL button on the remote control again. Switch the pages using the PAGE UP or DOWN button on the ... B) USB cable (option) to page-up before connecting the USB cable. Page-up and page-down the presentation data using the remote control, connect the projector with a USB port are supported. • Wait for a long time because the afterimages may persist on the remote control. Advanced feature Still To stop the...

User Manual
Page 22
...of lamp replacement When the lamp shutdown notice is issued, the lamp replacement is recommended even if the lamp is set to prevent failure and fire. • If the lamp should break, never shake the lamp box or hold the handle of your dealer for one . XD110U/XD110R/SD110U/SD110R *1...the screen for a new lamp. When taking the lamp box out, be sure not to 2000 hours. Loosen the screws (c) using the projector. Caution: • The lamp is reset. When the lamp operation time exceeds the time elapsed until the lamp is replaced and the lamp operation time is fragile. ...
...of lamp replacement When the lamp shutdown notice is issued, the lamp replacement is recommended even if the lamp is set to prevent failure and fire. • If the lamp should break, never shake the lamp box or hold the handle of your dealer for one . XD110U/XD110R/SD110U/SD110R *1...the screen for a new lamp. When taking the lamp box out, be sure not to 2000 hours. Loosen the screws (c) using the projector. Caution: • The lamp is reset. When the lamp operation time exceeds the time elapsed until the lamp is replaced and the lamp operation time is fragile. ...

User Manual
Page 23
...is correctly selected as the input source. • When an extension cord is indicating that the projector is connected to go out.) 2. Wait for one minute when you plug the power cord next time. Replace the lamp in this especially when the external device is a notebook computer.) • Check that the cable...'t turn on again for the air inlet or outlet fan to stop and press the POWER button to light the lamp again. • If the projector was turned off . 3. Plug the power cord into the wall outlet next time. If images are blocking the air inlet or outlet grille, remove them ....
...is correctly selected as the input source. • When an extension cord is indicating that the projector is connected to go out.) 2. Wait for one minute when you plug the power cord next time. Replace the lamp in this especially when the external device is a notebook computer.) • Check that the cable...'t turn on again for the air inlet or outlet fan to stop and press the POWER button to light the lamp again. • If the projector was turned off . 3. Plug the power cord into the wall outlet next time. If images are blocking the air inlet or outlet grille, remove them ....

User Manual
Page 24
...to each other . (See page 12.) • This symptom is normal for a DLP projector and is incorrect. In this case, readjust the keystone so that the amount of .... (See page 17.) • Check that occurs in the IMAGE menu. (See page 18.) • Replace the lamp. (See page 22.) • Remove the lens cap. • Adjust the focus. (See page 13.) •... • Some images and texts appear obscured during the keystone adjustment. In such cases, use the projector without applying the keystone adjustment. (See page 12.) EN-24 Troubleshooting (continued) Images aren't projected correctly...
...to each other . (See page 12.) • This symptom is normal for a DLP projector and is incorrect. In this case, readjust the keystone so that the amount of .... (See page 17.) • Check that occurs in the IMAGE menu. (See page 18.) • Replace the lamp. (See page 22.) • Remove the lens cap. • Adjust the focus. (See page 13.) •... • Some images and texts appear obscured during the keystone adjustment. In such cases, use the projector without applying the keystone adjustment. (See page 12.) EN-24 Troubleshooting (continued) Images aren't projected correctly...

User Manual
Page 25
...• Do not spray insecticide on or inside of cooling the inside the projector. • Do not use benzine or thinner to turn off the lamp and unplug the power cord from the projector. • TJhe password function is loaded in the ambient temperature. •...The STATUS indicator blinks. "TEMPERATURE!!" Wait about 10 minutes, plug the power cord in rare occasions. Cause and solution • Attach the lamp cover on the projector. is not a malfunction. The buttons on . Such symptom is displayed. This isn't a product malfunction. • Check that the ...
...• Do not spray insecticide on or inside of cooling the inside the projector. • Do not use benzine or thinner to turn off the lamp and unplug the power cord from the projector. • TJhe password function is loaded in the ambient temperature. •...The STATUS indicator blinks. "TEMPERATURE!!" Wait about 10 minutes, plug the power cord in rare occasions. Cause and solution • Attach the lamp cover on the projector. is not a malfunction. The buttons on . Such symptom is displayed. This isn't a product malfunction. • Check that the ...

User Manual
Page 26
... above solution is high. • Clean the ventilation grilles. • Relocate the projector to possible problems. If these problem persist, turn the projector off . (See page 22.) Replace the lamp. Off Close the cover correctly. POSSIBLE SOLUTION Steady green or Steady red Steady red ... is not effective, replace the lamp. EN-26 Contact your dealer. Indicators This projector has two indicators, each of which shows the operation condition of the projector. Blinking green/red The lamp operation time exceeds the time elapsed until the lamp shutdown notice while the power is...
... above solution is high. • Clean the ventilation grilles. • Relocate the projector to possible problems. If these problem persist, turn the projector off . (See page 22.) Replace the lamp. Off Close the cover correctly. POSSIBLE SOLUTION Steady green or Steady red Steady red ... is not effective, replace the lamp. EN-26 Contact your dealer. Indicators This projector has two indicators, each of which shows the operation condition of the projector. Blinking green/red The lamp operation time exceeds the time elapsed until the lamp shutdown notice while the power is...

User Manual
Page 27
... input Display Technology Colors Projection lens Light source lamp Picture size PC compatibility Video compatibility Speaker S-video input Video input Audio input Analog RGB input Control connector Outside dimensions Weight Length of power cord Temperature, humidity (performance guaranteed) DLP™ DATA projector XD110U/XD110R/SD110U/SD110R 100 - 240 V AC, 50 / 60 Hz 2.9 A 0.55-inch...
... input Display Technology Colors Projection lens Light source lamp Picture size PC compatibility Video compatibility Speaker S-video input Video input Audio input Analog RGB input Control connector Outside dimensions Weight Length of power cord Temperature, humidity (performance guaranteed) DLP™ DATA projector XD110U/XD110R/SD110U/SD110R 100 - 240 V AC, 50 / 60 Hz 2.9 A 0.55-inch...

User Manual
Page 28
... 02552-0072-00 02552-0068-00 1 Remote control 1 Safety manual/Quick start up 1 CD-ROM 2 Battery Replacement part (Option / Not included in the box) Spare lamp 499B045-10 VLT-XD110LP EN-28 Specifications (continued) Connectors IN pin No. 1 2 3 4 5 6 7 8 9 10 11 12 13 14 15 COMPUTER IN/OUT (Mini D-SUB 15-pin...
... 02552-0072-00 02552-0068-00 1 Remote control 1 Safety manual/Quick start up 1 CD-ROM 2 Battery Replacement part (Option / Not included in the box) Spare lamp 499B045-10 VLT-XD110LP EN-28 Specifications (continued) Connectors IN pin No. 1 2 3 4 5 6 7 8 9 10 11 12 13 14 15 COMPUTER IN/OUT (Mini D-SUB 15-pin...
