DIY In-Ceiling and In-Wall Installation Guide
Page 2
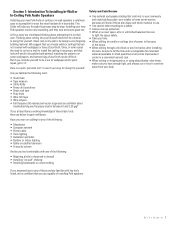
...tools listed, we're confident that are intimidated thinking about cutting into a wall to install the cabling is necessary, and that area of installing Polk speakers. Have you ever run cabling for any of the following: • Telephones • Computer network • Printer cable • ... for it -yourselfer. If you at least have a faux finish. Section 1: Introduction To Installing In-Wall or In-Ceiling Polk Audio Speakers Installing your new Polk Audio in-ceiling or in-wall speakers is relatively easy to accomplish for even the most hesitant do you familiar the following : ...
...tools listed, we're confident that are intimidated thinking about cutting into a wall to install the cabling is necessary, and that area of installing Polk speakers. Have you ever run cabling for any of the following: • Telephones • Computer network • Printer cable • ... for it -yourselfer. If you at least have a faux finish. Section 1: Introduction To Installing In-Wall or In-Ceiling Polk Audio Speakers Installing your new Polk Audio in-ceiling or in-wall speakers is relatively easy to accomplish for even the most hesitant do you familiar the following : ...
DIY In-Ceiling and In-Wall Installation Guide
Page 4
... under a carpet or on the cables you install. b. This situation will require running cables to run cable under 100' (33m) use 12 gauge cable. Section 2: Polk Audio In-Wall and In-Ceiling Speaker Installation Guide Materials and Preparation Before cutting into your walls to install your new... Polk Audio speakers, gather up all basic speaker applications you will need a minimum of 2 conductors, thus the term cable is used here instead of "wire". 2) Be certain ...
... under a carpet or on the cables you install. b. This situation will require running cables to run cable under 100' (33m) use 12 gauge cable. Section 2: Polk Audio In-Wall and In-Ceiling Speaker Installation Guide Materials and Preparation Before cutting into your walls to install your new... Polk Audio speakers, gather up all basic speaker applications you will need a minimum of 2 conductors, thus the term cable is used here instead of "wire". 2) Be certain ...
DIY In-Ceiling and In-Wall Installation Guide
Page 5
... first is much easier to run of a typical volume control: Use a stud finder to locate structural members inside the walls and ceiling. When your new Polk speakers, we suggest you check out the space just to make sure there is enough room for Front Left, Center and Right channels should be...
... first is much easier to run of a typical volume control: Use a stud finder to locate structural members inside the walls and ceiling. When your new Polk speakers, we suggest you check out the space just to make sure there is enough room for Front Left, Center and Right channels should be...
DIY In-Ceiling and In-Wall Installation Guide
Page 6
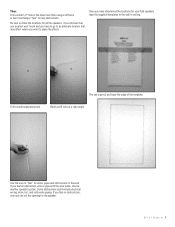
... sure to check the locations for all the speakers, if you discover that one location won't work and you have determined the locations for your Polk speakers tape the supplied templates to place the others.
... sure to check the locations for all the speakers, if you discover that one location won't work and you have determined the locations for your Polk speakers tape the supplied templates to place the others.
DIY In-Ceiling and In-Wall Installation Guide
Page 7
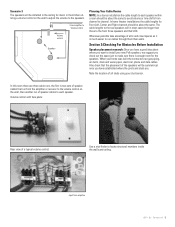
...: Cutting Drywall and Running Speaker Cables This section covers cutting into the sheetrock to bring in the home. Polk Audio can recommend a professional installation company, call (800) 377-7655 during normal east coast business hours. Bad things will not be one of the small holes - ...
...: Cutting Drywall and Running Speaker Cables This section covers cutting into the sheetrock to bring in the home. Polk Audio can recommend a professional installation company, call (800) 377-7655 during normal east coast business hours. Bad things will not be one of the small holes - ...
DIY In-Ceiling and In-Wall Installation Guide
Page 13
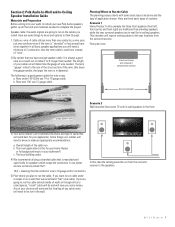
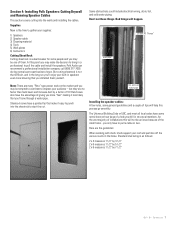
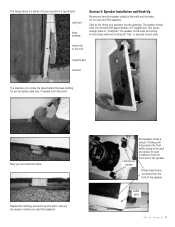
The image below is to utilize the space behind the base molding for your new Polk speakers! Start by dry-fitting your speakers into the hole with paint, now you can install the cable: Replace the molding, and touch up with ...approximately 1/8" wiggle room-this leaves enough space to "straighten" the speaker to install your new Polk speakers. rotating cam clamps Our speakers utilize a unique "rotating cam" that presses the front baffle casing to each other. Phillips head screw, accessed from the...
The image below is to utilize the space behind the base molding for your new Polk speakers! Start by dry-fitting your speakers into the hole with paint, now you can install the cable: Replace the molding, and touch up with ...approximately 1/8" wiggle room-this leaves enough space to "straighten" the speaker to install your new Polk speakers. rotating cam clamps Our speakers utilize a unique "rotating cam" that presses the front baffle casing to each other. Phillips head screw, accessed from the...

Vanishing In-Wall Manual
Page 2
...for starting wall cut). Port plug (265-ls, 65f/x-ls, 65-ls, 265-rt, 65f/x-rt & 65-rt only) 4. Registration Card Important Note: If anything is best performed by contacting Polk Audio at extremely high volume levels, which you should find the following:... any ventilation openings. E NGLISH IMPORTANT SAFETY INSTRUCTIONS READ BEFORE OPERATING EQUIPMENT 1. WARNING: Listen Carefully Polk Audio loudspeakers and subwoofers are installing the speakers. Installation Recommendation For Optimum Performance Important Note: Vanishing Series Loudspeakers are ...
...for starting wall cut). Port plug (265-ls, 65f/x-ls, 65-ls, 265-rt, 65f/x-rt & 65-rt only) 4. Registration Card Important Note: If anything is best performed by contacting Polk Audio at extremely high volume levels, which you should find the following:... any ventilation openings. E NGLISH IMPORTANT SAFETY INSTRUCTIONS READ BEFORE OPERATING EQUIPMENT 1. WARNING: Listen Carefully Polk Audio loudspeakers and subwoofers are installing the speakers. Installation Recommendation For Optimum Performance Important Note: Vanishing Series Loudspeakers are ...

Vanishing In-Wall Manual
Page 3
...and each application of paint, wait approximately 1 minute, rotate the grille 90°, and apply the next thin coat. Surround SPEAKER PLACEMENT Polk Audio F/X® surround loudspeakers give you cut a hole in more realistic reproduction and more accurate imaging. Left/Right Orientation: F/X® surround ... procedure to : www.polkaudio.com/education/article.php?id=15 or www.polkaudio.com/downloads/hthandbook.pdf Tweeter Switch (LS and RT models except F/X models) Filter-If your listening room is very reflective, with smooth sheetrock walls, hardwood floors, and non-cushioned...
...and each application of paint, wait approximately 1 minute, rotate the grille 90°, and apply the next thin coat. Surround SPEAKER PLACEMENT Polk Audio F/X® surround loudspeakers give you cut a hole in more realistic reproduction and more accurate imaging. Left/Right Orientation: F/X® surround ... procedure to : www.polkaudio.com/education/article.php?id=15 or www.polkaudio.com/downloads/hthandbook.pdf Tweeter Switch (LS and RT models except F/X models) Filter-If your listening room is very reflective, with smooth sheetrock walls, hardwood floors, and non-cushioned...

Vanishing In-Wall Manual
Page 4
...365.1mm x 225.4mm) 12 3/4" H x 7 1/4" W (323.9mm x 184.2mm) 3 1/2" (88.9mm) 3" (76.2mm) 65-rt 14 3/8" H x 8 7/8" W (365.1mm x 225.4mm) 12 3/4" H x 7 1/4" W (323.9mm x 184.2mm) 3 1/2" (88.9mm) 3" (76.2mm) 65f/x-rt 14 3/8" H x 8 7/8" W (365.1mm x 225.4mm) 12 3/4" H x 7 1/4" W (323.9mm x 184.2mm) 3 ...65-ls, 265-rt, 65f/x-rt & 65-rt. Product Depth D. Overall Dimensions 255c-ls 9 5/16" H x 14 13/16" W (236.5mm x 376.2mm) B. Mounting Depth (using 1/2" drywall) 3 1/4" (82.6mm) 3 1/4" (82.6mm) Specifiations For complete Vanishing Series specifications, visit www.polkaudio.com 4 Polk Audio...
...365.1mm x 225.4mm) 12 3/4" H x 7 1/4" W (323.9mm x 184.2mm) 3 1/2" (88.9mm) 3" (76.2mm) 65-rt 14 3/8" H x 8 7/8" W (365.1mm x 225.4mm) 12 3/4" H x 7 1/4" W (323.9mm x 184.2mm) 3 1/2" (88.9mm) 3" (76.2mm) 65f/x-rt 14 3/8" H x 8 7/8" W (365.1mm x 225.4mm) 12 3/4" H x 7 1/4" W (323.9mm x 184.2mm) 3 ...65-ls, 265-rt, 65f/x-rt & 65-rt. Product Depth D. Overall Dimensions 255c-ls 9 5/16" H x 14 13/16" W (236.5mm x 376.2mm) B. Mounting Depth (using 1/2" drywall) 3 1/4" (82.6mm) 3 1/4" (82.6mm) Specifiations For complete Vanishing Series specifications, visit www.polkaudio.com 4 Polk Audio...


