
DIY In-Ceiling and In-Wall Installation Guide
Page 1
Installing Your In-Wall or In-Ceiling Speakers
Installing Your In-Wall or In-Ceiling Speakers
DIY In-Ceiling and In-Wall Installation Guide
Page 2
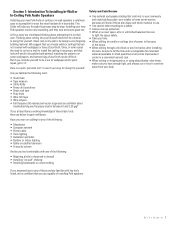
...wires, or using sharp blades-slow down, make sure you are capable of installing Polk speakers. DIY CI Tutorial 2 Thinking about troubleshooting any frequency scatter between 5 and 2.35 gig? Installing your new Polk speakers can be difficult. If you choose walls or ceilings that you have ...cases the need to be patched and painted, matching the patterns on their own. Section 1: Introduction To Installing In-Wall or In-Ceiling Polk Audio Speakers Installing your new Polk Audio in-ceiling or in-wall speakers is relatively easy to accomplish for doing this yourself. We suggest that...
...wires, or using sharp blades-slow down, make sure you are capable of installing Polk speakers. DIY CI Tutorial 2 Thinking about troubleshooting any frequency scatter between 5 and 2.35 gig? Installing your new Polk speakers can be difficult. If you choose walls or ceilings that you have ...cases the need to be patched and painted, matching the patterns on their own. Section 1: Introduction To Installing In-Wall or In-Ceiling Polk Audio Speakers Installing your new Polk Audio in-ceiling or in-wall speakers is relatively easy to accomplish for doing this yourself. We suggest that...

DIY In-Ceiling and In-Wall Installation Guide
Page 3
Photos and description of the Tools Sheet rock saw Stiff Putty blade Fish tape to help install wire into existing walls Tape measure, utility knife and wire stripper Battery powered hand held drill and driver (shown with magnetic driver extension) DIY CI Tutorial 3
Photos and description of the Tools Sheet rock saw Stiff Putty blade Fish tape to help install wire into existing walls Tape measure, utility knife and wire stripper Battery powered hand held drill and driver (shown with magnetic driver extension) DIY CI Tutorial 3
DIY In-Ceiling and In-Wall Installation Guide
Page 4
... surround receiver to the speakers. Runs under a carpet or on the cables you install. Section 2: Polk Audio In-Wall and In-Ceiling Speaker Installation Guide Materials and Preparation Before cutting into your walls to install your retailer will need to know and options to think through attics or crawl spaces.... The length of your bathroom?) c. Here are going to run cable under 100' (33m) use 12 gauge cable. Some things your new Polk Audio speakers, gather up all basic speaker applications you will need a minimum of 2 conductors, thus the term cable is used here instead of "wire...
... surround receiver to the speakers. Runs under a carpet or on the cables you install. Section 2: Polk Audio In-Wall and In-Ceiling Speaker Installation Guide Materials and Preparation Before cutting into your walls to install your retailer will need to know and options to think through attics or crawl spaces.... The length of your bathroom?) c. Here are going to run cable under 100' (33m) use 12 gauge cable. Some things your new Polk Audio speakers, gather up all basic speaker applications you will need a minimum of 2 conductors, thus the term cable is used here instead of "wire...
DIY In-Ceiling and In-Wall Installation Guide
Page 5
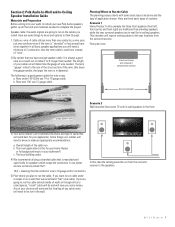
... the speakers will be about the same. Whenever possible take advantage of a typical volume control: Use a stud finder to channel. When your new Polk speakers, we suggest you have established where the joists and studs are three cable runs, the first is two sets of speaker cables that run...from the amplifier or receiver to the volume control on the wall to adjust the volume to the speakers. Section 3:Checking For Obstacles Before Installation Speaker placement research: Once you check out the space just to the front three speakers and that the placement of all studs using your ...
... the speakers will be about the same. Whenever possible take advantage of a typical volume control: Use a stud finder to channel. When your new Polk speakers, we suggest you have established where the joists and studs are three cable runs, the first is two sets of speaker cables that run...from the amplifier or receiver to the volume control on the wall to adjust the volume to the speakers. Section 3:Checking For Obstacles Before Installation Speaker placement research: Once you check out the space just to the front three speakers and that the placement of all studs using your ...
DIY In-Ceiling and In-Wall Installation Guide
Page 7
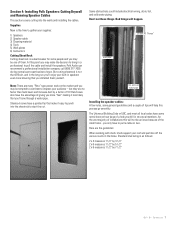
...general guidelines and a couple of 10! Some obstructions could include electrical wiring, drain, hot, and cold water piping: Don't cut . Polk Audio can recommend a professional installation company, call (800) 377-7655 during normal east coast business hours. The Universal Building Code or UBC, and most all local codes .... At this process go smoothly. Bad things will help this point you 'll saw through a water pipe. Section 4: Installing Polk Speakers: Cutting Drywall and Running Speaker Cables This section covers cutting into the sheetrock to pull a cable or two. Supplies ...
...general guidelines and a couple of 10! Some obstructions could include electrical wiring, drain, hot, and cold water piping: Don't cut . Polk Audio can recommend a professional installation company, call (800) 377-7655 during normal east coast business hours. The Universal Building Code or UBC, and most all local codes .... At this process go smoothly. Bad things will help this point you 'll saw through a water pipe. Section 4: Installing Polk Speakers: Cutting Drywall and Running Speaker Cables This section covers cutting into the sheetrock to pull a cable or two. Supplies ...
DIY In-Ceiling and In-Wall Installation Guide
Page 8
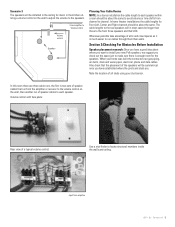
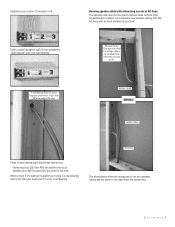
... the AC lines with alternating current or AC lines: The national code restricts the use of common holes for both. In load bearing walls be installed in the same holes or boxes as AC. DIY CI Tutorial 8 The above photos show the wrong way to run your drilled holes to the...
... the AC lines with alternating current or AC lines: The national code restricts the use of common holes for both. In load bearing walls be installed in the same holes or boxes as AC. DIY CI Tutorial 8 The above photos show the wrong way to run your drilled holes to the...
DIY In-Ceiling and In-Wall Installation Guide
Page 13
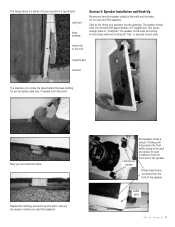
... Hook Up By now you have the speaker cables in the walls and the holes cut for your new Polk speakers! In most cases walls are ready to install your new Polk speakers. Phillips head screw, accessed from the front side of the speaker baffle plate D I Y C I T u t o r i a l 13 rotating cam clamps Our speakers utilize...
... Hook Up By now you have the speaker cables in the walls and the holes cut for your new Polk speakers! In most cases walls are ready to install your new Polk speakers. Phillips head screw, accessed from the front side of the speaker baffle plate D I Y C I T u t o r i a l 13 rotating cam clamps Our speakers utilize...
DIY In-Ceiling and In-Wall Installation Guide
Page 14
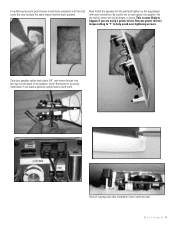
... avoid over tighten the speaker-the dry wall or sheet rock could dimple, or break. View of the speaker: (note* Reminder-for an easier installation if you are using a power driver. This is most likely to happen if you leave a generous cable lead to place the same amount behind... each speaker). Strip your screwdriver. For additional acoustic performance install some insulation into the wall cavity (be sure to work with your speaker cables back about 3/4", and insert the pair into the wall and ...
... avoid over tighten the speaker-the dry wall or sheet rock could dimple, or break. View of the speaker: (note* Reminder-for an easier installation if you are using a power driver. This is most likely to happen if you leave a generous cable lead to place the same amount behind... each speaker). Strip your screwdriver. For additional acoustic performance install some insulation into the wall cavity (be sure to work with your speaker cables back about 3/4", and insert the pair into the wall and ...
DIY In-Ceiling and In-Wall Installation Guide
Page 15
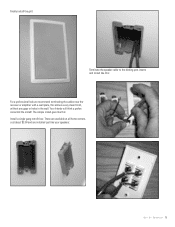
Finally install the grill: Terminate the speaker cable to the binding post inserts and install like your speakers: D I Y C I T u t o r i a l 15 Your friends will think a professional did the install! The simple install goes like this: Install a single gang retrofit box: These are available at all home centers, cost about $3.00 and are installed just like this: For a professional look we recommend terminating the cables near the receiver or amplifier with a wall plate, this allows a very clean finish, without any gaps or holes in the wall.
Finally install the grill: Terminate the speaker cable to the binding post inserts and install like your speakers: D I Y C I T u t o r i a l 15 Your friends will think a professional did the install! The simple install goes like this: Install a single gang retrofit box: These are available at all home centers, cost about $3.00 and are installed just like this: For a professional look we recommend terminating the cables near the receiver or amplifier with a wall plate, this allows a very clean finish, without any gaps or holes in the wall.

Vanishing In-Wall Manual
Page 2
...) television or video monitor. WARNING: Listen Carefully Polk Audio loudspeakers and subwoofers are installing the speakers. One in mind and always use wire that you should not be exposed to volumes that produce heat. 9. Speaker cutout mounting template 3. Port plug (265-ls, 65f/x-ls, 65-ls, 265-rt, 65f/x-rt & 65-rt only) 4. Registration Card Important Note: If...
...) television or video monitor. WARNING: Listen Carefully Polk Audio loudspeakers and subwoofers are installing the speakers. One in mind and always use wire that you should not be exposed to volumes that produce heat. 9. Speaker cutout mounting template 3. Port plug (265-ls, 65f/x-ls, 65-ls, 265-rt, 65f/x-rt & 65-rt only) 4. Registration Card Important Note: If...

Vanishing In-Wall Manual
Page 3
...the serial number label on the back of the magnet for 5.1 and 7.1 systems, when two additional in-wall speakers are installed in the rear wall. Surround SPEAKER PLACEMENT Polk Audio F/X® surround loudspeakers give you cover the grille frame. 4. Please Note: For more accurate imaging. Apply one light,...placement go to: www.polkaudio.com/education/article.php?id=15 or www.polkaudio.com/downloads/hthandbook.pdf Tweeter Switch (LS and RT models except F/X models) Filter-If your way around the perimeter of the grille to work your listening room is very reflective, ...
...the serial number label on the back of the magnet for 5.1 and 7.1 systems, when two additional in-wall speakers are installed in the rear wall. Surround SPEAKER PLACEMENT Polk Audio F/X® surround loudspeakers give you cover the grille frame. 4. Please Note: For more accurate imaging. Apply one light,...placement go to: www.polkaudio.com/education/article.php?id=15 or www.polkaudio.com/downloads/hthandbook.pdf Tweeter Switch (LS and RT models except F/X models) Filter-If your way around the perimeter of the grille to work your listening room is very reflective, ...

Vanishing In-Wall Manual
Page 4
...specifications, visit www.polkaudio.com 4 Polk Audio Customer Service: 1-800-377-7655 (Outside US & Canada: 410-358-3600) Monday-Friday, 9:00 AM-6:00 PM EST, [email protected] Product Depth 3 3/4" (95.3mm) 255c-rt 9 5/16" H x 14...installing any of the in-wall loudspeakers listed below in an area larger than a standard open stud bay. Dimensions Model A. Product Depth D. Overall Dimensions B. Cutout Dimensions C. Mounting Depth (using 1/2" drywall) Dimensions Model A. The port plug should be used on the following models: 265-ls, 65f/x-ls, 65-ls, 265-rt, 65f/x-rt & 65-rt...
...specifications, visit www.polkaudio.com 4 Polk Audio Customer Service: 1-800-377-7655 (Outside US & Canada: 410-358-3600) Monday-Friday, 9:00 AM-6:00 PM EST, [email protected] Product Depth 3 3/4" (95.3mm) 255c-rt 9 5/16" H x 14...installing any of the in-wall loudspeakers listed below in an area larger than a standard open stud bay. Dimensions Model A. Product Depth D. Overall Dimensions B. Cutout Dimensions C. Mounting Depth (using 1/2" drywall) Dimensions Model A. The port plug should be used on the following models: 265-ls, 65f/x-ls, 65-ls, 265-rt, 65f/x-rt & 65-rt...

65 Mounting Template
Page 1
... le gabarit sur ('emplacement determine. 3) Tracez le pourtour du gabarit. 4) Taillez ('embrasure. RT, 65-LS, 625-RT, 65F/V-RT & 65F/V-Ls Mounting Template and Instructions Gabarit D'Installation et Consignes Follow these steps while installing the 65-RT, 65-LS, 625-RT, 65F/v-RT & 65F/X®-LS Etapes a suivre pour installer 65-RT, 65-is no larger than • the shape you traced. 5) Attach the speaker...
... le gabarit sur ('emplacement determine. 3) Tracez le pourtour du gabarit. 4) Taillez ('embrasure. RT, 65-LS, 625-RT, 65F/V-RT & 65F/V-Ls Mounting Template and Instructions Gabarit D'Installation et Consignes Follow these steps while installing the 65-RT, 65-LS, 625-RT, 65F/v-RT & 65F/X®-LS Etapes a suivre pour installer 65-RT, 65-is no larger than • the shape you traced. 5) Attach the speaker...