
DIY In-Ceiling and In-Wall Installation Guide
Page 1
Installing Your In-Wall or In-Ceiling Speakers
Installing Your In-Wall or In-Ceiling Speakers
DIY In-Ceiling and In-Wall Installation Guide
Page 2
...yes to any frequency scatter between 5 and 2.35 gig? Section 1: Introduction To Installing In-Wall or In-Ceiling Polk Audio Speakers Installing your new Polk Audio in-ceiling or in-wall speakers is relatively easy to accomplish for even the most hesitant do you have a faux finish. Thinking about attempting ...; When cutting or stripping wires, or using sharp blades-slow down, make sure you feel comfortable with any of installing Polk speakers. Installing your new Polk speakers can be sure to gain confidence. Here is a quick "personal test" to see below to fill the hole with ...
...yes to any frequency scatter between 5 and 2.35 gig? Section 1: Introduction To Installing In-Wall or In-Ceiling Polk Audio Speakers Installing your new Polk Audio in-ceiling or in-wall speakers is relatively easy to accomplish for even the most hesitant do you have a faux finish. Thinking about attempting ...; When cutting or stripping wires, or using sharp blades-slow down, make sure you feel comfortable with any of installing Polk speakers. Installing your new Polk speakers can be sure to gain confidence. Here is a quick "personal test" to see below to fill the hole with ...
DIY In-Ceiling and In-Wall Installation Guide
Page 4
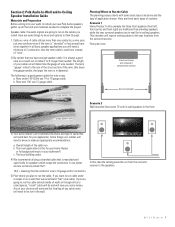
...-wall (or in the front: 12 gauge speaker cable 3) Your audio retailer can recommend the brand and type of walls or through : 1. Section 2: Polk Audio In-Wall and In-Ceiling Speaker Installation Guide Materials and Preparation Before cutting into your walls to install your new Polk Audio speakers, gather up all basic speaker applications you will save you some money.
...-wall (or in the front: 12 gauge speaker cable 3) Your audio retailer can recommend the brand and type of walls or through : 1. Section 2: Polk Audio In-Wall and In-Ceiling Speaker Installation Guide Materials and Preparation Before cutting into your walls to install your new Polk Audio speakers, gather up all basic speaker applications you will save you some money.
DIY In-Ceiling and In-Wall Installation Guide
Page 5
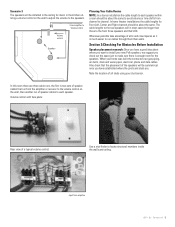
...Tutorial 5 Volume control with face plate: Rear view of a typical volume control: Use a stud finder to each speaker within a room should be about where you want to install your new Polk speakers, we suggest you have established where the joists and studs are three cable runs, the first is two sets... phone and data cables. In this room there are : Note the location of the speakers will be symmetrical once you have a good idea about the same. Scenario 3 The speakers will be installed in the ceiling for music in most cases be longer than those to make sure there is enough room...
...Tutorial 5 Volume control with face plate: Rear view of a typical volume control: Use a stud finder to each speaker within a room should be about where you want to install your new Polk speakers, we suggest you have established where the joists and studs are three cable runs, the first is two sets... phone and data cables. In this room there are : Note the location of the speakers will be symmetrical once you have a good idea about the same. Scenario 3 The speakers will be installed in the ceiling for music in most cases be longer than those to make sure there is enough room...
DIY In-Ceiling and In-Wall Installation Guide
Page 6
... CI Tutorial 6 Be sure to the wall or ceiling. Once you have to go to an alternate location that may affect where you can cut the opening for your Polk speakers tape the supplied templates to check the locations for all the speakers, if you discover that one location won't work ...and you have determined the locations for the speaker. Some obstructions could include electrical wiring, drain, hot, and...
... CI Tutorial 6 Be sure to the wall or ceiling. Once you have to go to an alternate location that may affect where you can cut the opening for your Polk speakers tape the supplied templates to check the locations for all the speakers, if you discover that one location won't work ...and you have determined the locations for the speaker. Some obstructions could include electrical wiring, drain, hot, and...
DIY In-Ceiling and In-Wall Installation Guide
Page 10
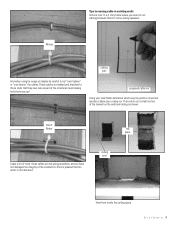
... D I Y C I T u t o r i a l 10 Then notch out a small section of the drywall on the wall and ceiling as shown: Much Better top plate Leave a bit of room, these studs that his music is pleased that they now rate as part of the ...conductors-Elvis is not distorted. proposed cable run Using your stud finder determine which way the joists or structural members above your ceiling run cabling between floors to some ceiling speakers: Wrong ceiling joist And when using tie wraps or staples be careful to not "over tighten" or "over fasten" the cables: These cables...
... D I Y C I T u t o r i a l 10 Then notch out a small section of the drywall on the wall and ceiling as shown: Much Better top plate Leave a bit of room, these studs that his music is pleased that they now rate as part of the ...conductors-Elvis is not distorted. proposed cable run Using your stud finder determine which way the joists or structural members above your ceiling run cabling between floors to some ceiling speakers: Wrong ceiling joist And when using tie wraps or staples be careful to not "over tighten" or "over fasten" the cables: These cables...

DIY In-Ceiling and In-Wall Installation Guide
Page 11
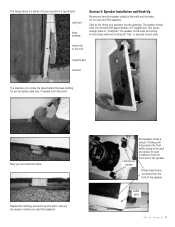
... of the fish tape. Fish the tape from the top notch through the wall to the speaker opening , attach the speaker wire and pull (gently) up through the wall. Carefully drill through the top plate as shown: ceiling joist top plate wall stud Thread the cable through the top plate (use the fish...-tape if needed). ceiling joist top plate wall stud wall stud When attaching speaker cabling to the pull or fish tap-overlap the cable through the "paper-clip" on the end of electrical tape as shown to create...
... of the fish tape. Fish the tape from the top notch through the wall to the speaker opening , attach the speaker wire and pull (gently) up through the wall. Carefully drill through the top plate as shown: ceiling joist top plate wall stud Thread the cable through the top plate (use the fish...-tape if needed). ceiling joist top plate wall stud wall stud When attaching speaker cabling to the pull or fish tap-overlap the cable through the "paper-clip" on the end of electrical tape as shown to create...
DIY In-Ceiling and In-Wall Installation Guide
Page 13
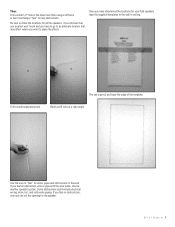
...to "straighten" the speaker to the walls and ceiling. Phillips head screw, accessed from the front side of the speaker. Start by dry-fitting your speakers into the hole with paint, now you have the speaker cables in the walls and the holes cut for your new Polk speakers! sheet rock or... dry wall carpet & pad sub floor The idea here is a photo of a cross section of the speaker baffle plate D I Y C I T u t o r i a l 13 In most cases walls are ready to each other. The speaker should slide into the openings. The...
...to "straighten" the speaker to the walls and ceiling. Phillips head screw, accessed from the front side of the speaker. Start by dry-fitting your speakers into the hole with paint, now you have the speaker cables in the walls and the holes cut for your new Polk speakers! sheet rock or... dry wall carpet & pad sub floor The idea here is a photo of a cross section of the speaker baffle plate D I Y C I T u t o r i a l 13 In most cases walls are ready to each other. The speaker should slide into the openings. The...

MC Series Manual
Page 2
... toward your listening position. We specify a wide range of power such as front/main home theater speakers (figure 2), aim the tweeters toward the nearest reflecting surface (an adjacent wall or ceiling) for a more diffuse sound field. 2 Polk Audio Customer Service 800-377-7655 (Outside USA & Canada: 410-358-3600) 2' 2' (60cm) (60cm) recommended height 5' 7" (170cm...
... toward your listening position. We specify a wide range of power such as front/main home theater speakers (figure 2), aim the tweeters toward the nearest reflecting surface (an adjacent wall or ceiling) for a more diffuse sound field. 2 Polk Audio Customer Service 800-377-7655 (Outside USA & Canada: 410-358-3600) 2' 2' (60cm) (60cm) recommended height 5' 7" (170cm...

MC Series Manual
Page 4
...to insert the saw , utility knife or materialappropriate cutting tool for the utmost in your Polk Audio dealer, or a professional installer. 1. Prior to installation, hold the speaker in sound quality. Use this hole to make certain the template is straight and plumb....LEFT RIGHT +_ +_ AMP _+ _+ Figure 12-Hook up the speaker wires. You should have cut the hole, fish your speaker and the wire from adjoining walls or ceiling, internal studs or plumbing. 2. Install speaker wires before installing speakers. Use at least 1" (25mm) from the black terminal (-) ...
...to insert the saw , utility knife or materialappropriate cutting tool for the utmost in your Polk Audio dealer, or a professional installer. 1. Prior to installation, hold the speaker in sound quality. Use this hole to make certain the template is straight and plumb....LEFT RIGHT +_ +_ AMP _+ _+ Figure 12-Hook up the speaker wires. You should have cut the hole, fish your speaker and the wire from adjoining walls or ceiling, internal studs or plumbing. 2. Install speaker wires before installing speakers. Use at least 1" (25mm) from the black terminal (-) ...


