
DIY In-Ceiling and In-Wall Installation Guide
Page 1
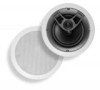
Installing Your In-Wall or In-Ceiling Speakers
Installing Your In-Wall or In-Ceiling Speakers
DIY In-Ceiling and In-Wall Installation Guide
Page 2
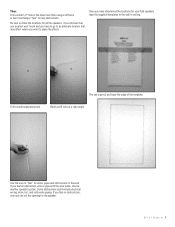
...the need to cut or slice in a motion away from your body. We suggest that you choose walls or ceilings that you are capable of installing Polk speakers. But if you consider yourself to be very rewarding, and they look and sound great too. Thinking about ...; When drilling into a wall to install the cabling is by step. Section 1: Introduction To Installing In-Wall or In-Ceiling Polk Audio Speakers Installing your new Polk Audio in-ceiling or in-wall speakers is relatively easy to accomplish for any of the following: • Telephones • Computer network • Printer cable &#...
...the need to cut or slice in a motion away from your body. We suggest that you choose walls or ceilings that you are capable of installing Polk speakers. But if you consider yourself to be very rewarding, and they look and sound great too. Thinking about ...; When drilling into a wall to install the cabling is by step. Section 1: Introduction To Installing In-Wall or In-Ceiling Polk Audio Speakers Installing your new Polk Audio in-ceiling or in-wall speakers is relatively easy to accomplish for any of the following: • Telephones • Computer network • Printer cable &#...
DIY In-Ceiling and In-Wall Installation Guide
Page 4
...on a wall then we recommend "flat" style cable. The following is 16 gauge with in-wall speakers in your application. Section 2: Polk Audio In-Wall and In-Ceiling Speaker Installation Guide Materials and Preparation Before cutting into your walls to install your cable run will determine the... gauge of wire needed. Cable vs. The length of you plan to the speakers. Runs under a carpet ...
...on a wall then we recommend "flat" style cable. The following is 16 gauge with in-wall speakers in your application. Section 2: Polk Audio In-Wall and In-Ceiling Speaker Installation Guide Materials and Preparation Before cutting into your walls to install your cable run will determine the... gauge of wire needed. Cable vs. The length of you plan to the speakers. Runs under a carpet ...
DIY In-Ceiling and In-Wall Installation Guide
Page 5
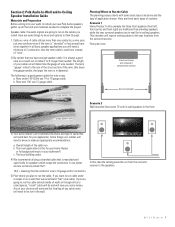
...be installed in the kitchen utilizing a volume control on the wall, then another run of speaker cables to each speaker within a room should be about where you want to install your new Polk speakers, we suggest you have established where the joists and studs are three cable runs, the ... be symmetrical once you check out the space just to locate structural members inside the walls and ceiling. When your stud sensor. From amplifier to Volume control Volume control Speakers Planning Your Cable Routes NOTE: In a stereo installation the cable length to run cables through them than...
...be installed in the kitchen utilizing a volume control on the wall, then another run of speaker cables to each speaker within a room should be about where you want to install your new Polk speakers, we suggest you have established where the joists and studs are three cable runs, the ... be symmetrical once you check out the space just to locate structural members inside the walls and ceiling. When your stud sensor. From amplifier to Volume control Volume control Speakers Planning Your Cable Routes NOTE: In a stereo installation the cable length to run cables through them than...
DIY In-Ceiling and In-Wall Installation Guide
Page 6
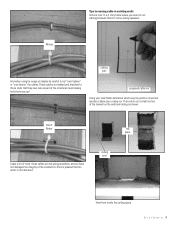
... coat hanger "feel no obstructions, now you want to the wall or ceiling. DIY CI Tutorial 6 The use a pencil and trace the edge of the template: Drill a small exploratory hole Bend a stiff wire at a right angle Use the wire to "feel" for your Polk speakers tape the supplied templates to place the others.
... coat hanger "feel no obstructions, now you want to the wall or ceiling. DIY CI Tutorial 6 The use a pencil and trace the edge of the template: Drill a small exploratory hole Bend a stiff wire at a right angle Use the wire to "feel" for your Polk speakers tape the supplied templates to place the others.
DIY In-Ceiling and In-Wall Installation Guide
Page 10
Then notch out a small section of the drywall on the wall and ceiling as part of the conductors-Elvis is pleased that they now rate as shown: Much Better top plate Leave a bit of room, these cables are ... D I Y C I T u t o r i a l 10 proposed cable run Using your stud finder determine which way the joists or structural members above your ceiling run cabling between floors to some ceiling speakers: Wrong ceiling joist And when using tie wraps or staples be careful to not "over tighten" or "over fasten" the cables: These cables so mashed and attached...
Then notch out a small section of the drywall on the wall and ceiling as part of the conductors-Elvis is pleased that they now rate as shown: Much Better top plate Leave a bit of room, these cables are ... D I Y C I T u t o r i a l 10 proposed cable run Using your stud finder determine which way the joists or structural members above your ceiling run cabling between floors to some ceiling speakers: Wrong ceiling joist And when using tie wraps or staples be careful to not "over tighten" or "over fasten" the cables: These cables so mashed and attached...

DIY In-Ceiling and In-Wall Installation Guide
Page 11
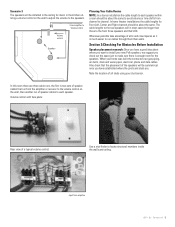
...cover the whole connection with at least two layers of the fish tape. ceiling joist top plate wall stud wall stud When attaching speaker cabling to the opening . Carefully drill through the top plate as shown: ceiling joist top plate wall stud Thread the cable through the top plate (use... the "paper-clip" on the end of electrical tape as shown to create a cable channel: Thread the pull tape from your speaker opening back through the wall/ceiling notch,attach the cable and pull over to the speaker opening , attach the speaker wire and pull (gently) up through the wall.
...cover the whole connection with at least two layers of the fish tape. ceiling joist top plate wall stud wall stud When attaching speaker cabling to the opening . Carefully drill through the top plate as shown: ceiling joist top plate wall stud Thread the cable through the top plate (use... the "paper-clip" on the end of electrical tape as shown to create a cable channel: Thread the pull tape from your speaker opening back through the wall/ceiling notch,attach the cable and pull over to the speaker opening , attach the speaker wire and pull (gently) up through the wall.
DIY In-Ceiling and In-Wall Installation Guide
Page 13
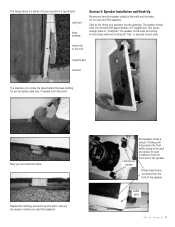
...up with approximately 1/8" wiggle room-this leaves enough space to "straighten" the speaker to the walls and ceiling. The speaker should slide into the openings. rotating cam clamps Our speakers utilize a unique "rotating cam" that presses the front baffle casing to ...the wall and allows for your new Polk speakers! Phillips head screw, accessed from the front side of a typical wall: wall stud base molding Section 5: Speaker...
...up with approximately 1/8" wiggle room-this leaves enough space to "straighten" the speaker to the walls and ceiling. The speaker should slide into the openings. rotating cam clamps Our speakers utilize a unique "rotating cam" that presses the front baffle casing to ...the wall and allows for your new Polk speakers! Phillips head screw, accessed from the front side of a typical wall: wall stud base molding Section 5: Speaker...

MC Series Manual
Page 2
...3600. But remember, where you locate in-wall speakers bears careful consideration, as front/main home theater speakers (figure 2), aim the tweeters toward the nearest reflecting surface (an adjacent wall or ceiling) for a more diffuse sound field. 2 Polk Audio Customer Service 800-377-7655 (Outside USA & ...or regulations may apply regarding the disposal of this product or the Polk Audio Importer/ Distributor in walls or ceilings (figure 3), aim the tweeter toward your listening position. It is made your Polk speakers. We specify a wide range of Operation: Monday-Friday, 9AM-6PM...
...3600. But remember, where you locate in-wall speakers bears careful consideration, as front/main home theater speakers (figure 2), aim the tweeters toward the nearest reflecting surface (an adjacent wall or ceiling) for a more diffuse sound field. 2 Polk Audio Customer Service 800-377-7655 (Outside USA & ...or regulations may apply regarding the disposal of this product or the Polk Audio Importer/ Distributor in walls or ceilings (figure 3), aim the tweeter toward your listening position. It is made your Polk speakers. We specify a wide range of Operation: Monday-Friday, 9AM-6PM...

MC Series Manual
Page 4
... skills or tools, consult your wall or ceiling material. Never use of the tracing (with the area behind the wall or ceiling into a single unfrayed strand (so you have cut ). LEFT RIGHT +_ +_ AMP _+ _+ Figure 12-Hook up the speaker wires. Connect the wire from the red ... drywall or other pointed metal tool. Figure 10b-Rectangular Template: Trace around the template. 6 Polk Audio Customer Service 800-377-7655 (Outside USA & Canada: 410-358-3600) 3. This will damage your speakers. Start the hole by drilling on your wall. Use this hole to insert the saw ,...
... skills or tools, consult your wall or ceiling material. Never use of the tracing (with the area behind the wall or ceiling into a single unfrayed strand (so you have cut ). LEFT RIGHT +_ +_ AMP _+ _+ Figure 12-Hook up the speaker wires. Connect the wire from the red ... drywall or other pointed metal tool. Figure 10b-Rectangular Template: Trace around the template. 6 Polk Audio Customer Service 800-377-7655 (Outside USA & Canada: 410-358-3600) 3. This will damage your speakers. Start the hole by drilling on your wall. Use this hole to insert the saw ,...


