DIY In-Ceiling and In-Wall Installation Guide
Page 1
Installing Your In-Wall or In-Ceiling Speakers
Installing Your In-Wall or In-Ceiling Speakers
DIY In-Ceiling and In-Wall Installation Guide
Page 2
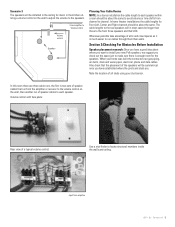
...these basic tools then see if you at least have a faux finish. DIY CI Tutorial 2 Installing your new Polk speakers can be a wiz at any of installing Polk speakers. But if you consider yourself to be difficult. If you answered yes to any home improvement center in a ...be patched and painted, matching the patterns on their own. Section 1: Introduction To Installing In-Wall or In-Ceiling Polk Audio Speakers Installing your new Polk Audio in-ceiling or in-wall speakers is relatively easy to accomplish for it -yourselfer. If you 're up for any of the following : •...
...these basic tools then see if you at least have a faux finish. DIY CI Tutorial 2 Installing your new Polk speakers can be a wiz at any of installing Polk speakers. But if you consider yourself to be difficult. If you answered yes to any home improvement center in a ...be patched and painted, matching the patterns on their own. Section 1: Introduction To Installing In-Wall or In-Ceiling Polk Audio Speakers Installing your new Polk Audio in-ceiling or in-wall speakers is relatively easy to accomplish for it -yourselfer. If you 're up for any of the following : •...
DIY In-Ceiling and In-Wall Installation Guide
Page 4
...a. Any of "wire". 2) Be certain that the conductor size is used here instead of your bathroom?) c. Section 2: Polk Audio In-Wall and In-Ceiling Speaker Installation Guide Materials and Preparation Before cutting into your walls to install your retailer will need to know and options to think through... will do and will save you plan to run cable under 100' (33m) use 12 gauge cable. Some things your new Polk Audio speakers, gather up all basic speaker applications you will require running cables to the size of the cross section of walls or through : 1. This situation will need ...
...a. Any of "wire". 2) Be certain that the conductor size is used here instead of your bathroom?) c. Section 2: Polk Audio In-Wall and In-Ceiling Speaker Installation Guide Materials and Preparation Before cutting into your walls to install your retailer will need to know and options to think through... will do and will save you plan to run cable under 100' (33m) use 12 gauge cable. Some things your new Polk Audio speakers, gather up all basic speaker applications you will require running cables to the size of the cross section of walls or through : 1. This situation will need ...
DIY In-Ceiling and In-Wall Installation Guide
Page 5
...and crawl spaces as it is two sets of speaker cables that 's OK. When your new Polk speakers, we suggest you have a good idea about where you want to the rear speakers will be longer than walls. input from channel to each speaker. The cable lengths to install your home was ... and data cables. Volume control with face plate: Rear view of all studs using your stud sensor. Section 3:Checking For Obstacles Before Installation Speaker placement research: Once you have established where the joists and studs are three cable runs, the first is much easier to run from the...
...and crawl spaces as it is two sets of speaker cables that 's OK. When your new Polk speakers, we suggest you have a good idea about where you want to the rear speakers will be longer than walls. input from channel to each speaker. The cable lengths to install your home was ... and data cables. Volume control with face plate: Rear view of all studs using your stud sensor. Section 3:Checking For Obstacles Before Installation Speaker placement research: Once you have established where the joists and studs are three cable runs, the first is much easier to run from the...
DIY In-Ceiling and In-Wall Installation Guide
Page 6
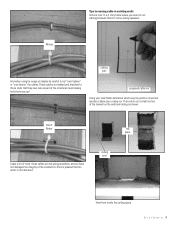
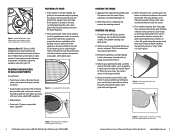
... you discover that one location won't work and you have determined the locations for your Polk speakers tape the supplied templates to the wall or ceiling. Some obstructions could include electrical wiring, drain, hot, and cold water piping. DIY CI Tutorial 6 If ... obstructions in the sheet rock then using a stiff wire or bent coat hanger "feel an obstruction, wire or pipe with the wire probe, choose another speaker location. The use a pencil and trace the edge of the template: Drill a small exploratory hole Bend a stiff wire at a right angle Use the wire to...
... you discover that one location won't work and you have determined the locations for your Polk speakers tape the supplied templates to the wall or ceiling. Some obstructions could include electrical wiring, drain, hot, and cold water piping. DIY CI Tutorial 6 If ... obstructions in the sheet rock then using a stiff wire or bent coat hanger "feel an obstruction, wire or pipe with the wire probe, choose another speaker location. The use a pencil and trace the edge of the template: Drill a small exploratory hole Bend a stiff wire at a right angle Use the wire to...
DIY In-Ceiling and In-Wall Installation Guide
Page 7
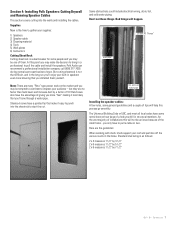
... a professional to pull the cable and install the speakers. Sheetrock saws have a pointed tip that make the decision to bring in the home. The Universal Building Code or UBC, and most all local codes have to pull a cable or two. Polk Audio can recommend a professional installation company, call (800)... increase dust by 7 1/2" DIY CI Tutorial 7 but they are the guidelines: When working with studs: studs support your audience - Section 4: Installing Polk Speakers: Cutting Drywall and Running Speaker Cables This section covers cutting into the sheetrock to start the cut these things.
... a professional to pull the cable and install the speakers. Sheetrock saws have a pointed tip that make the decision to bring in the home. The Universal Building Code or UBC, and most all local codes have to pull a cable or two. Polk Audio can recommend a professional installation company, call (800)... increase dust by 7 1/2" DIY CI Tutorial 7 but they are the guidelines: When working with studs: studs support your audience - Section 4: Installing Polk Speakers: Cutting Drywall and Running Speaker Cables This section covers cutting into the sheetrock to start the cut these things.
DIY In-Ceiling and In-Wall Installation Guide
Page 8
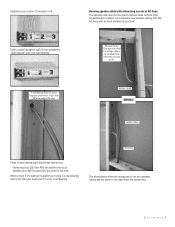
... 40% the width of the stud Notches must be sure to keep your drilled holes to the right show the wrong way to run your speaker cabling from the AC lines with alternating current or AC lines: The national code restricts the use of common holes for performance reasons try to... separate your speaker cables and the photo to less then 40% the width of the stud speaker cables WRONG! DIY CI Tutorial 8 Also for both. Running speaker cable with as much distance as practical: National Electric Code does not allow low...
... 40% the width of the stud Notches must be sure to keep your drilled holes to the right show the wrong way to run your speaker cabling from the AC lines with alternating current or AC lines: The national code restricts the use of common holes for performance reasons try to... separate your speaker cables and the photo to less then 40% the width of the stud speaker cables WRONG! DIY CI Tutorial 8 Also for both. Running speaker cable with as much distance as practical: National Electric Code does not allow low...

DIY In-Ceiling and In-Wall Installation Guide
Page 9
When running speaker cables separate them from AC wiring and when When bending the speaker cables use a gentle or gradual arch: crossing the AC wires cross them at 90 degrees: Wrong speaker cables AC wiring RIGHT speaker cables AC wiring Correct DIY CI Tutorial 9
When running speaker cables separate them from AC wiring and when When bending the speaker cables use a gentle or gradual arch: crossing the AC wires cross them at 90 degrees: Wrong speaker cables AC wiring RIGHT speaker cables AC wiring Correct DIY CI Tutorial 9
DIY In-Ceiling and In-Wall Installation Guide
Page 10
...! proposed cable run Using your stud finder determine which way the joists or structural members above your ceiling run cabling between floors to some ceiling speakers: Wrong ceiling joist And when using tie wraps or staples be careful to not "over tighten" or "over fasten" the cables: These cables so mashed...
...! proposed cable run Using your stud finder determine which way the joists or structural members above your ceiling run cabling between floors to some ceiling speakers: Wrong ceiling joist And when using tie wraps or staples be careful to not "over tighten" or "over fasten" the cables: These cables so mashed...

DIY In-Ceiling and In-Wall Installation Guide
Page 11
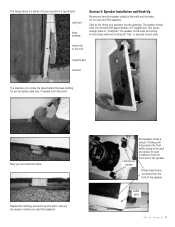
... wall stud Thread the cable through the top plate (use the fish-tape if needed). ceiling joist top plate wall stud wall stud When attaching speaker cabling to the pull or fish tap-overlap the cable through the "paper-clip" on the end of electrical tape as shown to create a cable... channel: Thread the pull tape from your speaker opening back through the wall. Fish the tape from the top notch through the wall to the speaker opening , attach the speaker wire and pull (gently) up through the wall/ceiling notch,attach the cable and pull...
... wall stud Thread the cable through the top plate (use the fish-tape if needed). ceiling joist top plate wall stud wall stud When attaching speaker cabling to the pull or fish tap-overlap the cable through the "paper-clip" on the end of electrical tape as shown to create a cable... channel: Thread the pull tape from your speaker opening back through the wall. Fish the tape from the top notch through the wall to the speaker opening , attach the speaker wire and pull (gently) up through the wall/ceiling notch,attach the cable and pull...

DIY In-Ceiling and In-Wall Installation Guide
Page 12
Horizontal runs Running speaker cabling across a room may seem difficult-one good idea is possible to drill through using the speaker hole to utilize the base board molding. First use a utility knife and score the top edge of the base molding to separate the paint on the dry wall and the paint on the molding then using a stiff putty blade gently pry the molding outward as shown: When you find a fire-block in between the studs it is to get your drill into the wall: D I Y C I T u t o r i a l 12
Horizontal runs Running speaker cabling across a room may seem difficult-one good idea is possible to drill through using the speaker hole to utilize the base board molding. First use a utility knife and score the top edge of the base molding to separate the paint on the dry wall and the paint on the molding then using a stiff putty blade gently pry the molding outward as shown: When you find a fire-block in between the studs it is to get your drill into the wall: D I Y C I T u t o r i a l 12
DIY In-Ceiling and In-Wall Installation Guide
Page 13
The image below is to utilize the space behind the base molding for your new Polk speakers. Phillips head screw, accessed from the front side of the speaker. Start by dry-fitting your new Polk speakers! rotating cam clamps Our speakers utilize a unique "rotating cam" that presses the front baffle casing to the wall and allows for...
The image below is to utilize the space behind the base molding for your new Polk speakers. Phillips head screw, accessed from the front side of the speaker. Start by dry-fitting your new Polk speakers! rotating cam clamps Our speakers utilize a unique "rotating cam" that presses the front baffle casing to the wall and allows for...
DIY In-Ceiling and In-Wall Installation Guide
Page 14
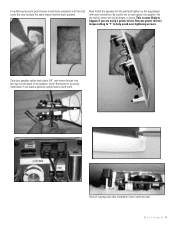
...'s torque setting to "1" to over -tightening screws. D I Y C I T u t o r i a l 14 Be careful not to help avoid over tighten the speaker-the dry wall or sheet rock could dimple, or break. Strip your screwdriver. This is most likely to happen if you leave a generous cable lead ...to place the same amount behind each speaker). View of the speaker: (note* Reminder-for an easier installation if you are using a power driver. Now install the speaker into the wall cavity (be sure to work with your speaker cables back about 3/4", and insert the pair into the...
...'s torque setting to "1" to over -tightening screws. D I Y C I T u t o r i a l 14 Be careful not to help avoid over tighten the speaker-the dry wall or sheet rock could dimple, or break. Strip your screwdriver. This is most likely to happen if you leave a generous cable lead ...to place the same amount behind each speaker). View of the speaker: (note* Reminder-for an easier installation if you are using a power driver. Now install the speaker into the wall cavity (be sure to work with your speaker cables back about 3/4", and insert the pair into the...
DIY In-Ceiling and In-Wall Installation Guide
Page 15
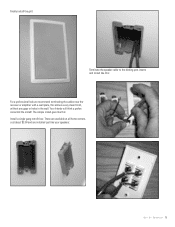
The simple install goes like your speakers: D I Y C I T u t o r i a l 15 Finally install the grill: Terminate the speaker cable to the binding post inserts and install like this: For a professional look we recommend terminating the cables near the receiver or amplifier with a wall plate, this : Install a single gang retrofit box: These are available at all home centers, cost about $3.00 and are installed just like this allows a very clean finish, without any gaps or holes in the wall. Your friends will think a professional did the install!
The simple install goes like your speakers: D I Y C I T u t o r i a l 15 Finally install the grill: Terminate the speaker cable to the binding post inserts and install like this: For a professional look we recommend terminating the cables near the receiver or amplifier with a wall plate, this : Install a single gang retrofit box: These are available at all home centers, cost about $3.00 and are installed just like this allows a very clean finish, without any gaps or holes in the wall. Your friends will think a professional did the install!

MC Series Manual
Page 2
... available for short term peaks is important to articles, FAQs, and online manuals are available on the Polk Audio website www.polkaudio.com or by installing speakers in your purchase, or contact Polk Audio Customer Service 800-377-7655 (M-F, 9-6 EST, US & Canada only) or via email [email protected] local laws and/or regulations may apply regarding the disposal of this level can add a harsh, gritty sound to the speaker, contact the authorized Polk Audio dealer where you cut a hole in -ceiling placement. If you not to better sound quality, maximum dynamic range and effortless ...
... available for short term peaks is important to articles, FAQs, and online manuals are available on the Polk Audio website www.polkaudio.com or by installing speakers in your purchase, or contact Polk Audio Customer Service 800-377-7655 (M-F, 9-6 EST, US & Canada only) or via email [email protected] local laws and/or regulations may apply regarding the disposal of this level can add a harsh, gritty sound to the speaker, contact the authorized Polk Audio dealer where you cut a hole in -ceiling placement. If you not to better sound quality, maximum dynamic range and effortless ...
MC Series Manual
Page 3
.... Be careful not to remove grille. Spray painting is an ideal primer. 2. Place this while the speaker is completely dry, remove the masking material. Figure 5-MC60, MC80 Models: While supporting the tweeter bridge, carefully use your index finger to protect the drivers and ...coating is recommended (figure 7). 2. If you do this on the frame. Use thin coats of the speaker, use a brush and paint. When the grille is already in thin coats. 4 Polk Audio Customer Service 800-377-7655 (Outside USA & Canada: 410-358-3600) PAINTING THE FRAME: 1. When...
.... Be careful not to remove grille. Spray painting is an ideal primer. 2. Place this while the speaker is completely dry, remove the masking material. Figure 5-MC60, MC80 Models: While supporting the tweeter bridge, carefully use your index finger to protect the drivers and ...coating is recommended (figure 7). 2. If you do this on the frame. Use thin coats of the speaker, use a brush and paint. When the grille is already in thin coats. 4 Polk Audio Customer Service 800-377-7655 (Outside USA & Canada: 410-358-3600) PAINTING THE FRAME: 1. When...

MC Series Manual
Page 4
... that the rotating wall clamps are in the proper use a knife or screwdriver to pry between the grille and the speaker frame. Install speaker wires before installing speakers. You Will Need: • Pencil for drywall or other pointed metal tool. Once you have two unfrayed strands). ...the conductors into the cutout. Wire meeting appropriate building and fire codes must be used. Figure 10b-Rectangular Template: Trace around the template. 6 Polk Audio Customer Service 800-377-7655 (Outside USA & Canada: 410-358-3600) 3. Use this hole to insert the saw , utility knife or...
... that the rotating wall clamps are in the proper use a knife or screwdriver to pry between the grille and the speaker frame. Install speaker wires before installing speakers. You Will Need: • Pencil for drywall or other pointed metal tool. Once you have two unfrayed strands). ...the conductors into the cutout. Wire meeting appropriate building and fire codes must be used. Figure 10b-Rectangular Template: Trace around the template. 6 Polk Audio Customer Service 800-377-7655 (Outside USA & Canada: 410-358-3600) 3. Use this hole to insert the saw , utility knife or...


