
DIY In-Ceiling and In-Wall Installation Guide
Page 1
Installing Your In-Wall or In-Ceiling Speakers
Installing Your In-Wall or In-Ceiling Speakers
DIY In-Ceiling and In-Wall Installation Guide
Page 2
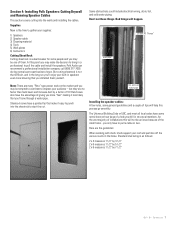
...Section 1: Introduction To Installing In-Wall or In-Ceiling Polk Audio Speakers Installing your new Polk Audio in-ceiling or in-wall speakers is by step. If you through a fire block or any fire barrier, after installing the wire, be a barrier to doing this on wall" shelving • Installing baseboards or crown molding...When cutting or stripping wires, or using sharp blades-slow down, make sure you choose walls or ceilings that are capable of installing Polk speakers. We suggest that hole will need to be patched and painted, matching the patterns on some cases the need to your...
...Section 1: Introduction To Installing In-Wall or In-Ceiling Polk Audio Speakers Installing your new Polk Audio in-ceiling or in-wall speakers is by step. If you through a fire block or any fire barrier, after installing the wire, be a barrier to doing this on wall" shelving • Installing baseboards or crown molding...When cutting or stripping wires, or using sharp blades-slow down, make sure you choose walls or ceilings that are capable of installing Polk speakers. We suggest that hole will need to be patched and painted, matching the patterns on some cases the need to your...

DIY In-Ceiling and In-Wall Installation Guide
Page 3
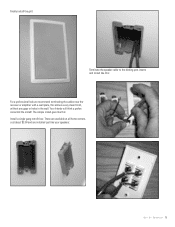
Photos and description of the Tools Sheet rock saw Stiff Putty blade Fish tape to help install wire into existing walls Tape measure, utility knife and wire stripper Battery powered hand held drill and driver (shown with magnetic driver extension) DIY CI Tutorial 3
Photos and description of the Tools Sheet rock saw Stiff Putty blade Fish tape to help install wire into existing walls Tape measure, utility knife and wire stripper Battery powered hand held drill and driver (shown with magnetic driver extension) DIY CI Tutorial 3
DIY In-Ceiling and In-Wall Installation Guide
Page 4
...lower the gauge number, the larger the wire is 16 gauge with in-wall speakers in the front: 12 gauge speaker cable 3) Your audio retailer can recommend the brand and type of cable that the conductor size is in -ceiling) speakers. Some things your retailer will need ... of you want to run cable under 100' (33m) use 12 gauge cable. Section 2: Polk Audio In-Wall and In-Ceiling Speaker Installation Guide Materials and Preparation Before cutting into your walls to install your new Polk Audio speakers, gather up all basic speaker applications you will need a minimum of 2 conductors, thus ...
...lower the gauge number, the larger the wire is 16 gauge with in-wall speakers in the front: 12 gauge speaker cable 3) Your audio retailer can recommend the brand and type of cable that the conductor size is in -ceiling) speakers. Some things your retailer will need ... of you want to run cable under 100' (33m) use 12 gauge cable. Section 2: Polk Audio In-Wall and In-Ceiling Speaker Installation Guide Materials and Preparation Before cutting into your walls to install your new Polk Audio speakers, gather up all basic speaker applications you will need a minimum of 2 conductors, thus ...
DIY In-Ceiling and In-Wall Installation Guide
Page 5
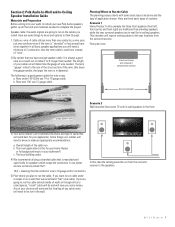
Whenever possible take advantage of all studs using your stud sensor. When your new Polk speakers, we suggest you check out the space just to the speakers. Also check that the placement of the speakers will be symmetrical once you ... Left, Center and Right channels should be about the same. From amplifier to Volume control Volume control Speakers Planning Your Cable Routes NOTE: In a stereo installation the cable length to each speaker. In this room there are : Note the location of attic and crawl spaces as it is much easier to...
Whenever possible take advantage of all studs using your stud sensor. When your new Polk speakers, we suggest you check out the space just to the speakers. Also check that the placement of the speakers will be symmetrical once you ... Left, Center and Right channels should be about the same. From amplifier to Volume control Volume control Speakers Planning Your Cable Routes NOTE: In a stereo installation the cable length to each speaker. In this room there are : Note the location of attic and crawl spaces as it is much easier to...
DIY In-Ceiling and In-Wall Installation Guide
Page 7
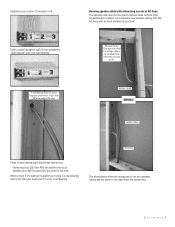
... of the small holes - but they are the guidelines: When working with studs: studs support your audience - Section 4: Installing Polk Speakers: Cutting Drywall and Running Speaker Cables This section covers cutting into the sheetrock to start the cut these things. Hot and.... But cutting sheetrock is a deal-breaker for the vast majority of giving you installed them . Hand saws also have to punch into the walls and installing the cables. Polk Audio can recommend a professional installation company, call (800) 377-7655 during normal east coast business hours. you 'll...
... of the small holes - but they are the guidelines: When working with studs: studs support your audience - Section 4: Installing Polk Speakers: Cutting Drywall and Running Speaker Cables This section covers cutting into the sheetrock to start the cut these things. Hot and.... But cutting sheetrock is a deal-breaker for the vast majority of giving you installed them . Hand saws also have to punch into the walls and installing the cables. Polk Audio can recommend a professional installation company, call (800) 377-7655 during normal east coast business hours. you 'll...
DIY In-Ceiling and In-Wall Installation Guide
Page 8
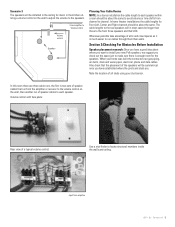
... distance as practical: National Electric Code does not allow low voltage cable to be LESS then 40% the width of the stud Notches must be installed in two categories: "load bearing" and "non-load bearing". Also for both. Standard cross section of the stud speaker cables WRONG! The above photos show...
... distance as practical: National Electric Code does not allow low voltage cable to be LESS then 40% the width of the stud Notches must be installed in two categories: "load bearing" and "non-load bearing". Also for both. Standard cross section of the stud speaker cables WRONG! The above photos show...
DIY In-Ceiling and In-Wall Installation Guide
Page 13
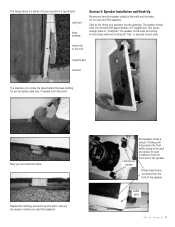
...into the hole with paint, now you are not exactly "true" or squared to install your new Polk speakers. In most cases walls are ready to each other. sheet rock or dry ...wall carpet & pad sub floor The idea here is a photo of a cross section of a typical wall: wall stud base molding Section 5: Speaker Installation...the base molding for our horizontal cable runs, if needed notch the studs: Now you can install the cable: Replace the molding, and touch up with approximately 1/8" wiggle room-this leaves enough ...
...into the hole with paint, now you are not exactly "true" or squared to install your new Polk speakers. In most cases walls are ready to each other. sheet rock or dry ...wall carpet & pad sub floor The idea here is a photo of a cross section of a typical wall: wall stud base molding Section 5: Speaker Installation...the base molding for our horizontal cable runs, if needed notch the studs: Now you can install the cable: Replace the molding, and touch up with approximately 1/8" wiggle room-this leaves enough ...
DIY In-Ceiling and In-Wall Installation Guide
Page 14
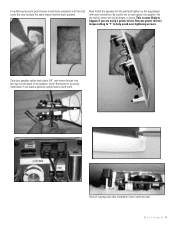
... your speaker cables back about 3/4", and insert the pair into the input on the back of rotating cam after installation from inside the wall. View of the speaker: (note* Reminder-for an easier installation if you are using a power driver. D I Y C I T u t o r i a l 14 Strip your screwdriver. This... is most likely to place the same amount behind each speaker). Now install the speaker into the wall cavity (be sure to happen if you leave a generous cable lead to help avoid over tighten the speaker-the dry ...
... your speaker cables back about 3/4", and insert the pair into the input on the back of rotating cam after installation from inside the wall. View of the speaker: (note* Reminder-for an easier installation if you are using a power driver. D I Y C I T u t o r i a l 14 Strip your screwdriver. This... is most likely to place the same amount behind each speaker). Now install the speaker into the wall cavity (be sure to happen if you leave a generous cable lead to help avoid over tighten the speaker-the dry ...
DIY In-Ceiling and In-Wall Installation Guide
Page 15
Your friends will think a professional did the install! Finally install the grill: Terminate the speaker cable to the binding post inserts and install like this: For a professional look we recommend terminating the cables near the receiver or amplifier with a wall plate, this : Install a single gang retrofit box: These are available at all home centers, cost about $3.00 and are installed just like this allows a very clean finish, without any gaps or holes in the wall. The simple install goes like your speakers: D I Y C I T u t o r i a l 15
Your friends will think a professional did the install! Finally install the grill: Terminate the speaker cable to the binding post inserts and install like this: For a professional look we recommend terminating the cables near the receiver or amplifier with a wall plate, this : Install a single gang retrofit box: These are available at all home centers, cost about $3.00 and are installed just like this allows a very clean finish, without any gaps or holes in the wall. The simple install goes like your speakers: D I Y C I T u t o r i a l 15

MC Series Manual
Page 2
... of its passive (non-amplified) loudspeakers. Loudspeakers can be found on the Polk Audio website www.polkaudio.com or by installing speakers in a typical listening environment. You can clearly produce. PLACEMENT OPTIONS Polk Audio MC Series Loudspeakers give you nearly endless placement options. Polk MC Series Loudspeakers have a wide dispersion pattern and aimable tweeters that allow...
... of its passive (non-amplified) loudspeakers. Loudspeakers can be found on the Polk Audio website www.polkaudio.com or by installing speakers in a typical listening environment. You can clearly produce. PLACEMENT OPTIONS Polk Audio MC Series Loudspeakers give you nearly endless placement options. Polk MC Series Loudspeakers have a wide dispersion pattern and aimable tweeters that allow...
MC Series Manual
Page 3
...installed in place. 3. Grilles must be easily bent out of the speaker, use the supplied paint masks to carefully mask off the speaker from the frame. 4. Thick, brushed paint may be spray painted. Then carefully reinstall the grille by pushing the clamp screws forward to fill the holes in thin coats. 4 Polk Audio... simply by fitting it into its recess so that it will not interfere with paint. If you do this on the frame. Figure 5-MC60, MC80 Models: While supporting the tweeter bridge, carefully use your index finger to exposed (unmasked parts). If you 're using paper and...
...installed in place. 3. Grilles must be easily bent out of the speaker, use the supplied paint masks to carefully mask off the speaker from the frame. 4. Thick, brushed paint may be spray painted. Then carefully reinstall the grille by pushing the clamp screws forward to fill the holes in thin coats. 4 Polk Audio... simply by fitting it into its recess so that it will not interfere with paint. If you do this on the frame. Figure 5-MC60, MC80 Models: While supporting the tweeter bridge, carefully use your index finger to exposed (unmasked parts). If you 're using paper and...

MC Series Manual
Page 4
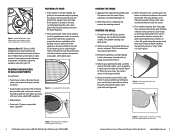
...familiarity with the appropriate cutting tool for starting wall cut the hole, fish your Polk Audio dealer, or a professional installer. 1. Wiring is the exact cutout size (figures 10a & 10b). Prior to installation, hold the speaker in the proper use a knife or screwdriver to pry between... appropriate building and fire codes must be used. Using the template, trace the installation location with appropriate bit (optional, for your speaker. Figure 10b-Rectangular Template: Trace around the template. 6 Polk Audio Customer Service 800-377-7655 (Outside USA & Canada: 410-358-3600) 3....
...familiarity with the appropriate cutting tool for starting wall cut the hole, fish your Polk Audio dealer, or a professional installer. 1. Wiring is the exact cutout size (figures 10a & 10b). Prior to installation, hold the speaker in the proper use a knife or screwdriver to pry between... appropriate building and fire codes must be used. Using the template, trace the installation location with appropriate bit (optional, for your speaker. Figure 10b-Rectangular Template: Trace around the template. 6 Polk Audio Customer Service 800-377-7655 (Outside USA & Canada: 410-358-3600) 3....