
DIY In-Ceiling and In-Wall Installation Guide
Page 1
Installing Your In-Wall or In-Ceiling Speakers
Installing Your In-Wall or In-Ceiling Speakers
DIY In-Ceiling and In-Wall Installation Guide
Page 2
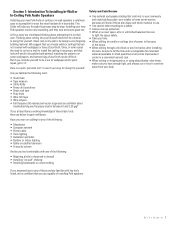
...DIY CI Tutorial 2 This Guide will know if these basic tools then see if you're up for any of installing Polk speakers. We suggest that you choose walls or ceilings that area of these and are familiar with the tools listed, we're confident that hole will need to be patched and...not covered with wallpaper or have a faux finish. Here is relatively easy to accomplish for it -yourselfer. Section 1: Introduction To Installing In-Wall or In-Ceiling Polk Audio Speakers Installing your new Polk Audio in-ceiling or in-wall speakers is a quick "personal test" to see below to gain confidence.
...DIY CI Tutorial 2 This Guide will know if these basic tools then see if you're up for any of installing Polk speakers. We suggest that you choose walls or ceilings that area of these and are familiar with the tools listed, we're confident that hole will need to be patched and...not covered with wallpaper or have a faux finish. Here is relatively easy to accomplish for it -yourselfer. Section 1: Introduction To Installing In-Wall or In-Ceiling Polk Audio Speakers Installing your new Polk Audio in-ceiling or in-wall speakers is a quick "personal test" to see below to gain confidence.
DIY In-Ceiling and In-Wall Installation Guide
Page 4
... wire needed. The term "gauge" refers to complete the project. DIY CI Tutorial 4 Section 2: Polk Audio In-Wall and In-Ceiling Speaker Installation Guide Materials and Preparation Before cutting into your walls to install your new Polk Audio speakers, gather up all basic speaker applications you will need a minimum of 2 conductors, thus the term cable is used here...
... wire needed. The term "gauge" refers to complete the project. DIY CI Tutorial 4 Section 2: Polk Audio In-Wall and In-Ceiling Speaker Installation Guide Materials and Preparation Before cutting into your walls to install your new Polk Audio speakers, gather up all basic speaker applications you will need a minimum of 2 conductors, thus the term cable is used here...
DIY In-Ceiling and In-Wall Installation Guide
Page 5
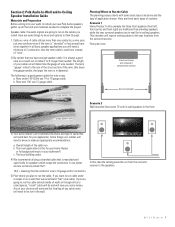
... time shifts from amplifier DIY CI Tutorial 5 input from channel to the speakers. In this room there are : Note the location of speaker cables to each speaker within a room should be installed in the ceiling for music in most cases be longer than walls. Section 3:Checking For...'s OK. The cable lengths to the rear speakers will be about where you want to each speaker. From amplifier to Volume control Volume control Speakers Planning Your Cable Routes NOTE: In a stereo installation the cable length to install your new Polk speakers, we suggest you have a good idea about...
... time shifts from amplifier DIY CI Tutorial 5 input from channel to the speakers. In this room there are : Note the location of speaker cables to each speaker within a room should be installed in the ceiling for music in most cases be longer than walls. Section 3:Checking For...'s OK. The cable lengths to the rear speakers will be about where you want to each speaker. From amplifier to Volume control Volume control Speakers Planning Your Cable Routes NOTE: In a stereo installation the cable length to install your new Polk speakers, we suggest you have a good idea about...
DIY In-Ceiling and In-Wall Installation Guide
Page 6
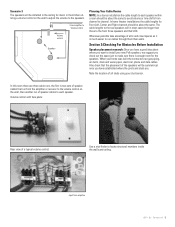
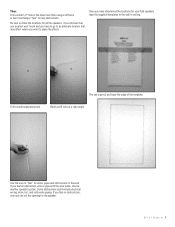
... obstructions in the sheet rock then using a stiff wire or bent coat hanger "feel" for your Polk speakers tape the supplied templates to place the others. Once you have to go to an alternate location that... may affect where you can cut the opening for the speaker. Be sure to check the locations for all the speakers, if you discover that one location won't work and you feel ...an obstruction, wire or pipe with the wire probe, choose another speaker location. If you have determined the locations for any obstructions. Then: Drill a small 1/2" ...
... obstructions in the sheet rock then using a stiff wire or bent coat hanger "feel" for your Polk speakers tape the supplied templates to place the others. Once you have to go to an alternate location that... may affect where you can cut the opening for the speaker. Be sure to check the locations for all the speakers, if you discover that one location won't work and you feel ...an obstruction, wire or pipe with the wire probe, choose another speaker location. If you have determined the locations for any obstructions. Then: Drill a small 1/2" ...
DIY In-Ceiling and In-Wall Installation Guide
Page 10
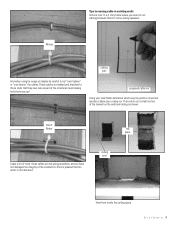
...I T u t o r i a l 10 proposed cable run Using your stud finder determine which way the joists or structural members above your ceiling run cabling between floors to some ceiling speakers: Wrong ceiling joist And when using tie wraps or staples be careful to not "over tighten" or "over fasten" the cables: These cables so mashed and attached... runs: In a 2 story home where you want to run . Then notch out a small section of the drywall on the wall and ceiling as shown: Much Better top plate Leave a bit of room, these studs that his music is pleased that they now rate as part of...
...I T u t o r i a l 10 proposed cable run Using your stud finder determine which way the joists or structural members above your ceiling run cabling between floors to some ceiling speakers: Wrong ceiling joist And when using tie wraps or staples be careful to not "over tighten" or "over fasten" the cables: These cables so mashed and attached... runs: In a 2 story home where you want to run . Then notch out a small section of the drywall on the wall and ceiling as shown: Much Better top plate Leave a bit of room, these studs that his music is pleased that they now rate as part of...

DIY In-Ceiling and In-Wall Installation Guide
Page 11
... the end of electrical tape as shown to create a cable channel: Thread the pull tape from your speaker opening back through the wall/ceiling notch,attach the cable and pull over to the speaker opening , attach the speaker wire and pull (gently) up through the wall. D I Y C I T u t o r i a l 11 Carefully drill through the top plate as...
... the end of electrical tape as shown to create a cable channel: Thread the pull tape from your speaker opening back through the wall/ceiling notch,attach the cable and pull over to the speaker opening , attach the speaker wire and pull (gently) up through the wall. D I Y C I T u t o r i a l 11 Carefully drill through the top plate as...
DIY In-Ceiling and In-Wall Installation Guide
Page 13
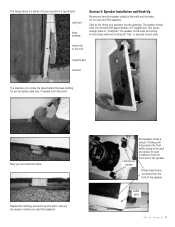
...and allows for easy installation from the front of the speaker baffle plate D I Y C I T u t o r i a l 13 Start by dry-fitting your new Polk speakers. The speaker should slide into the openings. In most cases walls are ready to install your new Polk speakers! sheet rock or dry wall carpet & pad sub floor... the cable: Replace the molding, and touch up with approximately 1/8" wiggle room-this leaves enough space to "straighten" the speaker to the walls and ceiling. The image below is to utilize the space behind the base molding for our horizontal cable runs, if needed notch the ...
...and allows for easy installation from the front of the speaker baffle plate D I Y C I T u t o r i a l 13 Start by dry-fitting your new Polk speakers. The speaker should slide into the openings. In most cases walls are ready to install your new Polk speakers! sheet rock or dry wall carpet & pad sub floor... the cable: Replace the molding, and touch up with approximately 1/8" wiggle room-this leaves enough space to "straighten" the speaker to the walls and ceiling. The image below is to utilize the space behind the base molding for our horizontal cable runs, if needed notch the ...

MC Series Manual
Page 2
... wattage, is conducive to your listening material. Loudspeakers can be expressed as front/main home theater speakers (figure 2), aim the tweeters toward the nearest reflecting surface (an adjacent wall or ceiling) for a more diffuse sound field. 2 Polk Audio Customer Service 800-377-7655 (Outside USA & Canada: 410-358-3600) 2' 2' (60cm) (60cm) recommended height 5' 7" (170cm...
... wattage, is conducive to your listening material. Loudspeakers can be expressed as front/main home theater speakers (figure 2), aim the tweeters toward the nearest reflecting surface (an adjacent wall or ceiling) for a more diffuse sound field. 2 Polk Audio Customer Service 800-377-7655 (Outside USA & Canada: 410-358-3600) 2' 2' (60cm) (60cm) recommended height 5' 7" (170cm...

MC Series Manual
Page 4
...or other pointed metal tool. Once you have two unfrayed strands). Follow the hookup directions included with the area behind the wall or ceiling into your cutout without nicking your previously positioned wiring out of the two conductors to help you maintain consistency (figure 12). 5. ...+_ +_ AMP _+ _+ Figure 12-Hook up the speaker wires. Use at least 1" (25mm) from each of the two conductors of the wire to expose the bare metal and twist each of local building and fire codes and a familiarity with your Polk Audio dealer, or a professional installer. 1. Your cutout must...
...or other pointed metal tool. Once you have two unfrayed strands). Follow the hookup directions included with the area behind the wall or ceiling into your cutout without nicking your previously positioned wiring out of the two conductors to help you maintain consistency (figure 12). 5. ...+_ +_ AMP _+ _+ Figure 12-Hook up the speaker wires. Use at least 1" (25mm) from each of the two conductors of the wire to expose the bare metal and twist each of local building and fire codes and a familiarity with your Polk Audio dealer, or a professional installer. 1. Your cutout must...


