DIY In-Ceiling and In-Wall Installation Guide
Page 1
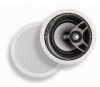
Installing Your In-Wall or In-Ceiling Speakers
Installing Your In-Wall or In-Ceiling Speakers
DIY In-Ceiling and In-Wall Installation Guide
Page 2
... installing the wire, be very rewarding, and they look and sound great too. Here is by step. Section 1: Introduction To Installing In-Wall or In-Ceiling Polk Audio Speakers Installing your new Polk Audio in-ceiling or in a motion away from your body. This Guide will need to cut or slice in -wall... speakers is relatively easy to install the cabling is necessary, and that you through a fire block or any of these and are familiar with the tools ...
... installing the wire, be very rewarding, and they look and sound great too. Here is by step. Section 1: Introduction To Installing In-Wall or In-Ceiling Polk Audio Speakers Installing your new Polk Audio in-ceiling or in a motion away from your body. This Guide will need to cut or slice in -wall... speakers is relatively easy to install the cabling is necessary, and that you through a fire block or any of these and are familiar with the tools ...
DIY In-Ceiling and In-Wall Installation Guide
Page 4
... be run b. In this case the cabling would be run in the wall. Section 2: Polk Audio In-Wall and In-Ceiling Speaker Installation Guide Materials and Preparation Before cutting into your walls to install your new Polk Audio speakers, gather up all basic speaker applications you will need a minimum of 2 conductors, thus the term cable is used here...
... be run b. In this case the cabling would be run in the wall. Section 2: Polk Audio In-Wall and In-Ceiling Speaker Installation Guide Materials and Preparation Before cutting into your walls to install your new Polk Audio speakers, gather up all basic speaker applications you will need a minimum of 2 conductors, thus the term cable is used here...
DIY In-Ceiling and In-Wall Installation Guide
Page 5
...sure there is much easier to run cables through them than those to the front three speakers and that run of a typical volume control: Use a stud finder to the speakers. When your new Polk speakers, we suggest you have established where the joists and studs are three cable runs, ...the first is two sets of speaker cables that 's OK. Scenario 3 The speakers will be installed in the ceiling for music in most cases be about ...
...sure there is much easier to run cables through them than those to the front three speakers and that run of a typical volume control: Use a stud finder to the speakers. When your new Polk speakers, we suggest you have established where the joists and studs are three cable runs, ...the first is two sets of speaker cables that 's OK. Scenario 3 The speakers will be installed in the ceiling for music in most cases be about ...
DIY In-Ceiling and In-Wall Installation Guide
Page 6
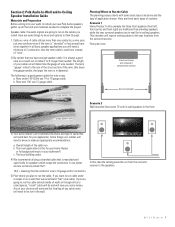
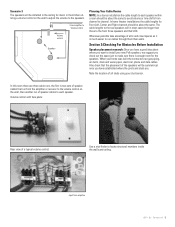
If you feel no obstructions, now you feel " for your Polk speakers tape the supplied templates to place the others. The use a pencil and trace the edge of the template: ...wire or bent coat hanger "feel an obstruction, wire or pipe with the wire probe, choose another speaker location. DIY CI Tutorial 6 Then: Drill a small 1/2" hole in the wall If you can cut the opening for the... electrical wiring, drain, hot, and cold water piping. Be sure to check the locations for all the speakers, if you discover that one location won't work and you have to go to an alternate location that may...
If you feel no obstructions, now you feel " for your Polk speakers tape the supplied templates to place the others. The use a pencil and trace the edge of the template: ...wire or bent coat hanger "feel an obstruction, wire or pipe with the wire probe, choose another speaker location. DIY CI Tutorial 6 Then: Drill a small 1/2" hole in the wall If you can cut the opening for the... electrical wiring, drain, hot, and cold water piping. Be sure to check the locations for all the speakers, if you discover that one location won't work and you have to go to an alternate location that may...
DIY In-Ceiling and In-Wall Installation Guide
Page 10
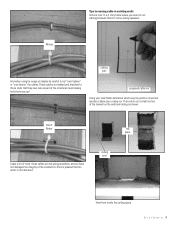
... D I Y C I T u t o r i a l 10 Then notch out a small section of the drywall on the wall and ceiling as part of the conductors-Elvis is pleased that they now rate as shown: Much Better top plate Leave a bit of room, these cables are ... helping hold the house up! proposed cable run Using your stud finder determine which way the joists or structural members above your ceiling run cabling between floors to some ceiling speakers: Wrong ceiling joist And when using tie wraps or staples be careful to not "over tighten" or "over fasten" the cables: These cables...
... D I Y C I T u t o r i a l 10 Then notch out a small section of the drywall on the wall and ceiling as part of the conductors-Elvis is pleased that they now rate as shown: Much Better top plate Leave a bit of room, these cables are ... helping hold the house up! proposed cable run Using your stud finder determine which way the joists or structural members above your ceiling run cabling between floors to some ceiling speakers: Wrong ceiling joist And when using tie wraps or staples be careful to not "over tighten" or "over fasten" the cables: These cables...

DIY In-Ceiling and In-Wall Installation Guide
Page 11
... from the top notch through the wall to the opening, attach the speaker wire and pull (gently) up through the wall. ceiling joist top plate wall stud wall stud When attaching speaker cabling to the speaker opening back through the wall/ceiling notch,attach the cable and pull over to the pull or fish tap...
... from the top notch through the wall to the opening, attach the speaker wire and pull (gently) up through the wall. ceiling joist top plate wall stud wall stud When attaching speaker cabling to the speaker opening back through the wall/ceiling notch,attach the cable and pull over to the pull or fish tap...
DIY In-Ceiling and In-Wall Installation Guide
Page 13
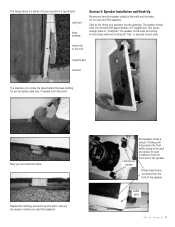
... up with approximately 1/8" wiggle room-this leaves enough space to "straighten" the speaker to the walls and ceiling. In most cases walls are ready to the wall and allows for your speakers into the hole with paint, now you are not exactly "true" or squared... walls and the holes cut for easy installation from the front of the speaker. rotating cam clamps Our speakers utilize a unique "rotating cam" that presses the front baffle casing to install your new Polk speakers! Phillips head screw, accessed from the front side of the speaker baffle plate D I Y C I T u t o r i...
... up with approximately 1/8" wiggle room-this leaves enough space to "straighten" the speaker to the walls and ceiling. In most cases walls are ready to the wall and allows for your speakers into the hole with paint, now you are not exactly "true" or squared... walls and the holes cut for easy installation from the front of the speaker. rotating cam clamps Our speakers utilize a unique "rotating cam" that presses the front baffle casing to install your new Polk speakers! Phillips head screw, accessed from the front side of the speaker baffle plate D I Y C I T u t o r i...
TCi Series Manual
Page 6
...around the template. If you possess the necessary skills or tools, consult your speakers. Install speaker wires before installing speakers. En commençant par un coin, poussez petit à petit ...l'utilisation d'outils manuels et électriques. Starting with the area behind the wall or ceiling into the grille notch a little bit at least 18 gauge wire or heavier for the...carefully press the fabric scrim back into its recess so that you intend to install your Polk Audio dealer, or a professional installer. 5. POP-OUT AREA TEMPLATE TEMPLATE FIGURE 10a Round ...
...around the template. If you possess the necessary skills or tools, consult your speakers. Install speaker wires before installing speakers. En commençant par un coin, poussez petit à petit ...l'utilisation d'outils manuels et électriques. Starting with the area behind the wall or ceiling into the grille notch a little bit at least 18 gauge wire or heavier for the...carefully press the fabric scrim back into its recess so that you intend to install your Polk Audio dealer, or a professional installer. 5. POP-OUT AREA TEMPLATE TEMPLATE FIGURE 10a Round ...

TCi Series Manual
Page 7
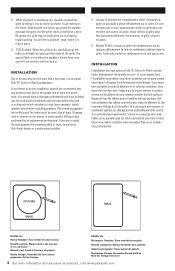
...10b]. • Carefully cut ). Use a level to installation, hold the speaker in your wall or ceiling material. Haga el corte con la herramienta apropiada. L+EFT_ R+IGH_T AMP _+ _+ FIGURE 12 Hook up the speaker wires. Conecte los cables de los altavoces. Prior to make sure it (...l'aide du gabarit, tracez l'endroit de l'installation avec un crayon. Your cutout must be at least 1" (25mm) from adjoining walls or ceiling, internal studs or plumbing. • Using the template, trace the installation location with appropriate bit (optional, for starting wall cut the hole...
...10b]. • Carefully cut ). Use a level to installation, hold the speaker in your wall or ceiling material. Haga el corte con la herramienta apropiada. L+EFT_ R+IGH_T AMP _+ _+ FIGURE 12 Hook up the speaker wires. Conecte los cables de los altavoces. Prior to make sure it (...l'aide du gabarit, tracez l'endroit de l'installation avec un crayon. Your cutout must be at least 1" (25mm) from adjoining walls or ceiling, internal studs or plumbing. • Using the template, trace the installation location with appropriate bit (optional, for starting wall cut the hole...


