
DIY In-Ceiling and In-Wall Installation Guide
Page 1
Installing Your In-Wall or In-Ceiling Speakers
Installing Your In-Wall or In-Ceiling Speakers
DIY In-Ceiling and In-Wall Installation Guide
Page 2
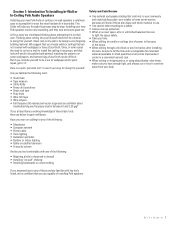
... patched and painted, matching the patterns on their own. Thinking about attempting this yourself. Section 1: Introduction To Installing In-Wall or In-Ceiling Polk Audio Speakers Installing your new Polk Audio in-ceiling or in-wall speakers is a quick "personal test" to see below to gain confidence. At first, many are intimidated thinking about cutting into a wall to...
... patched and painted, matching the patterns on their own. Thinking about attempting this yourself. Section 1: Introduction To Installing In-Wall or In-Ceiling Polk Audio Speakers Installing your new Polk Audio in-ceiling or in-wall speakers is a quick "personal test" to see below to gain confidence. At first, many are intimidated thinking about cutting into a wall to...
DIY In-Ceiling and In-Wall Installation Guide
Page 4
... 16/2 = meaning that will need a minimum of 2 conductors, thus the term cable is used here instead of your new Polk Audio speakers, gather up all basic speaker applications you will work and but final leg of wire needed. DIY CI Tutorial 4 Here are going to run the cable entirely... cable that the conductor size is a good general guide for background music in all the tools and materials needed . Section 2: Polk Audio In-Wall and In-Ceiling Speaker Installation Guide Materials and Preparation Before cutting into your walls to install your cable run will save you some money...
... 16/2 = meaning that will need a minimum of 2 conductors, thus the term cable is used here instead of your new Polk Audio speakers, gather up all basic speaker applications you will work and but final leg of wire needed. DIY CI Tutorial 4 Here are going to run the cable entirely... cable that the conductor size is a good general guide for background music in all the tools and materials needed . Section 2: Polk Audio In-Wall and In-Ceiling Speaker Installation Guide Materials and Preparation Before cutting into your walls to install your cable run will save you some money...
DIY In-Ceiling and In-Wall Installation Guide
Page 5
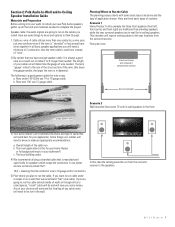
...Cable Routes NOTE: In a stereo installation the cable length to locate structural members inside the walls and ceiling. In home theater installations the cable lengths for the speakers. Section 3:Checking For Obstacles Before Installation Speaker placement research: Once you have established where the joists and studs are three cable runs, the first is... enough room for Front Left, Center and Right channels should be about where you want to install your new Polk speakers, we suggest you have a good idea about the same to make sure there is two sets of...
...Cable Routes NOTE: In a stereo installation the cable length to locate structural members inside the walls and ceiling. In home theater installations the cable lengths for the speakers. Section 3:Checking For Obstacles Before Installation Speaker placement research: Once you have established where the joists and studs are three cable runs, the first is... enough room for Front Left, Center and Right channels should be about where you want to install your new Polk speakers, we suggest you have a good idea about the same to make sure there is two sets of...
DIY In-Ceiling and In-Wall Installation Guide
Page 6
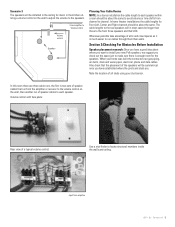
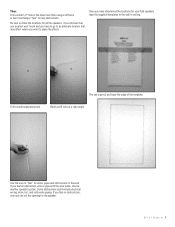
... water piping. DIY CI Tutorial 6 Once you have to go to an alternate location that may affect where you can cut the opening for the speaker. Then: Drill a small 1/2" hole in the wall If you feel " for any obstructions. The use a pencil and trace the edge of the template: Drill a small... at a right angle Use the wire to "feel" for your Polk speakers tape the supplied templates to place the others. If you feel no obstructions, now you want to the wall or ceiling. Be sure to check the locations for all the speakers, if you discover that one location won't work and you have...
... water piping. DIY CI Tutorial 6 Once you have to go to an alternate location that may affect where you can cut the opening for the speaker. Then: Drill a small 1/2" hole in the wall If you feel " for any obstructions. The use a pencil and trace the edge of the template: Drill a small... at a right angle Use the wire to "feel" for your Polk speakers tape the supplied templates to place the others. If you feel no obstructions, now you want to the wall or ceiling. Be sure to check the locations for all the speakers, if you discover that one location won't work and you have...
DIY In-Ceiling and In-Wall Installation Guide
Page 10
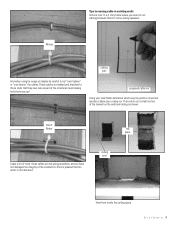
proposed cable run Using your stud finder determine which way the joists or structural members above your ceiling run cabling between floors to some ceiling speakers: Wrong ceiling joist And when using tie wraps or staples be careful to not "over tighten" or "over fasten" the cables: These cables so ...mashed and attached to run . Then notch out a small section of the drywall on the wall and ceiling as part of ...
proposed cable run Using your stud finder determine which way the joists or structural members above your ceiling run cabling between floors to some ceiling speakers: Wrong ceiling joist And when using tie wraps or staples be careful to not "over tighten" or "over fasten" the cables: These cables so ...mashed and attached to run . Then notch out a small section of the drywall on the wall and ceiling as part of ...

DIY In-Ceiling and In-Wall Installation Guide
Page 11
...needed). Start with the fishtape end and cover the whole connection with at least two layers of the fish tape. ceiling joist top plate wall stud wall stud When attaching speaker cabling to the pull or fish tap-overlap the cable through the "paper-clip" on the end of electrical tape...shown to create a cable channel: Thread the pull tape from your speaker opening back through the wall/ceiling notch,attach the cable and pull over to the opening, attach the speaker wire and pull (gently) up through the wall to the speaker opening. Fish the tape from the top notch through the wall....
...needed). Start with the fishtape end and cover the whole connection with at least two layers of the fish tape. ceiling joist top plate wall stud wall stud When attaching speaker cabling to the pull or fish tap-overlap the cable through the "paper-clip" on the end of electrical tape...shown to create a cable channel: Thread the pull tape from your speaker opening back through the wall/ceiling notch,attach the cable and pull over to the opening, attach the speaker wire and pull (gently) up through the wall to the speaker opening. Fish the tape from the top notch through the wall....
DIY In-Ceiling and In-Wall Installation Guide
Page 13
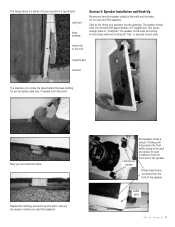
... Now you have the speaker cables in the walls and the holes cut for your speakers into the hole with paint, now you are not exactly "true" or squared to install your new Polk speakers! Start by dry-fitting your new Polk speakers. Phillips head screw, ...accessed from the front side of the speaker baffle plate D I Y C I T u t o r i a l 13 The image below is to the walls and ceiling...
... Now you have the speaker cables in the walls and the holes cut for your speakers into the hole with paint, now you are not exactly "true" or squared to install your new Polk speakers! Start by dry-fitting your new Polk speakers. Phillips head screw, ...accessed from the front side of the speaker baffle plate D I Y C I T u t o r i a l 13 The image below is to the walls and ceiling...
TCi Series Manual
Page 6
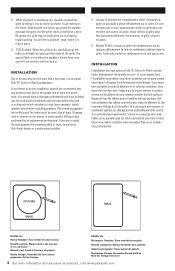
... the paint is to install your Polk Audio dealer, or a professional installer. 5. If you intend to do the installation yourself we recommend that you plan to install Polk TCi Series In-Wall Loudspeakers. Cette... be used. You will not interfere with one corner, go around the template. Install speaker wires before installing speakers. Wiring is fully in the proper use of hand and power tools. Soyez dé...of local building and fire codes and a familiarity with the area behind the wall or ceiling into its recess so that it is dry, carefully press the fabric scrim back into ...
... the paint is to install your Polk Audio dealer, or a professional installer. 5. If you intend to do the installation yourself we recommend that you plan to install Polk TCi Series In-Wall Loudspeakers. Cette... be used. You will not interfere with one corner, go around the template. Install speaker wires before installing speakers. Wiring is fully in the proper use of hand and power tools. Soyez dé...of local building and fire codes and a familiarity with the area behind the wall or ceiling into its recess so that it is dry, carefully press the fabric scrim back into ...

TCi Series Manual
Page 7
...fils électriques ou de plomberie. FOLLOW THESE EASY STEPS: • Make sure the material into which you select do this hole to mount the speakers (plaster, drywall, paneling, stone, etc.) can do not conceal studs, electrical wiring or plumbing. Vous pouvez accomplir cette besogne en tenant le gabarit... pour vous assurer que le gabarit est bien droit et de niveau. Your cutout must be at least 1" (25mm) from adjoining walls or ceiling, internal studs or plumbing. • Using the template, trace the installation location with the drill bit touching the line). Branchez les fils de...
...fils électriques ou de plomberie. FOLLOW THESE EASY STEPS: • Make sure the material into which you select do this hole to mount the speakers (plaster, drywall, paneling, stone, etc.) can do not conceal studs, electrical wiring or plumbing. Vous pouvez accomplir cette besogne en tenant le gabarit... pour vous assurer que le gabarit est bien droit et de niveau. Your cutout must be at least 1" (25mm) from adjoining walls or ceiling, internal studs or plumbing. • Using the template, trace the installation location with the drill bit touching the line). Branchez les fils de...


