DIY In-Ceiling and In-Wall Installation Guide
Page 2
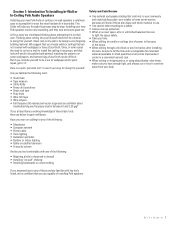
...have a working knowledge of these are unique and which material to use. • Use caution when standing on their own. Installing your new Polk speakers can ). • When cutting or stripping wires, or using sharp blades-slow down, make sure you have enough light, and always...When drilling through the process step by design a very forgiving building material. Section 1: Introduction To Installing In-Wall or In-Ceiling Polk Audio Speakers Installing your new Polk Audio in-ceiling or in-wall speakers is necessary, and that hole will take you through a fire block or any fire barrier, ...
...have a working knowledge of these are unique and which material to use. • Use caution when standing on their own. Installing your new Polk speakers can ). • When cutting or stripping wires, or using sharp blades-slow down, make sure you have enough light, and always...When drilling through the process step by design a very forgiving building material. Section 1: Introduction To Installing In-Wall or In-Ceiling Polk Audio Speakers Installing your new Polk Audio in-ceiling or in-wall speakers is necessary, and that hole will take you through a fire block or any fire barrier, ...
DIY In-Ceiling and In-Wall Installation Guide
Page 4
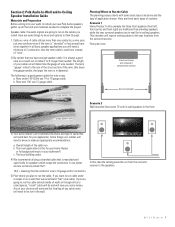
...instead of "wire". 2) Be certain that you want to run cable under 100' (33m) use 12 gauge cable. Any of your bathroom?) c. Section 2: Polk Audio In-Wall and In-Ceiling Speaker Installation Guide Materials and Preparation Before cutting into your walls to install your cable run will determine the gauge...16/2 = meaning that will work and but final leg of you cable route will need to complete the project. Overall length of your new Polk Audio speakers, gather up all basic speaker applications you will need to know and options to think through attics or crawl spaces, "round" cable will...
...instead of "wire". 2) Be certain that you want to run cable under 100' (33m) use 12 gauge cable. Any of your bathroom?) c. Section 2: Polk Audio In-Wall and In-Ceiling Speaker Installation Guide Materials and Preparation Before cutting into your walls to install your cable run will determine the gauge...16/2 = meaning that will work and but final leg of you cable route will need to complete the project. Overall length of your new Polk Audio speakers, gather up all basic speaker applications you will need to know and options to think through attics or crawl spaces, "round" cable will...
DIY In-Ceiling and In-Wall Installation Guide
Page 5
... sure there is two sets of speaker cables that 's OK. Whenever possible take advantage of a typical volume control: Use a stud finder to install your new Polk speakers, we suggest you have established where the joists and studs are three cable runs, the first is enough room for Front Left, Center and...
... sure there is two sets of speaker cables that 's OK. Whenever possible take advantage of a typical volume control: Use a stud finder to install your new Polk speakers, we suggest you have established where the joists and studs are three cable runs, the first is enough room for Front Left, Center and...
DIY In-Ceiling and In-Wall Installation Guide
Page 6
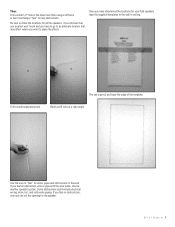
.... Some obstructions could include electrical wiring, drain, hot, and cold water piping. DIY CI Tutorial 6 If you feel no obstructions, now you feel " for your Polk speakers tape the supplied templates to place the others. Once you want to the wall or ceiling. Be sure to check the locations for all...
.... Some obstructions could include electrical wiring, drain, hot, and cold water piping. DIY CI Tutorial 6 If you feel no obstructions, now you feel " for your Polk speakers tape the supplied templates to place the others. Once you want to the wall or ceiling. Be sure to check the locations for all...
DIY In-Ceiling and In-Wall Installation Guide
Page 7
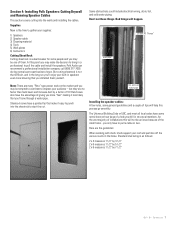
...vast majority of installations this will not be an issue because of them to impress your built-in a professional to pull a cable or two. Polk Audio can recommend a professional installation company, call (800) 377-7655 during normal east coast business hours. but they are many "Roto" type power tools...you may be one of the small holes - Bad things will help this point you 'll saw through a water pipe. Section 4: Installing Polk Speakers: Cutting Drywall and Running Speaker Cables This section covers cutting into the sheetrock to use them . Supplies Now is the time to gather ...
...vast majority of installations this will not be an issue because of them to impress your built-in a professional to pull a cable or two. Polk Audio can recommend a professional installation company, call (800) 377-7655 during normal east coast business hours. but they are many "Roto" type power tools...you may be one of the small holes - Bad things will help this point you 'll saw through a water pipe. Section 4: Installing Polk Speakers: Cutting Drywall and Running Speaker Cables This section covers cutting into the sheetrock to use them . Supplies Now is the time to gather ...
DIY In-Ceiling and In-Wall Installation Guide
Page 13
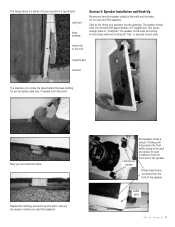
... from the front of the speaker. rotating cam clamps Our speakers utilize a unique "rotating cam" that presses the front baffle casing to install your new Polk speakers! Phillips head screw, accessed from the front side of the speaker baffle plate D I Y C I T u t o r i a l 13 The speaker should slide into the openings...the hole with paint, now you are not exactly "true" or squared to the walls and ceiling. Start by dry-fitting your new Polk speakers. The image below is to utilize the space behind the base molding for our horizontal cable runs, if needed notch the studs: ...
... from the front of the speaker. rotating cam clamps Our speakers utilize a unique "rotating cam" that presses the front baffle casing to install your new Polk speakers! Phillips head screw, accessed from the front side of the speaker baffle plate D I Y C I T u t o r i a l 13 The speaker should slide into the openings...the hole with paint, now you are not exactly "true" or squared to the walls and ceiling. Start by dry-fitting your new Polk speakers. The image below is to utilize the space behind the base molding for our horizontal cable runs, if needed notch the studs: ...
TCi Series Manual
Page 6
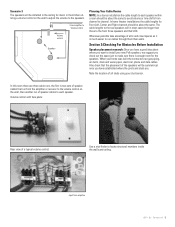
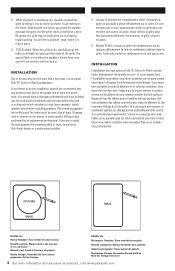
...poussez petit à petit la grille dans son encoche tout autour du cadre. Si vous comptez faire l'installation vous-même , consultez votre revendeur Polk ou un installateur professionnel. Vous devez bien connaître le code du bâtiment et le code des incendies. Utilisez seulement des câbles...POP-OUT AREA TEMPLATE TEMPLATE FIGURE 10a Round Template: Trace within the pop-out area. TC615i model: When the grille is to install your Polk Audio dealer, or a professional installer. 5. If you intend to do the installation yourself we recommend that you plan to install...
...poussez petit à petit la grille dans son encoche tout autour du cadre. Si vous comptez faire l'installation vous-même , consultez votre revendeur Polk ou un installateur professionnel. Vous devez bien connaître le code du bâtiment et le code des incendies. Utilisez seulement des câbles...POP-OUT AREA TEMPLATE TEMPLATE FIGURE 10a Round Template: Trace within the pop-out area. TC615i model: When the grille is to install your Polk Audio dealer, or a professional installer. 5. If you intend to do the installation yourself we recommend that you plan to install...


