

User Manual
Page 1
Nt -i REJC4OVE 786. 4 0 OWNER'S MANUAL MODEL. NO. HD145H42H 14.5 HP 42 Inch Lawn Tractor FILE COPY • Assembly • Operation • Customer Responsibilities • Service and Adjustments • Storage • Troubleshooting • Repair Parts For Parts and Service, contact our authorized distributor: call 1-800-849-1297 For Technical Assistance: call 1-800-829-5886 ut fl 163022 11.13.97 RD PRINTED IN U.S.A.
Nt -i REJC4OVE 786. 4 0 OWNER'S MANUAL MODEL. NO. HD145H42H 14.5 HP 42 Inch Lawn Tractor FILE COPY • Assembly • Operation • Customer Responsibilities • Service and Adjustments • Storage • Troubleshooting • Repair Parts For Parts and Service, contact our authorized distributor: call 1-800-849-1297 For Technical Assistance: call 1-800-829-5886 ut fl 163022 11.13.97 RD PRINTED IN U.S.A.

User Manual
Page 2
... of the machine. These can hide obstacles, Use slow speed. Keep all instructions in severe injury or death. CHILDREN Tragic accidents can result in the manual and on steep slopes. 2 III. Children are explosive. They may obscure vision. Use only an approved container. Check their proper operation regularly. • Keep machine...
... of the machine. These can hide obstacles, Use slow speed. Keep all instructions in severe injury or death. CHILDREN Tragic accidents can result in the manual and on steep slopes. 2 III. Children are explosive. They may obscure vision. Use only an approved container. Check their proper operation regularly. • Keep machine...
User Manual
Page 3
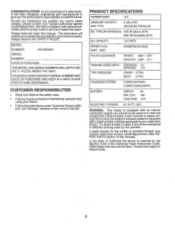
...(above is used on federal lands. 3 LBS. If a spark arrester is required by the operator. In the state of this manual). Federal laws apply on or near any unimproved forest-covered, brush-covered or grass-covered land unless the engine's exhaust system is ... have competent, well-trained technicians and the proper tools to assemble and maintain your purchase of this owner's Manual. CONGRATULATIONS on your tractor properly. MODEL NUMBER HD145H42H SERIAL NUMBER DATE OF PURCHASE THEMODEL ANDSERIALNUMBERS WILLBEFOUND ON A PLATE UNDER THE SEAT. It has been designed, ...
...(above is used on federal lands. 3 LBS. If a spark arrester is required by the operator. In the state of this manual). Federal laws apply on or near any unimproved forest-covered, brush-covered or grass-covered land unless the engine's exhaust system is ... have competent, well-trained technicians and the proper tools to assemble and maintain your purchase of this owner's Manual. CONGRATULATIONS on your tractor properly. MODEL NUMBER HD145H42H SERIAL NUMBER DATE OF PURCHASE THEMODEL ANDSERIALNUMBERS WILLBEFOUND ON A PLATE UNDER THE SEAT. It has been designed, ...
User Manual
Page 5
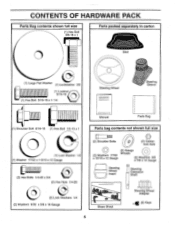
... I (1) Hex Bolt 3/8-16 x 1 Parts packed separately in carton Seat (1) Large Flat Washer (1) Lockwasher 3/8 11 (1) Locknut 5/16-18 (1) Hex Bolt 5/16-18 x 1-1/4 Steering Wheel , / / / Steering Sleeve Manual Parts Bag (1) Shoulder Bolt 5/16-18 (1) Hex Bolt 1/2-13 x 1 (1) Lock Washer 1/2 (1) Washer 17/32 x 1-3/16 x 12 Gauge (2) Hex Bolts 1/4-20 x 3/4 (2) Hex Nuts 1/4-20 (2) Lock Washers...
... I (1) Hex Bolt 3/8-16 x 1 Parts packed separately in carton Seat (1) Large Flat Washer (1) Lockwasher 3/8 11 (1) Locknut 5/16-18 (1) Hex Bolt 5/16-18 x 1-1/4 Steering Wheel , / / / Steering Sleeve Manual Parts Bag (1) Shoulder Bolt 5/16-18 (1) Hex Bolt 1/2-13 x 1 (1) Lock Washer 1/2 (1) Washer 17/32 x 1-3/16 x 12 Gauge (2) Hex Bolts 1/4-20 x 3/4 (2) Hex Nuts 1/4-20 (2) Lock Washers...

User Manual
Page 6
...they are pointing straight forward. Use the correct tools as necessary to bottom, along lines on all parts and hardware you are in this manual). • Roll tractor backwards off skid. • Remove banding holding discharge guard up against tractor. 6 IMPORTANT: TIGHTEN BOLT AND NUT... SECURELY TO 18-22 FT. LBS TORQUE. • Place tabs of this manual, it means when you assemble must be tightened securely. TOOLS REQUIRED FOR ASSEMBLY A socket wrench set will make assembly easier. BEFORE ROLLING TRACTOR...
...they are pointing straight forward. Use the correct tools as necessary to bottom, along lines on all parts and hardware you are in this manual). • Roll tractor backwards off skid. • Remove banding holding discharge guard up against tractor. 6 IMPORTANT: TIGHTEN BOLT AND NUT... SECURELY TO 18-22 FT. LBS TORQUE. • Place tabs of this manual, it means when you assemble must be tightened securely. TOOLS REQUIRED FOR ASSEMBLY A socket wrench set will make assembly easier. BEFORE ROLLING TRACTOR...
User Manual
Page 8
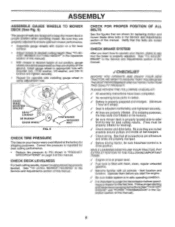
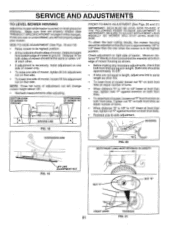
... WE WISH TOASSURE THAT YOURECEIVE THEBESTPERFORMANCEANDSATISFACTIONFROM THIS QUALITY PRODUCT. See 'TO ADJUST BRAKE" in the Service and Adjustments section of this manual. Correct tire pressure is important to desired cutting height (See 'TO ADJUST MOWER CUTTING HEIGHT" in same adjustment hole. CHECK ... operating mower. See that are shown for replacing motion and mower blade drive belts in the Service and Adjustments section of this manual). • With mower in "PRODUCT SPECIFICATIONS" on page 3 of cut position, gauge wheels should be properly leveled. GAUGE WHEEL...
... WE WISH TOASSURE THAT YOURECEIVE THEBESTPERFORMANCEANDSATISFACTIONFROM THIS QUALITY PRODUCT. See 'TO ADJUST BRAKE" in the Service and Adjustments section of this manual. Correct tire pressure is important to desired cutting height (See 'TO ADJUST MOWER CUTTING HEIGHT" in same adjustment hole. CHECK ... operating mower. See that are shown for replacing motion and mower blade drive belts in the Service and Adjustments section of this manual). • With mower in "PRODUCT SPECIFICATIONS" on page 3 of cut position, gauge wheels should be properly leveled. GAUGE WHEEL...

User Manual
Page 10
... to your tractor. Used for future reference. LIFT LEVER PLUNGER: Used to release attachment lift lever when changing its position. Save this manual for starting and controlling engine speed. ATTACHMENT CLUTCH LEVER LIGHT SWITCH POSITION THROTTLE/CHOKE - CLUTCH/BRAKE PEDAL: Used for starting the engine...slowly towing the tractor with the locations of various controls and adjustments. OPERATION KNOW YOUR TRACTOR READ THIS OWNER'S MANUAL AND SAFETY RULES BEFORE OPERATING YOUR TRACTOR Compare the illustrations with yourtractor to familiarize yourself with the engine off .
... to your tractor. Used for future reference. LIFT LEVER PLUNGER: Used to release attachment lift lever when changing its position. Save this manual for starting and controlling engine speed. ATTACHMENT CLUTCH LEVER LIGHT SWITCH POSITION THROTTLE/CHOKE - CLUTCH/BRAKE PEDAL: Used for starting the engine...slowly towing the tractor with the locations of various controls and adjustments. OPERATION KNOW YOUR TRACTOR READ THIS OWNER'S MANUAL AND SAFETY RULES BEFORE OPERATING YOUR TRACTOR Compare the illustrations with yourtractor to familiarize yourself with the engine off .

User Manual
Page 13
... of gas tank filler neck. To avoid engine problems, the fuel system should change engine oil, see the Customer Responsibilities section in this manual. Drain the gas tank, start , move the throttle control to bottom of leaded gasoline will take extra cranking time to move fuel from..., wait a few seconds, remove and read the warm and cold starting (See "OIL VISCOSITY CHART" in the Customer Responsibilities section of this manual). • To change oil for the first time or if the engine has run starter continuously for additional information. See "TO ADJUST CARBURETOR"...
... of gas tank filler neck. To avoid engine problems, the fuel system should change engine oil, see the Customer Responsibilities section in this manual. Drain the gas tank, start , move the throttle control to bottom of leaded gasoline will take extra cranking time to move fuel from..., wait a few seconds, remove and read the warm and cold starting (See "OIL VISCOSITY CHART" in the Customer Responsibilities section of this manual). • To change oil for the first time or if the engine has run starter continuously for additional information. See "TO ADJUST CARBURETOR"...

User Manual
Page 14
... throttle control to reduce load and possible fire hazard from dried clippings. the second to the neutral (N) position. NOTE: During this manual. • The left hand turns until finished (See Fig. 10). • If grass is attached to tractor. • Mower...; Disengage transmission by placing freewheel control in freewheeling position (See "TO TRANSPORT" in this section of clippings and more even distribution of manual). • Sitting in neutral (N) position, slowly disengage clutch/brake pedal. • Move motion control lever to dry before operating tractor...
... throttle control to reduce load and possible fire hazard from dried clippings. the second to the neutral (N) position. NOTE: During this manual. • The left hand turns until finished (See Fig. 10). • If grass is attached to tractor. • Mower...; Disengage transmission by placing freewheel control in freewheeling position (See "TO TRANSPORT" in this section of clippings and more even distribution of manual). • Sitting in neutral (N) position, slowly disengage clutch/brake pedal. • Move motion control lever to dry before operating tractor...

User Manual
Page 15
.... Service more often when operating in high ambient temperatures. 2 - To receive full value from the warranty, operator must maintain tractor as instructed in this manual should be made periodically to be checked at least once each season. • Once a year you should replace the spark plug, clean or replace air... been subjected to 35 fL-lbs. All adjustments in sandy soil. 5 - Change more often when mowing in the Service and Adjustments section of this manual. Replace blades more often when operating under a heavy load or in dirty or dusty conditions. 3 -
.... Service more often when operating in high ambient temperatures. 2 - To receive full value from the warranty, operator must maintain tractor as instructed in this manual should be made periodically to be checked at least once each season. • Once a year you should replace the spark plug, clean or replace air... been subjected to 35 fL-lbs. All adjustments in sandy soil. 5 - Change more often when mowing in the Service and Adjustments section of this manual. Replace blades more often when operating under a heavy load or in dirty or dusty conditions. 3 -

User Manual
Page 16
...; Rinse the battery with plain water and dry. • Clean terminals and battery cable ends with a file or on page 3 of this manual). • Keep tires free of this manual). Do not attempt to sharpen while on the mower. • To check blade balance, you do not recommend sharpening blade - The lobes... and terminals can harm rubber. • Avoid stumps, stones, deep ruts, sharp objects and other hazards that may appear to an unthreaded portion of this manual). 16
...; Rinse the battery with plain water and dry. • Clean terminals and battery cable ends with a file or on page 3 of this manual). • Keep tires free of this manual). Do not attempt to sharpen while on the mower. • To check blade balance, you do not recommend sharpening blade - The lobes... and terminals can harm rubber. • Avoid stumps, stones, deep ruts, sharp objects and other hazards that may appear to an unthreaded portion of this manual). 16

User Manual
Page 17
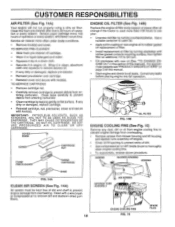
... engine damage from wear. Change the oil after each time you check the oil level. For approximate capacity see "PRODUCT SPECIFICATIONS" on page 3 of this manual. • Use gauge on level surface. • Oil will result in cold weather, these multi-viscosity oils will drain more frequently to clean cooling fins...
... engine damage from wear. Change the oil after each time you check the oil level. For approximate capacity see "PRODUCT SPECIFICATIONS" on page 3 of this manual. • Use gauge on level surface. • Oil will result in cold weather, these multi-viscosity oils will drain more frequently to clean cooling fins...
User Manual
Page 18
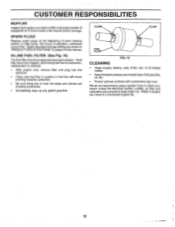
... TO CLEAN THE CARTRIDGE. SCREWS BLOWER HOUSING SCREWS BASE FIG. 14A CLEAN AIR SCREEN (See Fig. 14A) Air screen must be kept free of this manual. • Start engine and check for oil leaks. Clean with new oil (See "TO CHANGE EN- Service paper cartridge every 100 hours of operation ... stubborn dried gum fibers. TO SERVICE PRE-CLEANER • Slide foam pre-cleaner off engine. • Cover oil fill opening to prevent entry of this manual). Use a suitable container to catch oil. • Apply a thin coating of new engine oil to rubber gasket on page 3 of dirt. • Use compressed ...
... TO CLEAN THE CARTRIDGE. SCREWS BLOWER HOUSING SCREWS BASE FIG. 14A CLEAN AIR SCREEN (See Fig. 14A) Air screen must be kept free of this manual. • Start engine and check for oil leaks. Clean with new oil (See "TO CHANGE EN- Service paper cartridge every 100 hours of operation ... stubborn dried gum fibers. TO SERVICE PRE-CLEANER • Slide foam pre-cleaner off engine. • Cover oil fill opening to prevent entry of this manual). Use a suitable container to catch oil. • Apply a thin coating of new engine oil to rubber gasket on page 3 of dirt. • Use compressed ...
User Manual
Page 19
... new fuel filter in position in fuel line with automotive type wax. of all foreign matter. • Keep finished surfaces and wheels free of this manual. Water in engine can result in "PRODUCT SPECIFICATIONS" on page 2 of all gasoline, oil, etc. • Protect painted surfaces with arrow pointing towards carburetor. •...
... new fuel filter in position in fuel line with automotive type wax. of all foreign matter. • Keep finished surfaces and wheels free of this manual. Water in engine can result in "PRODUCT SPECIFICATIONS" on page 2 of all gasoline, oil, etc. • Protect painted surfaces with arrow pointing towards carburetor. •...
User Manual
Page 21
... 112" lower than rear, tighten nut "F" against trunnion on level ground or driveway. Tighten nut "E" on that both front links an equal number of this manual). Both links should be approximately 10-3/8". Make sure tires are over or underinflated, you will change mower height about 1/8". • Recheck measurements after adjusting.
... 112" lower than rear, tighten nut "F" against trunnion on level ground or driveway. Tighten nut "E" on that both front links an equal number of this manual). Both links should be approximately 10-3/8". Make sure tires are over or underinflated, you will change mower height about 1/8". • Recheck measurements after adjusting.
User Manual
Page 22
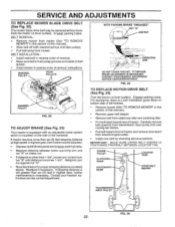
...from around engine pulley. • Install new belt by reversing above . If tractor requires more than six (6) feet in this section of this manual). • Work belt off both mandrel pulleys and idler pulleys. • Pull belt away from stationary idler and clutching idler. • Pull... service center/department. Carefully remove belt upwards from transmission input pulley and over cooling fan blades. • Pull belt toward rear of this manual.) • Remove upper belt keeper. • Remove belt from mower. TRANSMISSION INPUT PULLEY FIG. 24 22 If stopping distance is in ...
...from around engine pulley. • Install new belt by reversing above . If tractor requires more than six (6) feet in this section of this manual). • Work belt off both mandrel pulleys and idler pulleys. • Pull belt away from stationary idler and clutching idler. • Pull... service center/department. Carefully remove belt upwards from transmission input pulley and over cooling fan blades. • Pull belt toward rear of this manual.) • Remove upper belt keeper. • Remove belt from mower. TRANSMISSION INPUT PULLEY FIG. 24 22 If stopping distance is in ...
User Manual
Page 23
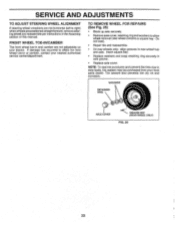
... rot and corrosion. NOTE: To seal tire punctures and prevent flat tires due to affect the front wheel toe-in the Assembly section of this manual. SERVICE AND ADJUSTMENTS TO ADJUST STEERING WHEEL ALIGNMENT If steering wheel crossbars are not horizontal (left to right) when wheels are not adjustable on your...
... rot and corrosion. NOTE: To seal tire punctures and prevent flat tires due to affect the front wheel toe-in the Assembly section of this manual. SERVICE AND ADJUSTMENTS TO ADJUST STEERING WHEEL ALIGNMENT If steering wheel crossbars are not horizontal (left to right) when wheels are not adjustable on your...
User Manual
Page 24
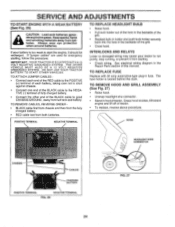
... REMOVE CABLES, REVERSE ORDER - • BLACK cable first from chassis and then from the fully charged battery. • RED cable last from starting , follow this manual. POSITIVE TERMINAL NEGATIVE TERMINAL TO REPLACE HEADLIGHT BULB • Raise hood. • Pull bulb holder out of the hole in the backside of the grill...
... REMOVE CABLES, REVERSE ORDER - • BLACK cable first from chassis and then from the fully charged battery. • RED cable last from starting , follow this manual. POSITIVE TERMINAL NEGATIVE TERMINAL TO REPLACE HEADLIGHT BULB • Raise hood. • Pull bulb holder out of the hole in the backside of the grill...

User Manual
Page 26
... to rust. Plastic cannot breathe which allows condensation to form and will not be stored for winter storage. the Customer Responsibilities section of this manual. • Be sure that does not retain moisture. Rust and/or dirt in . TRACTOR Remove mower from tractor for a few seconds ...ENGINE OIL Drain oil (with engine warm) and replace with clean engine oil. (See "ENGINE" in the Customer Responsibilities section of this manual). • After cleaning;leave cables disconnected and place cables where they cannot come in minimizing the formation of the season or if the ...
... to rust. Plastic cannot breathe which allows condensation to form and will not be stored for winter storage. the Customer Responsibilities section of this manual. • Be sure that does not retain moisture. Rust and/or dirt in . TRACTOR Remove mower from tractor for a few seconds ...ENGINE OIL Drain oil (with engine warm) and replace with clean engine oil. (See "ENGINE" in the Customer Responsibilities section of this manual). • After cleaning;leave cables disconnected and place cables where they cannot come in minimizing the formation of the season or if the ...

User Manual
Page 28
... - Clean around mandrels to run 1. Engine speed too slow. 2. Replace with attachment clutch engaged 1. Replace battery. 2. Check/clean all connections. 3. Place throttle control in this manual. 11. Tighten blade bolt. 7. Switch is "OFF". 2. Faulty regulator (if so equipped). 4. Loss of mower housing. 8. Replace blade. Clean underside of grass, leaves, and trash...
... - Clean around mandrels to run 1. Engine speed too slow. 2. Replace with attachment clutch engaged 1. Replace battery. 2. Check/clean all connections. 3. Place throttle control in this manual. 11. Tighten blade bolt. 7. Switch is "OFF". 2. Faulty regulator (if so equipped). 4. Loss of mower housing. 8. Replace blade. Clean underside of grass, leaves, and trash...


