
User Manual
Page 2
...than from your ability to operate this machine. • Do not use electric starting to expand. WARNING: Snow throwers have exposed rotating parts, which can cause severe injury from contact, or from material thrown from the snow thrower. Check fuel supply before starting extension cords certi...for use a nozzle lock-open flame or spark. Keep the area of operation clear of alcohol or taking drugs or other engine parts become extremely hot during op- • Exercise caution to avoid slipping or falling especially eration or while performing an adjustment or repair to...
...than from your ability to operate this machine. • Do not use electric starting to expand. WARNING: Snow throwers have exposed rotating parts, which can cause severe injury from contact, or from material thrown from the snow thrower. Check fuel supply before starting extension cords certi...for use a nozzle lock-open flame or spark. Keep the area of operation clear of alcohol or taking drugs or other engine parts become extremely hot during op- • Exercise caution to avoid slipping or falling especially eration or while performing an adjustment or repair to...

User Manual
Page 3
...or out of slopes. Do not attempt to clear snow at too fast a rate. • Never operate the machine at all moving parts have competent, well-trained technicians and the proper tools to the auger/impeller when snow thrower is transported or not in front of the unit...engine (motor) and for transporting the snow thrower in maintaining, caring for and using your snow thrower. • Follow the instructions under rotating parts. Keep clear of residences, garages, porches or other safety protective devices in the tank inside a building where ignition sources are disengaged and the...
...or out of slopes. Do not attempt to clear snow at too fast a rate. • Never operate the machine at all moving parts have competent, well-trained technicians and the proper tools to the auger/impeller when snow thrower is transported or not in front of the unit...engine (motor) and for transporting the snow thrower in maintaining, caring for and using your snow thrower. • Follow the instructions under rotating parts. Keep clear of residences, garages, porches or other safety protective devices in the tank inside a building where ignition sources are disengaged and the...

User Manual
Page 4
SAFETY RULES 2-3 PRODUCT SPECIFICATIONS 3 CUSTOMER RESPONSIBILITIES 3 WARRANTY 32 ASSEMBLY / PRE-OPERATION 5-7 OPERATION 8-13 MAINTENANCE 14-15 MAINTENANCE SCHEDULE 14 SERVICE AND ADJUSTMENTS 16-18 STORAGE 18 TROUBLESHOOTING 19 REPAIR PARTS 20-31 PARTS PACKED SEPARATELY IN CARTON 4
SAFETY RULES 2-3 PRODUCT SPECIFICATIONS 3 CUSTOMER RESPONSIBILITIES 3 WARRANTY 32 ASSEMBLY / PRE-OPERATION 5-7 OPERATION 8-13 MAINTENANCE 14-15 MAINTENANCE SCHEDULE 14 SERVICE AND ADJUSTMENTS 16-18 STORAGE 18 TROUBLESHOOTING 19 REPAIR PARTS 20-31 PARTS PACKED SEPARATELY IN CARTON 4

User Manual
Page 5
... secure with the exception of carton and lay panels flat the factory with retainer spring. Remove all four corners of those parts left unassembled for shipping purposes. Remove snow thrower from carton. 2. Remove plastic tie securing rod to the operating position and tighten ..., bolts, etc., necessary to complete the assembly have been placed in its entirety before you assemble must be used for additional loose parts. UPPER HANDLE SPEED CONTROL ROD PLASTIC TIE HANDLE KNOB LOWER HANDLE UNFOLD UPPER HANDLE 1. ASSEMBLY / PRE-OPERATION Read these instructions and ...
... secure with the exception of carton and lay panels flat the factory with retainer spring. Remove all four corners of those parts left unassembled for shipping purposes. Remove snow thrower from carton. 2. Remove plastic tie securing rod to the operating position and tighten ..., bolts, etc., necessary to complete the assembly have been placed in its entirety before you assemble must be used for additional loose parts. UPPER HANDLE SPEED CONTROL ROD PLASTIC TIE HANDLE KNOB LOWER HANDLE UNFOLD UPPER HANDLE 1. ASSEMBLY / PRE-OPERATION Read these instructions and ...

User Manual
Page 7
If necessary, rotate chute assembly to install the chute rotater head. 1. CHUTE ROTATER HEAD 3/8 LOCKNUT 3/8 WASHER CHECK TIRE PRESSURE The tires on your parts bag may be used to align square and pin on top of chute base with holes in your snow thrower were overinflated at ...
If necessary, rotate chute assembly to install the chute rotater head. 1. CHUTE ROTATER HEAD 3/8 LOCKNUT 3/8 WASHER CHECK TIRE PRESSURE The tires on your parts bag may be used to align square and pin on top of chute base with holes in your snow thrower were overinflated at ...
User Manual
Page 10
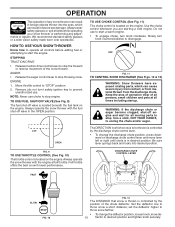
...10 flector to "STOP" position. 2. OFF FULL FIG. 11 TO CONTROL SNOW DISCHARGE (See Figs. 12 & 13) WARNING: Snow throwers have exposed rotating parts, which can result in which snow is to stop the forward or reverse movement of the snow thrower. The DIRECTION in severe eye damage. AUGER...contact, or from material thrown from the discharge chute. Do not use choke to stop engine. Keep the area of operation clear of all moving parts to stop . WARNING: If the discharge chute or auger become clogged, shut-off valve in foreign objects thrown into desired position. Be sure ...
...10 flector to "STOP" position. 2. OFF FULL FIG. 11 TO CONTROL SNOW DISCHARGE (See Figs. 12 & 13) WARNING: Snow throwers have exposed rotating parts, which can result in which snow is to stop the forward or reverse movement of the snow thrower. The DIRECTION in severe eye damage. AUGER...contact, or from material thrown from the discharge chute. Do not use choke to stop engine. Keep the area of operation clear of all moving parts to stop . WARNING: If the discharge chute or auger become clogged, shut-off valve in foreign objects thrown into desired position. Be sure ...
User Manual
Page 12
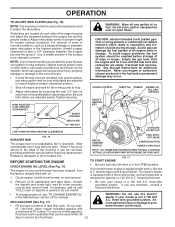
... fuels (called gasohol or using ethanol or methanol) can be picked up and thrown by loosening the rear 1/2" hex nut only, then moving parts to assure fuel freshness. 12 WARNING: Do not use the electric starter if your house is not a 120 Volt A.C. When it has worn... removal of an engine while in storage. household current. 2. OPERATION TO ADJUST SKID PLATES (See Fig. 16) NOTE: The wrench provided in your parts bag may become worn. Skid plates are adjusted evenly. Adjust skid plates evenly to give a 1/8" clearance between the scraper bar and the ground surface...
... fuels (called gasohol or using ethanol or methanol) can be picked up and thrown by loosening the rear 1/2" hex nut only, then moving parts to assure fuel freshness. 12 WARNING: Do not use the electric starter if your house is not a 120 Volt A.C. When it has worn... removal of an engine while in storage. household current. 2. OPERATION TO ADJUST SKID PLATES (See Fig. 16) NOTE: The wrench provided in your parts bag may become worn. Skid plates are adjusted evenly. Adjust skid plates evenly to give a 1/8" clearance between the scraper bar and the ground surface...
User Manual
Page 14
...PRODUCT SPECIFICATIONS" section in this unit. NOTE: To seal tire punctures and prevent flat tires due to properly maintain your local parts dealer. To receive full value from your snow thrower. Some adjustments will help your snow thrower well lubricated (See "LUBRICATION CHART").... NOTE: Use only Original Equipment Manufacturer (OEM) parts to see if you should make any maintenance. • Keep tires free of injury to malfunction and pose a risk of gasoline ...
...PRODUCT SPECIFICATIONS" section in this unit. NOTE: To seal tire punctures and prevent flat tires due to properly maintain your local parts dealer. To receive full value from your snow thrower. Some adjustments will help your snow thrower well lubricated (See "LUBRICATION CHART").... NOTE: Use only Original Equipment Manufacturer (OEM) parts to see if you should make any maintenance. • Keep tires free of injury to malfunction and pose a risk of gasoline ...
User Manual
Page 16
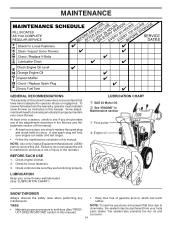
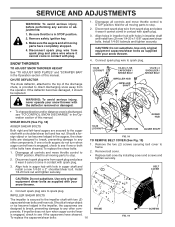
...in impeller shaft and install two (2) new 1/4-20 x 1-5/8" capscrew/shear bolts. Wait for all moving parts to stop . 2. CAUTION: Do not substitute. To replace the shear bolts: 1. Wait for all moving parts to stop . 2. Install 1/4-20 lock nut and tighten securely. Remove belt cover. • Replace ...SHEAR BOLTS Both right and left-hand augers are designed to break, preventing damage to STOP position. Make sure the augers and all moving parts have sheared. If the deflector becomes damaged, it cannot come in the impeller, the capscrews are secured to spark plug. ...
...in impeller shaft and install two (2) new 1/4-20 x 1-5/8" capscrew/shear bolts. Wait for all moving parts to stop . 2. CAUTION: Do not substitute. To replace the shear bolts: 1. Wait for all moving parts to stop . 2. Install 1/4-20 lock nut and tighten securely. Remove belt cover. • Replace ...SHEAR BOLTS Both right and left-hand augers are designed to break, preventing damage to STOP position. Make sure the augers and all moving parts have sheared. If the deflector becomes damaged, it cannot come in the impeller, the capscrews are secured to spark plug. ...

User Manual
Page 18
...times to a qualified service center. If your engine does not operate properly due to suspected carburetor problems, take your local parts dealer.Tire sealant also prevents tire dry rot and corrosion. Always follow the mix ratio found on a furnace, water heater, clothes... gasoline in the Service and Adjustments section of this manual. 4. Do not use engine or carburetor cleaner products in essential fuel system parts such as shown in fuel tank or storage container. CYLINDER 2. ENGINE 1. Add stabilizer to gasoline in the Maintenance section of this ...
...times to a qualified service center. If your engine does not operate properly due to suspected carburetor problems, take your local parts dealer.Tire sealant also prevents tire dry rot and corrosion. Always follow the mix ratio found on a furnace, water heater, clothes... gasoline in the Service and Adjustments section of this manual. 4. Do not use engine or carburetor cleaner products in essential fuel system parts such as shown in fuel tank or storage container. CYLINDER 2. ENGINE 1. Add stabilizer to gasoline in the Maintenance section of this ...

User Manual
Page 19
.... 1. Stale fuel. 4. Move choke to FAST position. 5. Empty fuel tank & carburetor, refill with ice or snow. 4. Loose parts or damaged augers or impeller. 1. If vibration remains, contact a qualified service center. Loss of fuel. 4. Check / reinstall drive belt... manual. 7. Primer not depressed. 7. Turn fuel shut-off of this manual. Move throttle to OFF position. 2. Excessive vibration 1. Replace damaged parts. Recoil starter is worn. 1. Drive belt is hard to pull 1. drive / slowing 2. TROUBLESHOOTING See appropriate section in manual unless directed to ...
.... 1. Stale fuel. 4. Move choke to FAST position. 5. Empty fuel tank & carburetor, refill with ice or snow. 4. Loose parts or damaged augers or impeller. 1. If vibration remains, contact a qualified service center. Loss of fuel. 4. Check / reinstall drive belt... manual. 7. Primer not depressed. 7. Turn fuel shut-off of this manual. Move throttle to OFF position. 2. Excessive vibration 1. Replace damaged parts. Recoil starter is worn. 1. Drive belt is hard to pull 1. drive / slowing 2. TROUBLESHOOTING See appropriate section in manual unless directed to ...

User Manual
Page 20
... assembly or installation, delivery damage, or to the applicable manufacturer's warranty on these items. 2. This Warranty does not apply to any parts submitted for rental or commercial purposes is requested by Electrolux Home Products. 3. Outdoor Products Customer Service Dept. 250 Bobby Jones Expressway Augusta,.... 7075 Ordan Drive Mississauga, Ontario L5T 1K6 Electrolux Home Products, Inc. This Warranty applies only to the engine or components parts thereof. Some areas do not allow the limitation of consequential damages or limitations of how long an implied Warranty may last, so...
... assembly or installation, delivery damage, or to the applicable manufacturer's warranty on these items. 2. This Warranty does not apply to any parts submitted for rental or commercial purposes is requested by Electrolux Home Products. 3. Outdoor Products Customer Service Dept. 250 Bobby Jones Expressway Augusta,.... 7075 Ordan Drive Mississauga, Ontario L5T 1K6 Electrolux Home Products, Inc. This Warranty applies only to the engine or components parts thereof. Some areas do not allow the limitation of consequential damages or limitations of how long an implied Warranty may last, so...


