

User Manual
Page 2
... and under the influence of objects such as rocks, tree limbs, etc. • Watch for small alcohol or drugs. SERVICE operate the riding mower safely enough to the keys before restarting. • Never make sudden changes in place. • Slow down slopes, not across. •... and vapors are sharp and can result in severe injury or death. • Never tamper with manufacturer's recommended parts, when necessary. • Mower blades are explosive. • Keep machine free of a cliff or ditch, or if an edge caves in reverse unless absolutely necessary. Uneven terrain...
... and under the influence of objects such as rocks, tree limbs, etc. • Watch for small alcohol or drugs. SERVICE operate the riding mower safely enough to the keys before restarting. • Never make sudden changes in place. • Slow down slopes, not across. •... and vapors are sharp and can result in severe injury or death. • Never tamper with manufacturer's recommended parts, when necessary. • Mower blades are explosive. • Keep machine free of a cliff or ditch, or if an edge caves in reverse unless absolutely necessary. Uneven terrain...

User Manual
Page 3
SAFETY RULES Safe Operation Practices for Ride-On Mowers • Be sure the area is dangerous. Stop machine if anyone enters the area. • Never carry passengers or children even with safe machine operation. &#...
SAFETY RULES Safe Operation Practices for Ride-On Mowers • Be sure the area is dangerous. Stop machine if anyone enters the area. • Never carry passengers or children even with safe machine operation. &#...

User Manual
Page 8
... to install the mulcher plate. • Raise and hold deflector shield in the CUSTOMER RESPONSABILITY section of this manual). Your mower is properly adjusted. Verify that the brake is now ready for discharging or installation of optional grass catcher accessory. TO INSTALL MULCHER...are still secure and wires are properly inflated. (For shipping purposes, the tires were overinflated at the factory for leveling). ✓ Check mower and drive belts. PLEASE REVIEW THE FOLLOWING CHECKLIST: ✓ All assembly instructions have been completed. ✓ No remaining loose parts in ...
... to install the mulcher plate. • Raise and hold deflector shield in the CUSTOMER RESPONSABILITY section of this manual). Your mower is properly adjusted. Verify that the brake is now ready for discharging or installation of optional grass catcher accessory. TO INSTALL MULCHER...are still secure and wires are properly inflated. (For shipping purposes, the tires were overinflated at the factory for leveling). ✓ Check mower and drive belts. PLEASE REVIEW THE FOLLOWING CHECKLIST: ✓ All assembly instructions have been completed. ✓ No remaining loose parts in ...

User Manual
Page 9
.... BATTERY CAUTION OR WARNING REVERSE FORWARD FAST SLOW ENGINE ON ENGINE OFF OIL PRESSURE CLUTCH LIGHTS ON OVER TEMP LIGHT FUEL CHOKE MOWER HEIGHT DIFFERENTIAL PARKING BRAKE LOCK LOCKED UNLOCKED MOWER LIFT REVERSE NEUTRAL HIGH LOW P PARKING BRAKE 15 15 15 ATTACHMENT ATTACHMENT CLUTCH ENGAGED CLUTCH DISENGAGED KEEP AREA CLEAR SLOPE HAZARDS...
.... BATTERY CAUTION OR WARNING REVERSE FORWARD FAST SLOW ENGINE ON ENGINE OFF OIL PRESSURE CLUTCH LIGHTS ON OVER TEMP LIGHT FUEL CHOKE MOWER HEIGHT DIFFERENTIAL PARKING BRAKE LOCK LOCKED UNLOCKED MOWER LIFT REVERSE NEUTRAL HIGH LOW P PARKING BRAKE 15 15 15 ATTACHMENT ATTACHMENT CLUTCH ENGAGED CLUTCH DISENGAGED KEEP AREA CLEAR SLOPE HAZARDS...

User Manual
Page 10
...for starting the engine. AMMETER: Indicates charging (+) or discharging (-) of tractor. 10 ATTACHMENT CLUTCH LEVER: Used to engage the mower blades, or other attachments mounted to familiarize yourself with the locations of the American National Standards Institute. PARKING BRAKE LEVER: Locks ...starting and controlling engine speed. LIGHT SWITCH POSITION: Turns the headlights on and off. Used to raise, lower, and adjust the mower deck or other attachments mounted to the safety standards of various controls and adjustments. GEARSHIFT LEVER: Selects the speed and direction of ...
...for starting the engine. AMMETER: Indicates charging (+) or discharging (-) of tractor. 10 ATTACHMENT CLUTCH LEVER: Used to engage the mower blades, or other attachments mounted to familiarize yourself with the locations of the American National Standards Institute. PARKING BRAKE LEVER: Locks ...starting and controlling engine speed. LIGHT SWITCH POSITION: Turns the headlights on and off. Used to raise, lower, and adjust the mower deck or other attachments mounted to the safety standards of various controls and adjustments. GEARSHIFT LEVER: Selects the speed and direction of ...
User Manual
Page 11
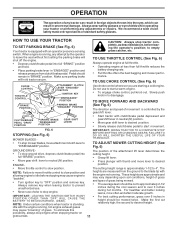
...knob in "BRAKE" position. CLUTCH/BRAKE PEDAL "DRIVE" POSITION PARKING BRAKE "DISENGAGED" POSITION GEAR SHIFT LEVER FIG. 6 STOPPING (See Fig. 6) MOWER BLADES - • To stop ground drive, depress clutch/brake pedal into the eyes, which can result in foreign objects thrown into cutting height. ...The position of the attachment lift lever determines the • To stop mower blades,move attachment clutch lever to "DISENGAGED" position. • Start tractor with thumb and move throttle control to slow position and ...
...knob in "BRAKE" position. CLUTCH/BRAKE PEDAL "DRIVE" POSITION PARKING BRAKE "DISENGAGED" POSITION GEAR SHIFT LEVER FIG. 6 STOPPING (See Fig. 6) MOWER BLADES - • To stop ground drive, depress clutch/brake pedal into the eyes, which can result in foreign objects thrown into cutting height. ...The position of the attachment lift lever determines the • To stop mower blades,move attachment clutch lever to "DISENGAGED" position. • Start tractor with thumb and move throttle control to slow position and ...

User Manual
Page 12
... ON HILLS CAUTION: Do not drive up or down hills with the engine running and the attachment clutch engaged will shut off the ground when mower is at more than 15° and do not drive across any slope. • Choose the slowest speed before starting up or down hills. &#... all turns slowly. Too heavy of your tractor, be assembled so they are slightly off the engine. • Select desired height of your tractor on mowers so equipped, or the deflector shield in same adjustment hole. TO TRANSPORT • Raise attachment lift to lose control of a load, while on hills. •...
... ON HILLS CAUTION: Do not drive up or down hills with the engine running and the attachment clutch engaged will shut off the ground when mower is at more than 15° and do not drive across any slope. • Choose the slowest speed before starting up or down hills. &#... all turns slowly. Too heavy of your tractor, be assembled so they are slightly off the engine. • Select desired height of your tractor on mowers so equipped, or the deflector shield in same adjustment hole. TO TRANSPORT • Raise attachment lift to lose control of a load, while on hills. •...

User Manual
Page 14
... time to week. Always mulch with the mulching action. the second to provide nutrients for the lawn. This will suit the terrain and give the mower cutting performance as well as the quality of cut desired. • When operating attachments, select a ground speed that has been cut path. •...; Change your lawn is extremely tall, it should be mulched a second time to completely hide the clippings. See "TO LEVEL MOWER HOUSING" in size so that as this will provide the best recutting action of clippings and more even distribution of the blades. • Avoid ...
... time to week. Always mulch with the mulching action. the second to provide nutrients for the lawn. This will suit the terrain and give the mower cutting performance as well as the quality of cut desired. • When operating attachments, select a ground speed that has been cut path. •...; Change your lawn is extremely tall, it should be mulched a second time to completely hide the clippings. See "TO LEVEL MOWER HOUSING" in size so that as this will provide the best recutting action of clippings and more even distribution of the blades. • Avoid ...
User Manual
Page 15
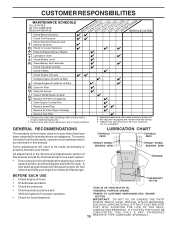
... IN DATES AS YOU COMPLETE REGULAR SERVICE Check Brake Operation Check Tire Pressure Check Operator Presence and T Interlock Systems R Check for Loose Fasteners A Sharpen/Replace Mower Blades C T Lubrication Chart 0 Check Battery Level R Clean Battery and Terminals Check Transaxle Cooling Check V-Belts BEFOREEEVAECRHYU8ESVHEEORUYRS2E5VHEROYUR5E0SVEHROYUR1E0SV0EHROYUBSREESFAOSROEN STORAGE SERVICE DATES 5 3 4 Check Engine Oil Level Change Engine...
... IN DATES AS YOU COMPLETE REGULAR SERVICE Check Brake Operation Check Tire Pressure Check Operator Presence and T Interlock Systems R Check for Loose Fasteners A Sharpen/Replace Mower Blades C T Lubrication Chart 0 Check Battery Level R Clean Battery and Terminals Check Transaxle Cooling Check V-Belts BEFOREEEVAECRHYU8ESVHEEORUYRS2E5VHEROYUR5E0SVEHROYUR1E0SV0EHROYUBSREESFAOSROEN STORAGE SERVICE DATES 5 3 4 Check Engine Oil Level Change Engine...

User Manual
Page 16
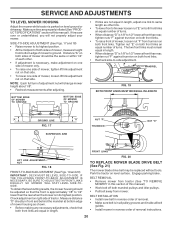
... engine is running and the attachment clutch is in all tires (See "PRODUCT SPECIFICATIONS" section of the center hole may appear to be taken to mower and engine. • The blade can harm rubber. • Avoid stumps, stones, deep ruts, sharp objects and other hazards that may be kept ...sharp. If your local parts dealer. BLADE CARE For best results mower blades must be adjusted. (See "TO ADJUST BRAKE" in the seat. TRAILING EDGE UP BLADE CENTER HOLE FLAT WASHER LOCK WASHER MANDREL ASSEMBLY STAR ...
... engine is running and the attachment clutch is in all tires (See "PRODUCT SPECIFICATIONS" section of the center hole may appear to be taken to mower and engine. • The blade can harm rubber. • Avoid stumps, stones, deep ruts, sharp objects and other hazards that may be kept ...sharp. If your local parts dealer. BLADE CARE For best results mower blades must be adjusted. (See "TO ADJUST BRAKE" in the seat. TRAILING EDGE UP BLADE CENTER HOLE FLAT WASHER LOCK WASHER MANDREL ASSEMBLY STAR ...

User Manual
Page 19
...8226; Push clutch cable housing guide into bracket, slide collar onto guide and secure with plug. IMPORTANT: IF AN ATTACHMENT OTHER THAN THE MOWER DECK IS TO BE MOUNTED ON THE TRACTOR, REMOVE THE FRONT LINKS AND HOOK THE CLUTCH SPRING INTO SQUARE HOLE IN FRAME. TO INSTALL...; Disconnect suspension arms from rear deck brackets by removing retainer springs. • Disconnect front links from deck by re- TRACTOR TO REMOVE MOWER (See Fig. 16) Mower will be easier to remove from the right side of bracket. • Disconnect anti-swaybar from chassis bracket by removing retainer springs. •...
...8226; Push clutch cable housing guide into bracket, slide collar onto guide and secure with plug. IMPORTANT: IF AN ATTACHMENT OTHER THAN THE MOWER DECK IS TO BE MOUNTED ON THE TRACTOR, REMOVE THE FRONT LINKS AND HOOK THE CLUTCH SPRING INTO SQUARE HOLE IN FRAME. TO INSTALL...; Disconnect suspension arms from rear deck brackets by removing retainer springs. • Disconnect front links from deck by re- TRACTOR TO REMOVE MOWER (See Fig. 16) Mower will be easier to remove from the right side of bracket. • Disconnect anti-swaybar from chassis bracket by removing retainer springs. •...
User Manual
Page 20
... Figs. 19 and 20) IMPORTANT: DECK MUST BE LEVEL SIDE-TO-SIDE. SIDE-TO-SIDE ADJUSTMENT (See Figs. 17 and 18) • Raise mower to ground. BELT INSTALLATION • Install new belt in reverse order of removal. • Make sure belt is in front and behind the mandrel at... front than rear, tighten nut "F" against trunnion on that both front links are over or underinflated, you will change mower height about 1/8". • Recheck measurements after adjusting. NOTE: Each full turn of removal instructions. 20 Tighten nut "E" on both front links an equal...
... Figs. 19 and 20) IMPORTANT: DECK MUST BE LEVEL SIDE-TO-SIDE. SIDE-TO-SIDE ADJUSTMENT (See Figs. 17 and 18) • Raise mower to ground. BELT INSTALLATION • Install new belt in reverse order of removal. • Make sure belt is in front and behind the mandrel at... front than rear, tighten nut "F" against trunnion on that both front links are over or underinflated, you will change mower height about 1/8". • Recheck measurements after adjusting. NOTE: Each full turn of removal instructions. 20 Tighten nut "E" on both front links an equal...
User Manual
Page 21
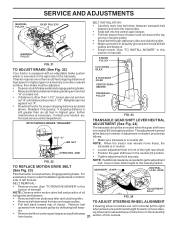
...Tighten adjustment bolt securely. NOTE: Observe entire motion drive belt and position of all belt guides and keepers. • Install mower (See "TO INSTALL MOWER" in this section of manual). WITH PARKING BRAKE "ENGAGED" STATIONARY IDLER CENTER SPAN KEEPER TRANSAXLE PULLEY FIG. 23 TRANSAXLE GEAR ...is a belt installation guide decal on the right side of the transaxle. Engage parking brake. BELT REMOVAL - • Remove mower (See "TO REMOVE MOWER" in front of the right rear wheel. The adjustment is in neutral. • Loosen adjustment bolt in this manual. ...
...Tighten adjustment bolt securely. NOTE: Observe entire motion drive belt and position of all belt guides and keepers. • Install mower (See "TO INSTALL MOWER" in this section of manual). WITH PARKING BRAKE "ENGAGED" STATIONARY IDLER CENTER SPAN KEEPER TRANSAXLE PULLEY FIG. 23 TRANSAXLE GEAR ...is a belt installation guide decal on the right side of the transaxle. Engage parking brake. BELT REMOVAL - • Remove mower (See "TO REMOVE MOWER" in front of the right rear wheel. The adjustment is in neutral. • Loosen adjustment bolt in this manual. ...

User Manual
Page 24
When mower is to be stored for damage, breakage and wear. sand lightly before storing in the Customer Responsibilities section of oil through spark plug hole(s) into ... thoroughly (see "TO CLEAN BATTERY AND TERMINALS" in the Customer Responsibilities section of this manual. • Be sure that does not retain moisture. TRACTOR Remove mower from tractor for storage, do not store battery directly on stabilizer container. IMPORTANT: NEVER COVER TRACTOR WHILE ENGINE AND EXHAUST AREAS ARE STILL WARM. 24...
When mower is to be stored for damage, breakage and wear. sand lightly before storing in the Customer Responsibilities section of oil through spark plug hole(s) into ... thoroughly (see "TO CLEAN BATTERY AND TERMINALS" in the Customer Responsibilities section of this manual. • Be sure that does not retain moisture. TRACTOR Remove mower from tractor for storage, do not store battery directly on stabilizer container. IMPORTANT: NEVER COVER TRACTOR WHILE ENGINE AND EXHAUST AREAS ARE STILL WARM. 24...

User Manual
Page 25
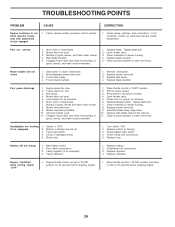
... speed. 2. Faulty solenoid or starter. 9. Recharge or replace battery. 4. Replace fuse. 5. Recharge or replace battery. 2. Build-up of mower housing. 4. Loose or damaged wiring. 14. Clean underside of grass, leaves and trash under mower. 4. Check oil level/change spark plug. 7. Clean engine air screen/fins. 12. Clean/replace muffler. 13. Bent blade...
... speed. 2. Faulty solenoid or starter. 9. Recharge or replace battery. 4. Replace fuse. 5. Recharge or replace battery. 2. Build-up of mower housing. 4. Loose or damaged wiring. 14. Clean underside of grass, leaves and trash under mower. 4. Check oil level/change spark plug. 7. Clean engine air screen/fins. 12. Clean/replace muffler. 13. Bent blade...
User Manual
Page 26
...Clean around mandrels. 1. Wet grass. 4. Worn, bent or loose blade. 7. Blades improperly installed. 10. Poor cable connections. 3. Mower deck not level. 3. Frozen idler pulley. 4. Frozen blade mandrel. 1. Poor grass discharge 1. Place throttle control in clutch mechanism. .... 5. Replace alternator. If not corrected, contact an authorized service center/ department. Clean underside of grass, leaves and trash under mower. 4. Reinstall blades sharp edge down. 10. Engine speed too slow. 2. Improper blades used. 11. Replace with attachment clutch ...
...Clean around mandrels. 1. Wet grass. 4. Worn, bent or loose blade. 7. Blades improperly installed. 10. Poor cable connections. 3. Mower deck not level. 3. Frozen idler pulley. 4. Frozen blade mandrel. 1. Poor grass discharge 1. Place throttle control in clutch mechanism. .... 5. Replace alternator. If not corrected, contact an authorized service center/ department. Clean underside of grass, leaves and trash under mower. 4. Reinstall blades sharp edge down. 10. Engine speed too slow. 2. Improper blades used. 11. Replace with attachment clutch ...
User Manual
Page 31
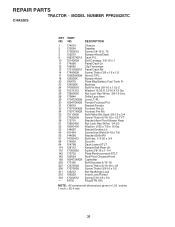
... Lh 34 179717X428 Footrest Pnt Rh 35 72110606 Bolt Rdhd Sht Sqnk 3/8-16 x 3/4 37 17490508 Screw Thdrol 6/16-18 x 1/2 TYT 38 175710 Bracket Asm Pivot Mower Rear 51 73800400 Nut Lock Hex W/Ins 1/4-20 52 19091416 Washer 9/32 x 7/8 x 16 Ga. 53 144697 Bracjet Grukke Lh 54 161464 Screw Hex Wshd 8-18... Nut Hexflange Lock 212 156229 Insert Lens Relect 219 17000512 Screw 5/16-18 x 3/4 --- 5479J Plug BTN. Blk NOTE: All component dimensions given in U.S. MODEL NUMBER PPR2042STC CHASSIS KEY PART NO. NO. REPAIR PARTS TRACTOR -
... Lh 34 179717X428 Footrest Pnt Rh 35 72110606 Bolt Rdhd Sht Sqnk 3/8-16 x 3/4 37 17490508 Screw Thdrol 6/16-18 x 1/2 TYT 38 175710 Bracket Asm Pivot Mower Rear 51 73800400 Nut Lock Hex W/Ins 1/4-20 52 19091416 Washer 9/32 x 7/8 x 16 Ga. 53 144697 Bracjet Grukke Lh 54 161464 Screw Hex Wshd 8-18... Nut Hexflange Lock 212 156229 Insert Lens Relect 219 17000512 Screw 5/16-18 x 3/4 --- 5479J Plug BTN. Blk NOTE: All component dimensions given in U.S. MODEL NUMBER PPR2042STC CHASSIS KEY PART NO. NO. REPAIR PARTS TRACTOR -
User Manual
Page 33
... Rod Brake Blk Zinc 26 840 Nut Hex Jam 3/8-16 Unc Spring Rod Brake 2 00 Zinc Washer 13/32 x 13/16 x 16 Ga. MODEL NUMBER PPR2042STC DRIVE KEY PART NO. DESCRIPTION 63 175410 Pulley Eng 64 71170764 Bolt Hex 7/16-20 x 4 Gr 5 65 10040700 Washer Lock Hvy Hlcl Spr 7/16 66... 154778 Keeper Belt Engine 69 145432 Screw Hex Wsh Hi-Lo 1/4-1/2 Unc 70 134683 Guide Belt Mower Drive RH 74 137057 Spacer Split 75 121749X Washer 25/32 x 1 1/4 x 16 Ga 76 12000001 E-ring #5133-75 77 123583X Key Square 78 121748X Washer...
... Rod Brake Blk Zinc 26 840 Nut Hex Jam 3/8-16 Unc Spring Rod Brake 2 00 Zinc Washer 13/32 x 13/16 x 16 Ga. MODEL NUMBER PPR2042STC DRIVE KEY PART NO. DESCRIPTION 63 175410 Pulley Eng 64 71170764 Bolt Hex 7/16-20 x 4 Gr 5 65 10040700 Washer Lock Hvy Hlcl Spr 7/16 66... 154778 Keeper Belt Engine 69 145432 Screw Hex Wsh Hi-Lo 1/4-1/2 Unc 70 134683 Guide Belt Mower Drive RH 74 137057 Spacer Split 75 121749X Washer 25/32 x 1 1/4 x 16 Ga 76 12000001 E-ring #5133-75 77 123583X Key Square 78 121748X Washer...
User Manual
Page 37
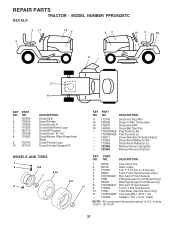
... 9 170456 Tire R T 20x10-8 Service 10 7152J Tube Rear (Service Item Only) 11 104757X428 Cap Axle Blk 1 50 X 1 00 - - 144334 Sealant, Tire ( 10 oz. MODEL NUMBER PPR2042STC DECALS 2 11 9 16 4 43 10 2 20 1 8 7 5 14 KEY NO. 1 2 3 4 5 7 8 PART NO. 156369 176305 176308 177020 180710 179128 170563 9 172740 10 157140 ...DESCRIPTION Decal Oper Decal Fender Decal Hood LH Decal Side Panel Logo Decal HP Engine Decal Deck "B" "42" Decal Mower Warn Keep Hand Away Decal Fender Logo Decal Fender Danger E/F WHEELS AND TIRES 1 2 5,8 4,10 7 6 3,9 11 KEY PART NO.
... 9 170456 Tire R T 20x10-8 Service 10 7152J Tube Rear (Service Item Only) 11 104757X428 Cap Axle Blk 1 50 X 1 00 - - 144334 Sealant, Tire ( 10 oz. MODEL NUMBER PPR2042STC DECALS 2 11 9 16 4 43 10 2 20 1 8 7 5 14 KEY NO. 1 2 3 4 5 7 8 PART NO. 156369 176305 176308 177020 180710 179128 170563 9 172740 10 157140 ...DESCRIPTION Decal Oper Decal Fender Decal Hood LH Decal Side Panel Logo Decal HP Engine Decal Deck "B" "42" Decal Mower Warn Keep Hand Away Decal Fender Logo Decal Fender Danger E/F WHEELS AND TIRES 1 2 5,8 4,10 7 6 3,9 11 KEY PART NO.
User Manual
Page 41
... Knob Round KEY PART NO. Pulley not included) - - 172559 Mower Deck, Complete NOTE: All component dimensions given in U.S. REPAIR PARTS TRACTOR - MODEL NUMBER PPR2042STC MOWER DECK KEY PART NO. DESCRIPTION 68 144959 V-Belt, 42" Mower 91 180532 Bracket Roller Nose Lh 94 132264 Roller Nose 38 & ...119 19121414 Washer 3/8 x 7/8 x 14 Ga. 121 173986 Bracket, Extruded 132 17060612 Screw 3/8-16 x .75 142 165890 Arm Spring Brake Mower 143 157109 Bracket Arm Idler 42" 144 173441 Keeper Belt 42" Clutch Cable 145 173437 Pulley Idler Flat 146 173443 Bolt Carriage Idler 147 131335...
... Knob Round KEY PART NO. Pulley not included) - - 172559 Mower Deck, Complete NOTE: All component dimensions given in U.S. REPAIR PARTS TRACTOR - MODEL NUMBER PPR2042STC MOWER DECK KEY PART NO. DESCRIPTION 68 144959 V-Belt, 42" Mower 91 180532 Bracket Roller Nose Lh 94 132264 Roller Nose 38 & ...119 19121414 Washer 3/8 x 7/8 x 14 Ga. 121 173986 Bracket, Extruded 132 17060612 Screw 3/8-16 x .75 142 165890 Arm Spring Brake Mower 143 157109 Bracket Arm Idler 42" 144 173441 Keeper Belt 42" Clutch Cable 145 173437 Pulley Idler Flat 146 173443 Bolt Carriage Idler 147 131335...


