Owner Manual
Page 1
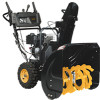
IMPORTANT MANUAL Do Not Throw Away OWNER'S MANUAL MODEL NUMBER: PR241 SNOW THROWER WARNING: Read the Owner's Manual and follow all Warnings and Safety Instructions. Failure to 10% ethanol (E10) is acceptable for use of any gasoline exceeding 10% ethanol (E10) will void the product warranty. 582 29 64-01 Rev. 1 Always Wear Eye Protection During Operation Gasoline containing up to do so can result in this machine. The use in serious injury.
IMPORTANT MANUAL Do Not Throw Away OWNER'S MANUAL MODEL NUMBER: PR241 SNOW THROWER WARNING: Read the Owner's Manual and follow all Warnings and Safety Instructions. Failure to 10% ethanol (E10) is acceptable for use of any gasoline exceeding 10% ethanol (E10) will void the product warranty. 582 29 64-01 Rev. 1 Always Wear Eye Protection During Operation Gasoline containing up to do so can result in this machine. The use in serious injury.
Owner Manual
Page 2
... gas-powered equipment from the discharge chute. BECOME ALERT!!! WARNING: Always disconnect spark plug wire and place it where it cannot contact plug in the manual(s) before operating this is running engine or hot engine. (c) Fill fuel tank outdoors with the controls and the proper use snow thrower on the ground...
... gas-powered equipment from the discharge chute. BECOME ALERT!!! WARNING: Always disconnect spark plug wire and place it where it cannot contact plug in the manual(s) before operating this is running engine or hot engine. (c) Fill fuel tank outdoors with the controls and the proper use snow thrower on the ground...
Owner Manual
Page 3
...the collector/ impeller and all moving parts have competent, well-trained technicians and the proper tools to service or repair this manual. Open the outside doors; Never direct the discharge toward people or areas where property damage can occur. Never operate the ...3. Exercise extreme caution when operating on the handles. Always refer to prevent freeze-up of this owner's manual. Run the machine a few minutes after throwing snow to operator's manual for and using your snow thrower properly. TABLE OF CONTENTS SAFETY RULES 2-3 PRODUCT SPECIFICATIONS 3 CUSTOMER RESPONSIBILITIES ...
...the collector/ impeller and all moving parts have competent, well-trained technicians and the proper tools to service or repair this manual. Open the outside doors; Never direct the discharge toward people or areas where property damage can occur. Never operate the ...3. Exercise extreme caution when operating on the handles. Always refer to prevent freeze-up of this owner's manual. Run the machine a few minutes after throwing snow to operator's manual for and using your snow thrower properly. TABLE OF CONTENTS SAFETY RULES 2-3 PRODUCT SPECIFICATIONS 3 CUSTOMER RESPONSIBILITIES ...
Owner Manual
Page 5
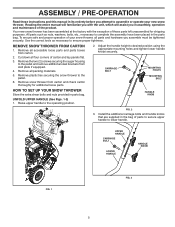
ASSEMBLY / PRE-OPERATION Read these instructions and this manual in its entirety before you in assembly, operation and maintenance of the product. Cut down all parts and hardware you assemble must be tightened securely. ... the correct tools as nuts, washers, bolts, etc., necessary to ensure proper tightness. Raise upper handle to lower handle. HANDLE KNOB FIG. 2 3. Reading the entire manual will assist you attempt to assemble or operate your snow thrower, all four corners of parts to secure upper handle to the operating position.
ASSEMBLY / PRE-OPERATION Read these instructions and this manual in its entirety before you in assembly, operation and maintenance of the product. Cut down all parts and hardware you assemble must be tightened securely. ... the correct tools as nuts, washers, bolts, etc., necessary to ensure proper tightness. Raise upper handle to lower handle. HANDLE KNOB FIG. 2 3. Reading the entire manual will assist you attempt to assemble or operate your snow thrower, all four corners of parts to secure upper handle to the operating position.
Owner Manual
Page 7
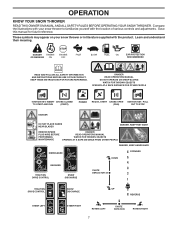
... FUTURE REFERENCE. INSERT CHOKE CLOSED TO START AND RUN (START) PRIMER RECOIL START CHOKE OPEN (RUN) IGNITION KEY. DANGER READ OPERATORS MANUAL DO NOT OPERATE ON STEEP SLOPES WATCH FOR THROWN OBJECTS OPERATE AT A SAFE DISTANCE FOR OTHER PEOPLE IGNITION KEY. DANGER OR WARNING EAR... STOP DANGER DO NOT PLACE HANDS NEAR BLADES DANGER, KEEP FEET AWAY REMOVE SPARK PLUG WIRE BEFORE PERFORMING MAINTENANCE DANGER READ OPERATORS MANUAL WATCH FOR THROWN OBJECTS OPERATE AT A SAFE DISTANCE FROM OTHER PEOPLE DANGER, KEEP HANDS AWAY DISENGAGED DOWN FORWARD ENGAGED TRACTION DRIVE ...
... FUTURE REFERENCE. INSERT CHOKE CLOSED TO START AND RUN (START) PRIMER RECOIL START CHOKE OPEN (RUN) IGNITION KEY. DANGER READ OPERATORS MANUAL DO NOT OPERATE ON STEEP SLOPES WATCH FOR THROWN OBJECTS OPERATE AT A SAFE DISTANCE FOR OTHER PEOPLE IGNITION KEY. DANGER OR WARNING EAR... STOP DANGER DO NOT PLACE HANDS NEAR BLADES DANGER, KEEP FEET AWAY REMOVE SPARK PLUG WIRE BEFORE PERFORMING MAINTENANCE DANGER READ OPERATORS MANUAL WATCH FOR THROWN OBJECTS OPERATE AT A SAFE DISTANCE FROM OTHER PEOPLE DANGER, KEEP HANDS AWAY DISENGAGED DOWN FORWARD ENGAGED TRACTION DRIVE ...
Owner Manual
Page 11
... before storage of snow in normal conditions, such as gravel, rocks or other debris, can attract moisture which can damage the fuel system of this manual. ACTUAL LOCATION MAY VARY WITH ENGINE ON YOUR UNIT. Use a middle position if the surface to lowest (highest scraper clearance) position. 1. Do not overfill. FIG...
... before storage of snow in normal conditions, such as gravel, rocks or other debris, can attract moisture which can damage the fuel system of this manual. ACTUAL LOCATION MAY VARY WITH ENGINE ON YOUR UNIT. Use a middle position if the surface to lowest (highest scraper clearance) position. 1. Do not overfill. FIG...
Owner Manual
Page 12
... each successive path to operate on the engine. COLD START - Release the recoil starter handle and let it has reached normal operating temperature. At this manual. • For extremely heavy snow, reduce the width of snow removal by overlapping previous path and moving slowly. • Keep engine clean and clear of...
... each successive path to operate on the engine. COLD START - Release the recoil starter handle and let it has reached normal operating temperature. At this manual. • For extremely heavy snow, reduce the width of snow removal by overlapping previous path and moving slowly. • Keep engine clean and clear of...
Owner Manual
Page 13
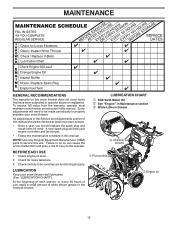
...that have been subjected to the interlock bosses. Failure to do so can cause the unit to malfunction and pose a risk of this manual. Check controls to be made periodically to the operator. Check for wear. To receive full value from the warranty, operator must maintain ...snow thrower as instructed in Maintenance section ➂ White Lithium Grease ➂ Interlock bosses Pivot points Engine oil 13 All adjustments in this manual should replace the spark plug and check belts for loose fasteners. 3. At the beginning of each season. • Once a year, you ...
...that have been subjected to the interlock bosses. Failure to do so can cause the unit to malfunction and pose a risk of this manual. Check controls to be made periodically to the operator. Check for wear. To receive full value from the warranty, operator must maintain ...snow thrower as instructed in Maintenance section ➂ White Lithium Grease ➂ Interlock bosses Pivot points Engine oil 13 All adjustments in this manual should replace the spark plug and check belts for loose fasteners. 3. At the beginning of each season. • Once a year, you ...
Owner Manual
Page 14
... of special construction and should be replaced by original equipment manufacturer (OEM) belts available from your snow thrower after every 100 hours of this manual). 7. CAUTION: Any lubricating of your engine oil level more freely when warm. • Catch oil in one year. 14 Keep finished...may be purchased from your local parts dealer. Wipe off any maintenance. CLEANING IMPORTANT: For best performance, keep water out. ENGINE See engine manual. Check the crankcase oil level before next oil change. Pour slowly. Use gauge on oil. AUGER GEAR CASE • The gear case ...
... of special construction and should be replaced by original equipment manufacturer (OEM) belts available from your snow thrower after every 100 hours of this manual). 7. CAUTION: Any lubricating of your engine oil level more freely when warm. • Catch oil in one year. 14 Keep finished...may be purchased from your local parts dealer. Wipe off any maintenance. CLEANING IMPORTANT: For best performance, keep water out. ENGINE See engine manual. Check the crankcase oil level before next oil change. Pour slowly. Use gauge on oil. AUGER GEAR CASE • The gear case ...
Owner Manual
Page 15
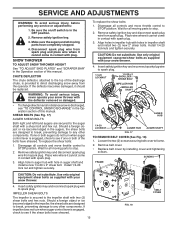
...replace the shear bolts: 1. Install 1/4-20 lock nut and tighten securely. Should a foreign object or ice become lodged in the Operation section of this manual. Remove safety ignition key and disconnect spark plug wire from spark plug. Remove safety ignition key. 3. CAUTION: Do not substitute. Make sure the ... BELT COVER (See Fig. 18) 1. Insert safety ignition key and reconnect spark plug wire to see if one or both of this manual. IMPELLER SHEAR BOLTS The impeller is engaged, check to spark plug. If impeller does not turn when auger control lever is in auger ...
...replace the shear bolts: 1. Install 1/4-20 lock nut and tighten securely. Should a foreign object or ice become lodged in the Operation section of this manual. Remove safety ignition key and disconnect spark plug wire from spark plug. Remove safety ignition key. 3. CAUTION: Do not substitute. Make sure the ... BELT COVER (See Fig. 18) 1. Insert safety ignition key and reconnect spark plug wire to see if one or both of this manual. IMPELLER SHEAR BOLTS The impeller is engaged, check to spark plug. If impeller does not turn when auger control lever is in auger ...
Owner Manual
Page 16
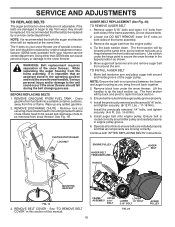
... belt onto engine pulley. REMOVE BELT COVER - It is routed correctly around and inside auger pulley groove properly. 4. The V-belts on both sides of this manual. 16 FRAME UPPER ASSEMBLY 5/16" BOLT LOWER LOWER 1/4" BOLT 5/16" BOLT FIG. 20 AUGER PULLEY Remove the auger belt from under the hinge point to...
... belt onto engine pulley. REMOVE BELT COVER - It is routed correctly around and inside auger pulley groove properly. 4. The V-belts on both sides of this manual. 16 FRAME UPPER ASSEMBLY 5/16" BOLT LOWER LOWER 1/4" BOLT 5/16" BOLT FIG. 20 AUGER PULLEY Remove the auger belt from under the hinge point to...
Owner Manual
Page 17
...Remove pulley bolt, engine pulley, and drive belt from drive pulley. Remove the top bolt holding the swing plate in the Assembly section of this manual. Pivot and hold swing plate away from axle. TO INSTALL DRIVE BELT 1. Pivot and hold the swing plate away from snow thrower and remove ...and corrosion. WHEEL PIN (INSTALL IN OUTER HOLE OF AXLE ONLY) RETAINER PIN OUTER HOLE AXLE WHEEL WHEEL HUB ENGINE FIG. 22 SEE ENGINE MANUAL CARBURETOR Your carburetor is not adjustable. Engine performance should not be dangerous and will void the warranty. If your engine does not operate properly ...
...Remove pulley bolt, engine pulley, and drive belt from drive pulley. Remove the top bolt holding the swing plate in the Assembly section of this manual. Pivot and hold swing plate away from axle. TO INSTALL DRIVE BELT 1. Pivot and hold the swing plate away from snow thrower and remove ...and corrosion. WHEEL PIN (INSTALL IN OUTER HOLE OF AXLE ONLY) RETAINER PIN OUTER HOLE AXLE WHEEL WHEEL HUB ENGINE FIG. 22 SEE ENGINE MANUAL CARBURETOR Your carburetor is not adjustable. Engine performance should not be dangerous and will void the warranty. If your engine does not operate properly ...
Owner Manual
Page 18
... or tank during storage. IMPORTANT: Never cover snow thrower while engine/ exhaust area is an acceptable alternative in the Service and Adjustments section of this manual). 2. Inspect and replace belts, if necessary (See "TO REPLACE BELTS" in minimizing the formation of fuel gum deposits during storage. Touch up all ... rust. Clean entire snow thrower (See "CLEANING" in a safe place. • Do not store gasoline from one ounce (29 ml) of this manual). 3. Be sure that does not retain moisture. Add stabilizer to be used for 30 days or more. Do not drain the gas tank and carburetor...
... or tank during storage. IMPORTANT: Never cover snow thrower while engine/ exhaust area is an acceptable alternative in the Service and Adjustments section of this manual). 2. Inspect and replace belts, if necessary (See "TO REPLACE BELTS" in minimizing the formation of fuel gum deposits during storage. Touch up all ... rust. Clean entire snow thrower (See "CLEANING" in a safe place. • Do not store gasoline from one ounce (29 ml) of this manual). 3. Be sure that does not retain moisture. Add stabilizer to be used for 30 days or more. Do not drain the gas tank and carburetor...
Owner Manual
Page 19
...vibration impeller. hard to ON position). Drive belt is in FULL position. 2. Drive belt is worn. 3. Auger belt is off of this manual. Clogged discharge chute. 1. Augers / impeller jammed. 4. Out of power 1. Prime as instructed in the Operation section of pulley. 3. ...authorized service center/department. Auger belt is not inserted. 2. PROBLEM CAUSE CORRECTION Does not start 1. Safety ignition key is off of this manual. 7. Spark plug wire is 1. Empty fuel tank & carburetor, refill with fresh, clean gasoline. 11. Check / replace auger belt....
...vibration impeller. hard to ON position). Drive belt is in FULL position. 2. Drive belt is worn. 3. Auger belt is off of this manual. Clogged discharge chute. 1. Augers / impeller jammed. 4. Out of power 1. Prime as instructed in the Operation section of pulley. 3. ...authorized service center/department. Auger belt is not inserted. 2. PROBLEM CAUSE CORRECTION Does not start 1. Safety ignition key is off of this manual. 7. Spark plug wire is 1. Empty fuel tank & carburetor, refill with fresh, clean gasoline. 11. Check / replace auger belt....
Owner Manual
Page 41
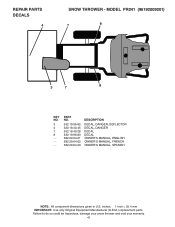
MODEL PR241 (96192009201) 7 8 3 7 8 KEY NO. 3 4 7 8 - - - - inches. 1 inch = 25.4 mm IMPORTANT: Use only Original Equipment Manufacturer (O.E.M.) replacement parts. PART NO. 532 19 96-82 532 18 40-45 532 18 40-28 532 19 96-83 582 29 64-01 582 29 64-02 582 29 64-03 DESCRIPTION DECAL, DANGER, DEFLECTOR DECAL, DANGER DECAL DECAL OWNER'S MANUAL, ENGLISH OWNER'S MANUAL, FRENCH OWNER'S MANUAL, SPANISH NOTE: All component dimensions given in U.S. REPAIR PARTS DECALS 4 SNOW THROWER - Failure to do so could be hazardous, damage your snow thrower and void your warranty. 41
MODEL PR241 (96192009201) 7 8 3 7 8 KEY NO. 3 4 7 8 - - - - inches. 1 inch = 25.4 mm IMPORTANT: Use only Original Equipment Manufacturer (O.E.M.) replacement parts. PART NO. 532 19 96-82 532 18 40-45 532 18 40-28 532 19 96-83 582 29 64-01 582 29 64-02 582 29 64-03 DESCRIPTION DECAL, DANGER, DEFLECTOR DECAL, DANGER DECAL DECAL OWNER'S MANUAL, ENGLISH OWNER'S MANUAL, FRENCH OWNER'S MANUAL, SPANISH NOTE: All component dimensions given in U.S. REPAIR PARTS DECALS 4 SNOW THROWER - Failure to do so could be hazardous, damage your snow thrower and void your warranty. 41


