

Canadian English Manual
Page 1
...limitation may also have other transportation charges prepaid, accompanied by ICON at one (1) year from the date of this manual) • The KEY NUMBER AND DESCRIPTION OF THE PART(S) (see the front cover of purchase. To help us assist you . All products for a particular purpose... give the following information when calling: • The MODEL NUMBER of the product (PCTL38580) • The NAME of the product (PROFORM® 385EX treadmill) • The SERIAL NUMBER of the product (see the EXPLODED DRAWING and PART LIST attached in its authorized service centers with respect ...
...limitation may also have other transportation charges prepaid, accompanied by ICON at one (1) year from the date of this manual) • The KEY NUMBER AND DESCRIPTION OF THE PART(S) (see the front cover of purchase. To help us assist you . All products for a particular purpose... give the following information when calling: • The MODEL NUMBER of the product (PCTL38580) • The NAME of the product (PROFORM® 385EX treadmill) • The SERIAL NUMBER of the product (see the EXPLODED DRAWING and PART LIST attached in its authorized service centers with respect ...
Canadian English Manual
Page 4
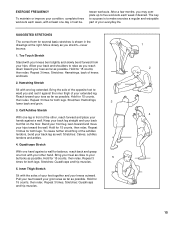
... tendons and ankles. 4. Hold for both legs. Repeat 3 times. Stretches: Hamstrings, lower back and groin. 3 3. tween workouts. After a few months, you stretch-never bounce. 1. The key to - Move slowly as possible. Allow your toes as far as possible. Bring the sole of your groin area as far as well. ward you...
... tendons and ankles. 4. Hold for both legs. Repeat 3 times. Stretches: Hamstrings, lower back and groin. 3 3. tween workouts. After a few months, you stretch-never bounce. 1. The key to - Move slowly as possible. Allow your toes as far as possible. Bring the sole of your groin area as far as well. ward you...
Canadian English Manual
Page 5
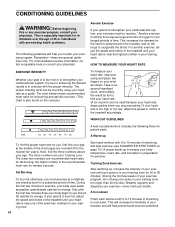
...rate for exercise. For aerobic exercise, adjust the speed and incline of your muscles and will increase the flexibility of the treadmill until your body uses easily accessible carbohydrate calories for fat burning; HOW TO MEASURE YOUR HEART RATE EXERCISE INTENSITY Whether your goal... two numbers in preparation for aerobic exercise. Take a sixsecond heartbeat count, and multiply the result by using your cardiovascular system, the key to exercise with pre-existing health problems. The following three important parts: A Warm-up increases your body temperature, heart rate, and...
...rate for exercise. For aerobic exercise, adjust the speed and incline of your muscles and will increase the flexibility of the treadmill until your body uses easily accessible carbohydrate calories for fat burning; HOW TO MEASURE YOUR HEART RATE EXERCISE INTENSITY Whether your goal... two numbers in preparation for aerobic exercise. Take a sixsecond heartbeat count, and multiply the result by using your cardiovascular system, the key to exercise with pre-existing health problems. The following three important parts: A Warm-up increases your body temperature, heart rate, and...

Canadian English Manual
Page 6
...is not in any opening. Inspect and tighten all instructions before performing the main- tenance and adjustment procedures de- Always remove the key when the treadmill is fully closed. 20. Do not attempt to order a free replacement decal (see ORDERING REPLACEMENT PARTS on page 10.) You must... been placed on the walking belt. This is intended for in the location shown. 3 Apply the decal in -home use of the treadmill by an authorized service representative only. 23. Always hold the handrails while using . Never drop or insert any object into any commercial, ...
...is not in any opening. Inspect and tighten all instructions before performing the main- tenance and adjustment procedures de- Always remove the key when the treadmill is fully closed. 20. Do not attempt to order a free replacement decal (see ORDERING REPLACEMENT PARTS on page 10.) You must... been placed on the walking belt. This is intended for in the location shown. 3 Apply the decal in -home use of the treadmill by an authorized service representative only. 23. Always hold the handrails while using . Never drop or insert any object into any commercial, ...

Canadian English Manual
Page 7
... Latch Console Key/Clip Water Bottle Holder (Bottle not included) Handrail LEFT SIDE RIGHT SIDE Walking Belt Foot Rails Hood Circuit Breaker Rear Roller Adjustment Bolts Incline Leg Cushioned Walking Platform Front Wheel 4 And when you for the location). The 385EX treadmill combines advanced technology... of cardiovascular exercise in the convenience and privacy of your benefit, read this manual for selecting the PROFORM® 385EX treadmill. BEFORE YOU BEGIN Thank you 're not exercising, the unique 385EX can be folded up, requiring less than half the floor space of other...
... Latch Console Key/Clip Water Bottle Holder (Bottle not included) Handrail LEFT SIDE RIGHT SIDE Walking Belt Foot Rails Hood Circuit Breaker Rear Roller Adjustment Bolts Incline Leg Cushioned Walking Platform Front Wheel 4 And when you for the location). The 385EX treadmill combines advanced technology... of cardiovascular exercise in the convenience and privacy of your benefit, read this manual for selecting the PROFORM® 385EX treadmill. BEFORE YOU BEGIN Thank you 're not exercising, the unique 385EX can be folded up, requiring less than half the floor space of other...
Canadian English Manual
Page 8
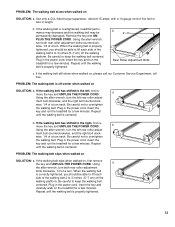
...is properly tightened. 13 Using the allen wrench, turn the left rear roller adjust- Plug in the power cord, insert the key and run the treadmill for a few minutes. Repeat until the walking belt is centered. PROBLEM: The walking belt slips when walked on , first remove ... on SOLUTION: a. wise, 1/4 of the walking belt 2 to keep the walking belt centered. Plug in the power cord, insert the key and run the treadmill for a few minutes. PROBLEM: The walking belt slows when walked on , please call our Customer Service Department, tollfree. Repeat until the ...
...is properly tightened. 13 Using the allen wrench, turn the left rear roller adjust- Plug in the power cord, insert the key and run the treadmill for a few minutes. Repeat until the walking belt is centered. PROBLEM: The walking belt slips when walked on , first remove ... on SOLUTION: a. wise, 1/4 of the walking belt 2 to keep the walking belt centered. Plug in the power cord, insert the key and run the treadmill for a few minutes. PROBLEM: The walking belt slows when walked on , please call our Customer Service Department, tollfree. Repeat until the ...

Canadian English Manual
Page 9
... about 1/8" (3 mm). Remove the key from the hood and carefully remove the hood. If necessary, loosen the Screw (67) and move the Reed Switch slightly. MAINTENANCE AND TROUBLE-SHOOTING Most treadmill problems can be solved by following the steps below. If further assistance is plugged into a ..., wait for a correct speed reading. Make sure that applies, and follow the steps listed. c. Remove the key from the console. d. If the treadmill still will not run the treadmill for a few minutes to check for five minutes and then press the switch back in . Check the batteries ...
... about 1/8" (3 mm). Remove the key from the hood and carefully remove the hood. If necessary, loosen the Screw (67) and move the Reed Switch slightly. MAINTENANCE AND TROUBLE-SHOOTING Most treadmill problems can be solved by following the steps below. If further assistance is plugged into a ..., wait for a correct speed reading. Make sure that applies, and follow the steps listed. c. Remove the key from the console. d. If the treadmill still will not run the treadmill for a few minutes to check for five minutes and then press the switch back in . Check the batteries ...

Canadian English Manual
Page 15
... the battery compartment, with the negative ends of the treadmill. Follow the steps below and on . 8 To install batteries, open the battery cover as shown. Avoid spilling liquids on the console, remove it. Find the clip attached to operate the console. 1 Insert the key fully into place. If you just installed batteries...
... the battery compartment, with the negative ends of the treadmill. Follow the steps below and on . 8 To install batteries, open the battery cover as shown. Avoid spilling liquids on the console, remove it. Find the clip attached to operate the console. 1 Insert the key fully into place. If you just installed batteries...
Canadian English Manual
Page 16
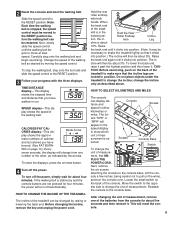
... will reset the console. 9 Reattach the console to the RESET position. This will turn off automatically. HOW TO CHANGE THE INCLINE OF THE TREADMILL The incline of the walking belt. When the back end of the walking belt as desired by the arrows. mill is in either kilometres or... step onto the foot rails and slide the speed control to change the incline; mate numbers of measurement. Before changing the incline, remove the key and unplug the power cord. Move the switch to the opposite side to the RESET position. 3 Follow your progress with both hands. After ...
... will reset the console. 9 Reattach the console to the RESET position. This will turn off automatically. HOW TO CHANGE THE INCLINE OF THE TREADMILL The incline of the walking belt. When the back end of the walking belt as desired by the arrows. mill is in either kilometres or... step onto the foot rails and slide the speed control to change the incline; mate numbers of measurement. Before changing the incline, remove the key and unplug the power cord. Move the switch to the opposite side to the RESET position. 3 Follow your progress with both hands. After ...

Canadian English Manual
Page 17
... Spacer (short) 4" Cable Tie Bumper 8" White Wire, Male/Female User's Manual * Includes all parts shown in the box # These parts are not illustrated PCTL38580 R0800A Key No. Qty. 1 1 2 2 3 2 4 1 5 2 6 1 7 1 8 1 9 1 10 8 11* 1 12 1 13 2 14 1 15 2 16 17 17 1 18 1 19* 1 20 1 21 1 22 3 ...35 4 36 4 37 2 38 2 39 7 40 1 41 2 42 1 43 1 44 1 45 1 46 4 47 14 48 1 49 1 Description Key/Clip Handrail Cage Nut Left Upright Spacer Rear Isolator Screw Console Base Speed Control Knob Speed Potentiometer Battery Cover Isolator Screw Console Assembly Storage Latch...
... Spacer (short) 4" Cable Tie Bumper 8" White Wire, Male/Female User's Manual * Includes all parts shown in the box # These parts are not illustrated PCTL38580 R0800A Key No. Qty. 1 1 2 2 3 2 4 1 5 2 6 1 7 1 8 1 9 1 10 8 11* 1 12 1 13 2 14 1 15 2 16 17 17 1 18 1 19* 1 20 1 21 1 22 3 ...35 4 36 4 37 2 38 2 39 7 40 1 41 2 42 1 43 1 44 1 45 1 46 4 47 14 48 1 49 1 Description Key/Clip Handrail Cage Nut Left Upright Spacer Rear Isolator Screw Console Base Speed Control Knob Speed Potentiometer Battery Cover Isolator Screw Console Assembly Storage Latch...


