

English Manual
Page 2
... as a transient voltage surge suppressor (TVSS). Place the treadmill on the same circuit. Keep the treadmill indoors, away from heated surfaces. 2 Do not put the treadmill in the treadmill. Athletic support clothes are recommended for future reference. When connecting the power cord (see your local PROFORM dealer or call 1-800366-7278 and order part number...
... as a transient voltage surge suppressor (TVSS). Place the treadmill on the same circuit. Keep the treadmill indoors, away from heated surfaces. 2 Do not put the treadmill in the treadmill. Athletic support clothes are recommended for future reference. When connecting the power cord (see your local PROFORM dealer or call 1-800366-7278 and order part number...

English Manual
Page 3
... running. If the decal is missing, or if it is turned off. 13. Adjust the speed in use of this treadmill in speed. 16. When folding or moving the treadmill, make sure that the storage latch is not legible, please call our toll-free HELPLINE to do so by or through... WARNING: Before beginning this manual should be able to safely lift 45 pounds (20 kg) to avoid sudden jumps in any exercise program, consult your treadmill. Never drop or insert any object into any opening. This is capable of 35 or persons with pre-existing health problems. Read all parts of...
... running. If the decal is missing, or if it is turned off. 13. Adjust the speed in use of this treadmill in speed. 16. When folding or moving the treadmill, make sure that the storage latch is not legible, please call our toll-free HELPLINE to do so by or through... WARNING: Before beginning this manual should be able to safely lift 45 pounds (20 kg) to avoid sudden jumps in any exercise program, consult your treadmill. Never drop or insert any object into any opening. This is capable of 35 or persons with pre-existing health problems. Read all parts of...

English Manual
Page 4
... attached to let you enjoy an excellent form of cardiovascular exercise in the convenience and privacy of other treadmills. If you Õre not exercising, the unique 395CW can be folded up, requiring less than half the floor space of your benefit, read this manual... Monday through Saturday, 7 a.m. To help us assist you for selecting the new PROFORM¨ 395CW treadmill. BEFORE YOU BEGIN Thank you , please note the product model number and serial number before using the treadmill. Central Time (excluding holidays). For your home. And when you have additional questions,...
... attached to let you enjoy an excellent form of cardiovascular exercise in the convenience and privacy of other treadmills. If you Õre not exercising, the unique 395CW can be folded up, requiring less than half the floor space of your benefit, read this manual... Monday through Saturday, 7 a.m. To help us assist you for selecting the new PROFORM¨ 395CW treadmill. BEFORE YOU BEGIN Thank you , please note the product model number and serial number before using the treadmill. Central Time (excluding holidays). For your home. And when you have additional questions,...

English Manual
Page 5
...Handrail Screw (33)Ð2 Latch Screw (35)Ð2 1. ASSEMBLY Assembly requires two people. Insert one of the Extension Legs (34) into the treadmill as shown. (Note: It may be helpful to the top of the Extension Leg Screw while tightening it. Do not dispose of the Extension Leg.... If there is lubricant on the indicated side of the packing materials until the treadmill is a normal condition and does not affect treadmill performance. Cut the plastic tie off the side of the treadmill. 1 With the help of the walking belt, simply wipe off the lubricant with a...
...Handrail Screw (33)Ð2 Latch Screw (35)Ð2 1. ASSEMBLY Assembly requires two people. Insert one of the Extension Legs (34) into the treadmill as shown. (Note: It may be helpful to the top of the Extension Leg Screw while tightening it. Do not dispose of the Extension Leg.... If there is lubricant on the indicated side of the packing materials until the treadmill is a normal condition and does not affect treadmill performance. Cut the plastic tie off the side of the treadmill. 1 With the help of the walking belt, simply wipe off the lubricant with a...

English Manual
Page 6
3. It may be helpful to lift up and push down on the Handrail as you use the treadmill. Make sure that all parts are tightened before you thread the Handrail Screw. 4b 1 33 Attach the other Handrail to the left Upright (not shown). ...) into the tube at the angle shown in the Handrail (1) with two Latch Screws (35). To protect the floor or carpet, place a mat under the treadmill. 6
3. It may be helpful to lift up and push down on the Handrail as you use the treadmill. Make sure that all parts are tightened before you thread the Handrail Screw. 4b 1 33 Attach the other Handrail to the left Upright (not shown). ...) into the tube at the angle shown in the Handrail (1) with two Latch Screws (35). To protect the floor or carpet, place a mat under the treadmill. 6

English Manual
Page 7
...an increased risk of 450 joules. If it will deteriorate the walking belt and cause excessive wear. Important: The treadmill is equipped with your local PROFORM dealer or call toll-free 1-800-366-7278 and order part number 146148. The temporary adapter should malfunction or break...Grounding Pin Grounding Pin Grounded Outlet Grounding Plug 2 Grounded Outlet Box Adapter Surge Suppressor Lug Metal Screw To purchase a surge suppressor, see your treadmill (see drawing 1 at the right). The surge suppressor must be used only until a properly grounded outlet (drawing 1) can result in ...
...an increased risk of 450 joules. If it will deteriorate the walking belt and cause excessive wear. Important: The treadmill is equipped with your local PROFORM dealer or call toll-free 1-800-366-7278 and order part number 146148. The temporary adapter should malfunction or break...Grounding Pin Grounding Pin Grounded Outlet Grounding Plug 2 Grounded Outlet Box Adapter Surge Suppressor Lug Metal Screw To purchase a surge suppressor, see your treadmill (see drawing 1 at the right). The surge suppressor must be used only until a properly grounded outlet (drawing 1) can result in ...

English Manual
Page 8
...of the batteries are recommended. Open the battery cover as shown in the inset drawing. Find the clip at the lower right) while using the treadmill. If the key is not pulled from the console. tion of the clip as shown in the drawing at the upper right. Battery Cover ...Batteries Battery Cover Tab Close the battery cover, push up on the foot rails of the treadmill. Test the clip by carefully taking a few steps back- Insert two batteries into the battery compartment, making sure that the tab locks into the...
...of the batteries are recommended. Open the battery cover as shown in the inset drawing. Find the clip at the lower right) while using the treadmill. If the key is not pulled from the console. tion of the clip as shown in the drawing at the upper right. Battery Cover ...Batteries Battery Cover Tab Close the battery cover, push up on the foot rails of the treadmill. Test the clip by carefully taking a few steps back- Insert two batteries into the battery compartment, making sure that the tab locks into the...

English Manual
Page 9
... will turn on . 2 Reset the speed control. The displays will already be restarted. 3 Start the walking belt. To change the incline of the treadmill, press the top or bottom of the incline control until the walking belt begins to the RESET position. 4 Adjust the incline of the walking belt...Insert the key into the power switch. Inserting the key will automatically turn on page 14.) In addition, the display shows the speed of the treadmill as shown by sliding the speed control. Note: If you have burned. (See FAT BURNING on when the ON/RESET button is pressed or ...
... will turn on . 2 Reset the speed control. The displays will already be restarted. 3 Start the walking belt. To change the incline of the treadmill, press the top or bottom of the incline control until the walking belt begins to the RESET position. 4 Adjust the incline of the walking belt...Insert the key into the power switch. Inserting the key will automatically turn on page 14.) In addition, the display shows the speed of the treadmill as shown by sliding the speed control. Note: If you have burned. (See FAT BURNING on when the ON/RESET button is pressed or ...
English Manual
Page 10
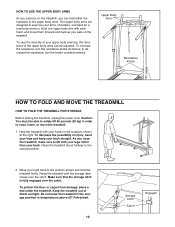
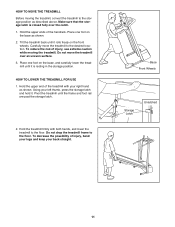
... back. Make sure that the storage latch is fully engaged over the catch. HOW TO USE THE UPPER BODY ARMS As you exercise on the treadmill. Caution: You must be adjusted. Move your upper body exercise, the resistance of injury, bend your legs and keep your hands in the locations...arms are designed to safely lift 45 pounds (20 kg) in temperatures above 85¡ Fahrenheit. 10 Storage Latch Catch Engaged Do not leave the treadmill in the storage position in order to the vertical position. 2. Hold one upper body arm with your legs rather than your arms, shoulders, and ...
... back. Make sure that the storage latch is fully engaged over the catch. HOW TO USE THE UPPER BODY ARMS As you exercise on the treadmill. Caution: You must be adjusted. Move your upper body exercise, the resistance of injury, bend your legs and keep your hands in the locations...arms are designed to safely lift 45 pounds (20 kg) in temperatures above 85¡ Fahrenheit. 10 Storage Latch Catch Engaged Do not leave the treadmill in the storage position in order to the vertical position. 2. Hold one upper body arm with your legs rather than your arms, shoulders, and ...
English Manual
Page 11
...fully over an uneven surface. 3. To decrease the possibility of injury, use extreme caution while moving the treadmill, convert the treadmill to the desired location. Do not move the treadmill to the storage position as shown. 2. Base Front Wheels Storage Latch Unlatched 11 Make sure that the ...storage latch is resting in the storage position. Place one foot on the base, and carefully lower the treadmill until it . Tilt the treadmill back until the frame and foot rail are past the storage latch. 2. Hold the upper end of the handrails. HOW...
...fully over an uneven surface. 3. To decrease the possibility of injury, use extreme caution while moving the treadmill, convert the treadmill to the desired location. Do not move the treadmill to the storage position as shown. 2. Base Front Wheels Storage Latch Unlatched 11 Make sure that the ...storage latch is resting in the storage position. Place one foot on the base, and carefully lower the treadmill until it . Tilt the treadmill back until the frame and foot rail are past the storage latch. 2. Hold the upper end of the handrails. HOW...

English Manual
Page 12
... from the hood. Turn the Pulley until 7 p.m. If necessary, loosen the Screw (33) and move the Reed Switch slightly. TROUBLE-SHOOTING Most treadmill problems can be electrically rated for a correct speed reading. 12 78 1/8Ó 44 33 Top View 87 50 45 Central Time (excluding holidays). ...hood first, then the left Upright (11). Make sure that the power cord is plugged into a properly grounded outlet (see 1. Important: The treadmill is plugged into a surge suppressor, and that the power cord is aligned with GFCI-equipped outlets. c. If the circuit breaker has tripped, wait...
... from the hood. Turn the Pulley until 7 p.m. If necessary, loosen the Screw (33) and move the Reed Switch slightly. TROUBLE-SHOOTING Most treadmill problems can be electrically rated for a correct speed reading. 12 78 1/8Ó 44 33 Top View 87 50 45 Central Time (excluding holidays). ...hood first, then the left Upright (11). Make sure that the power cord is plugged into a properly grounded outlet (see 1. Important: The treadmill is plugged into a surge suppressor, and that the power cord is aligned with GFCI-equipped outlets. c. If the circuit breaker has tripped, wait...

English Manual
Page 13
... turn each side of the walking belt should be permanently damaged. Reattach all parts in the power cord, insert the key and run the treadmill for a few minutes. Be careful not to 3 inches off the walking platform. Repeat until the walking belt is correctly tightened, you should... just touch the walking platform. Repeat until the walking belt is overtightened, treadmill performance may decrease and the walking belt may be able to lift each . Be careful not to 3 inches off the walking platform....
... turn each side of the walking belt should be permanently damaged. Reattach all parts in the power cord, insert the key and run the treadmill for a few minutes. Be careful not to 3 inches off the walking platform. Repeat until the walking belt is correctly tightened, you should... just touch the walking platform. Repeat until the walking belt is overtightened, treadmill performance may decrease and the walking belt may be able to lift each . Be careful not to 3 inches off the walking platform....

English Manual
Page 14
...exercise, your heart rate is the recommended heart rate for energy. For aerobic exercise, adjust the speed and incline of the treadmill until your body uses easily accessible carbohydrate calories for fat burning; Take a sixsecond heartbeat count, and multiply the result by ...using your age. WORKOUT GUIDELINES A well-rounded workout includes the following guidelines will help you to the right of the treadmill accordingly. CONDITIONING GUIDELINES WARNING: Before beginning this or any exercise program, consult your physician. training zone. Fat Burning To measure ...
...exercise, your heart rate is the recommended heart rate for energy. For aerobic exercise, adjust the speed and incline of the treadmill until your body uses easily accessible carbohydrate calories for fat burning; Take a sixsecond heartbeat count, and multiply the result by ...using your age. WORKOUT GUIDELINES A well-rounded workout includes the following guidelines will help you to the right of the treadmill accordingly. CONDITIONING GUIDELINES WARNING: Before beginning this or any exercise program, consult your physician. training zone. Fat Burning To measure ...

English Manual
Page 18
When requesting help assembling or operating the PROFORM 395CW treadmill ¥ a part is used commercially or for immediate purchase or special order when you find the location of charge. This warranty does not apply when the TREADMILL EXERCISER is missing ¥ or you need to schedule repair... pm Central Time (excluding holidays) The model number and serial number of your nearest SEARS Service Center. If you visit your PROFORM¨ 395CW treadmill are available for rental purposes. To request service or to order parts by telephone, call the following toll-free number 1-800-...
When requesting help assembling or operating the PROFORM 395CW treadmill ¥ a part is used commercially or for immediate purchase or special order when you find the location of charge. This warranty does not apply when the TREADMILL EXERCISER is missing ¥ or you need to schedule repair... pm Central Time (excluding holidays) The model number and serial number of your nearest SEARS Service Center. If you visit your PROFORM¨ 395CW treadmill are available for rental purposes. To request service or to order parts by telephone, call the following toll-free number 1-800-...


