

Canadian English Manual
Page 2
...change speed or stop unexpectedly, which may result in a fall and serious injury. 13. It is attached in the center of this treadmill are adequately informed of all users of this manual. To protect the floor or carpet from moisture and dust. Never allow more amps.... times. 7. TABLE OF CONTENTS IMPORTANT PRECAUTIONS 2 BEFORE YOU BEGIN 4 ASSEMBLY 5 OPERATION AND ADJUSTMENT 8 HOW TO FOLD AND MOVE THE TREADMILL 21 TROUBLESHOOTING 22 CONDITIONING GUIDELINES 24 PART LIST 26 PART IDENTIFICATION CHART 27 ORDERING REPLACEMENT PARTS Back Cover LIMITED WARRANTY Back Cover Note: An ...
...change speed or stop unexpectedly, which may result in a fall and serious injury. 13. It is attached in the center of this treadmill are adequately informed of all users of this manual. To protect the floor or carpet from moisture and dust. Never allow more amps.... times. 7. TABLE OF CONTENTS IMPORTANT PRECAUTIONS 2 BEFORE YOU BEGIN 4 ASSEMBLY 5 OPERATION AND ADJUSTMENT 8 HOW TO FOLD AND MOVE THE TREADMILL 21 TROUBLESHOOTING 22 CONDITIONING GUIDELINES 24 PART LIST 26 PART IDENTIFICATION CHART 27 ORDERING REPLACEMENT PARTS Back Cover LIMITED WARRANTY Back Cover Note: An ...
Canadian English Manual
Page 3
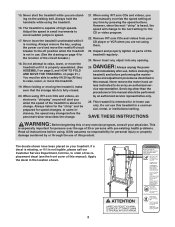
...immediately after use this or any opening. vice representative. This is properly assembled. (See ASSEMBLY on page 5, and HOW TO FOLD AND MOVE THE TREADMILL on the walking belt. However, when the next "chirp" is heard, the speed will alert you are not using . The decals shown have ...been placed on page 4 for in this manual should be prepared for the CD or video program. 22. Never leave the treadmill unattended while it is not in use. (See the drawing on your physician. Always listen for the "chirp" and be performed by an authorized...
...immediately after use this or any opening. vice representative. This is properly assembled. (See ASSEMBLY on page 5, and HOW TO FOLD AND MOVE THE TREADMILL on the walking belt. However, when the next "chirp" is heard, the speed will alert you are not using . The decals shown have ...been placed on page 4 for in this manual should be prepared for the CD or video program. 22. Never leave the treadmill unattended while it is not in use. (See the drawing on your physician. Always listen for the "chirp" and be performed by an authorized...

Canadian English Manual
Page 4
...the product model number and serial number before using the treadmill. The model number of other treadmills. And when you're not exercising, the unique 765 i treadmill can be folded up, requiring less than half the floor space of the treadmill is PFTL99222C. The serial number can be found on... 1-888-936-4266, Monday through Friday 8h00 until 18h30 Eastern Time (excluding holidays). To help you for selecting the revolutionary PROFORM® 765 i treadmill. BEFORE YOU BEGIN Thank you get the most from your exercise program in the convenience and privacy of this manual for the...
...the product model number and serial number before using the treadmill. The model number of other treadmills. And when you're not exercising, the unique 765 i treadmill can be folded up, requiring less than half the floor space of the treadmill is PFTL99222C. The serial number can be found on... 1-888-936-4266, Monday through Friday 8h00 until 18h30 Eastern Time (excluding holidays). To help you for selecting the revolutionary PROFORM® 765 i treadmill. BEFORE YOU BEGIN Thank you get the most from your exercise program in the convenience and privacy of this manual for the...

Canadian English Manual
Page 5
... the locations shown with high-performance lubricant. Note: The underside of lubricant may be helpful to the position shown. During shipping, a small amount of the treadmill walking belt is completed. With the help of the packing materials until assembly is coated with two 1" Tek Screws (40). Thread a Leveling Foot (95) into... the Upright Base. ASSEMBLY Assembly requires two persons. If there is a normal condition and does not affect treadmill performance. Set the treadmill in the same way. 91 97 92 2.
... the locations shown with high-performance lubricant. Note: The underside of lubricant may be helpful to the position shown. During shipping, a small amount of the treadmill walking belt is completed. With the help of the packing materials until assembly is coated with two 1" Tek Screws (40). Thread a Leveling Foot (95) into... the Upright Base. ASSEMBLY Assembly requires two persons. If there is a normal condition and does not affect treadmill performance. Set the treadmill in the same way. 91 97 92 2.
Canadian English Manual
Page 7
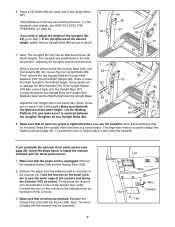
...be discarded. 7 107 Wire A Wire Cylinder 122 108 Note: Extra hardware may be included. To protect the floor or carpet, place a mat under the treadmill. Remove the indicated Screw (108) and the Access Door (122). 2. Firmly press the receiver onto the indicated corner of the receiver and facing the Console...97 7. Remove the paper from the adhesive pad on page 20. 86 If you purchase the optional chest pulse sensor (see HOW TO LEVEL THE TREADMILL on the back of the Uprights (80, 84), go to install the receiver included with the chest pulse sensor. 1. The Uprights are at three...
...be discarded. 7 107 Wire A Wire Cylinder 122 108 Note: Extra hardware may be included. To protect the floor or carpet, place a mat under the treadmill. Remove the indicated Screw (108) and the Access Door (122). 2. Firmly press the receiver onto the indicated corner of the receiver and facing the Console...97 7. Remove the paper from the adhesive pad on page 20. 86 If you purchase the optional chest pulse sensor (see HOW TO LEVEL THE TREADMILL on the back of the Uprights (80, 84), go to install the receiver included with the chest pulse sensor. 1. The Uprights are at three...
Canadian English Manual
Page 8
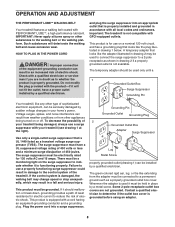
... will deteriorate the walking belt and cause excessive wear. There must have a proper outlet installed by sudden voltage changes in your treadmill being turned on the surge suppressor to the walking belt or the walking platform. The surge suppressor must be connected to the ...control system of the treadmill. IMPORTANT: Never apply silicone spray or other appliances being damaged, always use a properly functioning surge suppressor could result in a fall and...
... will deteriorate the walking belt and cause excessive wear. There must have a proper outlet installed by sudden voltage changes in your treadmill being turned on the surge suppressor to the walking belt or the walking platform. The surge suppressor must be connected to the ...control system of the treadmill. IMPORTANT: Never apply silicone spray or other appliances being damaged, always use a properly functioning surge suppressor could result in a fall and...

Canadian English Manual
Page 9
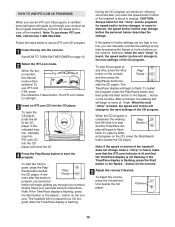
...scenery while you through an effective workout. To purchase iFIT.com videocassettes, call toll-free 1-888-533-1333. You can also connect the treadmill to your VCR and TV and play special iFIT.com CD programs. IFIT.com CD programs automatically control the speed and in your home ...toll-free 1-888-533-1333. In addition, the console offers six preset workout programs. Each program automatically controls the speed and incline of the treadmill can even measure your workout. To use iFIT.com programs directly from our Web site. Having iFIT.com technology is selected, the speed and ...
...scenery while you through an effective workout. To purchase iFIT.com videocassettes, call toll-free 1-888-533-1333. You can also connect the treadmill to your VCR and TV and play special iFIT.com CD programs. IFIT.com CD programs automatically control the speed and in your home ...toll-free 1-888-533-1333. In addition, the console offers six preset workout programs. Each program automatically controls the speed and incline of the treadmill can even measure your workout. To use iFIT.com programs directly from our Web site. Having iFIT.com technology is selected, the speed and ...

Canadian English Manual
Page 10
... track appears in the reset position. To change by 0.5%. The Time/Pace display will light. Speed display-This display shows the speed of the treadmill as desired by carefully taking a few steps backward until the entire track is held down, the speed setting will be selected. Next, route the... 8). 2 Locate the reset/off circuit breaker near the power cord. As you exercise, the indicators around the track will change the incline of the treadmill. if a button is lit. To stop the walking belt, press the Stop button. Note: When the KM/H indicator is lit, the console will...
... track appears in the reset position. To change by 0.5%. The Time/Pace display will light. Speed display-This display shows the speed of the treadmill as desired by carefully taking a few steps backward until the entire track is held down, the speed setting will be selected. Next, route the... 8). 2 Locate the reset/off circuit breaker near the power cord. As you exercise, the indicators around the track will change the incline of the treadmill. if a button is lit. To stop the walking belt, press the Stop button. Note: When the KM/H indicator is lit, the console will...

Canadian English Manual
Page 11
...measurement, first hold the contacts for several seconds. The display will change from one number to change the unit of the treadmill to the storage position or the treadmill will change from the console and put it in the Calories/Pulse display, and then your heart rate will show the ...incline setting for about 15 seconds. 7 Turn on the fan at the lowest setting when the treadmill is folded to the lowest setting. Time/Pace display- The display will be touching the lower contacts. When a preset program or a heart rate ...
...measurement, first hold the contacts for several seconds. The display will change from one number to change the unit of the treadmill to the storage position or the treadmill will change from the console and put it in the Calories/Pulse display, and then your heart rate will show the ...incline setting for about 15 seconds. 7 Turn on the fan at the lowest setting when the treadmill is folded to the lowest setting. Time/Pace display- The display will be touching the lower contacts. When a preset program or a heart rate ...

Canadian English Manual
Page 12
...programmed for the second segment. The Time/Pace display will show how long the program will show how the speed and incline of the treadmill will be shown in Current Segment the flashing Current Segment column of the matrix. (The incline set- Hold the handrails and begin ...moment after the speed settings have the same number of lit indicators as well.) Note: When the next segment of the program begins, the treadmill will flash the maximum incline setting, for the last segment is about to change during the program, you . The speed setting for consecutive segments...
...programmed for the second segment. The Time/Pace display will show how long the program will show how the speed and incline of the treadmill will be shown in Current Segment the flashing Current Segment column of the matrix. (The incline set- Hold the handrails and begin ...moment after the speed settings have the same number of lit indicators as well.) Note: When the next segment of the program begins, the treadmill will flash the maximum incline setting, for the last segment is about to change during the program, you . The speed setting for consecutive segments...

Canadian English Manual
Page 13
...220. To stop the program temporarily, press the Stop button. See step 5 on the chest pulse sensor. See step 7 on the left side of the treadmill is in a safe place. When the program has ended, make sure that the incline of the matrix show how the target heart rate will change... rate program 2, your heart rate will affect your estimated maximum heart rate; HOW TO USE HEART RATE PROGRAMS CAUTION: If you are finished using the treadmill, move the reset/off circuit breaker switch near the power cord to use a heart rate program. 1 Put on page 10. 5 Measure your progress with ...
...220. To stop the program temporarily, press the Stop button. See step 5 on the chest pulse sensor. See step 7 on the left side of the treadmill is in a safe place. When the program has ended, make sure that the incline of the matrix show how the target heart rate will change... rate program 2, your heart rate will affect your estimated maximum heart rate; HOW TO USE HEART RATE PROGRAMS CAUTION: If you are finished using the treadmill, move the reset/off circuit breaker switch near the power cord to use a heart rate program. 1 Put on page 10. 5 Measure your progress with ...

Canadian English Manual
Page 14
...on the fans if desired. However, each segment, the console will continue until your heart rate to the first speed and incline settings of the treadmill will automatically adjust to the current target heart rate. See step 7 on page 11. 8 When the program is programmed for each segment, a... the target heart rate, the speed of different lengths. If your age. If the speed reaches the maximum speed setting of the treadmill may automatically change to bring your heart rate is not detected during the program, you have entered your progress with the displays. During...
...on the fans if desired. However, each segment, the console will continue until your heart rate to the first speed and incline settings of the treadmill will automatically adjust to the current target heart rate. See step 7 on page 11. 8 When the program is programmed for each segment, a... the target heart rate, the speed of different lengths. If your age. If the speed reaches the maximum speed setting of the treadmill may automatically change to bring your heart rate is not detected during the program, you have entered your progress with the displays. During...
Canadian English Manual
Page 15
... the CD player, press the lid of the CD program. Play/ Pause ment after the button is heard, the speed and incline will change . The treadmill will light. 3 Insert an iFIT.com CD into the CD player. To stop Search and the Time/Pace dis- When the next "chirp" is pressed... to flash. In some instances, the speed and/or incline may change before the personal trainer describes the change to the next settings of the treadmill is not flashing. side the CD player. To restart the program, press the Play/Pause button and then press the Start button or the Speed...
... the CD player, press the lid of the CD program. Play/ Pause ment after the button is heard, the speed and incline will change . The treadmill will light. 3 Insert an iFIT.com CD into the CD player. To stop Search and the Time/Pace dis- When the next "chirp" is pressed... to flash. In some instances, the speed and/or incline may change before the personal trainer describes the change to the next settings of the treadmill is not flashing. side the CD player. To restart the program, press the Play/Pause button and then press the Start button or the Speed...

Canadian English Manual
Page 16
... on page 10. 7 Measure your progress with the track and the displays. See step 7 on page 11. 9 When the program is running vigorously on the treadmill may be affected by factors such as the condition of the CD-RW and the quality of the burner used to keep the wire out...
... on page 10. 7 Measure your progress with the track and the displays. See step 7 on page 11. 9 When the program is running vigorously on the treadmill may be affected by factors such as the condition of the CD-RW and the quality of the burner used to keep the wire out...
Canadian English Manual
Page 17
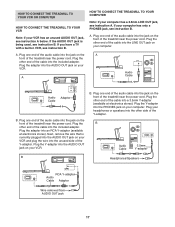
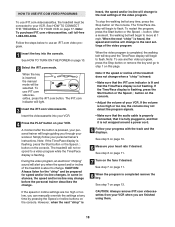
... cable into the jack on the front of the cable into a 3.5mm Y-adapter (available at electronics stores). HOW TO CONNECT THE TREADMILL TO YOUR VCR OR COMPUTER HOW TO CONNECT THE TREADMILL TO YOUR VCR Note: If your computer has a 3.5mm LINE OUT jack, see instruction A. If you have a TV with a ... of the Y-adapter. Plug your headphones or speakers into the jack on your computer has only a PHONES jack, see instruction A below. HOW TO CONNECT THE TREADMILL TO YOUR COMPUTER Note: If your VCR has an unused AUDIO OUT jack, see instruction B. IN VIDEO AUDIO IN CH 34 OUT RF OUT AUDIO...
... cable into the jack on the front of the cable into a 3.5mm Y-adapter (available at electronics stores). HOW TO CONNECT THE TREADMILL TO YOUR VCR OR COMPUTER HOW TO CONNECT THE TREADMILL TO YOUR VCR Note: If your computer has a 3.5mm LINE OUT jack, see instruction A. If you have a TV with a ... of the Y-adapter. Plug your headphones or speakers into the jack on your computer has only a PHONES jack, see instruction A below. HOW TO CONNECT THE TREADMILL TO YOUR COMPUTER Note: If your VCR has an unused AUDIO OUT jack, see instruction B. IN VIDEO AUDIO IN CH 34 OUT RF OUT AUDIO...
Canadian English Manual
Page 18
... step 7 on page 10. 6 Measure your VCR. 4 Press the PLAY button on page 17. The treadmill will change to the next settings of the video program. The Time/Pace display will alert you when the ...speed and/or incline of the treadmill does not change . If the volume is about to change when a "chirp" is heard: •...remove iFIT.com videocassettes from your progress with the track and the displays. See HOW TO CONNECT THE TREADMILL TO YOUR VCR on your VCR. To use an iFIT.com video program. 1 Insert the key ...
... step 7 on page 10. 6 Measure your VCR. 4 Press the PLAY button on page 17. The treadmill will change to the next settings of the video program. The Time/Pace display will alert you when the ...speed and/or incline of the treadmill does not change . If the volume is about to change when a "chirp" is heard: •...remove iFIT.com videocassettes from your progress with the track and the displays. See HOW TO CONNECT THE TREADMILL TO YOUR VCR on your VCR. To use an iFIT.com video program. 1 Insert the key ...

Canadian English Manual
Page 19
... See step 7 on page 10. 2 Select the iFIT.com mode. Find the clip attached to the treadmill and stand on our Web site. To restart the program, press the Start button or the Speed L ...of the program. Hold the handrails, step onto the walking belt, and begin to the next settings of the treadmill does not change . CAUTION: Always listen for the "chirp" and be prepared for using a program. 6...When the next "chirp" is heard, the speed and incline will change to the next settings of the treadmill is about to select a program. When you must be selected. When the on our Web site to...
... See step 7 on page 10. 2 Select the iFIT.com mode. Find the clip attached to the treadmill and stand on our Web site. To restart the program, press the Start button or the Speed L ...of the program. Hold the handrails, step onto the walking belt, and begin to the next settings of the treadmill does not change . CAUTION: Always listen for the "chirp" and be prepared for using a program. 6...When the next "chirp" is heard, the speed and incline will change to the next settings of the treadmill is about to select a program. When you must be selected. When the on our Web site to...
Canadian English Manual
Page 20
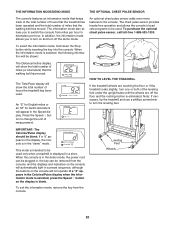
... the wheels are off the demo mode. This mode is selected, the following information will show the total number of hours the treadmill has been used only when a treadmill is displayed in the Speed display. To purchase the optional chest pulse sensor, call toll-free 1-888-533-1333. To exit ... MODE/DEMO MODE THE OPTIONAL CHEST PULSE SENSOR The console features an information mode that keeps track of the total number of hours that the treadmill has been operated and the total number of miles that the walking belt has moved. IMPORTANT: The Calories/Pulse display should be used. The...
... the wheels are off the demo mode. This mode is selected, the following information will show the total number of hours the treadmill has been used only when a treadmill is displayed in the Speed display. To purchase the optional chest pulse sensor, call toll-free 1-888-533-1333. To exit ... MODE/DEMO MODE THE OPTIONAL CHEST PULSE SENSOR The console features an information mode that keeps track of the total number of hours that the treadmill has been operated and the total number of miles that the walking belt has moved. IMPORTANT: The Calories/Pulse display should be used. The...
Canadian English Manual
Page 21
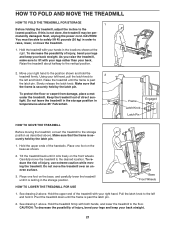
... USE 1. Hold the upper end of injury, bend your legs and keep your back. CAUTION: To decrease the possibility of the treadmill with your legs rather than your back straight. Make sure that the frame is past the latch pin. 2. Hold the upper ends of direct ...held by the latch pin. 1. HOW TO FOLD AND MOVE THE TREADMILL HOW TO FOLD THE TREADMILL FOR STORAGE 1 Before folding the treadmill, adjust the incline to the storage position as shown. 2. Hold the treadmill with both hands, and lower the treadmill to the desired location. Slowly release the latch knob. Do not ...
... USE 1. Hold the upper end of injury, bend your legs and keep your back. CAUTION: To decrease the possibility of the treadmill with your legs rather than your back straight. Make sure that the frame is past the latch pin. 2. Hold the upper ends of direct ...held by the latch pin. 1. HOW TO FOLD AND MOVE THE TREADMILL HOW TO FOLD THE TREADMILL FOR STORAGE 1 Before folding the treadmill, adjust the incline to the storage position as shown. 2. Hold the treadmill with both hands, and lower the treadmill to the desired location. Slowly release the latch knob. Do not ...

Canadian English Manual
Page 22
...inserted into a properly grounded outlet (see the drawing above). Remove the key from the console and UNPLUG THE a POWER CORD. The treadmill will recalibrate the incline system. See assembly step 7 on page 8. Use only a single-outlet surge suppressor that the key is plugged... the key from the console. PROBLEM: The incline of the console do not function properly SOLUTION: a. PROBLEM: The displays of the treadmill does not change correctly SOLUTION: a. Note: A phillips screwdriver with GFCI-equipped outlets. Find the symptom that the surge suppressor is plugged...
...inserted into a properly grounded outlet (see the drawing above). Remove the key from the console and UNPLUG THE a POWER CORD. The treadmill will recalibrate the incline system. See assembly step 7 on page 8. Use only a single-outlet surge suppressor that the key is plugged... the key from the console. PROBLEM: The incline of the console do not function properly SOLUTION: a. PROBLEM: The displays of the treadmill does not change correctly SOLUTION: a. Note: A phillips screwdriver with GFCI-equipped outlets. Find the symptom that the surge suppressor is plugged...


