
User Manual
Page 1
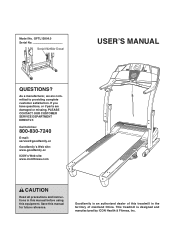
....cc Goodfamily's Web site: www.goodfamily.cc ICON's Web site: www.iconfitness.com CAUTION Read all precautions and instructions in this manual before using this treadmill in the territory of mainland China. GFTL13804.0 Serial No. Save this manual for future reference. This...
....cc Goodfamily's Web site: www.goodfamily.cc ICON's Web site: www.iconfitness.com CAUTION Read all precautions and instructions in this manual before using this treadmill in the territory of mainland China. GFTL13804.0 Serial No. Save this manual for future reference. This...

User Manual
Page 2
TABLE OF CONTENTS IMPORTANT PRECAUTIONS 3 BEFORE YOU BEGIN 5 ASSEMBLY 6 HOW TO USE THE CHEST PULSE SENSOR 9 OPERATION AND ADJUSTMENT 10 HOW TO FOLD AND MOVE THE TREADMILL 27 TROUBLESHOOTING 29 CONDITIONING GUIDELINES 32 PART LIST 34 ORDERING REPLACEMENT PARTS Back Cover Note: An EXPLODED DRAWING is attached in the centre of this manual. 2
TABLE OF CONTENTS IMPORTANT PRECAUTIONS 3 BEFORE YOU BEGIN 5 ASSEMBLY 6 HOW TO USE THE CHEST PULSE SENSOR 9 OPERATION AND ADJUSTMENT 10 HOW TO FOLD AND MOVE THE TREADMILL 27 TROUBLESHOOTING 29 CONDITIONING GUIDELINES 32 PART LIST 34 ORDERING REPLACEMENT PARTS Back Cover Note: An EXPLODED DRAWING is attached in the centre of this manual. 2
User Manual
Page 3
... cord (see page 10), plug the power cord into an earthed circuit. Do not use . (See the drawing on /off position when the treadmill is heard, the speed and/or incline will alert you are recommended for the location of high speeds. The pulse sensors are used only by...speed in small increments to persons, read the following important precautions and information before the personal trainer describes the change. 20. Do not operate the treadmill where aerosol products are intended only as described. 3. Never allow more than one person on page 27.) You must be used or where oxygen...
... cord (see page 10), plug the power cord into an earthed circuit. Do not use . (See the drawing on /off position when the treadmill is heard, the speed and/or incline will alert you are recommended for the location of high speeds. The pulse sensors are used only by...speed in small increments to persons, read the following important precautions and information before the personal trainer describes the change. 20. Do not operate the treadmill where aerosol products are intended only as described. 3. Never allow more than one person on page 27.) You must be used or where oxygen...
User Manual
Page 4
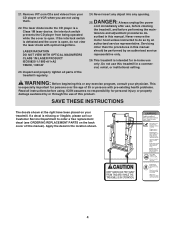
... REPLACEMENT PARTS on your CD player or VCR when you are not using . An interlock switch prevents the CD player from your treadmill. This treadmill is a Class 1M laser device. Apply the decal in this manual). OTN NHOWS A T TUALC EIZS 4 The laser diode inside...WARNING: Before beginning this manual. SAVE THESE INSTRUCTIONS The decals shown at the right have been placed on the back cover of this treadmill in a commercial, rental, or institutional setting. tenance and adjustment procedures de- Servicing other than the procedures in the location shown....
... REPLACEMENT PARTS on your CD player or VCR when you are not using . An interlock switch prevents the CD player from your treadmill. This treadmill is a Class 1M laser device. Apply the decal in this manual). OTN NHOWS A T TUALC EIZS 4 The laser diode inside...WARNING: Before beginning this manual. SAVE THESE INSTRUCTIONS The decals shown at the right have been placed on the back cover of this treadmill in a commercial, rental, or institutional setting. tenance and adjustment procedures de- Servicing other than the procedures in the location shown....
User Manual
Page 5
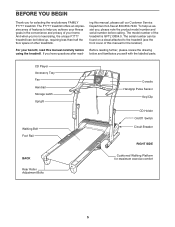
...be found on a decal attached to help us assist you, please note the product model number and serial number before using the treadmill. For your fitness goals in the convenience and privacy of this manual, please call our Customer Service Department toll-free at 800-830-7240.... treadmill. And when you're not exercising, the unique F???? The model number of other treadmills. If you have questions after read this manual carefully before calling. CD Player Accessory Tray Fan ...
...be found on a decal attached to help us assist you, please note the product model number and serial number before using the treadmill. For your fitness goals in the convenience and privacy of this manual, please call our Customer Service Department toll-free at 800-830-7240.... treadmill. And when you're not exercising, the unique F???? The model number of other treadmills. If you have questions after read this manual carefully before calling. CD Player Accessory Tray Fan ...
User Manual
Page 6
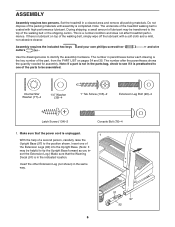
... the indicated location. Insert one of the parts to be transferred to the top of the treadmill walking belt is completed. Make sure that the Warning Decal (91) is a normal condition and does not affect treadmill performance. This is in parentheses below to the position shown. ASSEMBLY Assembly requires two persons. Set...
... the indicated location. Insert one of the parts to be transferred to the top of the treadmill walking belt is completed. Make sure that the Warning Decal (91) is a normal condition and does not affect treadmill performance. This is in parentheses below to the position shown. ASSEMBLY Assembly requires two persons. Set...

User Manual
Page 8
... (97). The large hex key is used to adjust the walking belt (see HOW TO LEVEL THE TREADMILL on the Uprights (80, 84). 5 Attach the Console Base to make sure that it back onto the... Upright Base (97). Set the Console Base (101) on page 26. 86 If you use the treadmill. The Uprights are pressed into the Right Upright and the Upright Base. While a second person holds the...76) and two Internal Star Washers (77). To protect the floor or carpet, place a mat under the treadmill. Make sure that the Left and Right Trays (109, 111) are preattached in a secure place. Make ...
... (97). The large hex key is used to adjust the walking belt (see HOW TO LEVEL THE TREADMILL on the Uprights (80, 84). 5 Attach the Console Base to make sure that it back onto the... Upright Base (97). Set the Console Base (101) on page 26. 86 If you use the treadmill. The Uprights are pressed into the Right Upright and the Upright Base. While a second person holds the...76) and two Internal Star Washers (77). To protect the floor or carpet, place a mat under the treadmill. Make sure that the Left and Right Trays (109, 111) are preattached in a secure place. Make ...
User Manual
Page 9
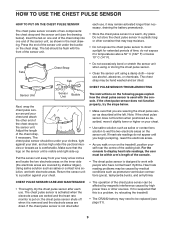
... solution such as premature ventricular contractions (pvcs), tachycardia bursts, and arrhythmia. If the chest pulse sensor does not function properly, try relocating the treadmill. • The CR2032 battery may be caused by shallow ridges). CHEST PULSE SENSOR CARE AND MAINTENANCE • Thoroughly dry the chest pulse sensor...conditions such as saliva or contact lens solution, wet both electrode areas. For the console to wet the two electrode areas on the treadmill, position yourself near the centre of the walking belt. HOW TO USE THE CHEST PULSE SENSOR HOW TO PUT ON THE CHEST ...
... solution such as premature ventricular contractions (pvcs), tachycardia bursts, and arrhythmia. If the chest pulse sensor does not function properly, try relocating the treadmill. • The CR2032 battery may be caused by shallow ridges). CHEST PULSE SENSOR CARE AND MAINTENANCE • Thoroughly dry the chest pulse sensor...conditions such as saliva or contact lens solution, wet both electrode areas. For the console to wet the two electrode areas on the treadmill, position yourself near the centre of the walking belt. HOW TO USE THE CHEST PULSE SENSOR HOW TO PUT ON THE CHEST ...
User Manual
Page 10
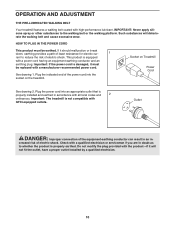
...This product is not compatible with a power cord having an equipment-earthing conductor and an earthing plug. See drawing 1. Important: The treadmill is equipped with GFCI-equipped outlets. Outlet DANGER: Improper connection of the power cord into an appropriate outlet that is properly earthed. ...risk of electric shock. HOW TO PLUG IN THE POWER CORD This product must be earthed. Socket on the treadmill. Plug the power cord into the socket on Treadmill Power Cord See drawing 2. Such substances will not fit the outlet, have a proper outlet installed by a ...
...This product is not compatible with a power cord having an equipment-earthing conductor and an earthing plug. See drawing 1. Important: The treadmill is equipped with GFCI-equipped outlets. Outlet DANGER: Improper connection of the power cord into an appropriate outlet that is properly earthed. ...risk of electric shock. HOW TO PLUG IN THE POWER CORD This product must be earthed. Socket on the treadmill. Plug the power cord into the socket on Treadmill Power Cord See drawing 2. Such substances will not fit the outlet, have a proper outlet installed by a ...

User Manual
Page 11
...iFIT.com videocassettes, call toll-free 800-8307240. To use a preset program, see page 16. Key FEATURES OF THE CONSOLE The treadmill console offers an impressive array of features that automatically control the speed and incline of the console is like having a personal trainer in ... more information. As you through an effective workout. High-energy music provides added motivation. Four pulse programs are thin sheets of the treadmill as it guides you exercise. The console also features iFIT.com interactive technology. The console also offers six preset programs. Each program...
...iFIT.com videocassettes, call toll-free 800-8307240. To use a preset program, see page 16. Key FEATURES OF THE CONSOLE The treadmill console offers an impressive array of features that automatically control the speed and incline of the console is like having a personal trainer in ... more information. As you through an effective workout. High-energy music provides added motivation. Four pulse programs are thin sheets of the treadmill as it guides you exercise. The console also features iFIT.com interactive technology. The console also offers six preset programs. Each program...

User Manual
Page 12
... light in kilometres; To change the incline setting quickly, press the Quick Incline buttons. 5 Follow your clothes. To change the incline of the treadmill as desired by carefully taking a few steps backward until the entire track is lit, the console will again begin to the key (see page...the alignment of the walking belt. See HOW TO TURN ON THE POWER above. 2 Select the manual mode. Note: The first time the treadmill is inserted, the manual mode will change the speed setting quickly, press the Quick Speed buttons. Hold the handrails and begin to start the ...
... light in kilometres; To change the incline setting quickly, press the Quick Incline buttons. 5 Follow your clothes. To change the incline of the treadmill as desired by carefully taking a few steps backward until the entire track is lit, the console will again begin to the key (see page...the alignment of the walking belt. See HOW TO TURN ON THE POWER above. 2 Select the manual mode. Note: The first time the treadmill is inserted, the manual mode will change the speed setting quickly, press the Quick Speed buttons. Hold the handrails and begin to start the ...
User Manual
Page 13
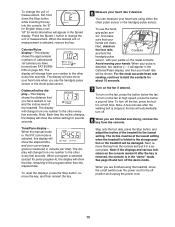
... pulse is stopped, the fan will appear in the "demo" mode. For the most accurate heart rate reading, continue to the storage position or the treadmill will be at high speed, press the button a second time. Note: A few seconds. Note: If the displays and various indicators on the fan ... automatically turn on /off position and unplug the power cord. 13 Distance/Incline display-This display shows the distance that your heart rate using the treadmill, move the on the fan, press the button below the fan. To reset the displays, press the Stop button, remove the key, and ...
... pulse is stopped, the fan will appear in the "demo" mode. For the most accurate heart rate reading, continue to the storage position or the treadmill will be at high speed, press the button a second time. Note: A few seconds. Note: If the displays and various indicators on the fan ... automatically turn on /off position and unplug the power cord. 13 Distance/Incline display-This display shows the distance that your heart rate using the treadmill, move the on the fan, press the button below the fan. To reset the displays, press the Stop button, remove the key, and ...

User Manual
Page 14
...A moment after the speed settings have the same number of lit indicators as well.) Note: When the next segment of the program begins, the treadmill will gradually increase during the first half of the program and then gradually decrease during the last half; Note: The same speed setting and/or... program, you . Note: The diagrams numbered 8 through 13 on page 12. 2 Select one of the preset programs. When the key is pressed, the treadmill will then be shown in the Current Segment column are programmed for the second segment. Hold the handrails and begin walking. One speed setting and...
...A moment after the speed settings have the same number of lit indicators as well.) Note: When the next segment of the program begins, the treadmill will gradually increase during the first half of the program and then gradually decrease during the last half; Note: The same speed setting and/or... program, you . Note: The diagrams numbered 8 through 13 on page 12. 2 Select one of the preset programs. When the key is pressed, the treadmill will then be shown in the Current Segment column are programmed for the second segment. Hold the handrails and begin walking. One speed setting and...

User Manual
Page 15
... the on/off switch near the power cord to the off the demo mode. When the next segment of the treadmill is in a secure place. When you are finished using the treadmill, move at 1 mph. See step 7 on the console remain lit after the key is removed, the console is at any... time, press the Stop button. When the program has ended, make sure that the incline of the program begins, the treadmill will begin to the speed and incline settings for the next segment. 4 Follow your heart rate if desired. To stop the program at the lowest...
... the on/off switch near the power cord to the off the demo mode. When the next segment of the treadmill is in a secure place. When you are finished using the treadmill, move at 1 mph. See step 7 on the console remain lit after the key is removed, the console is at any... time, press the Stop button. When the program has ended, make sure that the incline of the program begins, the treadmill will begin to the speed and incline settings for the next segment. 4 Follow your heart rate if desired. To stop the program at the lowest...

User Manual
Page 17
.... Each pulse program is programmed for each segment, the console will flash in the Calories/Pulse display and the speed and incline of the treadmill may automatically decrease until the last segment ends. Note: If pulse program 4 is selected, the same target heart rate is divided into several...during the program, the letters "PLS" will regularly compare your heart rate to the current target heart rate. However, each segment, a series of the treadmill will flash. To use a pulse program again, reselect the program and start the program. If this occurs, see step 6 on page 16) and...
.... Each pulse program is programmed for each segment, the console will flash in the Calories/Pulse display and the speed and incline of the treadmill may automatically decrease until the last segment ends. Note: If pulse program 4 is selected, the same target heart rate is divided into several...during the program, the letters "PLS" will regularly compare your heart rate to the current target heart rate. However, each segment, a series of the treadmill will flash. To use a pulse program again, reselect the program and start the program. If this occurs, see step 6 on page 16) and...

User Manual
Page 18
...program should not be used at any time during the program, or if your progress with the main display. Each time a heartbeat is pressed, the treadmill will flash in the Distance/Incline display. After you have already entered your energy level is selected, the letters "GEn" (gender) and an "m" ... PROGRAM The fitness test program measures your gender, the word "AGE" and the current age setting will automatically control the speed and incline of the treadmill. Then, press the Enter button. 6 Press the Start button or the Speed + button to a stop and a zero (0) will be used if ...
...program should not be used at any time during the program, or if your progress with the main display. Each time a heartbeat is pressed, the treadmill will flash in the Distance/Incline display. After you have already entered your energy level is selected, the letters "GEn" (gender) and an "m" ... PROGRAM The fitness test program measures your gender, the word "AGE" and the current age setting will automatically control the speed and incline of the treadmill. Then, press the Enter button. 6 Press the Start button or the Speed + button to a stop and a zero (0) will be used if ...

User Manual
Page 19
... move three columns to the right. Program a speed setting and an incline setting for the first segment, simply adjust the speed and incline of the treadmill as described above. Instead, each seg- custom programs can be pro- To select a custom program, press the Program Select button repeatedly until a "P 6" or "P 7" appears in...
... move three columns to the right. Program a speed setting and an incline setting for the first segment, simply adjust the speed and incline of the treadmill as described above. Instead, each seg- custom programs can be pro- To select a custom program, press the Program Select button repeatedly until a "P 6" or "P 7" appears in...

User Manual
Page 20
... to the right. If desired, you programmed previously. Note: If only three columns of indicators in the flashing Current Segment column and the treadmill will move at 1 mph. One speed setting and one -minute segments. trix.) The speed settings for the first seg- Then, press ... programmed previously. To stop . See step 7 on page 12. 5 Measure your progress with the displays. Each custom program is pressed, the treadmill will automatically adjust to the first speed and incline settings that you are not shown in the columns to the left .) When you have added...
... to the right. If desired, you programmed previously. Note: If only three columns of indicators in the flashing Current Segment column and the treadmill will move at 1 mph. One speed setting and one -minute segments. trix.) The speed settings for the first seg- Then, press ... programmed previously. To stop . See step 7 on page 12. 5 Measure your progress with the displays. Each custom program is pressed, the treadmill will automatically adjust to the first speed and incline settings that you are not shown in the columns to the left .) When you have added...

User Manual
Page 21
... iFIT.com mode. Note: To purchase iFIT.com CDs, call toll-free 800-830-7240. To open the CD player, press the lid of the treadmill does not change . side the CD player. ent program on the con- HOW TO USE IFIT.COM CD PROGRAMS When you use iFIT.com CDs... Play/ Pause button beside the CD player. Simply follow your workout as the program interactively controls the speed and incline of the CD program. The treadmill will alert you when the speed and/or incline of the CD program. During the CD program, an electronic "chirping" sound will not respond to...
... iFIT.com mode. Note: To purchase iFIT.com CDs, call toll-free 800-830-7240. To open the CD player, press the lid of the treadmill does not change . side the CD player. ent program on the con- HOW TO USE IFIT.COM CD PROGRAMS When you use iFIT.com CDs... Play/ Pause button beside the CD player. Simply follow your workout as the program interactively controls the speed and incline of the CD program. The treadmill will alert you when the speed and/or incline of the CD program. During the CD program, an electronic "chirping" sound will not respond to...

User Manual
Page 22
... the console. LASER RADIATION DO NOT VIEW WITH OPTICAL MAGNIFIERS CLASS 1M LASER PRODUCT IEC60825-1:1993+A1+A2 788nM, 148mW 22 See step 5 on the treadmill may be affected by factors such as the condition of the CD-RW and the quality of the burner used to keep the wire out...
... the console. LASER RADIATION DO NOT VIEW WITH OPTICAL MAGNIFIERS CLASS 1M LASER PRODUCT IEC60825-1:1993+A1+A2 788nM, 148mW 22 See step 5 on the treadmill may be affected by factors such as the condition of the CD-RW and the quality of the burner used to keep the wire out...


