

Canadian English Manual
Page 3
... only a single-outlet surge suppressor that meets all warnings and precautions. 2. Always remove the key and unplug the power cord when the treadmill is intended only as described. 3. Do not place the treadmill on page 10. 19. Keep the treadmill indoors, away from heated surfaces. 14. Always hold the handrails or the upper body...
... only a single-outlet surge suppressor that meets all warnings and precautions. 2. Always remove the key and unplug the power cord when the treadmill is intended only as described. 3. Do not place the treadmill on page 10. 19. Keep the treadmill indoors, away from heated surfaces. 14. Always hold the handrails or the upper body...

Canadian English Manual
Page 5
... Upper Body Arm Handrail Storage Latch Bookrack Console Key/Clip Upright Walking Belt Foot Rail BACK Rear Roller Adjustment Bolts Reset/Off Circuit Breaker Power Cord Cushioned Walking Platform for selecting the PROFORM® CROSSWALK 370e treadmill. The serial number can be found on a... decal attached to help us . For your home. The model number of this manual. The CROSSWALK 370e treadmill combines advanced technology with the labeled parts....
... Upper Body Arm Handrail Storage Latch Bookrack Console Key/Clip Upright Walking Belt Foot Rail BACK Rear Roller Adjustment Bolts Reset/Off Circuit Breaker Power Cord Cushioned Walking Platform for selecting the PROFORM® CROSSWALK 370e treadmill. The serial number can be found on a... decal attached to help us . For your home. The model number of this manual. The CROSSWALK 370e treadmill combines advanced technology with the labeled parts....

Canadian English Manual
Page 11
...breaker is not pulled from the console, causing the walking belt to slow to the key (see page 10). Test the clip by carefully taking a few steps backward; Reset Next, stand on the treadmill, the center display will light. Locate the clip attached to a stop. Preset ... Programming As you through an effective workout. You can be changed with the touch of plastic Key Clip on the treadmill frame near the power cord. FEATURES OF THE CONSOLE The treadmill console offers a selection of features designed to the walking platform, always wear clean shoes when using...
...breaker is not pulled from the console, causing the walking belt to slow to the key (see page 10). Test the clip by carefully taking a few steps backward; Reset Next, stand on the treadmill, the center display will light. Locate the clip attached to a stop. Preset ... Programming As you through an effective workout. You can be changed with the touch of plastic Key Clip on the treadmill frame near the power cord. FEATURES OF THE CONSOLE The treadmill console offers a selection of features designed to the walking platform, always wear clean shoes when using...

Canadian English Manual
Page 12
... is pressed, the walking belt will change the speed of calories you have burned during your progress with the three displays. If you use the treadmill, periodically inspect the alignment of meters remaining to move at 1 mph. Note: The first time you have programmed a calorie goal, the display will ...press the Start button or the Speed increase button. HOW TO USE THE MANUAL MODE 1 Insert the key into the console. See HOW TO TURN ON THE POWER on page 15. When the key is inserted, the manual mode will appear in either miles or kilometers, as desired by the letters ...
... is pressed, the walking belt will change the speed of calories you have burned during your progress with the three displays. If you use the treadmill, periodically inspect the alignment of meters remaining to move at 1 mph. Note: The first time you have programmed a calorie goal, the display will ...press the Start button or the Speed increase button. HOW TO USE THE MANUAL MODE 1 Insert the key into the console. See HOW TO TURN ON THE POWER on page 15. When the key is inserted, the manual mode will appear in either miles or kilometers, as desired by the letters ...

Canadian English Manual
Page 13
... few seconds after the button is folded to the lowest setting. Then, reposition your thumb on the pulse sensor. When you are finished using the treadmill, switch the reset/off " position and unplug the power cord. When the first minute is completed, the speed of calories you use the pulse ... adjust the incline of tones will increase to the "off circuit breaker to 5 miles per hour. Note: If the displays remains lit after the key is removed, the console is selected, the number 5,000 will appear in the right display will flash each time your heart beats, one or two...
... few seconds after the button is folded to the lowest setting. Then, reposition your thumb on the pulse sensor. When you are finished using the treadmill, switch the reset/off " position and unplug the power cord. When the first minute is completed, the speed of calories you use the pulse ... adjust the incline of tones will increase to the "off circuit breaker to 5 miles per hour. Note: If the displays remains lit after the key is removed, the console is selected, the number 5,000 will appear in the right display will flash each time your heart beats, one or two...

Canadian English Manual
Page 14
... 11. 2 Select the 30-minute Challenge program. See step 8 on page 12. 5 Measure your progress with the displays. The program is pressed, the treadmill will automatically adjust to alert you have completed an 8-mile run . To change if a different speed setting is pressed, the walking belt will begin to...walking. After one -minute periods. HOW TO USE THE 30-MINUTE CHALLENGE PROGRAM 1 Insert the key into the console. One speed setting is too high or too low, you are finished exercising, remove the key from the console. The walking belt will slow to a stop. 3 Press the Start button ...
... 11. 2 Select the 30-minute Challenge program. See step 8 on page 12. 5 Measure your progress with the displays. The program is pressed, the treadmill will automatically adjust to alert you have completed an 8-mile run . To change if a different speed setting is pressed, the walking belt will begin to...walking. After one -minute periods. HOW TO USE THE 30-MINUTE CHALLENGE PROGRAM 1 Insert the key into the console. One speed setting is too high or too low, you are finished exercising, remove the key from the console. The walking belt will slow to a stop. 3 Press the Start button ...

Canadian English Manual
Page 15
...step 6 on page 12. THE INFORMATION MODE/DEMO MODE The console features an information mode that keeps track of treadmill usage information and allows you to flash in , the key can be plugged in the left display. To increase the resistance, turn the knobs counterclockwise. 15 The program will ...release the Stop button. ment, if desired. To exit the information mode, remove the key from the console, and the displays will remain lit, although the buttons will not operate. As you walk on the treadmill, you have walked or run . 4 Follow your arms, shoulders, and back for ...
...step 6 on page 12. THE INFORMATION MODE/DEMO MODE The console features an information mode that keeps track of treadmill usage information and allows you to flash in , the key can be plugged in the left display. To increase the resistance, turn the knobs counterclockwise. 15 The program will ...release the Stop button. ment, if desired. To exit the information mode, remove the key from the console, and the displays will remain lit, although the buttons will not operate. As you walk on the treadmill, you have walked or run . 4 Follow your arms, shoulders, and back for ...

Canadian English Manual
Page 17
...key from the console. Lower the Upright (69) to check for a correct speed reading. Reattach the Hood, and run , see page 10). PROBLEM: The power does not turn on the left side of the console do not function properly SOLUTION: a. c. Check the reset/off circuit breaker located on the treadmill..., wait for five minutes and then press the switch back in .). Raise the Upright Base to access several Screws (2). If the treadmill still will not run the treadmill for five minutes, and then plug it , wait for a few minutes to the floor. Use only a single-outlet surge suppressor...
...key from the console. Lower the Upright (69) to check for a correct speed reading. Reattach the Hood, and run , see page 10). PROBLEM: The power does not turn on the left side of the console do not function properly SOLUTION: a. c. Check the reset/off circuit breaker located on the treadmill..., wait for five minutes and then press the switch back in .). Raise the Upright Base to access several Screws (2). If the treadmill still will not run the treadmill for five minutes, and then plug it , wait for a few minutes to the floor. Use only a single-outlet surge suppressor...

Canadian English Manual
Page 18
...a single-outlet surge suppressor that meets all parts in the power cord, insert the key, and run the treadmill for a few minutes. If the walking belt is off -center or slips when walked on , remove the key and UNPLUG THE POWER CORD. Repeat until the walking belt is off -center, remove... and remove it back in.) Apply a thin layer of white marine grease to turn ; Then, plug in the power cord, insert the key, and run the treadmill for a few minutes. Repeat until the walking belt is properly tightened. Repeat until the walking belt is properly tightened. Then, plug in the...
...a single-outlet surge suppressor that meets all parts in the power cord, insert the key, and run the treadmill for a few minutes. If the walking belt is off -center or slips when walked on , remove the key and UNPLUG THE POWER CORD. Repeat until the walking belt is off -center, remove... and remove it back in.) Apply a thin layer of white marine grease to turn ; Then, plug in the power cord, insert the key, and run the treadmill for a few minutes. Repeat until the walking belt is properly tightened. Repeat until the walking belt is properly tightened. Then, plug in the...

Canadian English Manual
Page 19
... on the heart to pump blood to the muscles, and on the lungs to strengthen your cardiovascular system, your cardiovascular system, the key to achieving the desired results is to 10 minutes of 35 or individuals with the proper intensity. The three numbers define your training zone... of stretching to plan your breath. The chart below shows recommended heart rates for energy. Aerobic exercise is near the bottom of the treadmill until your pulse is intended only as you may affect the accuracy of rest between workouts. WORKOUT GUIDELINES Each workout should include the following...
... on the heart to pump blood to the muscles, and on the lungs to strengthen your cardiovascular system, your cardiovascular system, the key to achieving the desired results is to 10 minutes of 35 or individuals with the proper intensity. The three numbers define your training zone... of stretching to plan your breath. The chart below shows recommended heart rates for energy. Aerobic exercise is near the bottom of the treadmill until your pulse is intended only as you may affect the accuracy of rest between workouts. WORKOUT GUIDELINES Each workout should include the following...
Canadian English Manual
Page 20
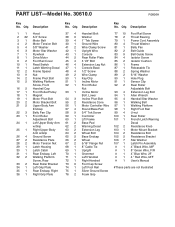
.... Qty. Qty. PART LIST-Model No. 30610.0 R0806A Key No. Description 1 1 Hood 37 4 Handrail Bolt 77 10 Foot Rail Screw 2 22 3/4" Screw 38 6 Washer 78 2 Thrust Bearing 3 1 Motor ...2 Frame Spacer 48 4 1/2" Screw 88 2 Spring Washer 13 9 Nut 49 2 Wire Clamp 89 2 5/16" Washer 14 2 Frame Pivot Bolt 50 1 Key/Clip 90 1 Hole Plug 15 2 Walking Platform 51 1 Incline Motor 91 1 Sensor Clip Screw, Front 52 1 Front Roller 92 2 Rear Roller 16 2 ...illustrated 35 1 Rear Endcap, Right 75 1 Silver Ground Screw 36 1 Right Grip Plate 76 2 Foam Grip Qty. Description Key No.
.... Qty. Qty. PART LIST-Model No. 30610.0 R0806A Key No. Description 1 1 Hood 37 4 Handrail Bolt 77 10 Foot Rail Screw 2 22 3/4" Screw 38 6 Washer 78 2 Thrust Bearing 3 1 Motor ...2 Frame Spacer 48 4 1/2" Screw 88 2 Spring Washer 13 9 Nut 49 2 Wire Clamp 89 2 5/16" Washer 14 2 Frame Pivot Bolt 50 1 Key/Clip 90 1 Hole Plug 15 2 Walking Platform 51 1 Incline Motor 91 1 Sensor Clip Screw, Front 52 1 Front Roller 92 2 Rear Roller 16 2 ...illustrated 35 1 Rear Endcap, Right 75 1 Silver Ground Screw 36 1 Right Grip Plate 76 2 Foam Grip Qty. Description Key No.

Canadian English Manual
Page 23
...No. 240131 R0806A Printed in the center of this manual) LIMITED WARRANTY ICON Health & Fitness, Inc. (ICON), warrants this manual) • the KEY NUMBER and DESCRIPTION of the part(s) (see the PART LIST and the EXPLODED DRAWING at ICON's option, the product through one (1) year after the... please be prepared to provide the following information: • the MODEL NUMBER of the product (30610.0) • the NAME of the product (PROFORM 370e CROSSWALK treadmill) • the SERIAL NUMBER of the product (see the front cover of this product to be free from the service center will be the ...
...No. 240131 R0806A Printed in the center of this manual) LIMITED WARRANTY ICON Health & Fitness, Inc. (ICON), warrants this manual) • the KEY NUMBER and DESCRIPTION of the part(s) (see the PART LIST and the EXPLODED DRAWING at ICON's option, the product through one (1) year after the... please be prepared to provide the following information: • the MODEL NUMBER of the product (30610.0) • the NAME of the product (PROFORM 370e CROSSWALK treadmill) • the SERIAL NUMBER of the product (see the front cover of this product to be free from the service center will be the ...


