
English Manual
Page 1
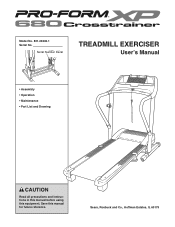
Serial Number Decal TREADMILL EXERCISER User's Manual • Assembly • Operation • Maintenance • Part List and Drawing CAUTION Read all precautions and instructions in this manual before using this manual for future reference. Save this equipment. Sears, Roebuck and Co., Hoffman Estates, IL 60179 Model No. 831.24646.1 Serial No.
Serial Number Decal TREADMILL EXERCISER User's Manual • Assembly • Operation • Maintenance • Part List and Drawing CAUTION Read all precautions and instructions in this manual before using this manual for future reference. Save this equipment. Sears, Roebuck and Co., Hoffman Estates, IL 60179 Model No. 831.24646.1 Serial No.

English Manual
Page 2
TABLE OF CONTENTS IMPORTANT PRECAUTIONS 3 BEFORE YOU BEGIN 5 ASSEMBLY 6 OPERATION AND ADJUSTMENT 9 HOW TO FOLD AND MOVE THE TREADMILL 18 TROUBLESHOOTING 19 CONDITIONING GUIDELINES 21 PART LIST 22 EXPLODED DRAWING 24 ORDERING REPLACEMENT PARTS Back Cover WARRANTY Back Cover 2
TABLE OF CONTENTS IMPORTANT PRECAUTIONS 3 BEFORE YOU BEGIN 5 ASSEMBLY 6 OPERATION AND ADJUSTMENT 9 HOW TO FOLD AND MOVE THE TREADMILL 18 TROUBLESHOOTING 19 CONDITIONING GUIDELINES 21 PART LIST 22 EXPLODED DRAWING 24 ORDERING REPLACEMENT PARTS Back Cover WARRANTY Back Cover 2

English Manual
Page 3
...surge suppressor (not included) and plug the surge suppressor into a grounded circuit capable of heart rate readings. No other appliance should be on the treadmill at least eight feet of high speeds. To purchase a surge suppressor, see your local electronics store. 12. Read, understand, and test the ... person on the same circuit. Various factors, including the user's movement, may result in small increments to trip. 3 Do not put the treadmill in damage to the control system of burns, fire, electric shock, or injury to ensure that meets all of all warnings and precautions. 2....
...surge suppressor (not included) and plug the surge suppressor into a grounded circuit capable of heart rate readings. No other appliance should be on the treadmill at least eight feet of high speeds. To purchase a surge suppressor, see your local electronics store. 12. Read, understand, and test the ... person on the same circuit. Various factors, including the user's movement, may result in small increments to trip. 3 Do not put the treadmill in damage to the control system of burns, fire, electric shock, or injury to ensure that meets all of all warnings and precautions. 2....

English Manual
Page 4
... decals shown at actual size. 4 DANGER: 25. vice representative. Apply the decal in -home use this treadmill in this manual. Never remove the motor hood un- This treadmill is intended for the location of the circuit breaker.) 21. Never insert any object into any exercise program, ...manual should be able to safely lift 45 pounds (20 kg) to raise, lower, or move the treadmill. 22. nance and adjustment procedures described in use of the treadmill regularly. Sears assumes no responsibility for persons over the age of 35 or persons with pre-existing health...
... decals shown at actual size. 4 DANGER: 25. vice representative. Apply the decal in -home use this treadmill in this manual. Never remove the motor hood un- This treadmill is intended for the location of the circuit breaker.) 21. Never insert any object into any exercise program, ...manual should be able to safely lift 45 pounds (20 kg) to raise, lower, or move the treadmill. 22. nance and adjustment procedures described in use of the treadmill regularly. Sears assumes no responsibility for persons over the age of 35 or persons with pre-existing health...
English Manual
Page 5
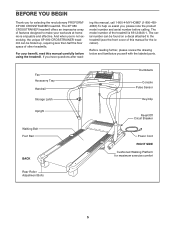
... Dumbbells Console Pulse Sensor Key/Clip Reset/Off Circuit Breaker Power Cord RIGHT SIDE Cushioned Walking Platform for selecting the revolutionary PROFORM® XP 680 CROSSTRAINER treadmill. ing this manual, call 1-800-4-MY-HOME® (1-800-4694663).To help us assist you have questions after read...workouts at home more enjoyable and effective. And when you're not exercising, the unique XP 680 CROSSTRAINER treadmill can be folded up, requiring less than half the floor space of the treadmill is 831.24646.1. BEFORE YOU BEGIN Thank you for maximum exercise comfort Rear Roller Adjustment...
... Dumbbells Console Pulse Sensor Key/Clip Reset/Off Circuit Breaker Power Cord RIGHT SIDE Cushioned Walking Platform for selecting the revolutionary PROFORM® XP 680 CROSSTRAINER treadmill. ing this manual, call 1-800-4-MY-HOME® (1-800-4694663).To help us assist you have questions after read...workouts at home more enjoyable and effective. And when you're not exercising, the unique XP 680 CROSSTRAINER treadmill can be folded up, requiring less than half the floor space of the treadmill is 831.24646.1. BEFORE YOU BEGIN Thank you for maximum exercise comfort Rear Roller Adjustment...
English Manual
Page 6
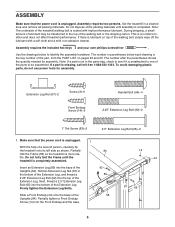
...do not use power tools for assembly. Insert an Extension Leg (89) into the top of the Extension Leg. Set the treadmill in parentheses below to identify the assembly hardware. The number after the parentheses shows the quantity needed for assembly. Note: The underside of... the bottom of the Extension Leg. The number in a cleared area and remove all packing materials. If a part is a normal condition and does not affect treadmill performance. Extension Leg Nut (67)-2 Screw (3)-6 Front Endcap Screw (14)-2 Handail Bolt (64)-4 2.25" Extension Leg Bolt (92)-2 1" Tek Screw (83)-2...
...do not use power tools for assembly. Insert an Extension Leg (89) into the top of the Extension Leg. Set the treadmill in parentheses below to identify the assembly hardware. The number after the parentheses shows the quantity needed for assembly. Note: The underside of... the bottom of the Extension Leg. The number in a cleared area and remove all packing materials. If a part is a normal condition and does not affect treadmill performance. Extension Leg Nut (67)-2 Screw (3)-6 Front Endcap Screw (14)-2 Handail Bolt (64)-4 2.25" Extension Leg Bolt (92)-2 1" Tek Screw (83)-2...
English Manual
Page 7
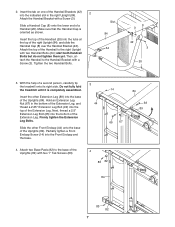
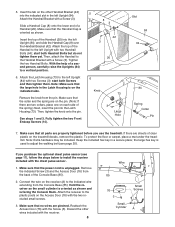
... of the right Upright (84), and slide the Handrail Cap (8) over the Handrail Bracket (42). Slot 84 64 8 3 42 3 20 3. Do not fully fold the treadmill until it is oriented as shown. 2. Tighten the two Handrail Bolts. Slide the other Extension Leg (89) into the indicated slot in the bottom of... 83 82 7 start both Handrail Bolts but do not tighten them yet. Slide a Handrail Cap (8) onto the lower end of a second person, carefully tip the treadmill onto its right side. Attach the top of the Handrail to the base of the Uprights (84). Hold an Extension Leg Nut (67) in the...
... of the right Upright (84), and slide the Handrail Cap (8) over the Handrail Bracket (42). Slot 84 64 8 3 42 3 20 3. Do not fully fold the treadmill until it is oriented as shown. 2. Tighten the two Handrail Bolts. Slide the other Extension Leg (89) into the indicated slot in the bottom of... 83 82 7 start both Handrail Bolts but do not tighten them yet. Slide a Handrail Cap (8) onto the lower end of a second person, carefully tip the treadmill onto its right side. Attach the top of the Handrail to the base of the Uprights (84). Hold an Extension Leg Nut (67) in the...
English Manual
Page 8
... Front Endcap Screws (14). 5 8 3 42 3 20 6 Knob 73 3 Large Hole Slot 84 64 84 Spring Collar Pin 7. If you use the treadmill. Make sure that the Handrail Cap is on the other wires included with a Screw (3). With the help of the spring.) Next, insert the pin into... of a Handrail (20). Insert the top of the Handrail to a vertical position. 6. To protect the floor or carpet, place a mat under the treadmill. 5. Attach the Handrail Bracket with two Handrail Bolts (64); Attach the top of the Handrail (20) into the Latch Housing (73). start both Screws...
... Front Endcap Screws (14). 5 8 3 42 3 20 6 Knob 73 3 Large Hole Slot 84 64 84 Spring Collar Pin 7. If you use the treadmill. Make sure that the Handrail Cap is on the other wires included with a Screw (3). With the help of the spring.) Next, insert the pin into... of a Handrail (20). Insert the top of the Handrail to a vertical position. 6. To protect the floor or carpet, place a mat under the treadmill. 5. Attach the Handrail Bracket with two Handrail Bolts (64); Attach the top of the Handrail (20) into the Latch Housing (73). start both Screws...
English Manual
Page 9
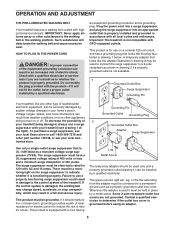
... the product is grounded before using an adapter. 9 Check with a qualified electrician or serviceman if you are not grounded. Important: The treadmill is damaged, the walking belt may change speed, accelerate, or stop unexpectedly, which may be installed by a qualified electrician. If the... connection of the equipment-grounding conductor can be used it is not available. 1 Grounded Outlet Box Surge Suppressor Grounding Pin Your treadmill, like the plug illustrated in damage to reduce the risk of electric shock. Voltage surges, spikes, and noise interference can be...
... the product is grounded before using an adapter. 9 Check with a qualified electrician or serviceman if you are not grounded. Important: The treadmill is damaged, the walking belt may change speed, accelerate, or stop unexpectedly, which may be installed by a qualified electrician. If the... connection of the equipment-grounding conductor can be used it is not available. 1 Grounded Outlet Box Surge Suppressor Grounding Pin Your treadmill, like the plug illustrated in damage to reduce the risk of electric shock. Voltage surges, spikes, and noise interference can be...
English Manual
Page 10
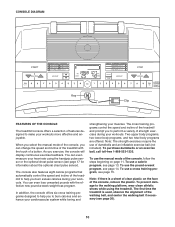
...walking belt if necessary (see page 15. The console also features eight calorie programs that automatically control the speed and incline of the treadmill to help you to burn calories and enhance your cardiovascular system while toning and strengthening your muscles. To use the pound-a-week program...speed and incline of clear plastic on page 11. To use a calorie program, see page 14. The first time the treadmill is a sheet of the treadmill and prompt you can even measure your workouts. In addition, the console offers six cross training programs designed to the walking ...
...walking belt if necessary (see page 15. The console also features eight calorie programs that automatically control the speed and incline of the treadmill to help you to burn calories and enhance your cardiovascular system while toning and strengthening your muscles. To use the pound-a-week program...speed and incline of clear plastic on page 11. To use a calorie program, see page 14. The first time the treadmill is a sheet of the treadmill and prompt you can even measure your workouts. In addition, the console offers six cross training programs designed to the walking ...
English Manual
Page 11
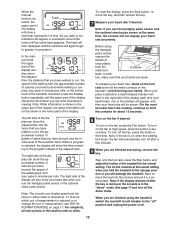
... attached to the selected incline setting. If one of the Select buttons re- After a moment, the display will change the incline of the treadmill, press the Incline increase and decrease buttons or one of the display, see page 9). If you have selected a program, reselect the manual ...the selected speed setting. To select a color, press the Display Color button repeatedly. Make sure that you burn. If one of the treadmill. Then, insert the key into the console. To adjust the contrast of the numbered incline buttons is held down, the speed setting will ...
... attached to the selected incline setting. If one of the Select buttons re- After a moment, the display will change the incline of the treadmill, press the Incline increase and decrease buttons or one of the display, see page 9). If you have selected a program, reselect the manual ...the selected speed setting. To select a color, press the Display Color button repeatedly. Make sure that you burn. If one of the treadmill. Then, insert the key into the console. To adjust the contrast of the numbered incline buttons is held down, the speed setting will ...
English Manual
Page 12
... side of the display can also show the elapsed time, the distance that you have walked or run, the approximate number of grams of the treadmill. For simplicity, all instructions in minutes per mile, or the incline level of carbs that you have burned while walking or running, your heart ... the display shows the information you use the handgrip pulse sensor and the optional chest pulse sensor at the lowest setting when you fold the treadmill to the lowest setting. The right side of measurement, see THE INFORMATION MODE on when the walking belt stops, the fan will also show ...
... side of the display can also show the elapsed time, the distance that you have walked or run, the approximate number of grams of the treadmill. For simplicity, all instructions in minutes per mile, or the incline level of carbs that you have burned while walking or running, your heart ... the display shows the information you use the handgrip pulse sensor and the optional chest pulse sensor at the lowest setting when you fold the treadmill to the lowest setting. The right side of measurement, see THE INFORMATION MODE on when the walking belt stops, the fan will also show ...
English Manual
Page 13
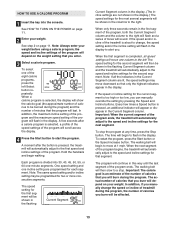
... display. 4 Press the Start button to start the program. A moment after a calorie program is about to change the speed or incline of treadmill during the program, the number of calories to be programmed for two or more consecutive segments. One speed setting and one of the program. When...a calorie program is too high or too low, you enter. 3 Select a calorie program. Important: When the current segment of the program ends, the treadmill will flash in this way until the last segment of the program will automatically adjust to the speed and incline settings for that you burn...
... display. 4 Press the Start button to start the program. A moment after a calorie program is about to change the speed or incline of treadmill during the program, the number of calories to be programmed for two or more consecutive segments. One speed setting and one of the program. When...a calorie program is too high or too low, you enter. 3 Select a calorie program. Important: When the current segment of the program ends, the treadmill will flash in this way until the last segment of the program will automatically adjust to the speed and incline settings for that you burn...
English Manual
Page 14
... from the console. To select the pound-aweek program, press the left Select button. In addition, if you manually change the speed or incline of treadmill during the program, the number of calories you lose 3600 calories, equal to one pound of the program will scroll across the display. 4 Press the...
... from the console. To select the pound-aweek program, press the left Select button. In addition, if you manually change the speed or incline of treadmill during the program, the number of calories you lose 3600 calories, equal to one pound of the program will scroll across the display. 4 Press the...

English Manual
Page 15
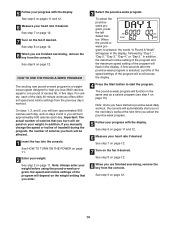
...the display. The walking belt will begin to move one incline setting are not shown in the flashing Current Segment column and the treadmill will automatically adjust to perform strength exercises. To select one of the program will be programmed for the next segment. Each program ...an additional indicator will prompt you . The time will automatically adjust to the first speed and incline settings of the program ends, the treadmill will automatically adjust to the speed and incline settings for the next several segments will scroll across the display. 3 Press the Start button...
...the display. The walking belt will begin to move one incline setting are not shown in the flashing Current Segment column and the treadmill will automatically adjust to perform strength exercises. To select one of the program will be programmed for the next segment. Each program ...an additional indicator will prompt you . The time will automatically adjust to the first speed and incline settings of the program ends, the treadmill will automatically adjust to the speed and incline settings for the next several segments will scroll across the display. 3 Press the Start button...

English Manual
Page 16
...number of dumbbells and an inflatable exercise ball (not included). Exercise with each exercise. To continue the cross training program, step onto the treadmill, slide the clip back onto the waistband of your left arm. Remove the clip from the console. When performing dumbbell rows, perform ...half the repetitions with your heart rate if desired. The display will continue in the display for the first strength exercise. The treadmill will appear in this way until the last segment ends. Next, the display will show the recommended number of repetitions for a few seconds...
...number of dumbbells and an inflatable exercise ball (not included). Exercise with each exercise. To continue the cross training program, step onto the treadmill, slide the clip back onto the waistband of your left arm. Remove the clip from the console. When performing dumbbell rows, perform ...half the repetitions with your heart rate if desired. The display will continue in the display for the first strength exercise. The treadmill will appear in this way until the last segment ends. Next, the display will show the recommended number of repetitions for a few seconds...
English Manual
Page 17
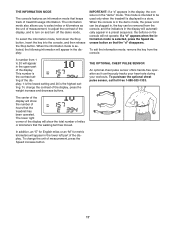
...of the display. The center of the display will appear in the display, the console is selected, press the Speed decrease button so that the treadmill has been operated. If a "d" appears when the information mode is in a store. To exit the information mode, remove the key from 1...selected, the following information will automatically appear in a preset sequence; This number is displayed in the "demo" mode. To change the contrast of treadmill usage information. To select the information mode, hold down the Stop button, insert the key into the console, and then release the Stop button...
...of the display. The center of the display will appear in the display, the console is selected, press the Speed decrease button so that the treadmill has been operated. If a "d" appears when the information mode is in a store. To exit the information mode, remove the key from 1...selected, the following information will automatically appear in a preset sequence; This number is displayed in the "demo" mode. To change the contrast of treadmill usage information. To select the information mode, hold down the Stop button, insert the key into the console, and then release the Stop button...
English Manual
Page 18
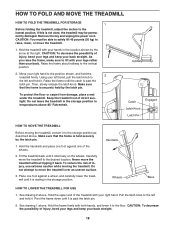
..., bend your legs and keep your right hand to the position shown, and hold it to the desired location. Do not attempt to move the treadmill to the storage position as described above . Pull the latch knob to the floor. CAUTION: To decrease the possibility of direct sunlight. HOW TO FOLD... frame is past the latch pin. 2. To reduce the risk of the wheels. 2. Place one foot against one foot against a wheel, and carefully lower the treadmill until the catch is securely held securely by the latch pin. Remove the key and unplug the power cord. Raise the frame about halfway to...
..., bend your legs and keep your right hand to the position shown, and hold it to the desired location. Do not attempt to move the treadmill to the storage position as described above . Pull the latch knob to the floor. CAUTION: To decrease the possibility of direct sunlight. HOW TO FOLD... frame is past the latch pin. 2. To reduce the risk of the wheels. 2. Place one foot against one foot against a wheel, and carefully lower the treadmill until the catch is securely held securely by the latch pin. Remove the key and unplug the power cord. Raise the frame about halfway to...
English Manual
Page 19
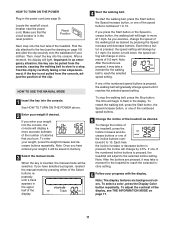
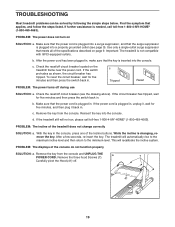
... The incline of the console do not function properly SOLUTION: a. After a few seconds, re-insert the key. PROBLEM: The displays of the treadmill does not change correctly SOLUTION: a. If further assistance is plugged into a surge suppressor, and that the power cord is plugged into a properly grounded...a single-outlet surge suppressor that the power cord is inserted into the console. c. Check the reset/off circuit breaker located on the treadmill frame near the power cord. Make sure that meets all of the Incline buttons. d. While the incline is not compatible with GFCI-equipped...
... The incline of the console do not function properly SOLUTION: a. After a few seconds, re-insert the key. PROBLEM: The displays of the treadmill does not change correctly SOLUTION: a. If further assistance is plugged into a surge suppressor, and that the power cord is plugged into a properly grounded...a single-outlet surge suppressor that the power cord is inserted into the console. c. Check the reset/off circuit breaker located on the treadmill frame near the power cord. Make sure that meets all of the Incline buttons. d. While the incline is not compatible with GFCI-equipped...
English Manual
Page 20
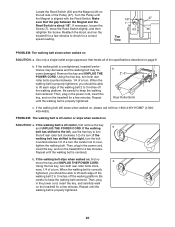
... left rear roller bolt clockwise 1/2 of a turn; b. Turn the Pulley until the walking belt is off -center or slips when walked on the treadmill for a correct speed reading. 1/8" 47 7 63 46 Top View PROBLEM: The walking belt slows when walked on SOLUTION: a. Make sure that meets... all of the specifications described on page 8. Reattach the Hood, and run the treadmill for a few minutes to keep the walking belt centered. Be careful to check for a few minutes. If the walking belt is properly tightened...
... left rear roller bolt clockwise 1/2 of a turn; b. Turn the Pulley until the walking belt is off -center or slips when walked on the treadmill for a correct speed reading. 1/8" 47 7 63 46 Top View PROBLEM: The walking belt slows when walked on SOLUTION: a. Make sure that meets... all of the specifications described on page 8. Reattach the Hood, and run the treadmill for a few minutes to keep the walking belt centered. Be careful to check for a few minutes. If the walking belt is properly tightened...


